

14 tips to optimize the performance of your Vaonis smart telescope.
04 Oct. 2021

The Rosette Nebula captured with Vespera and the dual band filter ( no editing)
ABSTRACT
-
-
- Turbulence and transparency: choose the right time.
- Light pollution, sun and moon: observe when the sky is dark.
- Temperature: acclimatize your observation station.
- Stability, vibrations, local turbulence: the right place to set up your telescope.
- Observation target: choose wisely.
- Under the best skies: take Stellina and Vespera along with you.
- Extend the experience: capture longer and manage the telescope power.
-
1. Turbulence and transparency: choose the right time.
Two factors affect the quality of astronomical observations even in fair weather: sky transparency and atmospheric turbulence.
Tip 1: check for optimal sky transparency.
Even in the absence of clouds, the atmosphere can be loaded with particles (dust, sand, pollution, haze) that absorb part of the light coming from the stars. Here’s how to assess the transparency of the sky.
- During the day, the horizon may seem hazy and long-distance visibility is limited, or you might notice a light halo around the sun. These are advance clues that sky transparency will be poor
- When the sunset is deep red, this indicates that the atmosphere is loaded with particles.
- This happens when a high-pressure system stays over a region for a long time, which often causes particles to stagnate in the atmosphere. Most of the time, this is associated with high pollution levels in cities.
- After a period of rain or heavy showers, the sky is generally “washed out” and more transparent (once the cloud cover has gone of course).
- The number of stars you can see with the naked eye from your usual observation site (after acclimatizing your eye to darkness) is also a good indicator of the sky’s transparency.
Tip 2: check for the lowest turbulence levels.
The atmosphere is comprised of air masses with different densities and temperatures that are in motion. This is atmospheric turbulence. It generates slight deviations of light rays, a kind of “shaking” of what we observe. It is responsible for the glittering of stars. Heavy turbulence alters the sharpness of the observed stars. Therefore, it is helpful to know how to evaluate the turbulence and choose the best nights of observation.
- As a general rule, when the weather is scorching, the air masses are moving faster, and turbulence is more critical. Conversely, in freezing weather, the turbulence is often lower. When the sky is clear, observations in winter may be of better quality.
- With the naked eye, if you notice that even the stars located very high in the sky are glittering a lot, it means that the turbulence is strong. Conversely, if the glittering of the stars is barely noticeable, then the atmospheric turbulence is low, and the conditions are right for better observations.
2. Light pollution, sun and moon: observe when the sky is dark
The darker the sky, the more contrasted and brighter your images of the stars will be.
Tip 3: keep away from artificial light sources where possible.
- If you observe from an urban area, try to avoid streetlights or prefer dimly lit areas, such as parks.
- For even better conditions, find a site far from urban areas and point away from the light halo created by distant towns.
Tip 4: observe after astronomical twilight.
Even after sunset, the sky is still bright because of the scattering of sunlight through the atmosphere. For perfect darkness and good visibility of the stars, the sun must go down at least 18° below the horizon. In summer in the northern hemisphere, above certain latitudes, the sun never goes low enough to obtain a sufficiently dark sky (near and beyond the Arctic Circle there is even no night). Winter is the season when you can enjoy longer dark nights.
Twilight phases
- Civil twilight: the Sun has set below the horizon but at less than 6°. The sky is still quite bright, and only the very brightest stars are visible.
- Nautical twilight: the Sun is between 6° and 12° below the horizon. Many stars become visible while the horizon also remains distinctly visible. This is when sailors could easily take measurements at sea with a sextant.
- Astronomical twilight: the Sun is between 12° and 18° below the horizon. The sky becomes dark enough to make astronomical observations in good conditions.

Even when the stars become visible, the sky is not yet dark enough to observe nebulae and galaxies in good conditions. Depending on the season, you have to wait between half an hour and 2 hours after sunset to have the darkest sky possible.
Tip 5: observe when the moon is not visible or in a thin crescent.
From the first quarter, the moon’s brightness is enough to produce a glow on the whole sky, hindering observations. The period around the new moon is ideal because the moon is not visible.
Around the first quarter, the moon is visible in the evening, and one can make observations of better quality during the second part of the night once the moon has set. On the other hand, around the last quarter, the first part of the night is more interesting, until the moon rises.
Around the full moon, it is especially bright and visible all night long making it the worst time for observation.
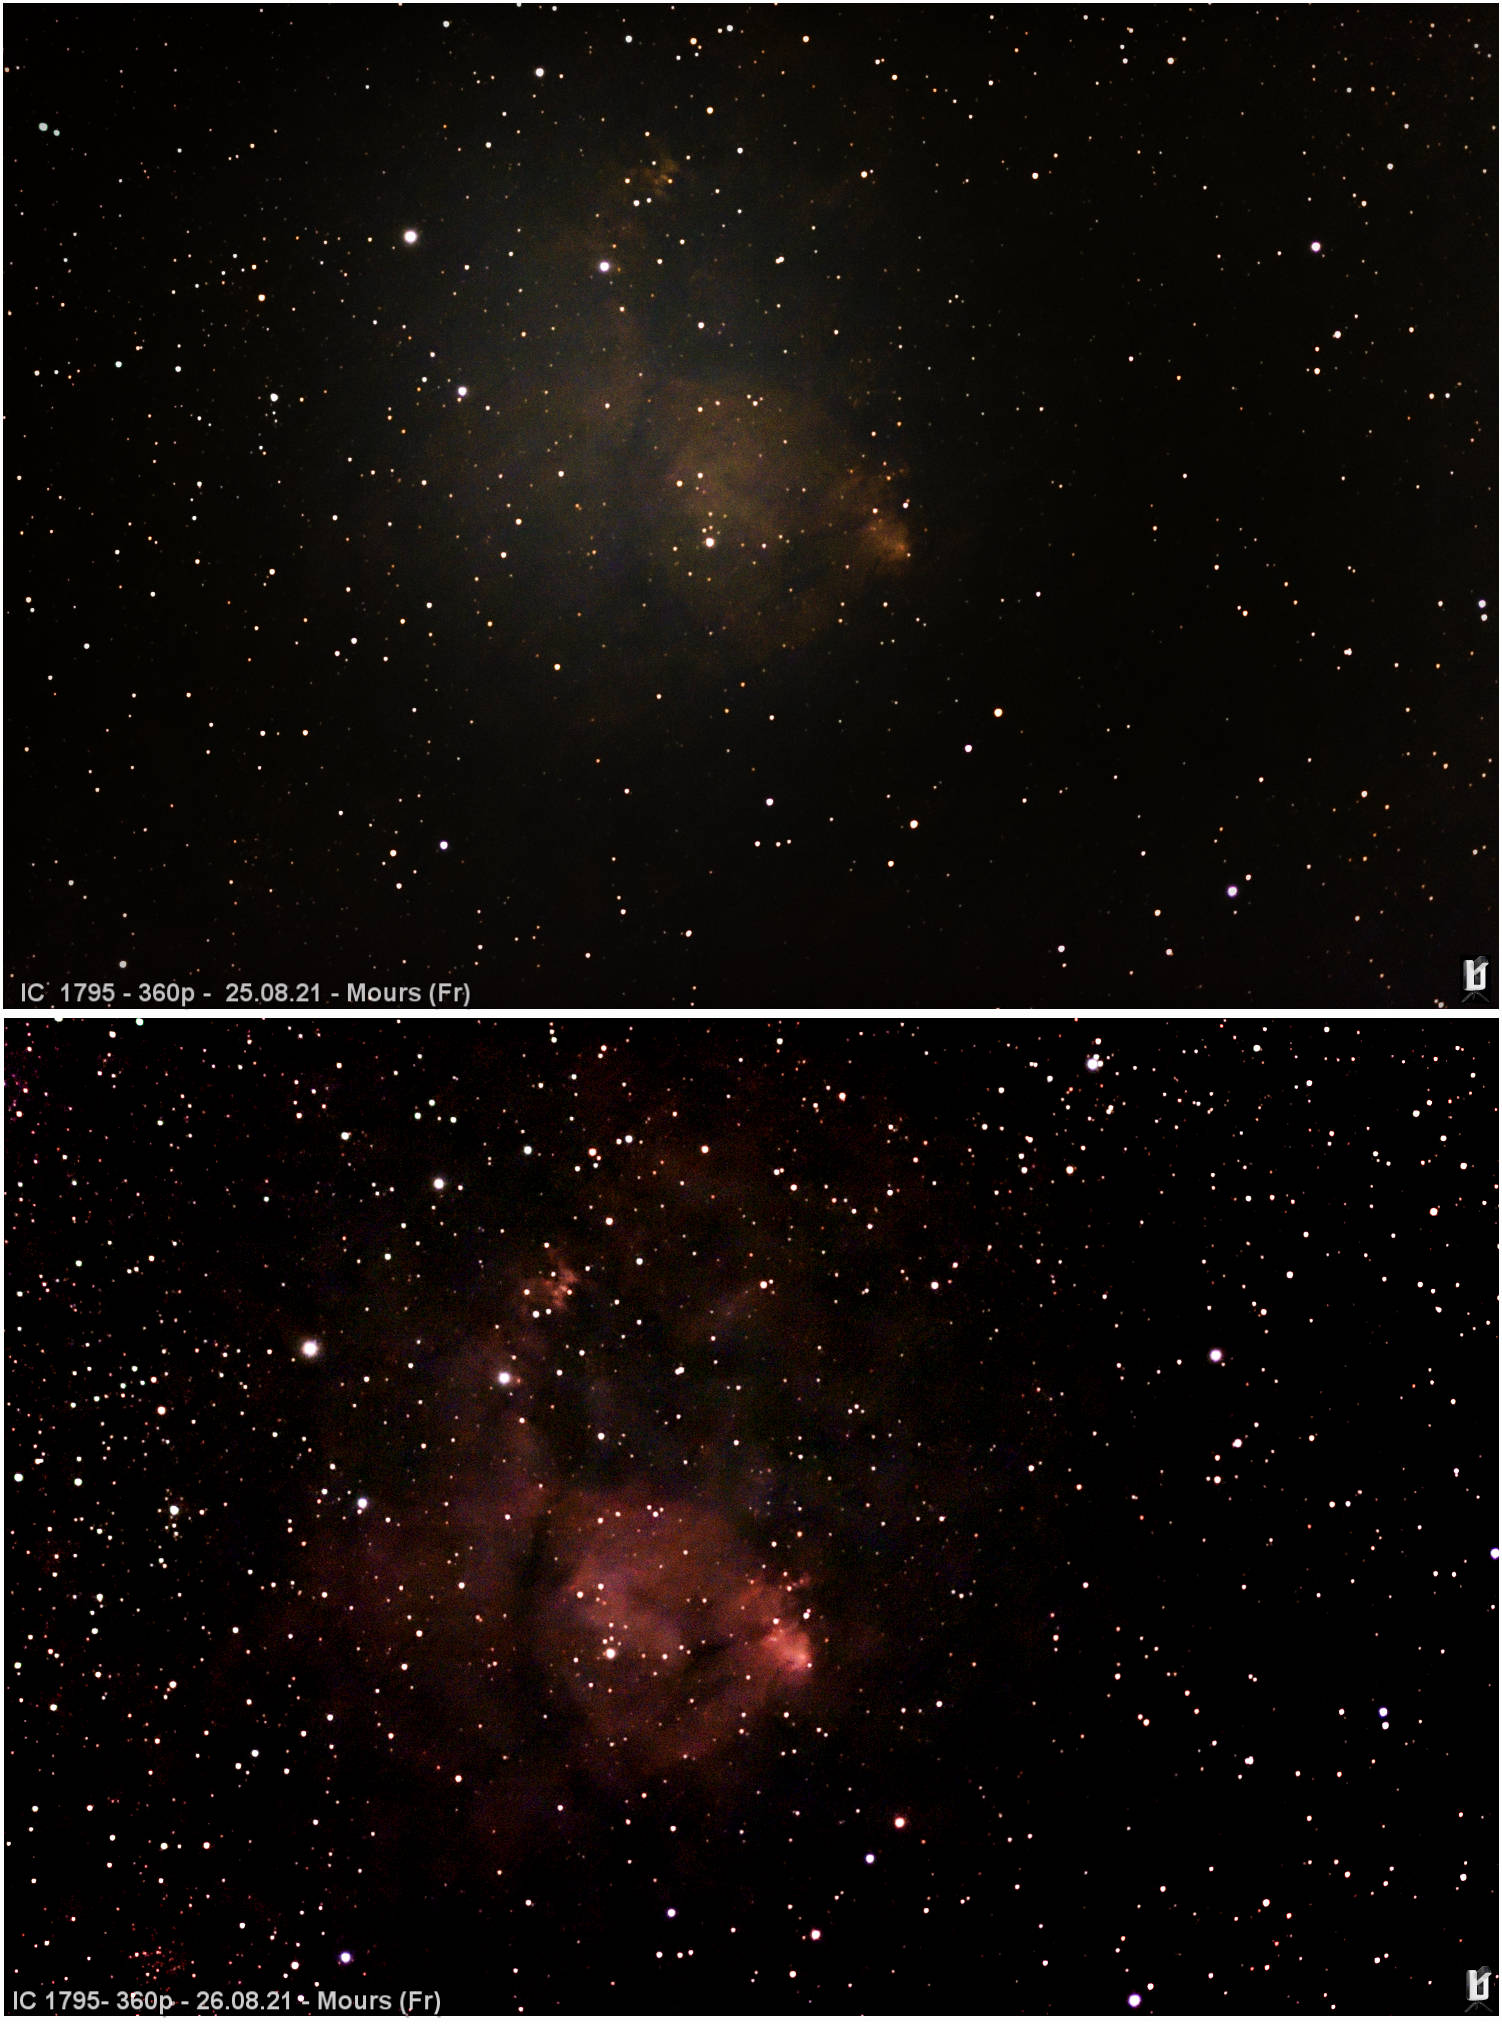
The Fish Head Nebula captured close to the full moon (top) and without the moon (bottom). Credit : Enrique Gonzales
Mobile apps that can be helpful.
There are a number of applications available to find the times of sunset and sunrise, astronomical twilight, moon phases and visibility, and to determine the best potential periods for observation. These include “Sun Surveyor” and “Photopills”, or specialized astronomy apps such as “Stellarium”.

Sun Surveyor helps you determine the best time to observe.
3. Temperature: acclimatize your smart telescope.
Tip 6: take out Stellina / Vespera one hour prior to your observation.
Telescopes are high precision instruments that require extremely fine adjustments to produce good-quality images. They are sensitive to temperature variations which cause contraction or shrinkage effects of mechanical and optical parts.
The telescope may have been stored in a warm place before you take it out in the evening, when the outside temperature has dropped significantly. There will therefore be a significant difference in temperature between your instrument and the outdoors (especially in winter). We recommend taking the instrument out one hour before starting your observation for it to cool down to the ambient temperature.
4. Stability, vibrations, local turbulence: the right place to set up your telescope.
Tip 7: it is best to avoid using concrete or tarred surfaces for setting up Stellina / Vespera. Grass or dirt is more suitable.
We have seen how atmospheric turbulence can cause problems for astronomical observations. Another type of turbulence is local turbulence which results from the day’s heat being released by certain surfaces during the night.
For example, cement and tar heat up when exposed to the sun. As night falls, the temperature drops and these surfaces become warmer than the surrounding air, producing localized turbulence. Grass or dirt surfaces do not retain as much heat and create little turbulence.
Tip 8: set up Stellina / Vespera on a stable floor.
After initialization, it is essential that the tripod does not move to ensure better tracking of the stars and sharper images (avoiding oval-shaped stars). Try not to place Stellina on loose soil, sand, or gravel.
> Learn more on the initialization of observation stations:

An ideal place to set up Stellina
Tip 9: observe when there is no wind, or shelter the telescope from the wind.
Wind above 10km/h can produce unwanted movements of the telescope, reducing the quality of the captured images or significantly increasing the capture time given that many images will be rejected.
Tip 10: avoid any vibrations near to the telescope.
Even small vibrations that you produce while walking near the telescope can be transmitted through the ground and affect image quality. This is especially the case if you observe from a terrace, a balcony, a wooden floor…
5. Observation target: choose wisely.
Tip 11: observe objects more than 20° above the horizon and less than 75°.
Near the horizon, light from the stars travels through a thicker layer of the atmosphere, causing a decrease in brightness. It is better to wait until the stars rise more than 30° over the horizon. Depending on the duration of observation required to get a good image quality, you may consider that the apparent rotation of the sky can bring your target under the limit of 20° although it was well-positioned at the beginning of observation. To avoid this, you may want to target stars rising in the east as soon as they reach 20°.
Tracking celestial objects that are more than 75 or 80° above the horizon is more critical with an altazimuth mount such as the one that equips Stellina and Vespera. A lot of frames may be rejected, particularly with Vespera Pro or when using mosaic mode.
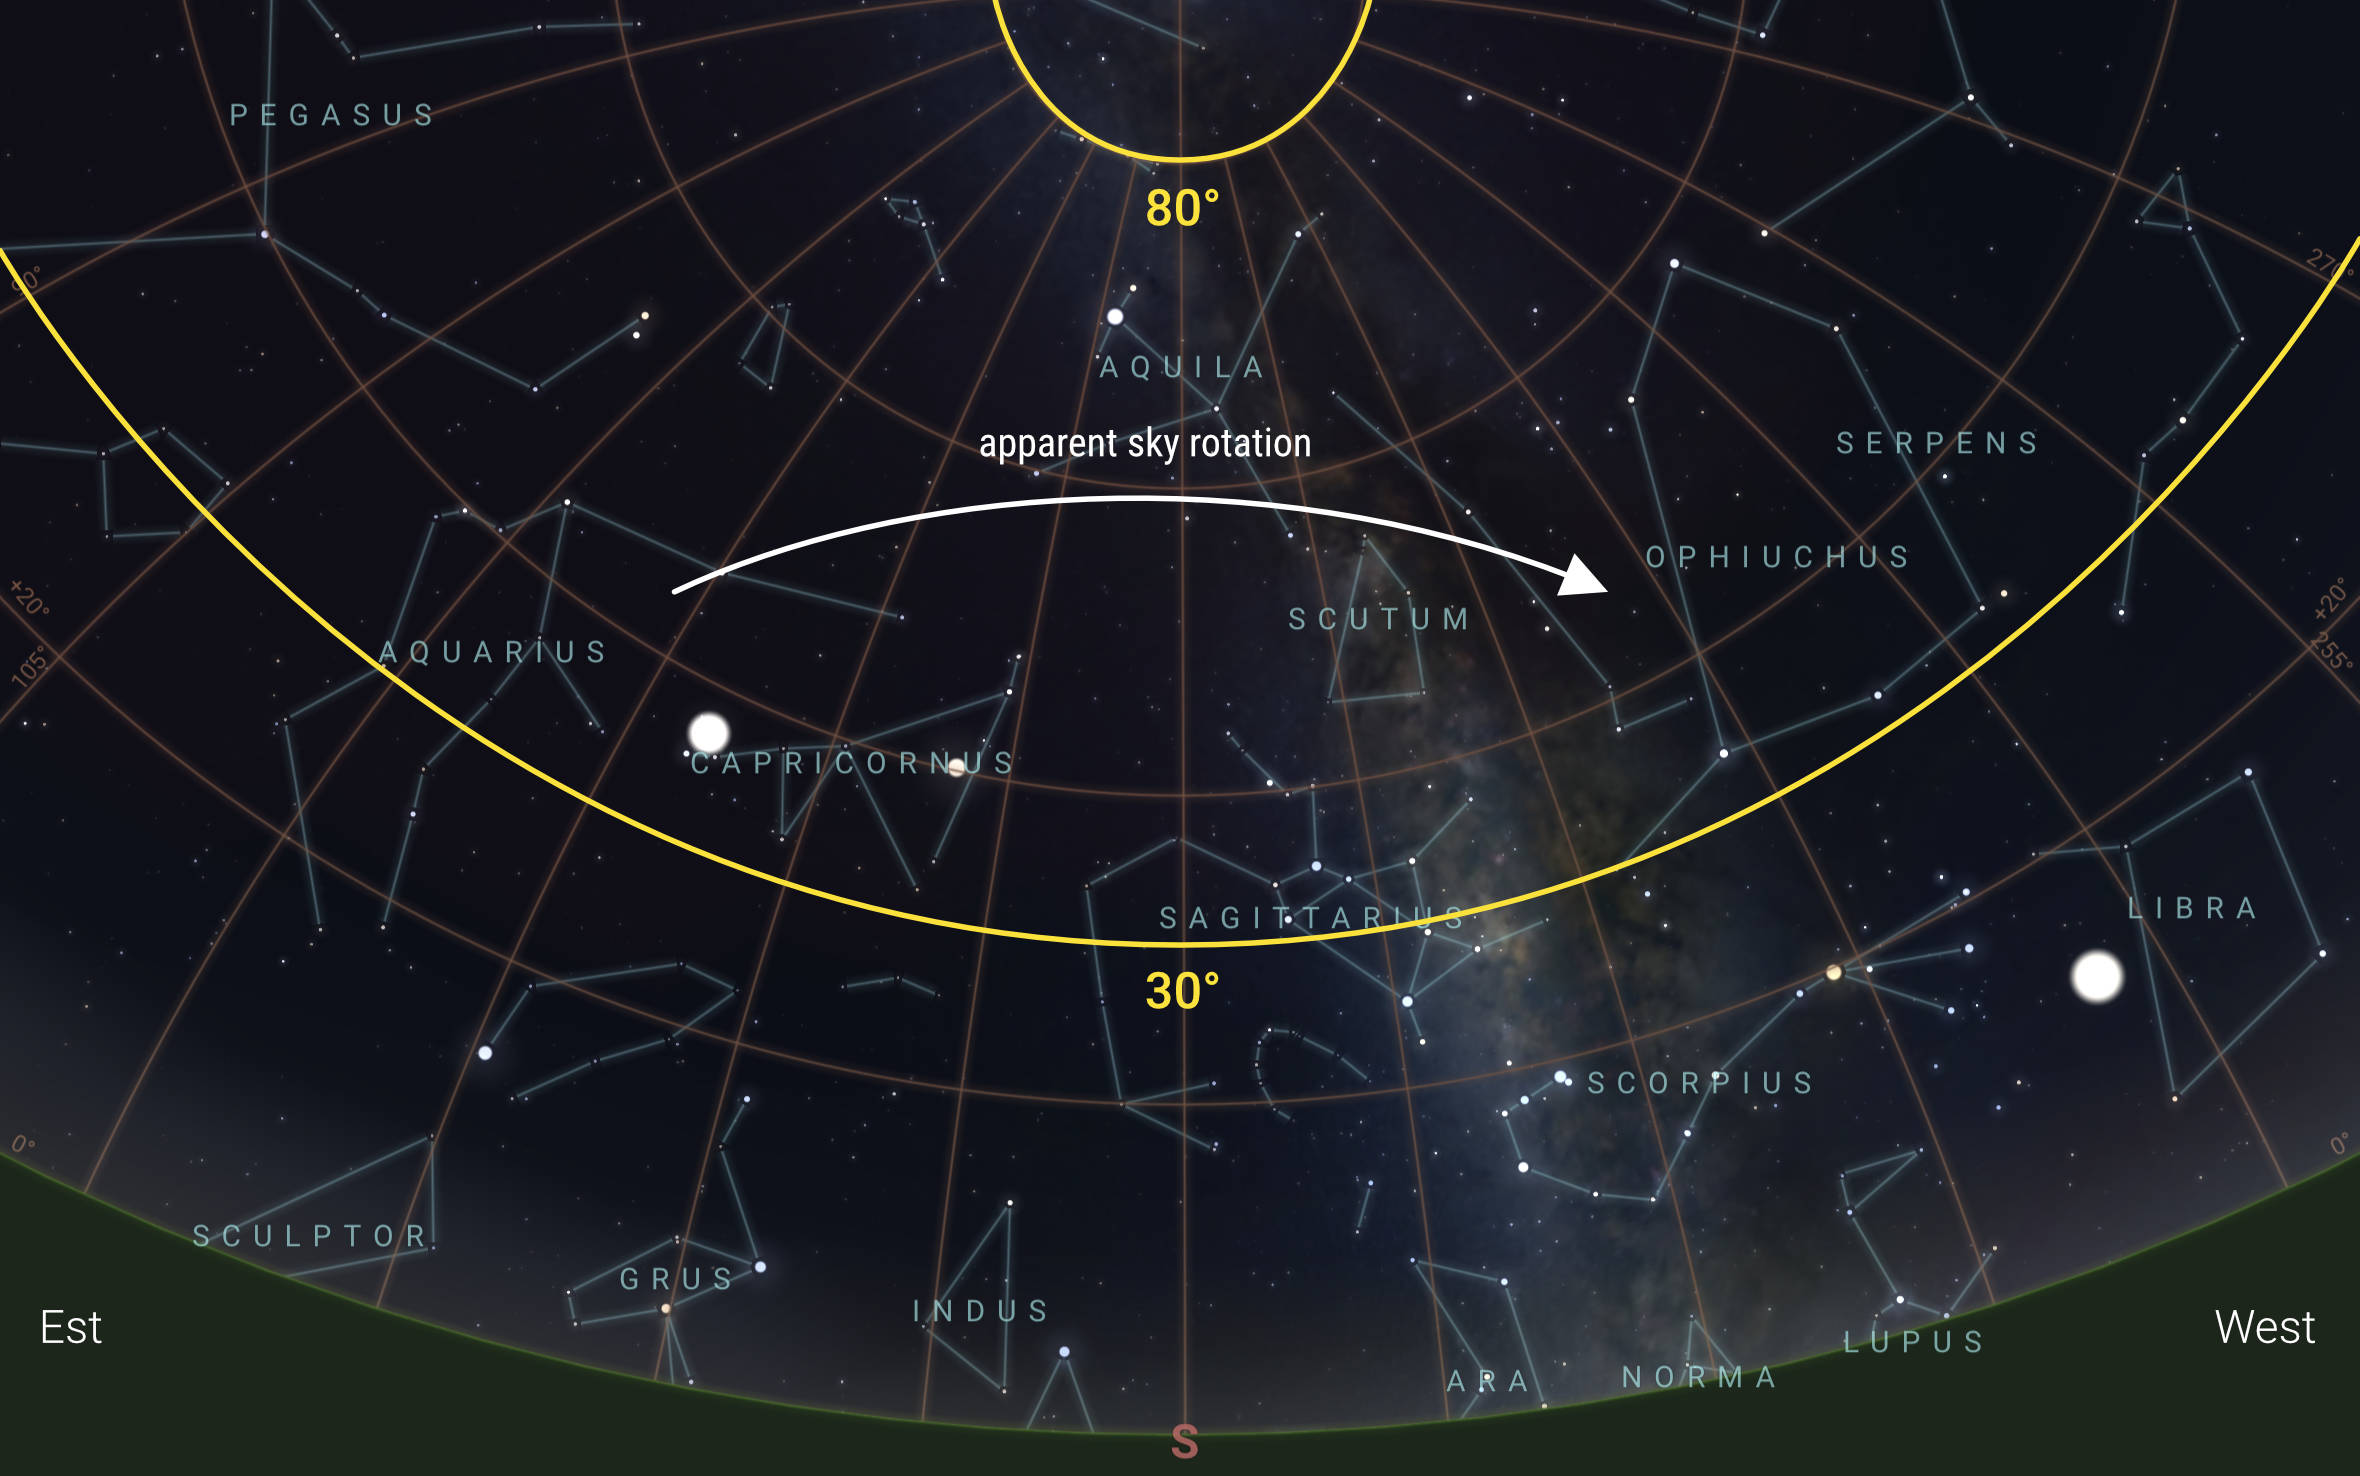
Favor targets between 30° and 80° of height, taking into account the apparent rotation of the sky. Sometimes you won’t have a choice, some stars will never be more than 30° high. Stellarium™ sky simulation
6. Under the best skies: take Stellina and Vespera along with you.
Tip 12: go and search for better skies with your observation station.
One of the benefits of Stellina and Vespera over conventional telescopes is their ease of carrying and setting up. It is mainly the case with Vespera, which is so compact you can take it everywhere with you: while hiking in the mountains or as cabin luggage when flying. A real opportunity to conquer skies of exceptional quality and get even more out of your telescope.
So where to go?
- A weekend in the countryside far from the light (and air) pollution of the cities. Thanks to the observation stations’ battery power, you can set up in the middle of a field. No one will come and disturb your observations.
- A stay in the mountains at altitude: the sky is often more transparent and far from artificial light. Even with the naked eye, you will see more stars. Take Vespera in your backpack for an overnight bivouac.
- Some countries or regions of the world have specific climatic conditions that favor exceptional sky quality. Plan your next trip with Stellina or Vespera to the most famous destinations with crystal clear skies: Arizona and Utah National Parks in the United States, the Canary Islands in the North Atlantic, Pic du Midi in France, the Atacama Desert in Chile, Namibia in Southern Africa, the Aoraki Mackenzie International Dark Sky Reserve in New Zealand, the Hawaiian archipelago…

Observation with Stellina from Namibia, one of the best skies on the planet.
Assessing the quality of the sky: the Bortle scale.
The Bortle scale, named after its creator, has 9 levels to assess the darkness and purity of the sky and, therefore, the quality of astronomical observations. The scale goes from 1 for an excellent sky to 9 for a very bright sky in the center of large cities (one can see very few stars with the naked eye).
Online maps are available to indicate light pollution and sky quality levels that can help you to choose your next destination. Keep in mind that temporary circumstances can change the sky quality locally… and that the weather must also be with you.
https://www.lightpollutionmap.info
7. Extend the experience: capture longer and manage the telescope power.
Tip 13: run longer captures to get images of better quality.
Stellina and Vespera show you objects of the universe vividly and colorfully thanks to their automatic image stacking process. The Singularity application recommends a minimum observation time, depending on the object, needed to collect enough images and get a good result. However, you can get even better results if you double the recommended capture time, especially on fainter nebulas and galaxies.
Tip 14: use approved batteries and carry a spare.
Longer captures require enough power supply. Stellina works with removable batteries. Vespera works with an integrated battery. Yet you still have the ability to plug an external one. You can therefore have several with you to last all night long (It won’t probably be needed with Vespera Pro since its internal battery lasts 11 hours) . Make sure your batteries meet the required specifications: 5.1 volts and 2.4 A minimum. A 10,000 mAh battery will last up to 5 hours. Yet keep in mind that if you operate in cold weather, the battery will be depleted more quickly.
Recap
Tip 1: check for optimal sky transparency.
Tip 2: check for the lowest turbulence levels.
Tip 3: keep away from artificial light sources where possible.
Tip 4: observe after astronomical twilight.
Tip 5: observe when the moon is not visible or in a thin crescent.
Tip 6: take out Stellina / Vespera one hour prior to your observation.
Tip 7: it is best to avoid using concrete or tarred surfaces for setting up Stellina / Vespera. Grass or dirt is more suitable.
Tip 8: set up Stellina / Vespera on a stable floor.
Tip 9: observe when there is no wind, or shelter the telescope from the wind.
Tip 10: avoid any vibrations near to the telescope.
Tip 11: observe objects more than 20° above the horizon and less than 75°.
Tip 12: go and search for better skies with your observation station.
Tip 13: run longer captures to get images of better quality.
Tip 14: use approved batteries and carry a spare.

