SUMMARY
Why multi-night observations matter in astrophotography
Deep space objects are incredibly faint, and capturing their light requires pushing telescope sensors to their limits. This often introduces noise into the images, making it hard to get a clear view of your target.
The solution? Image stacking, a technique where multiple exposures are combined to enhance the Signal-to-Noise Ratio (SNR). By stacking images, noise— which appears randomly in each exposure—gets progressively canceled out, revealing the full details of the celestial object.
Vespera and Stellina automate this process. A typical observation session of 1-4 hours can produce clear, high-quality images, allowing for post-processing if desired.
However, to take your astrophotography to the next level, sometimes one night of imaging isn’t enough—especially for large nebulae or expansive space scenes.
That’s where Multi-Night Observations come in, allowing you to capture the same object over several nights or multiple sessions in a single night, without any extra effort.
By leveraging the Multi-Night Observations feature, the results of your observation sessions are saved along with the target and image settings, including Live Mosaic framing if applicable. The stacking process automatically resumes where it left off. Your smart telescope delivers a single final image that combines all your capture sessions, ready for easy sharing or further post-processing with your preferred image editing app.
What are “Multi-Night Observations” capabilities?
Limitless acquisition
There’s no cap on the total exposure time you can accumulate on a target. Whether you need 10 hours or 50, your results are stored as a single file. No clutter, no fuss.
Smart Storage
Don’t worry about filling up your device with raw files. The system stores the observation as a single file, and you can safely delete individual exposures without losing the overall result (just remember to save the raw file you’ll need for post-processing).
Target and Settings Preservation
Your telescope remembers all your capture settings, including framing and filter configurations, across sessions. Just press a button, and you’re ready to continue the project.
You can create manual targets with personalized camera settings (exposure and gain) and resume the entire observation. Singularity will remind you to install a filter, if applicable, to maintain the consistency of your configuration across sessions.
Seamless Integration with Live Mosaic
Multi-Night Observations unlock the full potential of Live Mosaic capture. It preserves your exact framing and progress. Should you stop a session before a mosaic pass is complete, the next session will resume exactly where the previous one left off.
Automation with “Plan my Night”
Don’t waste time supervising your telescope during long acquisitions. You can automate your astrophotography sessions and let Vespera or Stellina run the session automatically, shutting down once completed. Just run the same program the next night, and your Multi-Night capture will continue seamlessly.
Manage Multiple Projects at Once
Your smart telescope can manage up to five multi-night projects simultaneously. Depending on the visibility of different targets, you can juggle multiple observation projects within the same night.
Limitations to Keep in Mind
- To create a new Multi-Night Observation, you need to be connected to your telescope.
- Since a multi-night capture is linked to the capabilities and configuration of your smart telescope, you can’t start an observation on one telescope and resume it on another.
- If you’re using filters for your captures, the same filter must be installed for every observation session. This consistency ensures the best quality for your final image.
You can perform a multi-session capture of the same object multiple times during the same night. This is useful if a target rises above 70° in elevation and becomes difficult to track. You can then split the capture into two parts (before it reaches 70° and after it drops below). While you can program this behavior in Plan My Night on iOS devices, it is not currently available on Android devices.
However, you can still manually launch a Multi-Night observation multiple times during the same night.
How to perform and manage multi-night observations.
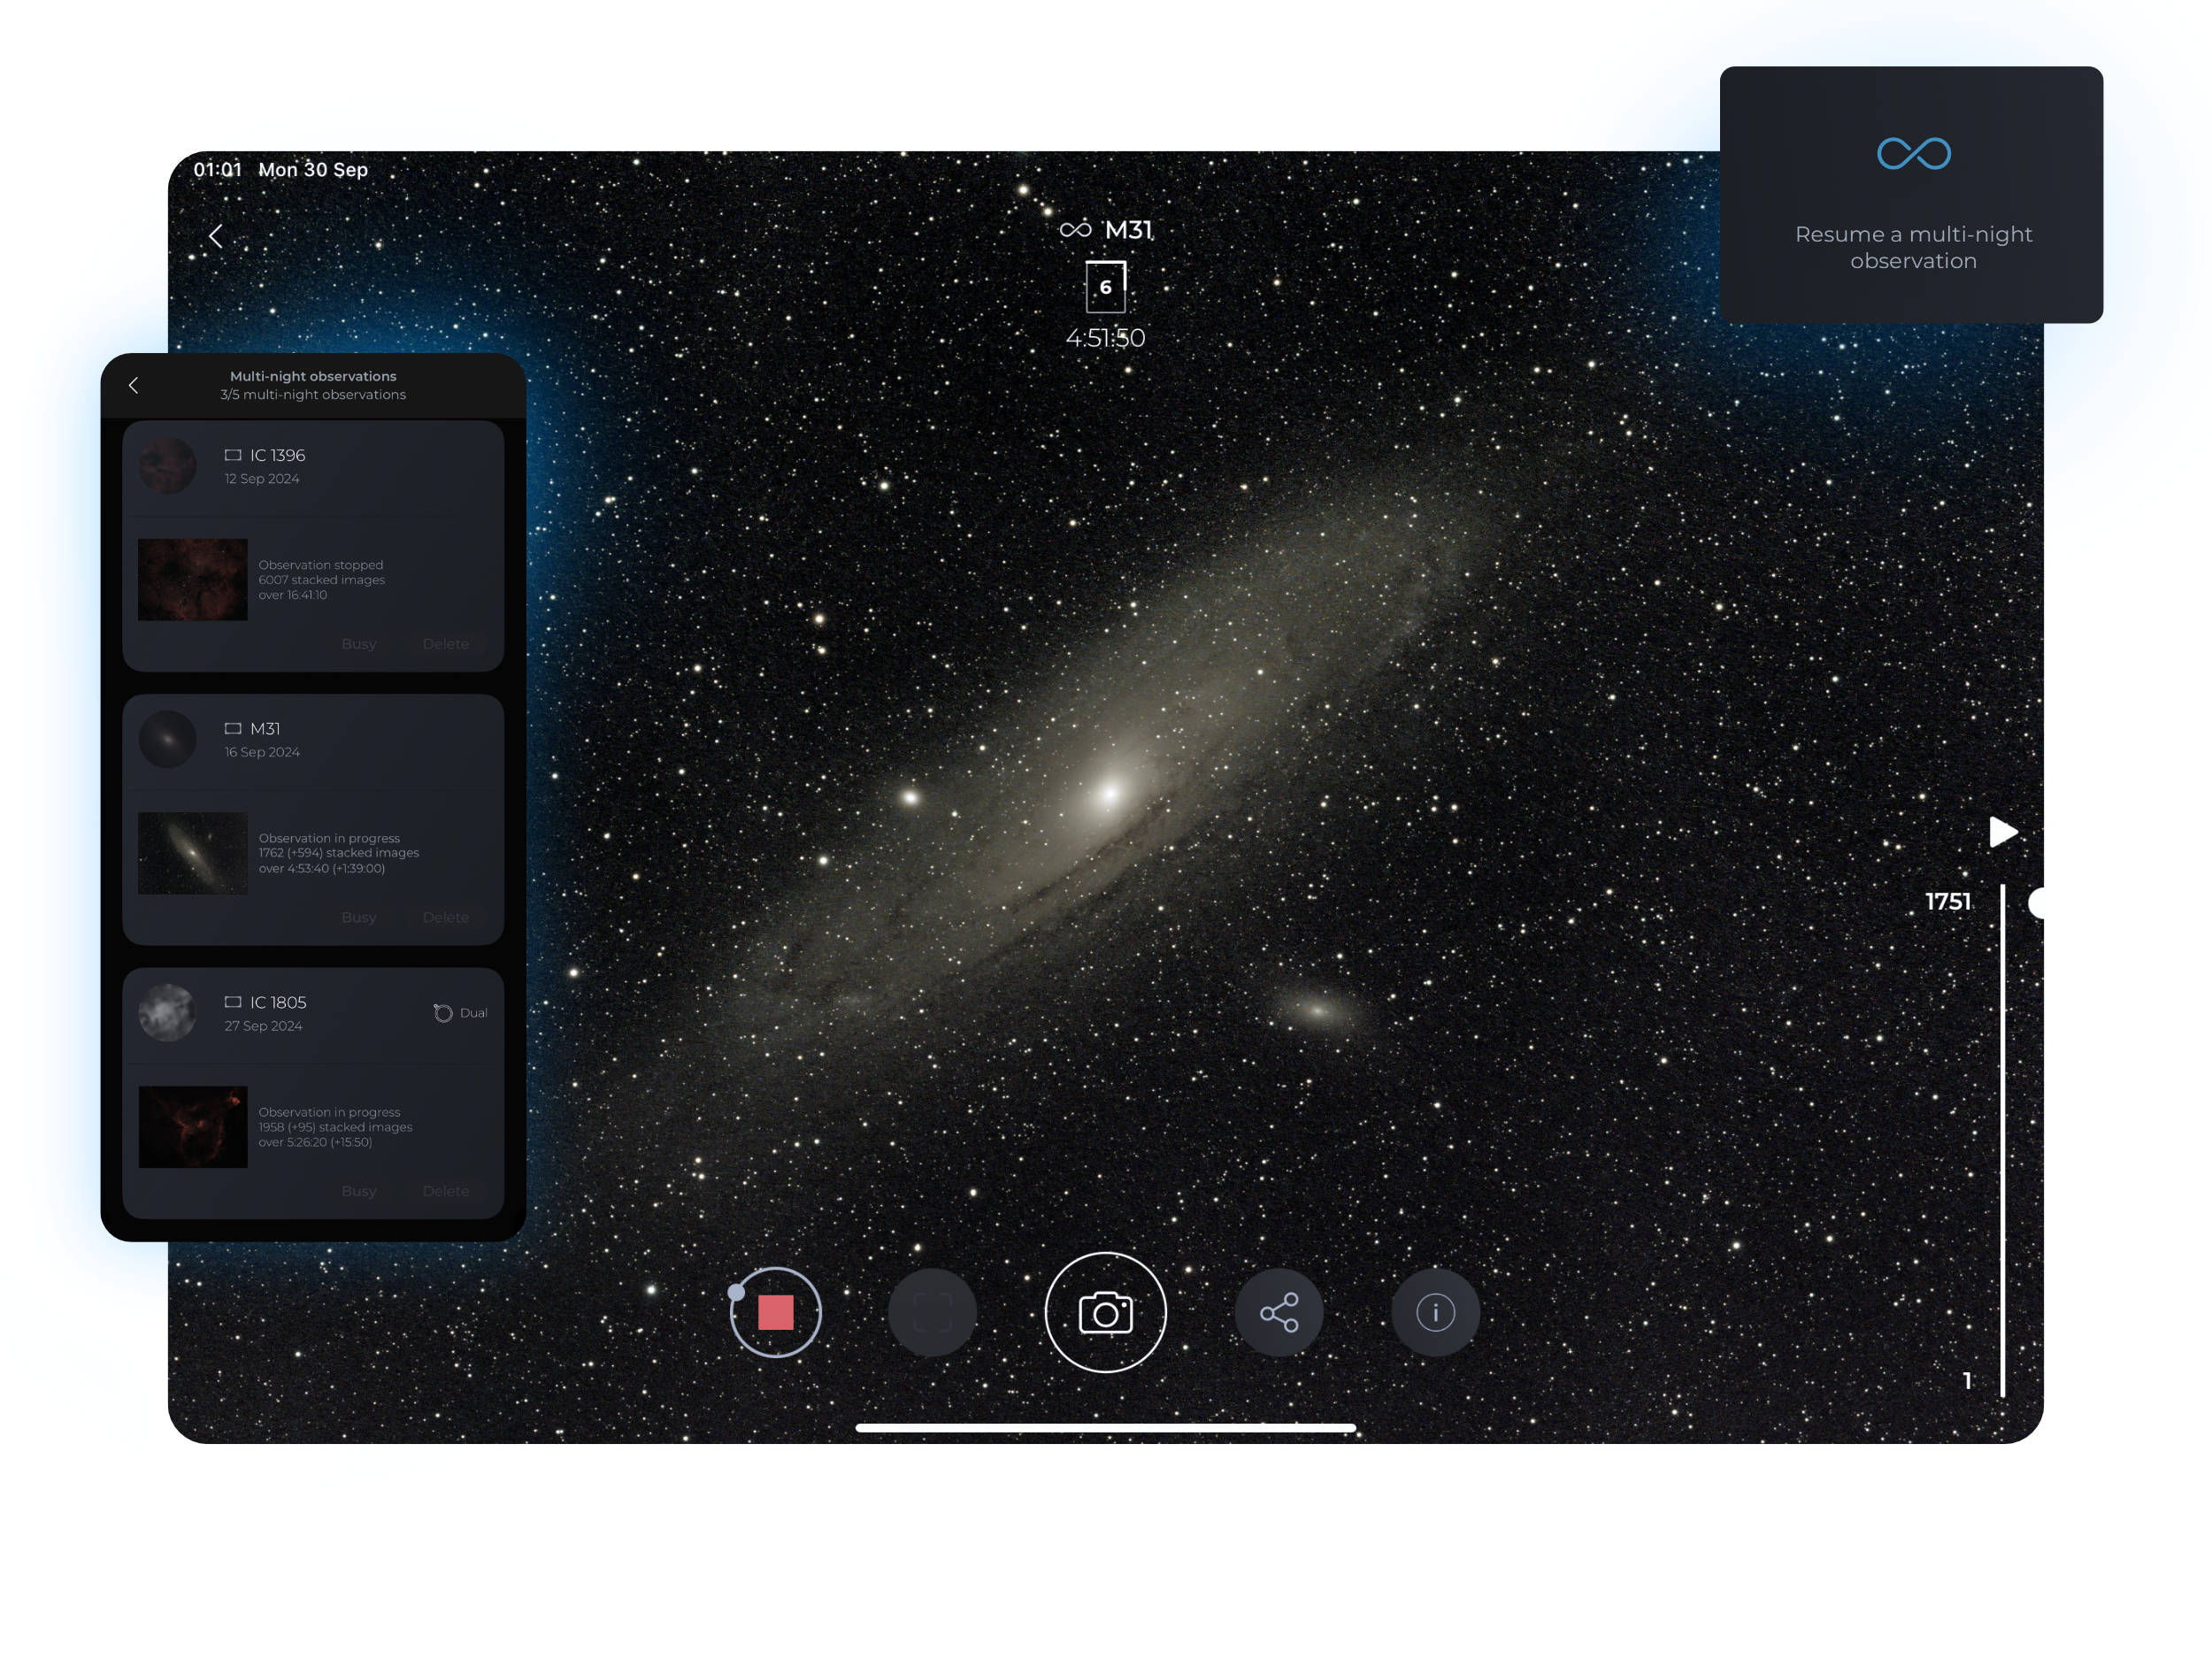
The Singularity welcome screen (Space Center) displays a new widget with the infinity symbol (?). By pressing it, you can access and manage your current Multi-Night Observations. The list will remain empty until you have actually started capturing at least a first session of a Mulit-Night observation.
Starting a new Multi-Night observation
Starting a new Multi-Night Observation from the catalog
Your smart telescope must be initialized.
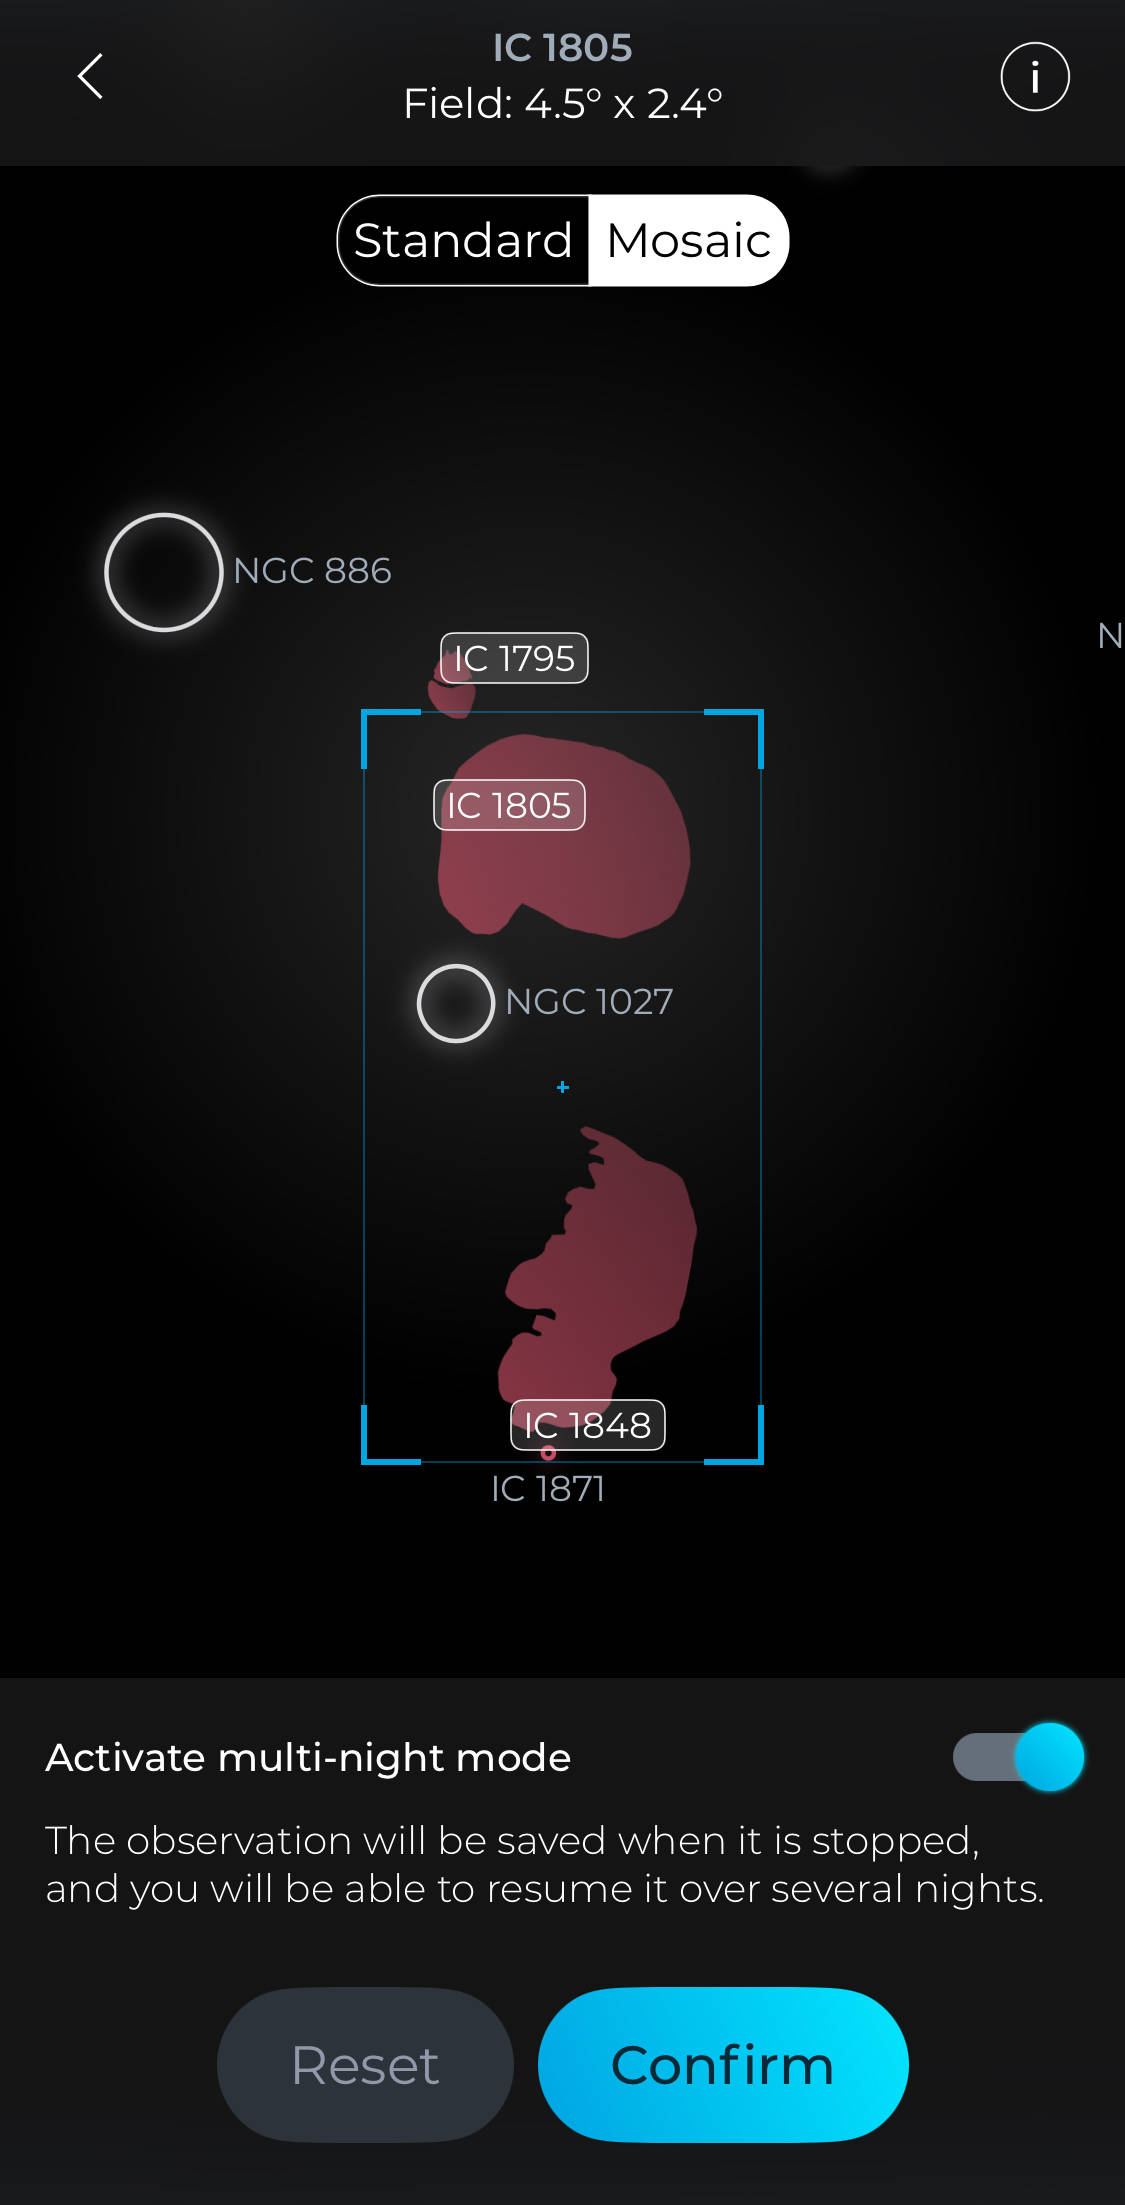
- Choose your target from the catalog or create a manual target for custom settings.
- If you’re using a filter, attach it to the telescope.
- Press the “Advanced Observation” button.
- Select whether you want a standard or Live Mosaic capture, and then activate Multi-Night observations.
- Press the “Observe” button.
HINT
In case you started an advanced observation without the Multi-Night mode, you can convert it as a Multi-Night Observation while the observation is currently running. In the observation screen, go to the top right menu and choose “Enable multi-night”.
Starting a new Multi-Night Observation from “Plan my Night”.
- Head to the “Plan my Night” interface.
- Create a new plan.
- Select your observation location.
- Set the date for the plan.
- Name your plan.
- Activate “Advanced observations” to be able to add a “Multi-Night Observation” target to your plan (you must be connected to your smart telescope).
- If you intend to observe with a filter, put it on your telescope.
- Add your target.
- Press the edit button at the bottom left of the scheduler (pen icon).
- If you intend to observe with a filter, put it on your telescope.
- Add your target.
- Press the edit button at the bottom left of the scheduler (pen icon).
- Choose wether you want a standard observation or a Live Mosaic then activate “Multi-Night Observation” at the bottom of the screen.
- Validate to add the target to your plan.
- Define the observation time frame.
Important notice
Since you activate “Advanced Observations” to add a Multi-Night Observation to your plan, the plan is linked to your telescope configuration. If you have a filter in place while creating your plan, you should keep it on throughout the entire operation of the telescope for that plan.
Watch our “Plan my Night” video tutorial to learn more on how to perform a scheduled observation.
Interrupting a multi-night observation
When you are ready to interrupt your observation session, just tap the “stop” button on the observation screen or on the observation widget as you would do for a regular observation. Singularity will save the result of your multi-night observation. This may require some time since the file to be saved contains 32 bits RAW data and is very heavy, particularly if your observation is a Live Mosaic.
While your smart telescope is saving the file, it is not possible to start another observation.
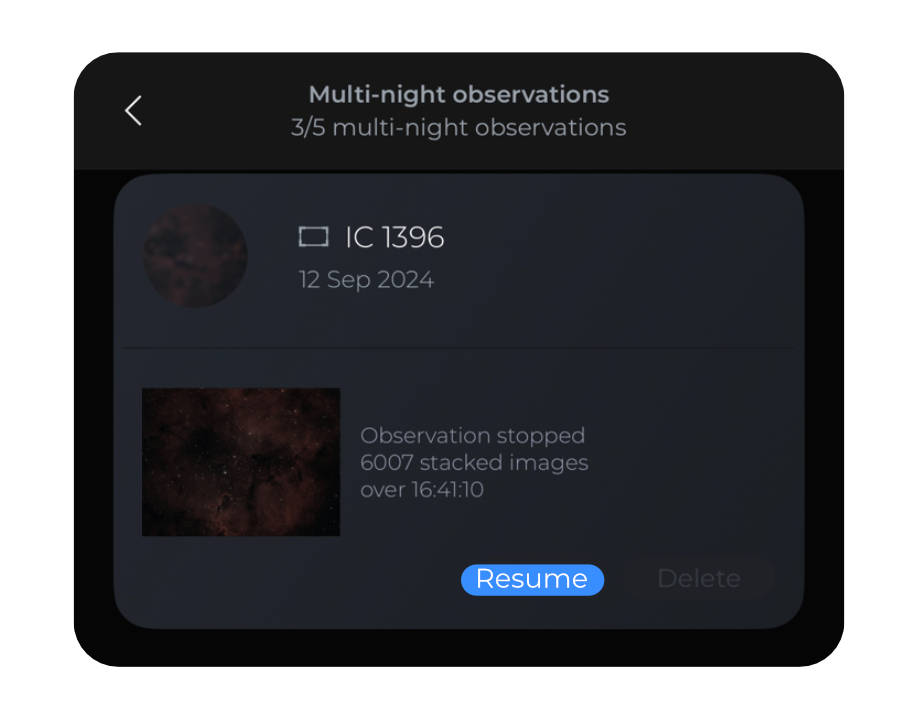
Resuming a Multi-Night observation
Your smart telescope must be initialized.
Head to the Multi-Night Observations widget on the Singularity welcome screen (marked with the infinity symbol ??). Select your target, press Observe, and let your telescope pick up where it left off.
Important notice :
If your Multi-Night Observation has been created with a filter on, the filter will also be required to resume the observation.
Adding existing Multi-Night targets to a “Plan My Night” program
Any Multi-Night project already initiated can be added to a plan. You can also mix multi-night targets and regular targets within the same plan.
- Head to the “Plan my Night” interface.
- Set the observation location and date for your plan and give it a name.
- The Multi-Night targets are listed at the top of the object list. Only the Multi-Night targets that are visible at the date of your plan and that match the filter configuration of your telescope are available.
- Select one of them to add it to your plan.
- Set the observation time frame.
- Add additional targets to your plan if desired.
While it is possible to add two or more observations sessions of the same Multi-Night target within a plan on iOS, this feature is not yet available on Android systems.
Watch our “Plan my Night” video tutorial to learn more on how to perform a scheduled observation.
Managing your Multi-Night Observations
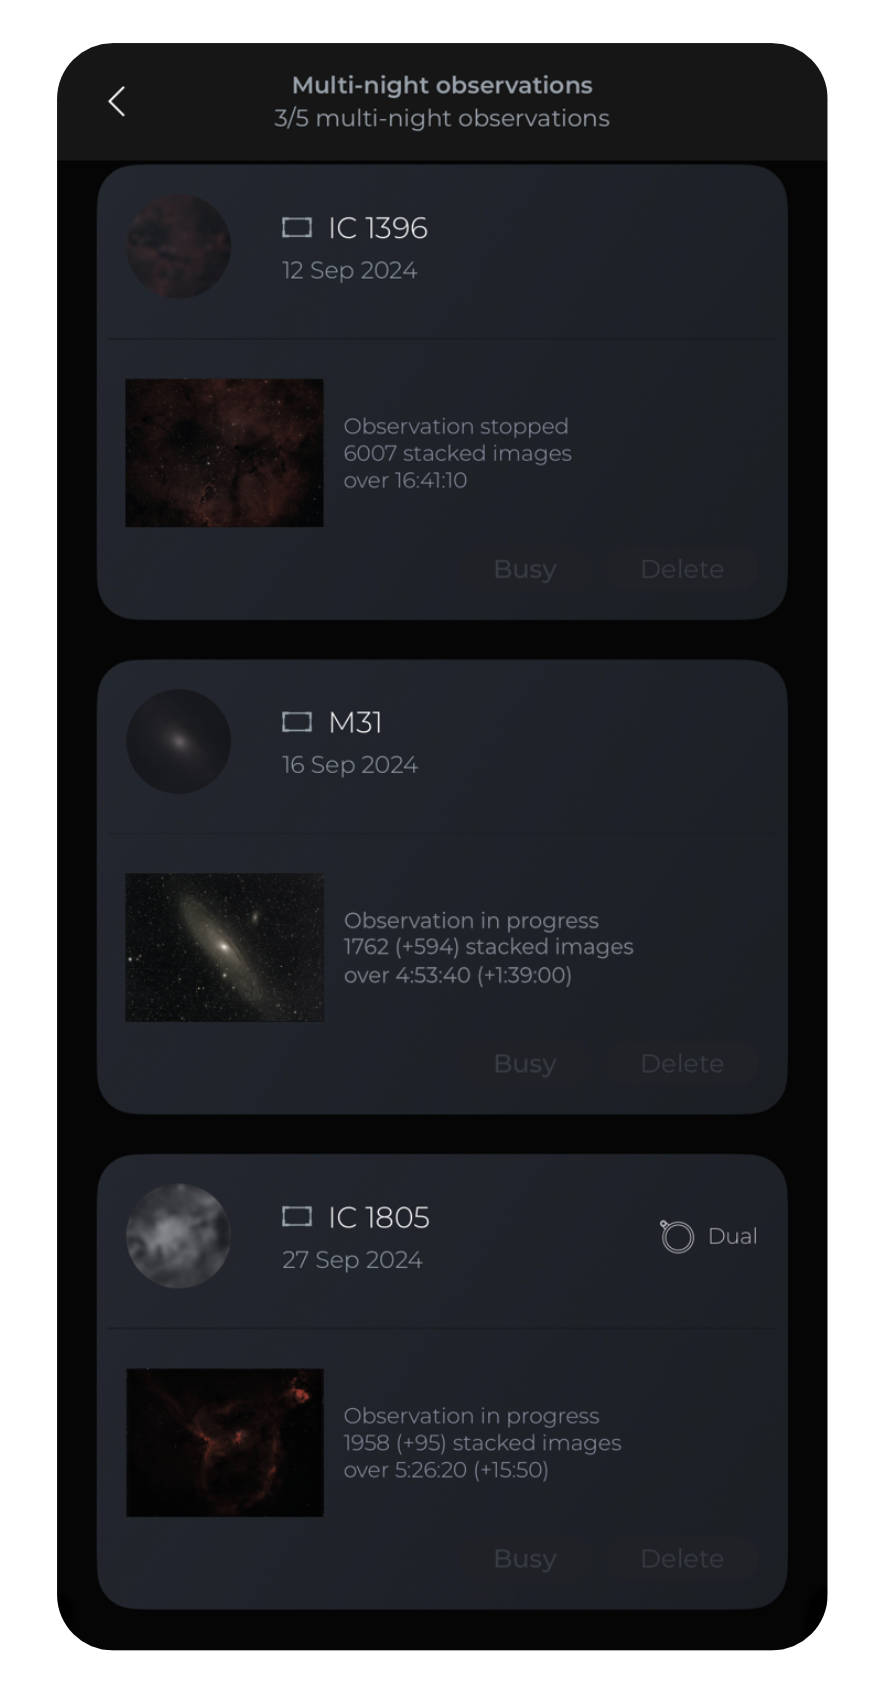
The “Multi-Night Observations” screen accessible from the Singularity welcome screen hosts all your currently active Multi-Night targets.
You must be connected to your Vaonis smart telescope to access the ‘Multi-Night Observations’ screen.
You can store up to 5 Multi-Night projects at the same time . Should you need to start a new one, you’ll have to delete an existing one.
In case the Multi-Night project is a mosaic capture, a specific icon is displayed along with the name of the object.
The usage of a filter is also mentioned with a specific icon.
To delete an existing Multi-Night Observation, touch the “Delete” button.
Ensure you have saved the results of your Multi-Night Observation before deletion.
Displaying, sharing and saving the result of a “Multi-Night Observation”
You must be connected to your smart telescope.
When a Multi-Night Observation is running, you can see its status and the resulting image in the Observation screen like any regular observation, and share or save it alike.
Watch our Singularity video tutorial to learn more ??
As long as you are connected to your smart telescope, you can check the resulting image of any Multi-Night Observation (even if it is not currently running or if another observation is running).
To do so:
- From the Singularity welcome screen (Space Center), touch the “Multi-Night Observations” widget to display the list of your multi-nights targets.
- Touch the thumbnail image of the one you want to see.
From this interface you can :
– Check the status of the observation (acquisition duration, number of sub-images stacked).
– Save the current image to your Singularity album or your smartphone photo roll.
– Share the image.
Important notice
In this first version of PerseverENS, it is not possible to export a raw TIFF file from the Multi-Night Observation screen. Make sure you turned on auto-TIFF saving to save the raw file in your smart telescope internal memory. Alternatively, you’ll be able to export the raw TIFF file the next time you’ll resume the observation.
Image file management
The result of a Multi-Night Observation is permanently saved (until you delete the multi-night project) in the internal memory of your telescope (within the system folder).
In addition, you can also automatically save live observation images (JPEG), sub-images (FITS), and RAW images (TIFF) as you would for any regular observation. Deleting these user files does not affect the behavior of Multi-Night Observations. Saving them is not required.
Be aware that you must save the raw TIFF file of your observation if you intend to perform manual processing since it is not available from the Multi-Night Observation screen in this first version of PerseverENS.
Stellina users:
Ensure your Stellina has enough battery for the entire duration of a multi-night observation. If your Stellina runs out of battery, the observation file will not be saved correctly, and the multi-night observation project will be lost.
Maximizing the Results of Multi-Night Observations
How long should you capture a target?
The answer depends on what you’re aiming for. A simple rule of thumb is: for every total acquisition time, doubling that time will produce a noticeable improvement in image quality. For example:
- 2 hours : Next step: 4 hours
- 4 hours : Next step: 8 hours
- 8 hours : Next step: 16 hours
For truly breathtaking astrophotography, a single night may not be enough, especially for faint targets. With Multi-Night Observations, there’s no limit to how far you can push your image quality.
Optimizing Your Sessions for the Best Results
The quality of your multi-night captures will depend on several factors, including atmospheric conditions and light pollution. Since your smart telescope averages the quality of each stacked image, it’s best to observe under consistent conditions.
For instance, try not to resume a session captured under a new moon during a full moon, as this could diminish the final quality.