Our online buy steroids store specializes in delivering steroids across the US.
Tips & News Archives - Page 5 of 11 - Vaonis
Our online buy steroids store specializes in delivering steroids across the US.

Tips & News

Tips & News, Travel journal

How to Spot the Inspiration4 Mission in Orbit This Week

SpaceX’s historic all-civilian Inspiration4 mission is visible if you know when to look for it.

An artist’s impression of Inspiration4 in space. Credit: SpaceX.

Spaceflight will never be the same.

Tonight, Inspiration4 will launch from historic Launch Complex-39A on Wednesday, September 16th at 00:02 Universal Time (UT)/8:02 PM Eastern Daylight Saving Time (EDT). LC-39A also hosted Apollo and Space Shuttle era launches.

The crew consists of Jared Isaacman, Hayley Arceneaux, Christopher Sembroski and Sian Proctor. Money raised for the mission and proceeds are going towards St. Jude’s Hospital.

Crew Dragon Resilience will launch tonight atop a twice flown Falcon 9/Block 5 rocket. After launch and deployment, the Falcon Stage 1 booster will head for recovery on the Just Read the Instructions landing platform at sea.

The crew will spend a three day mission in space, set for splashdown landing in the Atlantic on Sunday Sept 19th and recovery by the SpaceX vessel GO Navigator.

Inspiration4 is headed toward Low Earth orbit (LEO), in an orbit similar to ISS inclined 51.6 degrees relative to the equator 590 km (370 mi) up, in a 90 minute orbit.

Spotting Inspiration4

The good news is, with a steep inclined orbit, Crew Dragon Resilience and Insiration4 will—like the International Space Station—be visible over most of humanity while it’s in orbit. And while the 8.1 meter-long capsule won’t be as bright as the brilliant station, it will be at decent +1 magnitude ‘star’ on a good zenith pass.

If the mission launches on time tonight, there’s also a good chance that the launch might even be visible as it travels up the U.S. East Coast minutes after liftoff. We’ve seen night launches from Florida from here in downtown Norfolk before, and they can put on an amazing display at dawn or dusk.

Heavens-Above should start tracking the launch once its in orbit, and it will probably turn up as NORAD COSPAR ID 2021-083A. Plugging in Two-Line-Element sets supplied courtesy of satellite tracker Marco Langbroek into Orbitron, we see good early passes for Inspiration4 favoring 20-50 degrees north latitudes at dawn, and 10N to 30S latitudes at dusk. We’ll be updating sighting opportunities worldwide on Twitter as @Astroguyz.

Watching for Dragon an Inspiration4 is as easy as standing out and scanning the sky at dawn or dusk, with no optical assistance needed: you just need to know what time and direction to look. Satellites in LEO shine via reflected sunlight, and look like steady moving ‘stars’ in the twilight.

Space is getting crowded, as the roll call of humans in orbit is the largest its been in recent years. This week, we have:

-7 crew members on the International Space Station

-3 crew on China’s new Tiangong station (though there’s word that the crew may return to Earth this coming Friday).

-4 crew on Inspiration4 for a grand total of 14 humanoids in space.

This briefly breaks the record of 13 people in space at once set in March 14, 1995, with 7 astronauts aboard STS-67 space shuttle Endeavor, 3 cosmonauts aboard Mir, and 2 cosmonauts and one astronaut aboard Soyuz TM21.

…and there’s more to come, as Axiom Space plans to partner with SpaceX on future tourist missions to the ISS, the first of which may launch as early as January 2022.

Is civilian space the wave of the future? Will the argument of ‘billionaires are ruining space’ rear its ugly head again, like it did during the recent crewed Blue Origin and Virgin Galactic flights? Are private astronauts referred to as ‘privonauts?’

Whatever your opinion is, you can at least catch Inspiration4 on a visible pass near you this week, and marvel at the potential for what may be to come.

Tips & News, Travel journal

Enter the Equinox: Top Astronomy Highlights for September 2021

September is equinox month. Nights are getting longer in the northern hemisphere, meaning more time under dark skies before the chill of northern hemisphere winter sets in.

The September Sky: The glories of the summer Milky Way still linger post dusk. Up north, the famous summer triangle asterism rides high, with the stars Deneb, Altair, and Vega at its three corners.

The biannual equinox is short for ‘equal nights,’ a moment twice a year (once in March and again in September) when the rotational pole of the Earth is at a 90 degree perpendicular angle to the Sun, and day and night are equal worldwide. The equinox season is also special for a few other reasons: One is because it also marks GEOSat eclipse season. This is the period of a few weeks on either side of the equinox where distant satellites in geostationary/geosynchronous orbit seem to flare briefly into visibility, before vanishing into Earth’s shadow. Another phenomenon to watch for near the equinox is a peak in aurora activity. This biannual surge used to be a complete mystery until it was explained by what’s known as the Russell-McPherron Effect, which posits that solar wind streams through fissures opened in the Earth’s magnetic field. This occurs because the opposing magnetic field of the Earth is at its weakest angle right around the equinox. In 2021, we’re just now coming off a profound solar minimum, as Solar Cycle #25 gets underway in earnest. The jury is still out on whether or not the next solar cycle will ‘dazzle’ or ‘fizzle,’ though we’ve already seen some heightened solar activity worldwide in late August.

The Moon in September 2021: First Quarter Moon occurs on September 13th, and Last Quarter Moon occurs on September 28th, meaning the dark of the Moon (the best times for deep sky observations in the evening) runs from the 1st to the 13th centered on New Moon around September 7th, and resumes at the end of the month on September 29th and 30th. Of course, the Moon is a fascinating object to study in its own right, especially near Quarter phase when mountains and craters stand out in sharp contrast along the daylight/terminator.

The Planetary Rundown for September 2021: This month offers a true treat for evening skywatchers, as every naked eye planet is visible immediately after sunset. Mars is toughest, at just 12 degrees from the Sun at the start of the month, well below Mercury and Venus to the west. The gas giant planets Jupiter and Saturn rule the night rising in the east, fresh off of opposition last month. As an extra challenge, try spotting +8th magnitude Neptune with binoculars or a telescope in Aquarius this month. Fun fact: Neptune was discovered in the same constellation in 1846 after predictions made by astronomer Urbain Le Verrier), and has only completed one orbit in the last decade since discovery.

Highlighted object (northern hemisphere) Messier 57 The Ring Nebula – it was one of the first deep sky objects I ever went after. Situated in the constellation of Lyra the Lyre, M57 is a fine planetary nebula located about midway between the bright stars Beta and Gamma Lyrae, making it an easy find. I can just spy the ‘ghostly doughnut’ of M57 with binoculars from a dark sky site, and it really jumps out in a telescopic view. M57 is located approximately 2,300 light-years distant.

What you’re seeing is a star at the end of it’s life, ejecting gas and dust in its final death throes back into space. A challenging +15th magnitude white dwarf sits in the center of M57. Our Sun may do the same about 5 billion years from now, though a 2013 study cast doubt on whether we will also one day host a planetary nebula for future denizens of the Milky Way to enjoy at star parties. Fun fact: the term ‘planetary nebula’ actually has very little to do with planets: rather, early astronomers such as Charles Messier thought they appeared ‘planetary-looking’ while he was compiling his famous deep-sky catalog… and the name stuck.

Highlighted object (southern hemisphere): The Wild Duck Cluster Messier 11 – Many observers tend to overlook open clusters, which is a shame. Often, these loose stellar groupings still have enough ‘punch’ to go after, even from light-polluted urban sites. One of my favorites is M11. I often think of it as in the constellation of Aquila as it lies just off of the Eagle’s tail, but it’s actually just across the border in the tiny constellation of Scutum the Shield.

M11 is at southern declination of just over -6 degrees, making it a fine object for either hemisphere. At 6,200 light-years distant, M11 lies in the Sagittarius Arm of the Milky Way, towards the galactic center. At the eyepiece, M11 has a ‘powdered sugar’ look.

Challenge object (Northern Hemisphere): While you’re in the constellation Lyra checking out M57, try and see if you can resolve the famous ‘Double-Double’ star Epsilon Lyrae. The quadruple system is about 1.5 degrees from the brilliant Vega. Splitting the 210” pair is easy, even in binoculars; the challenge is to split the ‘pair into pair(s),’ both of which are only about 2.5” apart. This amazing system lies 162 light-years distant.

Challenge object (Southern Hemisphere): It’s a true irony of the night sky. Red dwarf stars, the most common type of stars in the universe are too faint to see with the naked eye. One of the brightest is the +6.6 magnitude star AX Microscopium in the obscure constellation of the Microscope. This star is 12.9 light-years distant, and offers a fine example of a nearby solitary red dwarf to check off of your life observing list. The coordinates for AX Microscopium are: RA: 21 Hours 18’ 35”, Declination -38 Degrees 46’ 49”.

Top Astronomy Events for September 2021

7th-New Moon

14th-Mercury greatest elongation (27 degrees east of the Sun at dusk)

14th-Neptune at opposition

15th-GEOSat eclipse season

17th-Comet 6P/d’Arrest at perihelion (+9th magnitude, 93 degrees east of the Sun in Sagittarius at dusk)

20th-Full Harvest Moon

20th-762 Pulcova occults +7 magnitude star for Mexico and US, in the brightest asteroid stellar occultation for 2021.

22nd-Southward Equinox

23rd-Aurora season


Star pattern analysis Stellinapp
Tips & News

Stellina & Vespera Initialization: how it works?

You are looking at the starry sky from a planet that orbits around the sun at about 30 km per second. In addition, the Earth rotates on itself, making a complete rotation every 23 hours, 56 minutes and 4 seconds.
Therefore, depending on your location and the date and time of your observation, visible stars and constellations are not always the same. Their positions even keep changing during your observation.
In these circumstances, accurately pointing to a star (often invisible to the naked eye) with a telescope and following its movement to capture sharp images is a real technical challenge. A telescope must be set up in a rigorous and precise manner, taking into account the date and location information.

This time-lapse video shows the apparent movement of the stars caused by the Earth’s rotation. The position of the stars is permanently changing.

With a classical telescope, the setting-up procedure required to be fully operational and start capturing images of celestial objects can take between 30 minutes and 1 hour, even for an experienced amateur astronomer. With Stellina or Vespera, on the other hand, it only takes a few minutes and no particular technical skill.
Here is a detailed description of the setting-up and initialization process of the Vaonis observing stations and an explanation of why the process is easier and faster than with a conventional telescope.

1. Requirements for a successful initialization

1.1 External conditions

Apart from solar observations which require appropriate filters, initialization of the two telescopes for night observation requires a dark enough sky and visible stars. It is not necessary to wait for complete darkness. The observation stations can initialize from the nautical twilight when the sun goes down 6° below the horizon. However, the initialization duration of Stellina and Vespera can be shorter if it is a very dark night.
The sky must also be clear enough. In case of heavy cloud cover, initialization may fail. In any event, under these conditions, most observations are impossible.

Initialisation de Stellina

As soon as enough stars are visible to the naked eye, you can launch the Stellina initialization. If it fails, wait for more darkness or check that the targeted region of the sky is clear.

1.2 Leveling the tripod

A similar step in setting-up Stellina and Vespera with a classic telescope is that it is required that the tripod be set horizontally. It is done manually by adjusting the length of each leg and checking the spirit level so that the bubble is positioned precisely in the center of the black circle.

Tip: Look at the spirit level from above to be sure of the position of the bubble. If you look at it from a different angle, you may think it is well centered while it’s actually not (due to the parallax).

niveau à bulle

Stellina’s bubble level allows the telescope to be set horizontally. This adjustment is required for more efficiency in pointing and tracking.

2. What is the initialization of a telescope?

2.1 Why is initialization necessary?

The start-up of Stellina and Vespera is much quicker than that of a classical telescope: less than 5 minutes in good conditions versus more than 1 hour for classical equipment. The main reason is that they are fewer manipulations to perform. Above all, one particularly long and complex step of the process with a classical telescope that is fully automatic with Stellina and Vespera is the syncing with the celestial sphere.

As explained previously, the appearance of the sky is constantly changing. Using a telescope to capture images of the universe requires accurate synchronization with the orientation and rotation of the sky. Time and geographical location must be taken into account. The mount axis must also be aligned in a particular way. Then the telescope can calculate the stars’ position and activate its motors to point and follow the lead to observe.

Ecran d'initialisation dans Stellinapp

With Stellina and Vespera, sky syncing is achieved within 2 or 3 minutes by simply pressing a button.

2.2 Stellina / Vespera: automatic initialization with astrometric calibration

The initialization of Stellina and Vespera requires four main steps, which can be followed in the Stellinapp.

Step 1: Geolocation and time syncing

Firstly, to properly operate, the observation stations must be input with the time and the geographical position. This information is retrieved from the connected device you use to control the telescopes.
If Stellinapp indicates it can’t get the geographical coordinates of your observation place, your smartphone or tablet may not have an integrated GPS, or it could be disabled. You can input your geographical coordinates (longitude and latitude) manually if necessary.

Step 2: Astrometric calibration

Stellina and Vespera have to determine their orientation with respect to the starry sky position and the horizontal (although the horizontal alignment has been achieved manually with the spirit level, it may be necessary to improve it for further accuracy).

To achieve this, our stations use the astrometric calibration method, also known as “plate-solving” calibration. It consists of comparing the starfield captured by the telescope with an internal database to identify the targeted region of the sky:

  1. The observation station targets a random area of the sky.
  2. It captures an image of the bright stars.
  3. The onboard computer analyzes the resulting image to determine patterns formed by groups of stars.
  4. The patterns are compared with an internal database to find a match and determine the sky target region.

In case of a fail, the observing station starts over with another region of the sky. Most of the time, the second attempt is successful. Clouds or haze in the targeted region of the sky may be responsible for the failure.

Step 3: Tracking activation

To remain in sync with the sky, Stellina and Vespera must follow the apparent movement of the stars caused by the rotation of Earth. This is accomplished by continuously activating the motors on the two axes of the telescope (and a third axis on Stellina which also compensates the starfield rotation).

Step 4: Focusing

Focusing consists of adjusting the sharpness of the image generated by the telescope. It is achieved by adjusting the distance between the lens and the camera in order to view the stars as sharply as possible.
Successful focus allows one to get the maximum amount of detail on the images of galaxies and nebulae.

Stellina and Vespera have an integrated automatic focuser. To this day, it is the only astronomy consumer telescope in the world equipped with such a feature.
With conventional telescopes, focusing is done manually using various methods, such as using Bathinov or Hartman masks or checking star diffraction spikes, possibly with specific astronomy software. The observer is the final judge of the sharpness of the images (focus).

2.3 Classical telescope: polar alignment

Classical telescopes are often equipped with an equatorial mount (while Stellina and Vespera have an azimuthal mount). It facilitates star tracking, yet above all, it is required to capture images of the universe. When properly installed, the equatorial mount allows one to follow the apparent rotation of the sky by performing a slow and steady course on one of its axes. It is also required to keep the object’s orientation in the field of view (essential for astrophotography). Stellina and Vespera have a mechanism to compensate for the field rotation (optical for Stellina and software-based for Vespera) to get the same result as an equatorial mount.

To achieve the polar alignment, the observer must sequentially point to different stars. Depending on the accuracy of the result, he must manually apply corrections to the orientation of the polar mount axis.
Some mounts are equipped with a viewfinder built into the polar axis, allowing for a first approximate orientation by targeting the North Star.
On conventional telescopes, astrometric calibration does not apply as they do not have an integrated camera and an onboard computer system to operate.

3. Six tips to reduce initialization time or limit failure?

  1. Regularly check to ensure that your Stellinapp mobile application and the internal program of the telescope are up to date. Visit the App Store or Google Play Store to check if new versions are available. You can subscribe to the Vaonis newsletter to be notified of updates and new features.
  2. Set up the telescope’s tripod on a flat, stable, and non-slippery surface (avoid loose soil or sand). If the mount moves during your observation, the calibration will lose its effectiveness.
  3. Shelter the telescope from the wind.
  4. Level the tripod as carefully as possible with the spirit level.
  5. Wait for sufficient darkness before starting the initialization.
  6. Before starting the initialization of Stellina or Vespera, rotate the telescope’s body on its tripod (taking care not to move the tripod) towards a region of the sky free of obstructions, clouds, and stray light sources such as street lamps. The stars should be clearly visible in the chosen area.

During the observation, if you find that your telescope struggles to point to a new object accurately or that stars are oval-shaped rather than circular, you can solve the issue by restarting the initialization.

Tip: Switch from the smartphone for initialization to the tablet for observation.

Stellina and Vespera need to retrieve the date, time, and geographical location from your mobile device to proceed with the initialization. A tablet with a larger screen may be better suited to observe the images captured by the telescopes. However, while all smartphones have a built-in GPS, most tablets do not. It is then impossible to use them for initialization unless you manually input your geographical coordinates in Stellinapp.
You can launch the initialization from your smartphone, switch instantly to your tablet by taking control of your instrument with it (first tab of Stellinapp), then enjoy the rest of your observation session with more ease.

Tips & News

Vespera, Vaonis newborn star

CONTENT

  1. Vespera
  2. What are the differences with Stellina ?
  3. Photos
  4. Frequently asked questions
  5. Press & media Kit

1. Vespera

Two years after the launch of Stellina, Vaonis is pleased to present its new creation, Vespera. Our team has put all of Stellina’s technology into a smaller, lighter but also more affordable version to make astronomy even more accessible.

We have highlighted the essential and the best of Stellina to design Vespera, which still offers the same simplicity of use, thanks to its initialization, automatic pointing and tracking system, its intelligent and very powerful image processing.

Vespera is designed for everyone, for sky lovers looking for simplicity and unforgettable experiences to share. As for Stellina, the instrument offers more manual possibilities (image processing), as well as a larger aperture and resolution.

Go to the Kickstarter page  to join the community on a new odyssey!

2. What are the differences with Stellina ?

Vespera

Stellina

Weight

5 kg (11 lbs)

11,2 kg (24,7 lbs)

Height

40 cm (15 in)

49 cm (19 in)

Width

20 cm (8 in)

39 cm (15 in)

Depth

9 cm (3.5 in)

13 cm (4.7 in)

Lens

Apochromatic Quadruplet

Apochromatic Doublet

Lens special features

Extra low dispersion
S-FPL52 equivalent (ULD)
with lanthanum glass

Very low dispersion
S-FPL51 equivalent (ED)
with lanthanum glass

Aperture

50 mm

80 mm

Focal length

200 mm

400 mm

Focal ratio

F/4

F/5

Field of view

1.6° x 0.9°

1° x 0.7°

Mount

Alt-azimutale

Alt-azimutale

Field derotator


Image sensor

Sony IMX462

Sony IMX178

Resolution

1920 x 1080 (2MP)

3072 x 2080 (6,4MP)

Sensor size

1/2.8”

1/1.8”

File formats

JPEG, TIFF, FITS

JPEG, TIFF, FITS

USB port (pictures download)


(with Wi-Fi)


Auto focus


Light pollution filter

Optional


Dew control

Optional


Temperature/humidity sensor


Battery type

Integrated

External (powerbank)

Battery life

4h

5h

Water Resistance

IP43

IP53

Multi user mode

Up to 5 users

Up to 10 users

 2021/2022 Developments

Solar pointing

Connected battery

Connection to Wi-Fi hotspots

Scheduling of observations

Up to 3 objets

Unlimited

Expert Mode (camera control)

HDR Image processing

Pictures stocking in the app

Up to 100 images

Up to 100 images

Mosaic Mode

5x sensor field

16x sensor field


Resolution difference (proportionally)

M27 Dumbbell nebula Vespera

Photo captured by Vespera (original size: 1920×1080)


M27 Dumbbell nebula Stellina

Photo captured by Stellina (original size: 2900×1972)


Size difference

3. Photos

Vespera’s development is ongoing. Photos were taken with the first prototypes in a peri-urban environment, Bortle 6. Click to enlarge the pictures.

Exposure time :
M31 Andromeda Galaxy: 177x10s (30min) – M13 Hercules Cluster: 177x10s (30min) – NGC6992 Veil Nebula: 330x10s (55min)
Moon: live – M27 Dumbbell Nebula: 177x10s (30min) – M42 Orion Nebula: 200x10s (33min)

4. Frequently asked questions

Is Stellina more powerful than Vespera? Does it offer a better photo quality?
You can find all the answers to your questions (pre-orders, deliveries, techniques) on this page :

https://desk.zoho.eu/portal/vaonis/fr/kb/vaonis

5. Press & media Kit

We put at the disposal of journalists, influencers, partners and associations :

  • a general presentation (10 slides)
  • a press release
  • photos
  • videos
  • photos taken by Vespera

Access the folder by clicking here.

Tips & News

How to get the best of your images captured with STELLINA – Affinity Photo tutorial

Image processing tutorial with Affinity Photo – Intermediate level

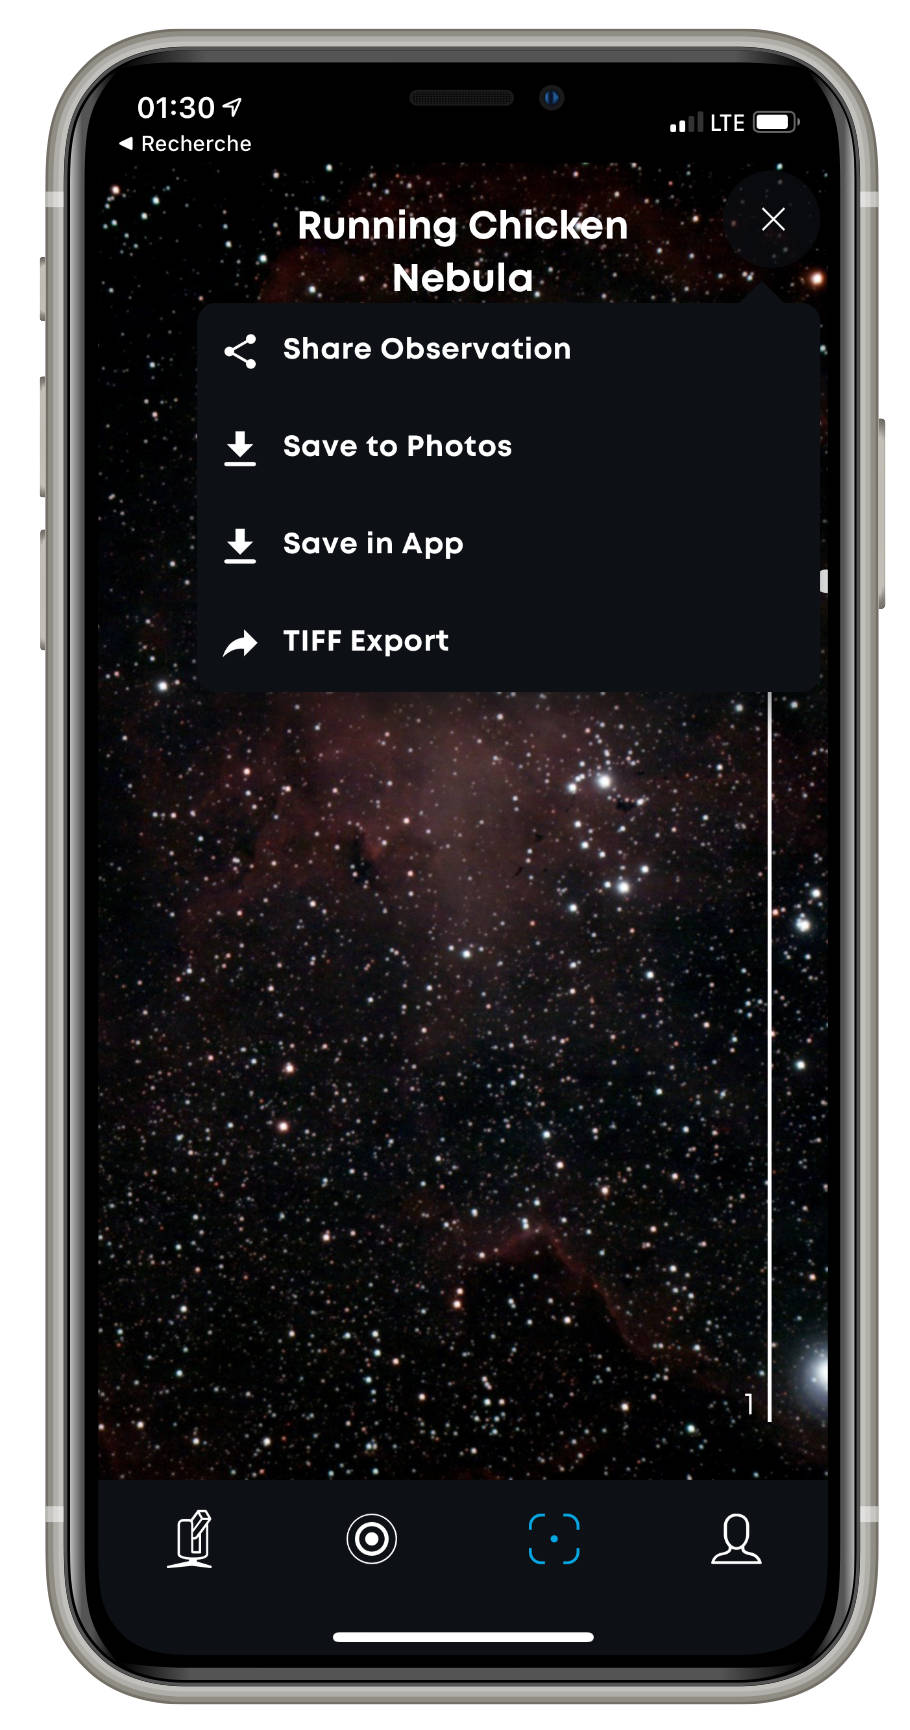
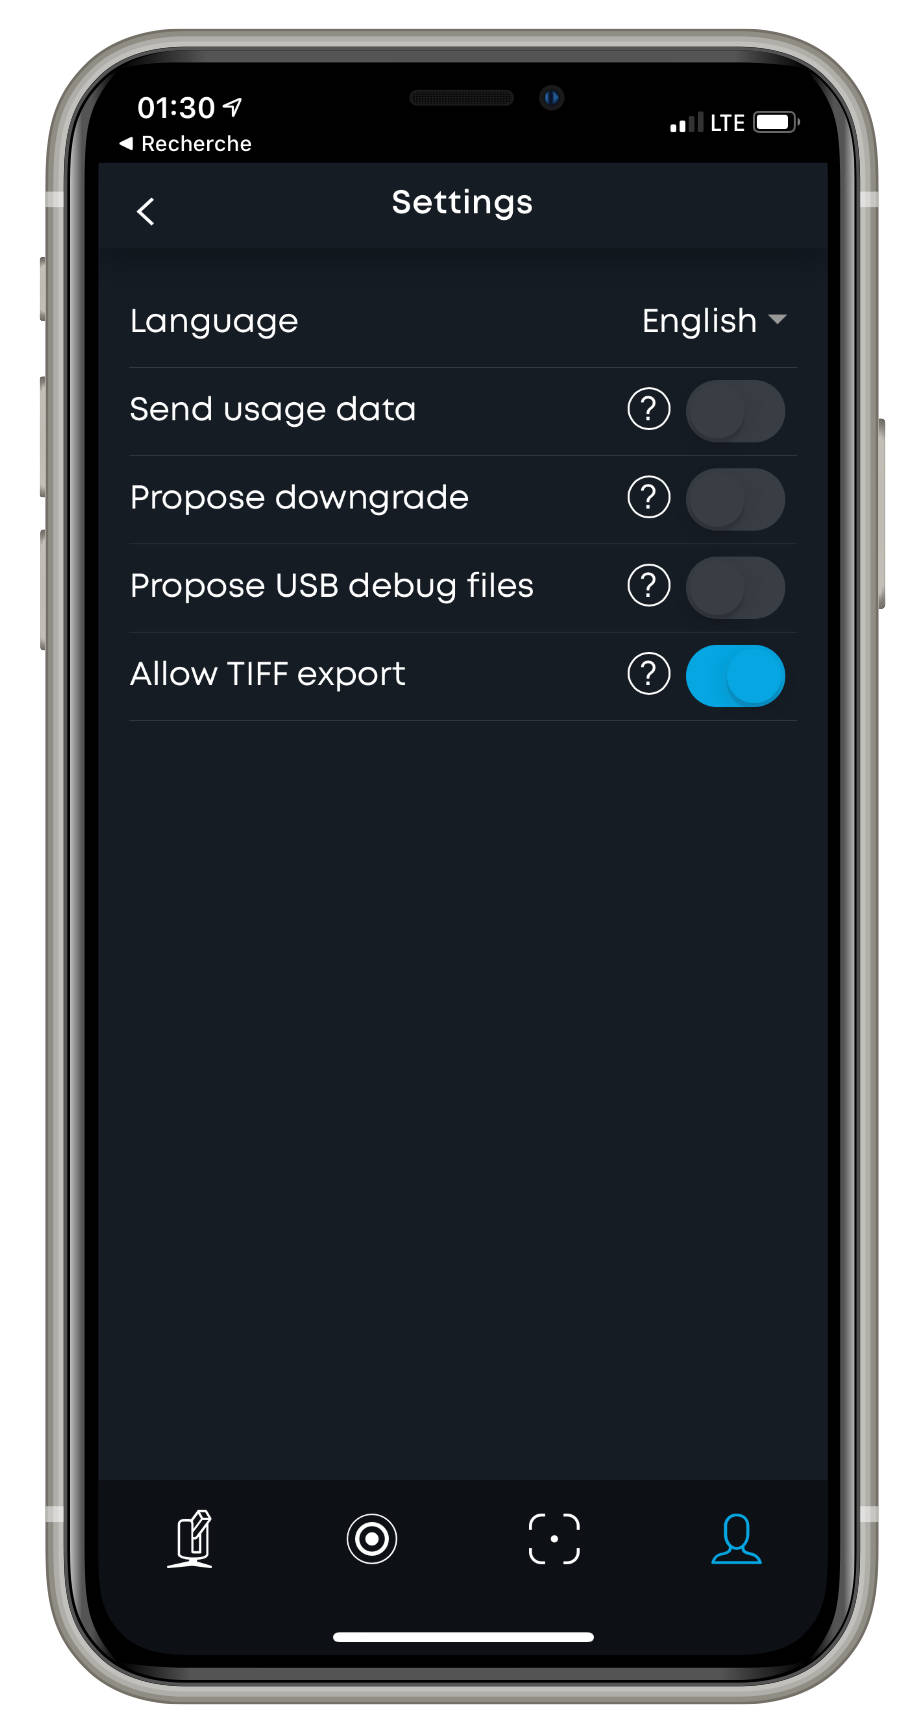
Did you know? You can now export the images of your observations in a 16-bit TIFF format. This raw file allows you to apply your own image processing settings and edit the images at your convenience. Doing so, you will get better image quality and personalize the results without the hassle from stacking files yourself on astrophotography software. This tutorial describes a method to process the images obtained from TIFF export using the Affinity Photo software. It explains basic concepts of image processing tools which can be applied using any other graphic design software.

For a more thorough understanding, please read:
Save, share and use STELLINA’s images

CONTENTS

  1. Introduction
    1. Requirements
    2. About the technique used in this tutorial
    3. Tips for capturing better images with STELLINA
  2. Processing steps
    1. Reveal the image
    2. Enhance the details
    3. Reduce the noise
    4. Adjust the colors
    5. Put the finishing touches
  3. Can we proceed further?


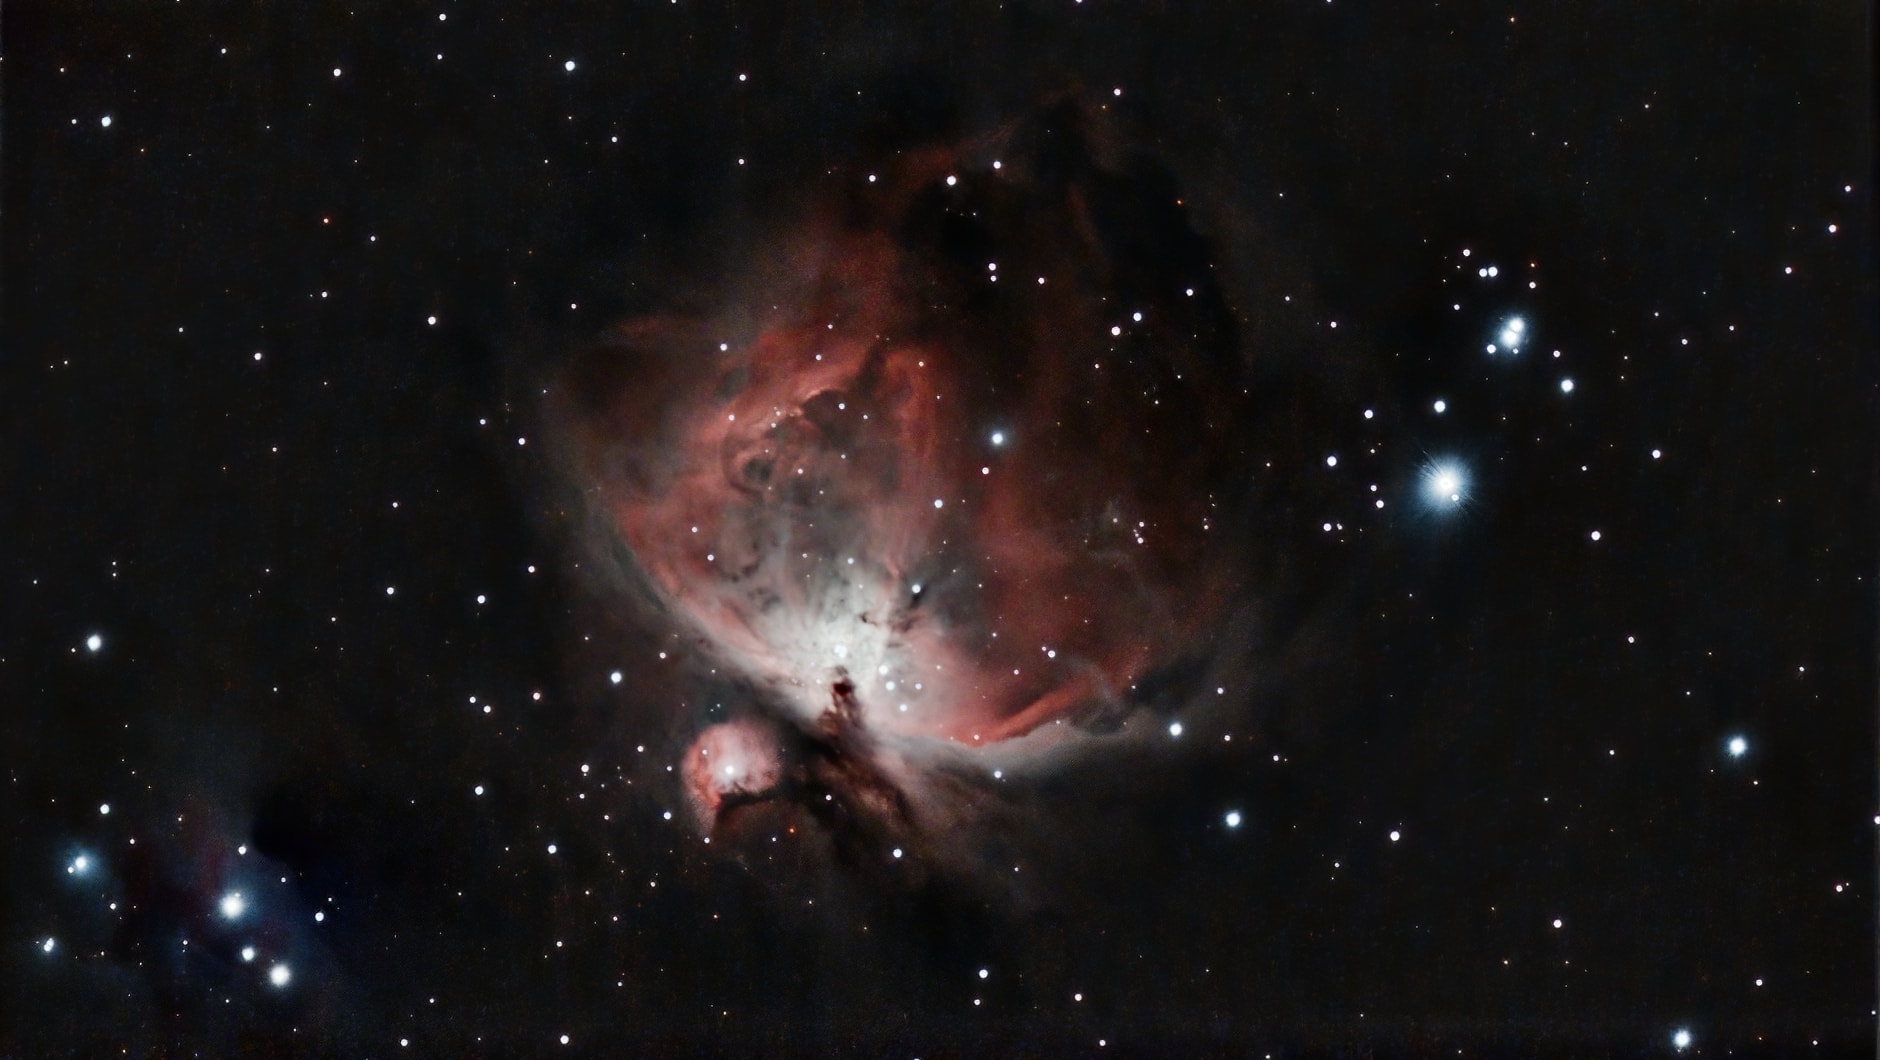
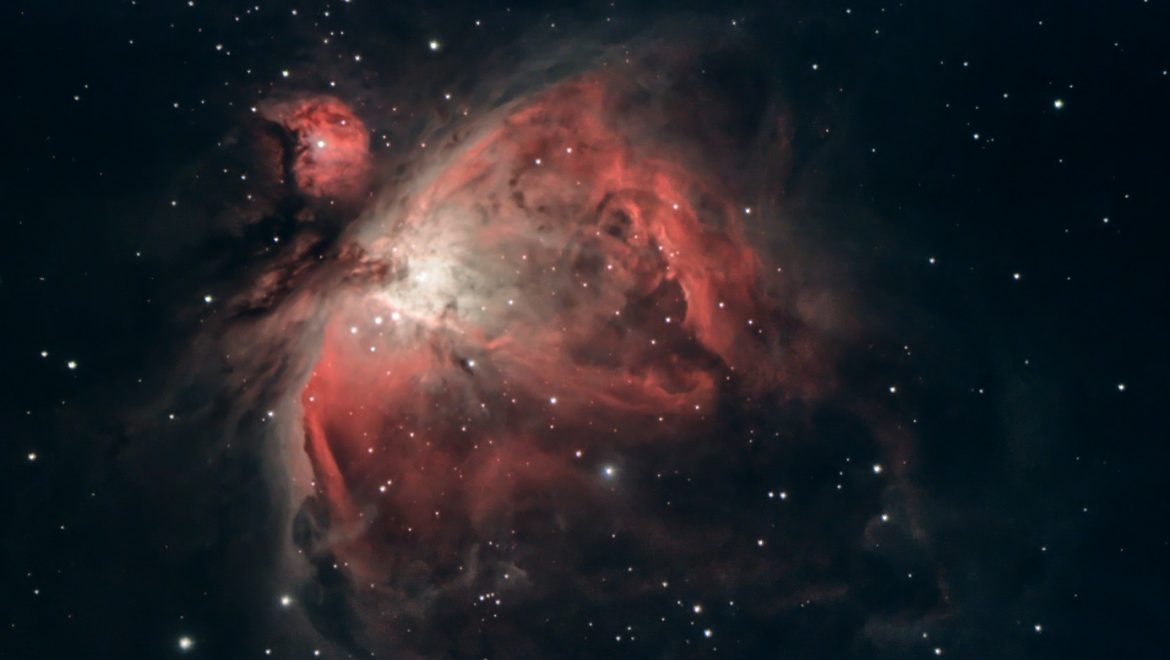
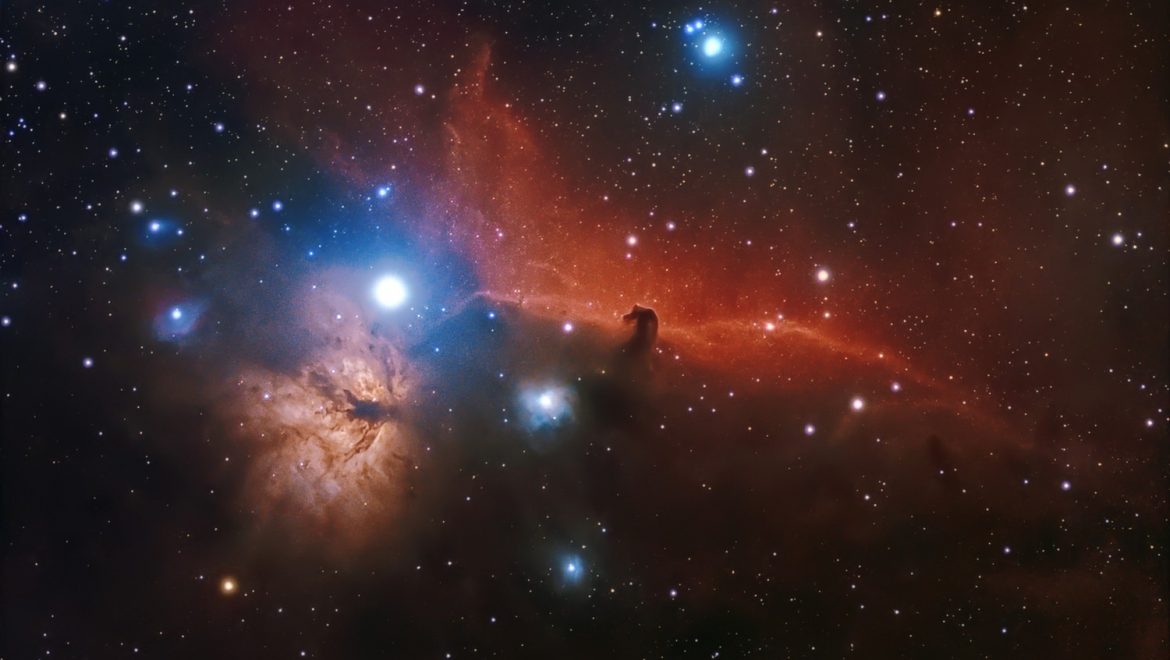
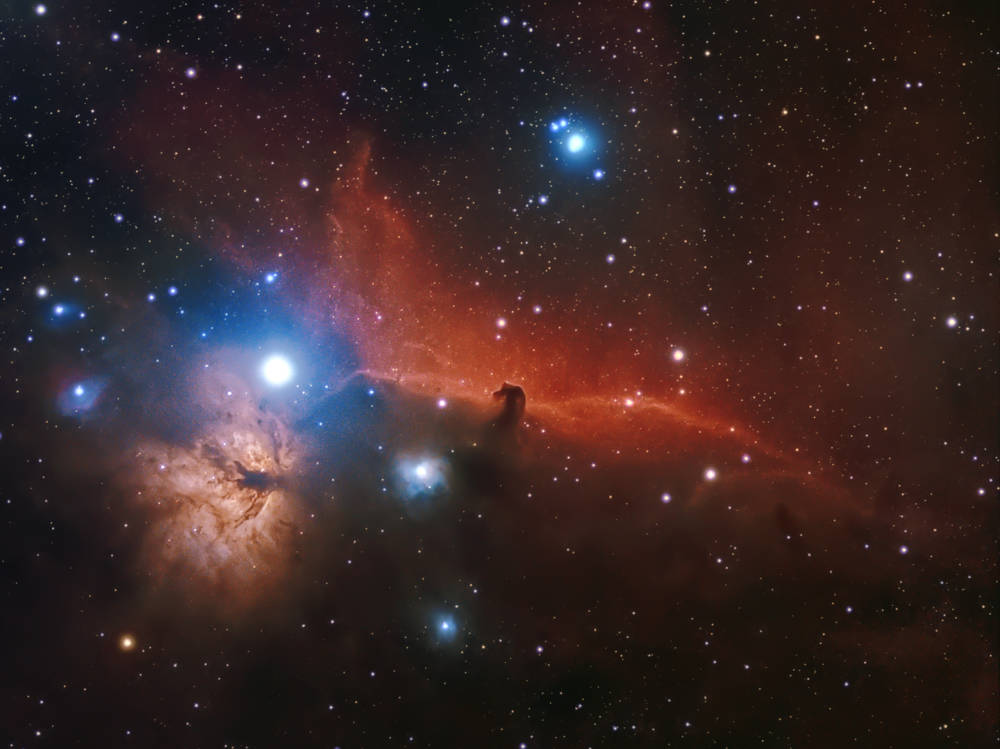
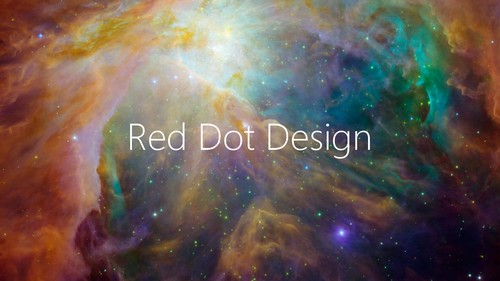
Fig 1: The Orion Nebula. Left side: as shown on your screen when observing with STELLINA. Right side: after processing the image via the TIFF export.

Introduction

Requirements

Affinity Photo software

Affinity Photo is a raster graphics editor similar to Photoshop. It is able to export and read Photoshop files (.psd) but it is more accessible than Photoshop because of its price, and its interface is more user-friendly. It is available for Windows and macOS systems. A version for the iPad is also available.

Information and download: www.affinity.serif.com

Rate: about 50€/$50 (one-time purchase)

If you already own image processing software, it probably shares many features with Affinity Photo. So you should be able to draw inspiration from it.

The example file

This tutorial is based on an image of the famous Orion Nebula (M42).You can download the original TIFF file (as you would retrieve it during your observation) by clicking here..

The Orion Nebula is an interesting case study. It has a very bright center – its heart is lit by 4 stars forming a trapeze – with faint extensions. The challenge for any astrophotographer is to enhance the extensions without “burning” the heart.

About the technique used in this tutorial

There is no unique way to process an astronomical image. The vast array of software available on the market and their various functionalities offer many ways to achieve a result. There is also a multitude of possible results. If you process the same image several times with the same tools, you probably won’t get an identical end result. 

The method described here is one among many. For this tutorial, we’ve decided to use Affinity Photo, a versatile graphic design software accessible to all, rather than a dedicated astrophotography software.

Be aware that the settings required to process a particular celestial object may significantly differ depending on whether they are nebulae, galaxies or star clusters. Celestial objects can show very different characteristics, even within their category. The advantage of manual processing over STELLINA’s automatic processing is precisely to allow for the treatment of objects differently depending on their features. It is important to understand that this article is not about strictly following the step-by-step tutorial, but rather understanding the notions related to image processing and being able to apply the concepts to other cases.

This tutorial is organized into 5 main steps:

  1. Revealing the image
  2. Enhancing the details
  3. Reducing noise
  4. Adjusting colors
  5. Adding the finishing touch

Tips for capturing your images with STELLINA

To obtain the best possible end image quality, you must begin with having all the right parameters in place when capturing photos with STELLINA. Here are a few tips that will positively impact your image’s final quality regardless of the processing technique you use.

  • Set up your STELLINA outside about 1 hour before starting your observation. This will allow time for the optical and mechanical components to adapt to the ambient temperature, ensuring a more precise focus (sharp stars, less rejected images…). Stellinapp displays the temperature of the instrument. If you notice a significant drop in temperature, it’s likely your final image will show some defects.
  • Target objects that are high in the sky, preferably above 30°. Close to the horizon line, the atmosphere absorbs more light. Furthermore, the more turbulence there is, the more the image quality will degrade. Keep in mind that during your observation, the apparent rotation of the sky will cause the celestial sphere to move. Use a star chart software such as Stellarium to control the height above the horizon of the object you plan to capture and check how it changes overnight.
  • The longer, the better: plan for longer exposures.  Stellinapp provides minimum observation time recommendations for each target in order to get an image with decent quality. However, by prolonging the capture beyond the recommended time, you can achieve a higher quality result. We recommend that you to double the total exposure time (2 hours if we recommend 1 hour).
  • The darker, the better: whenever possible, choose an observation site away from any artificial lights and use STELLINA when the moon is not too visible (new moon, waxing crescent phase…)
  • Avoid setting up STELLINA on or near tarred, concrete or rocky surfaces. Those materials release heat at night, which increases the turbulence. Prefer grassy or earthy grounds.

Step 1: Reveal the image

At first glance, when opening it, the TIFF file may confuse you (see figure 2): the image appears almost completely dark. Actually, the signal does exist. What we can see at this point is basically the heart of the nebula with the 4 stars of the trapeze. This image refers to a 30 minutes capture. As mentioned in the tips above, we could have obtained an even sharper result with a 1 hour exposure.

The goal of this step is to expose the extensions of the nebula without burning its heart. While adjusting the settings, you will need to keep checking that the stars of the trapeze and the heart’s details remain distinctly visible.


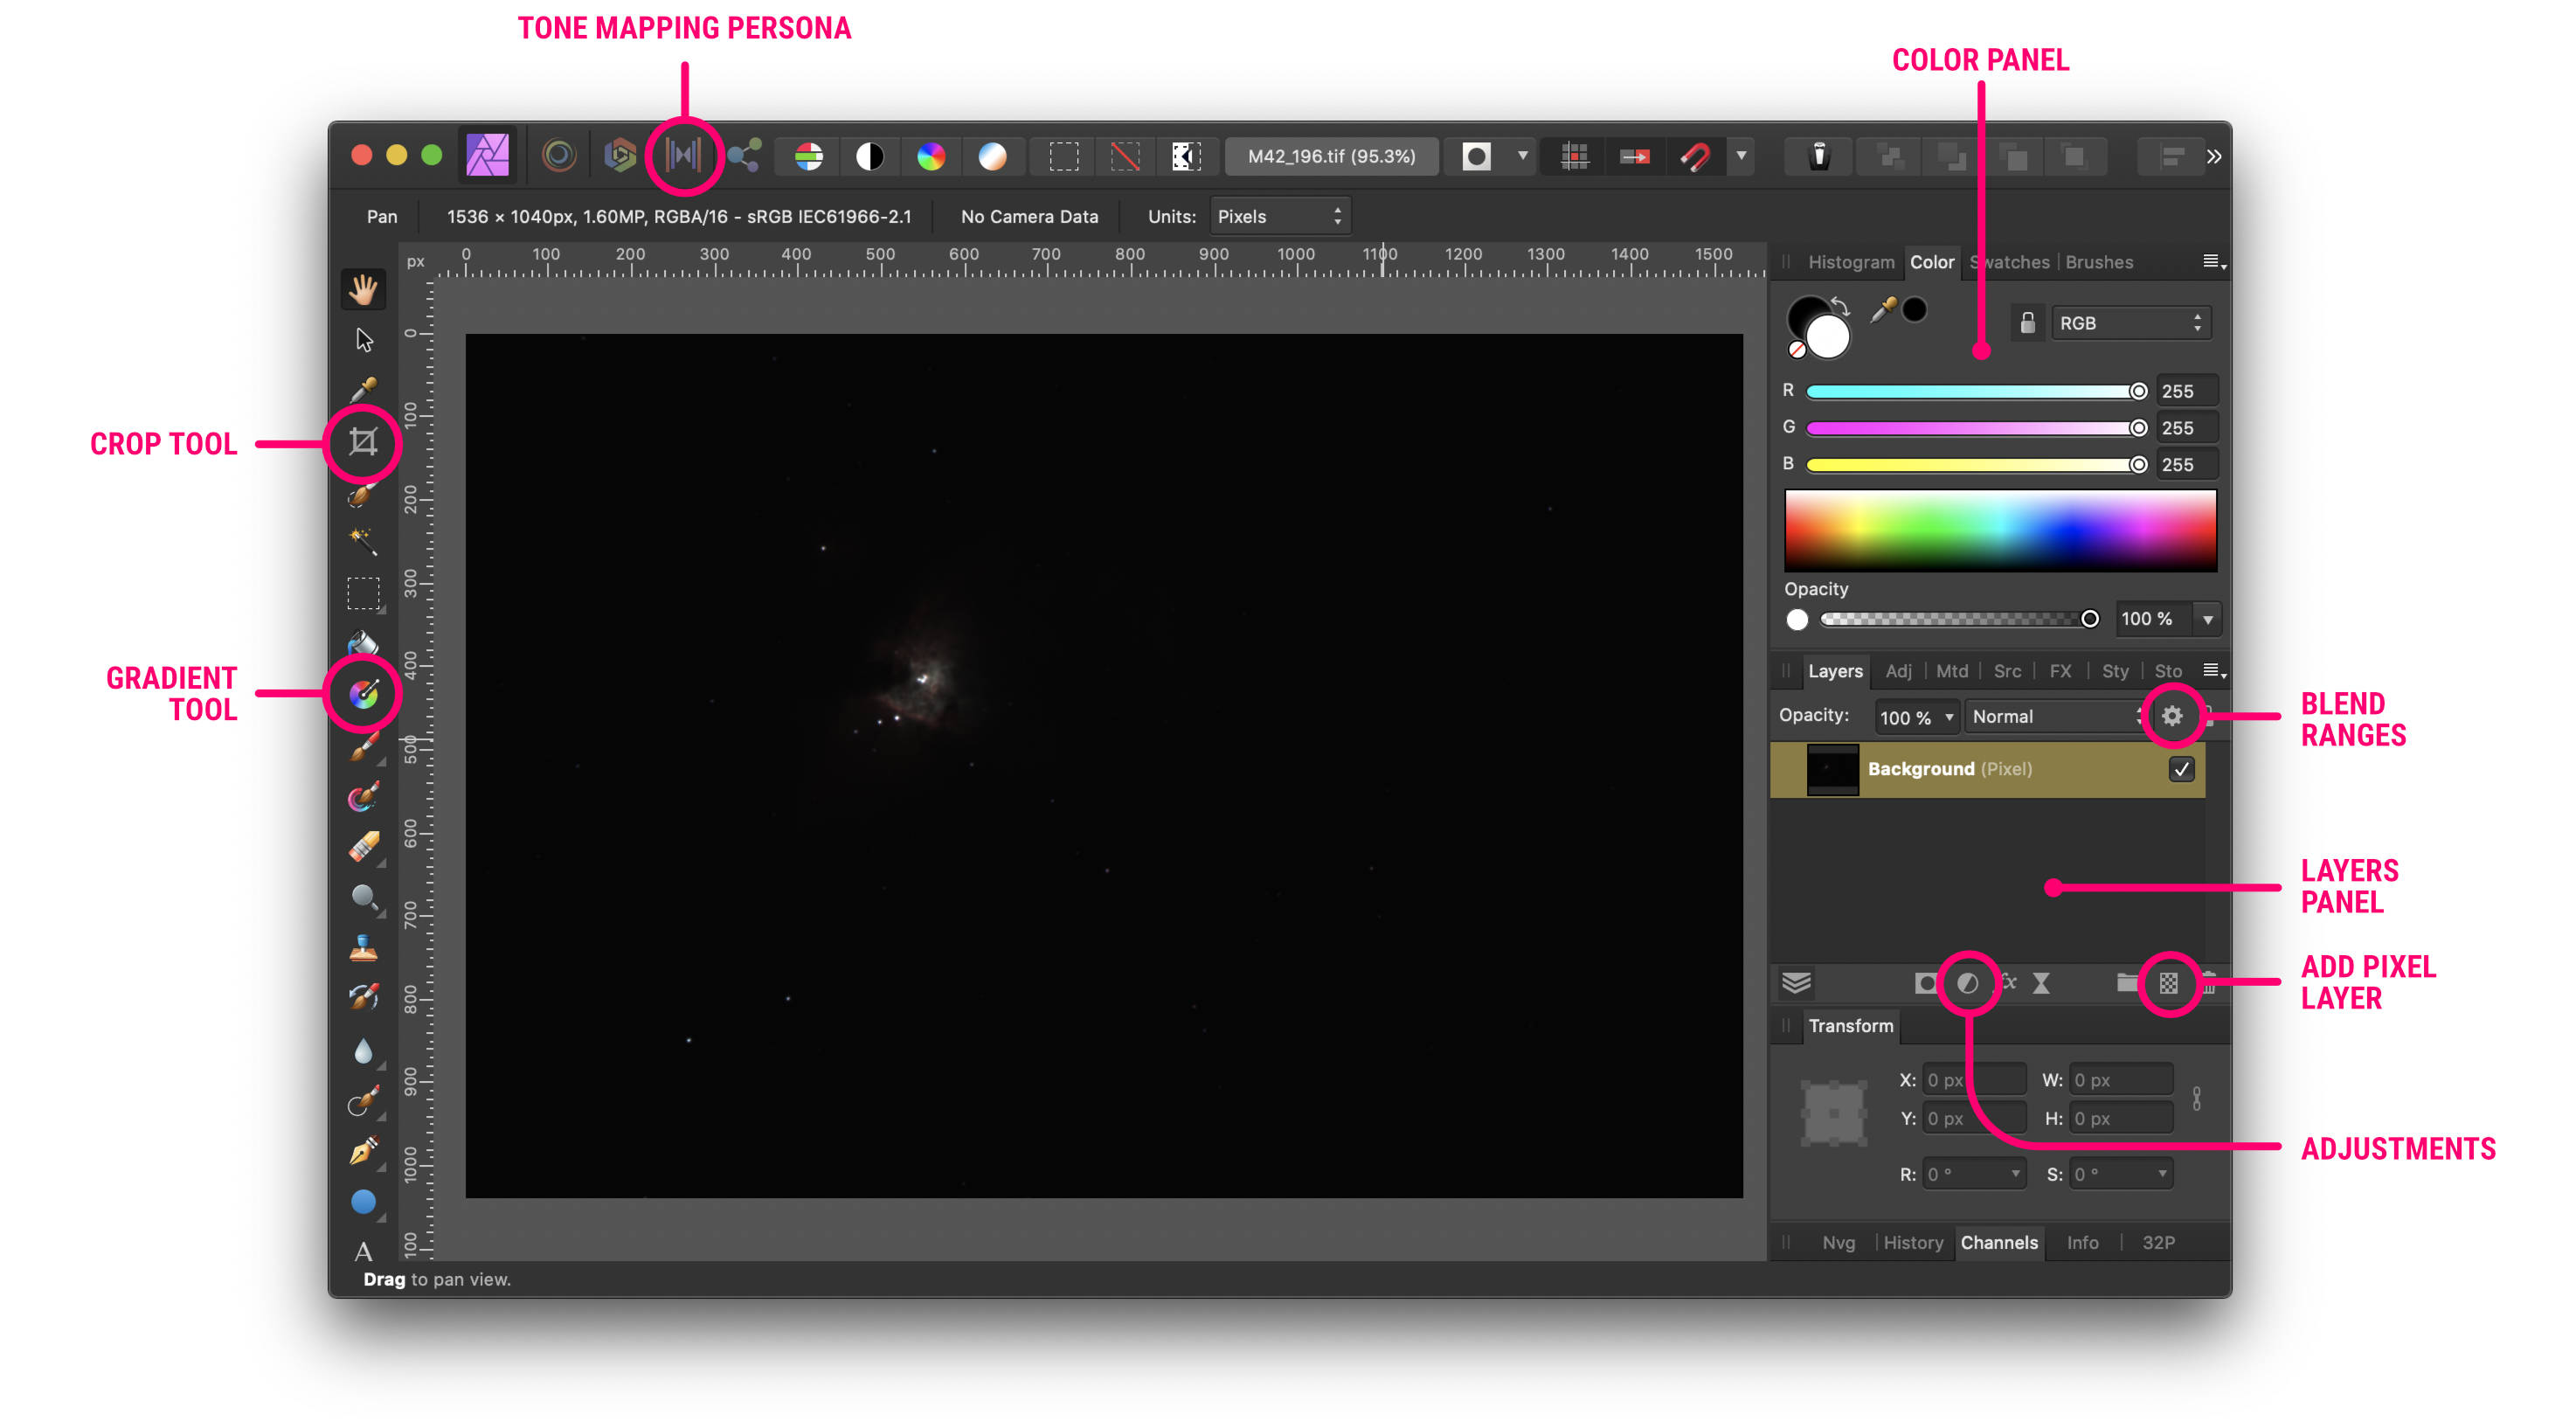
fig. 2: the image as it appears in Affinity Photo while opening it, with the main interface’s elements.

Once you’ve opened the image with Affinity Photo, take a look at the panels on the right (figure 2). Make sure the” Layer Panel” is visible.

Like most graphics software, Affinity Photo uses a combination of layers that blend together to compose the final image. You can think of layers as being like sheets of paper that are stacked one on top of the other. Transparent areas of a layer reveal the layer below, while opaque parts of a layer obscure the layers below. Some layers may contain an image, while others are adjustment layers that affect all the visible layers below them. All layer management is carried out from the Layers Panel.

So far, we only have one layer with our image on it. To keep this source safe in case we need to start over, we will work on a copy of this layer.

  • Click on the layer to select it, and in the “Layer” menu, choose “Duplicate“.
  • The new layer appears in the panel. For better organization, let’s rename it “Tone Mapping” (you’ll soon understand why).

Activate the tone mapping mode: “Tone mapping persona” (see figure 2). Tone mapping is the equivalent of the HDR filter feature you can find in other photo editing software. This tool is particularly useful for images with a high dynamic range, which is the case with a 16-bit TIFF file.

For a better understanding of: The role of tone mapping.

The range of shades that a computer screen can display (the dynamic) is much smaller than that of the TIFF file (256 levels per color for the screen vs. 65536 levels per color for the TIFF file). This is why we only see the very bright parts of the image on our screens.

Tone Mapping is the process of taking a range of tones and remapping them to a smaller range that most devices can accurately reproduce. Proceeding this way will reveal the fainter areas and locally increase the contrast in the picture without impacting the overall contrast (which would result in dimming the dark areas – low light – and would highlight the brighter ones, the opposite of what we are trying to achieve).


Use the controls available on the right-side panel to apply the relevant settings (Figure 3).

  • To adjust the overall brightness of the image, move the “Tone Compression” slider to low values, about 10%.
  • To bring out the less bright parts of the nebula, increase the value of the “Local Contrast,” for example, to 30%.
  • Slightly increase the “Blackpoint” value to darken the sky. During this step, don’t try to get an entirely dark sky background. You may lose details in the low lights. For example, set the slider to 3%.
  • To protect the brightest areas from being burnt, activate the “Shadows and highlight” panel, and reduce the highlights to minus 100%.

You can try different settings to find a result that suits you best. Take care not to burn the heart of the nebula. If the stars of the trapeze are slightly burnt, we will be able to rectify this in the next steps.

These are the only settings to be made in the “Tone mapping persona“. Click on “Apply” (top left) to return to the standard mode.

fig 3: the interface of the “Tone mapping persona” with the settings to be made.

We now have an image that looks more like the Orion Nebula as we know it. By zooming in on the stars of the trapeze, we may notice that they are slightly burnt. In our primary image (which is still on the layer underneath), they were perfect. For this area only, we will try to let the underlying layer appear.

To achieve this, we will use the blend options (the goal of this feature is explained more in-depth in part 3).

  • Make sure the “Tone Mapping” layer is selected.
  • At the top of the Layer Panel, locate the gear icon “Blend Ranges” (see figure 2) and click on it to display the layer blending options.
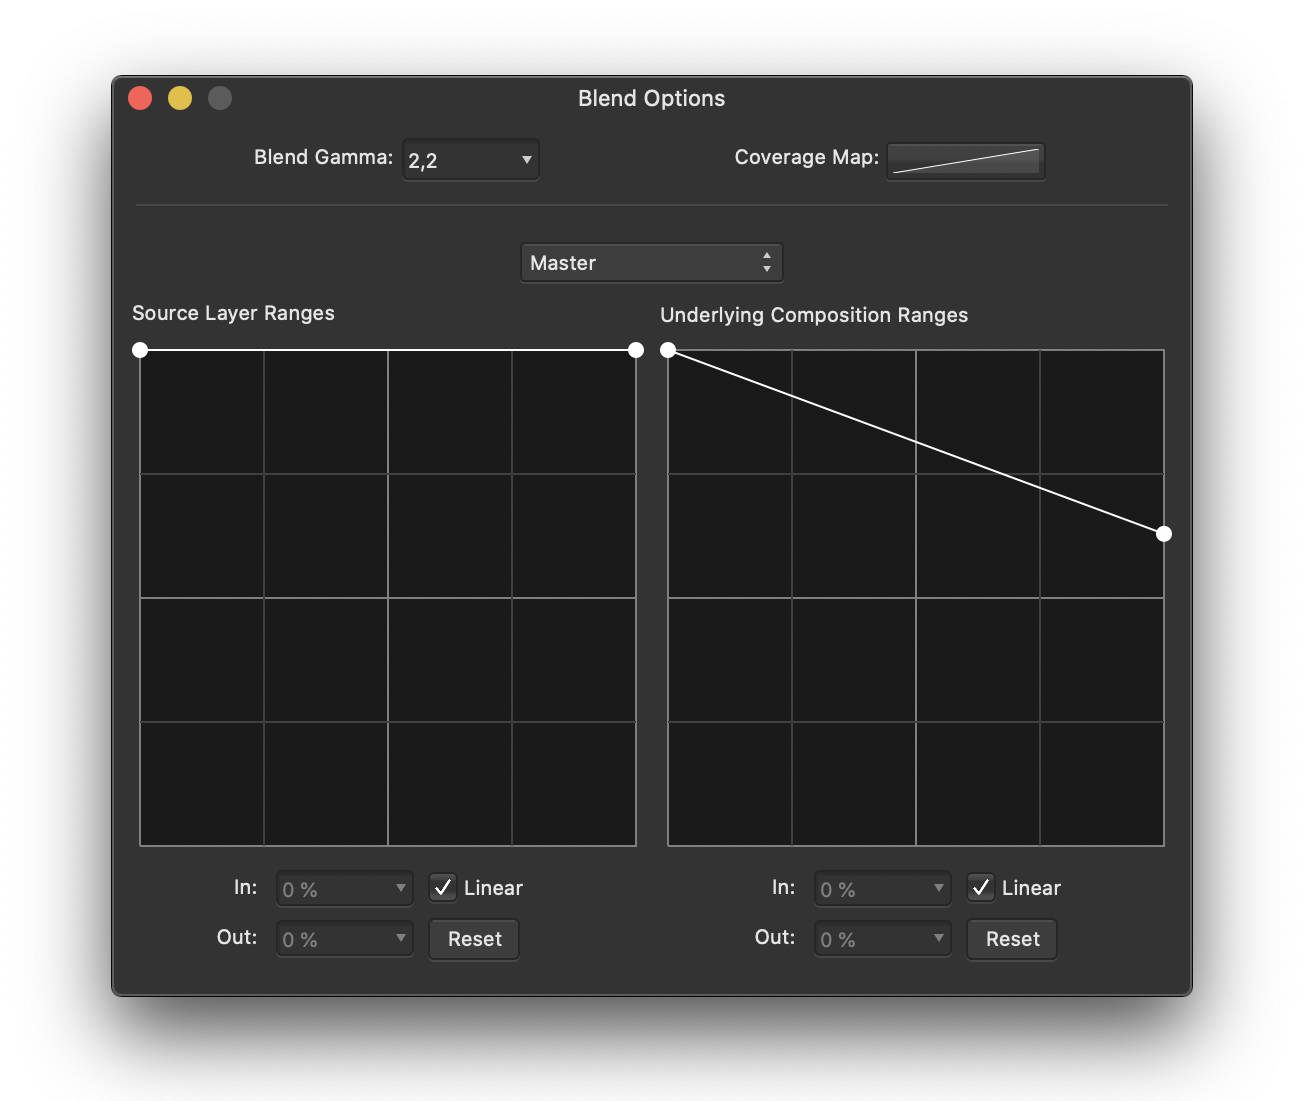
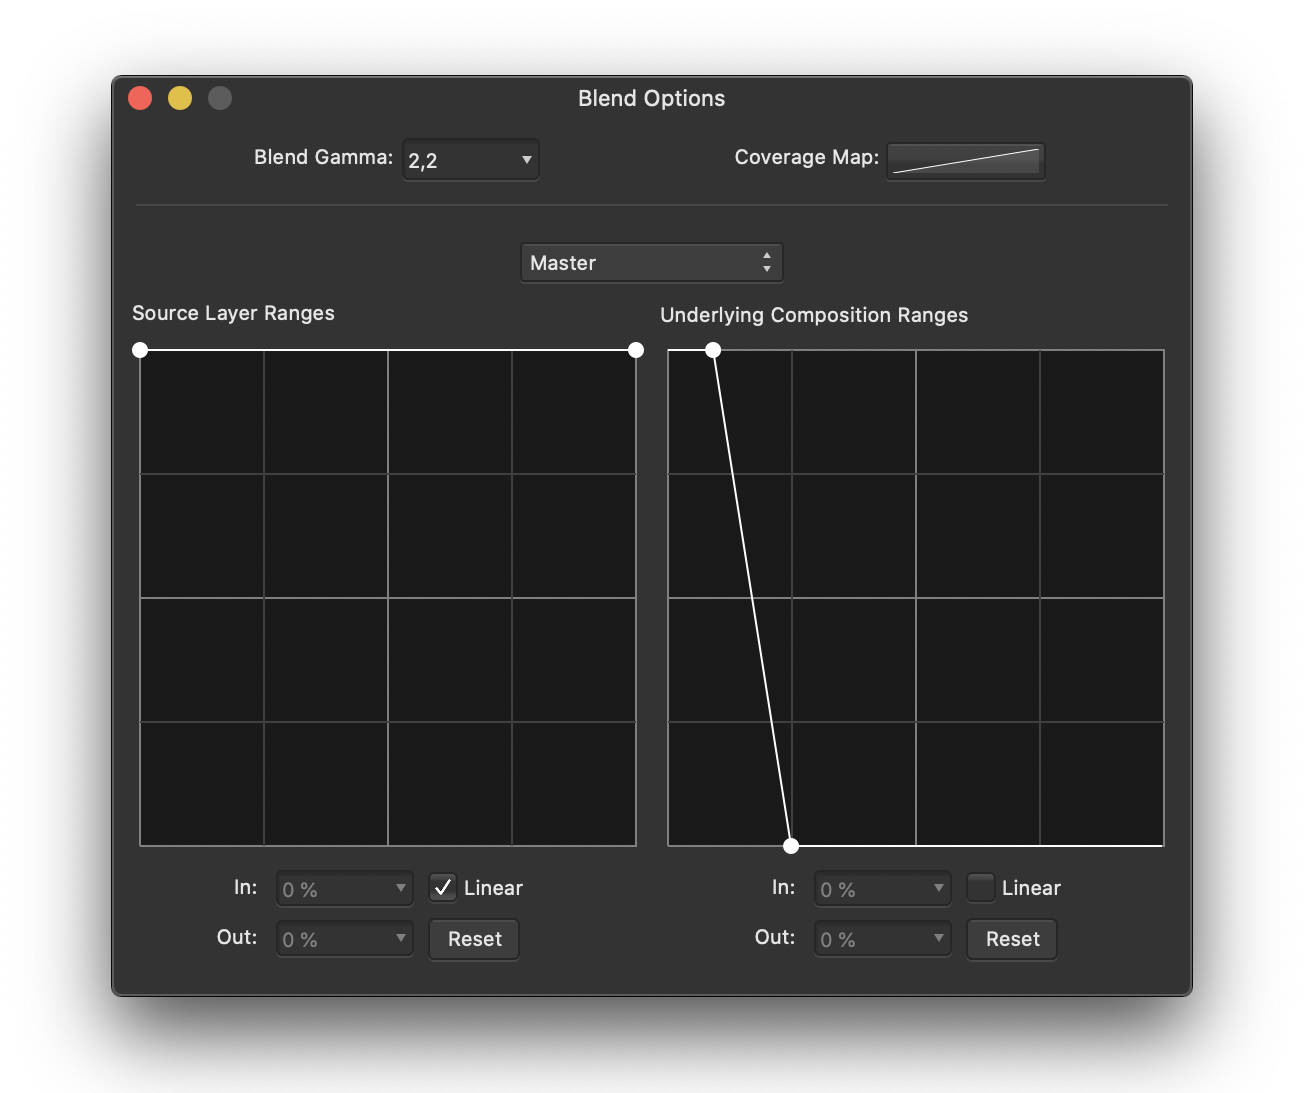
  • A new panel opens with two diagrams. Adjust the curve in the right-hand chart ((Underlying Composition Range))so that it looks like Figure 4. 

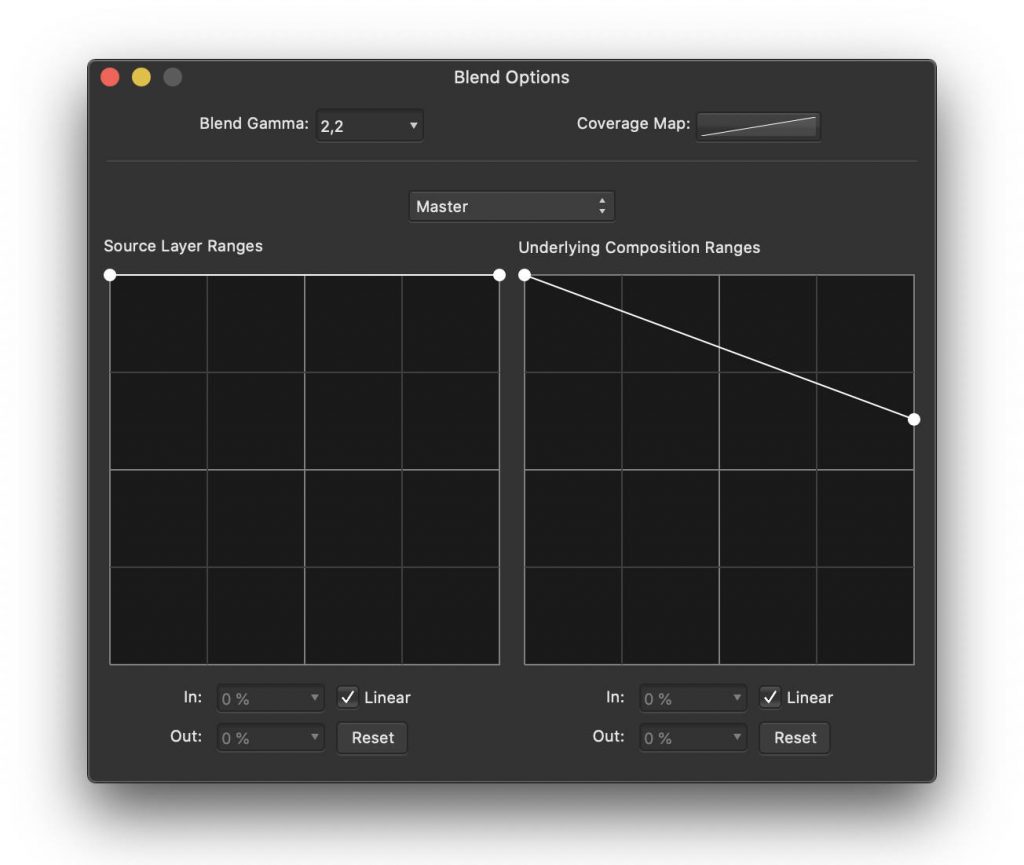
fig 4: setting the blending options for the “Tone Mapping” layer.

At this stage, the trapeze stars should no longer be burnt. We’ve revealed the underlying layer only for the very bright areas (where the stars in the trapeze are perfect).

This step is complete. The figure below compares the image at its opening in Affinity Photo with the result you should have at the end of step 1.

fig. 5: comparison before/after step 1

Step 2: Enhance the details

Now that we can clearly visualize the nebula, let’s try to enhance more details.

To achieve this, we are going to use a tool that looks intimidating at first glance, but is quite powerful: Tone Curves..  This adjustment is available as an adjustment layer.

  • At the bottom of the Layer Panel, click on the “Adjustment” icon (see figure 2) then choose “Curves” in the drop-down menu.

A new layer is created, and the proper setting panel opens (figure 6 on the left).

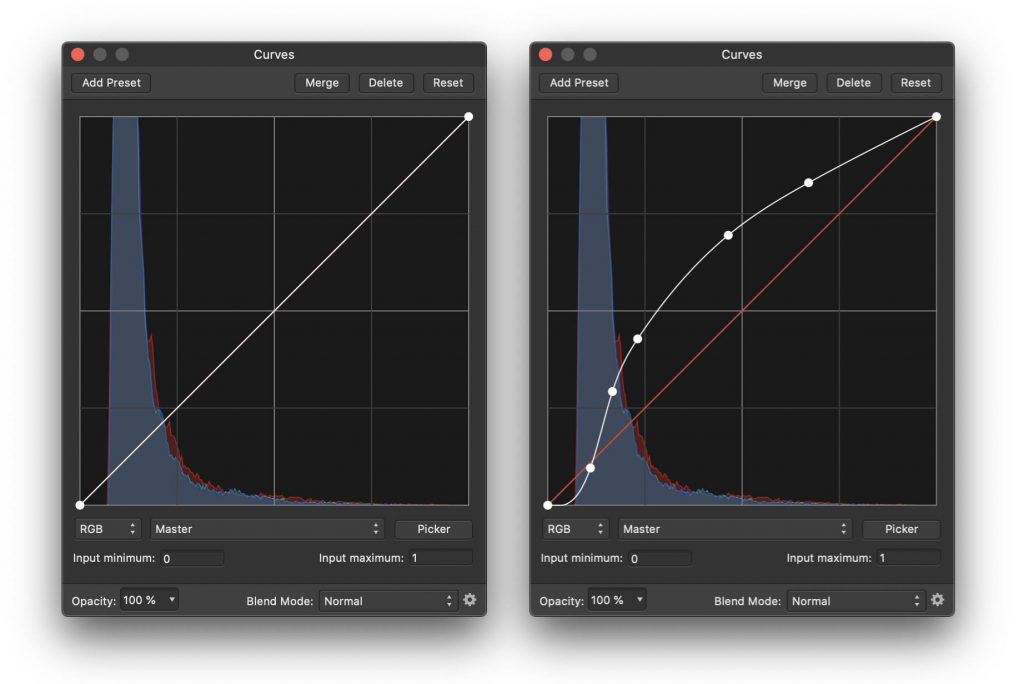
fig 6: the tone curve, prior and post adjustments.


For a better understanding of: Tone curves

The tone curve graph allows you to selectively increase or decrease the brightness of the image’s areas according to the brightness they already have. For example, you can decide to increase the brightness of dark areas without changing the brightness of areas that are bright enough.

The left side of the graph (Figure 6 on the left) stands for the very dark tones, called shadows (or blacks), while the right side refers to the very light tones ( “whites”). In between are the dark mid-tones and the light mid-tones.

The vertical axis of the graph shows the brightness value for each tone: minimum (black) at the bottom, and maximum (white) at the top. At first, the curve that runs through the graph consistently indicates that the shadows (on the left) are extremely faint, and the highlights on the right are very bright.


By clicking on the curve, you can change its shape in order to increase the brightness level of a particular tone range without impacting the other tone ranges too much.

In our case, we would like to increase the brightness of the dark tones without increasing the highlights in order to avoid burning the nebula’s heart.

  • Click on the curve on the dark tone side to add a control point and then move it upwards to increase the brightness of this tone range.

As a result, we enhance the darker areas, but burn the very light ones. We therefore need to add another control point on the curve to retract the brightness of the highlights to their initial values.

  • Add the required control points to the curve to get a shape similar to the one shown in Figure 5 on the right.
  • Check that the details of the heart and the stars of the trapeze remain distinctly visible.

To complete this step, we are going to apply a detail enhancement filter.. Before proceeding, let’s flatten, i.e., merge, the layer containing our original image (called “Background” if you have not modified it) with the “Tone Mapping” layer.

  • Uncheck the box next to the layer named “Curves setting” to temporarily disable the effect of this layer.
  • Right-click on one of the other layers to bring up the layer contextual menu.
  • In the contextual menu, choose “Merge visible“.

A new layer has been created. The initial layers are still available in case we need to go back to the previous steps.

  • Ensure that the new layer is between the “Tone Mapping“layer and the “Curves Adjustment” layer.
  • Activate the layer named “Curves adjustment” again by checking the relevant box.
  • Rename the newly created layer “Clarity“.
  • Make sure that the “Clarity” layer is selected, then in the menu “Filter / Sharpen…” choose the option “Clarity…
  • Adjust the intensity of the filter to increase the level of sharpness according to your preferences. Preserve the heart and stars of the trapeze. For example, you can set it to 40%.
  • Click “Apply“.
  • You can still adjust the tone curve settings if needed. This is the advantage of the adjustment layers: they produce non-destructive modifications and can be changed later.

This step is complete. The figure below compares the image between the beginning and the end of Step 2.

fig. 7: comparison before/after step 2

Step 3: Reduce the noise

When we zoom in on the image, we notice the presence of “noise.” Noise is the kind of granulation that appears, particularly in the darker areas of the picture.

The noise is distributed randomly and evenly throughout the image. It is less noticeable in bright areas as the brightness of the noise is low and therefore disappears in the strong “signal” of the bright areas.

For a better understanding of: what causes image noise?

Noise is initially present on any image captured by an electronic device. It can be produced by the image sensor and circuitry of a digital camera. It’s possible to limit the noise generated by the sensor by cooling it. This is why some experienced astrophotographers and professional astronomers use cooled cameras.


When processing an image, the various adjustments performed to enhance the details may increase the image noise. Let’s see how to limit that noise, in order to preserve the image quality.

Please keep in mind that by reducing the noise too much, we could loose some of the smallest details. Therefore, it’s important to keep a balance and accept that a certain amount of noise will always be present.

  • Duplicate the “Clarity“, layer to keep a back-up copy in case you want to revisit ((Layer menu / Duplicate)).
  • Rename this new layer “Noise Reduction“.
  • Make sure that the new layer is selected, then in the “Filters / Noise” menu, choose “denoise“.
  • Zoom in on a faint area of the nebula that has details and where noise is more noticeable. Use the “Luminance” setting to find a suitable compromise between noise reduction and loss of details. For example, you can set the luminance slider to 20%.
  • Click “Apply“.

Noise reduction has been applied to the whole image. We’ve seen that the noise was less noticeable in the bright areas. It would be interesting to apply the noise reduction only in the darker areas and then keep all the details in the bright areas.

You can achieve this by setting the blending options of the “Noise Reduction“layer. Indeed, we can indicate that the bright areas of the layer “Noise Reduction” become transparent. By doing so, the underlying layer “Clarity” which retains all the finest details, remains visible for that part of the image.

  • Select the “Noise Reduction” layer.
  • At the top of the Layer Panel, click on the gear icon “Blend Ranges“.

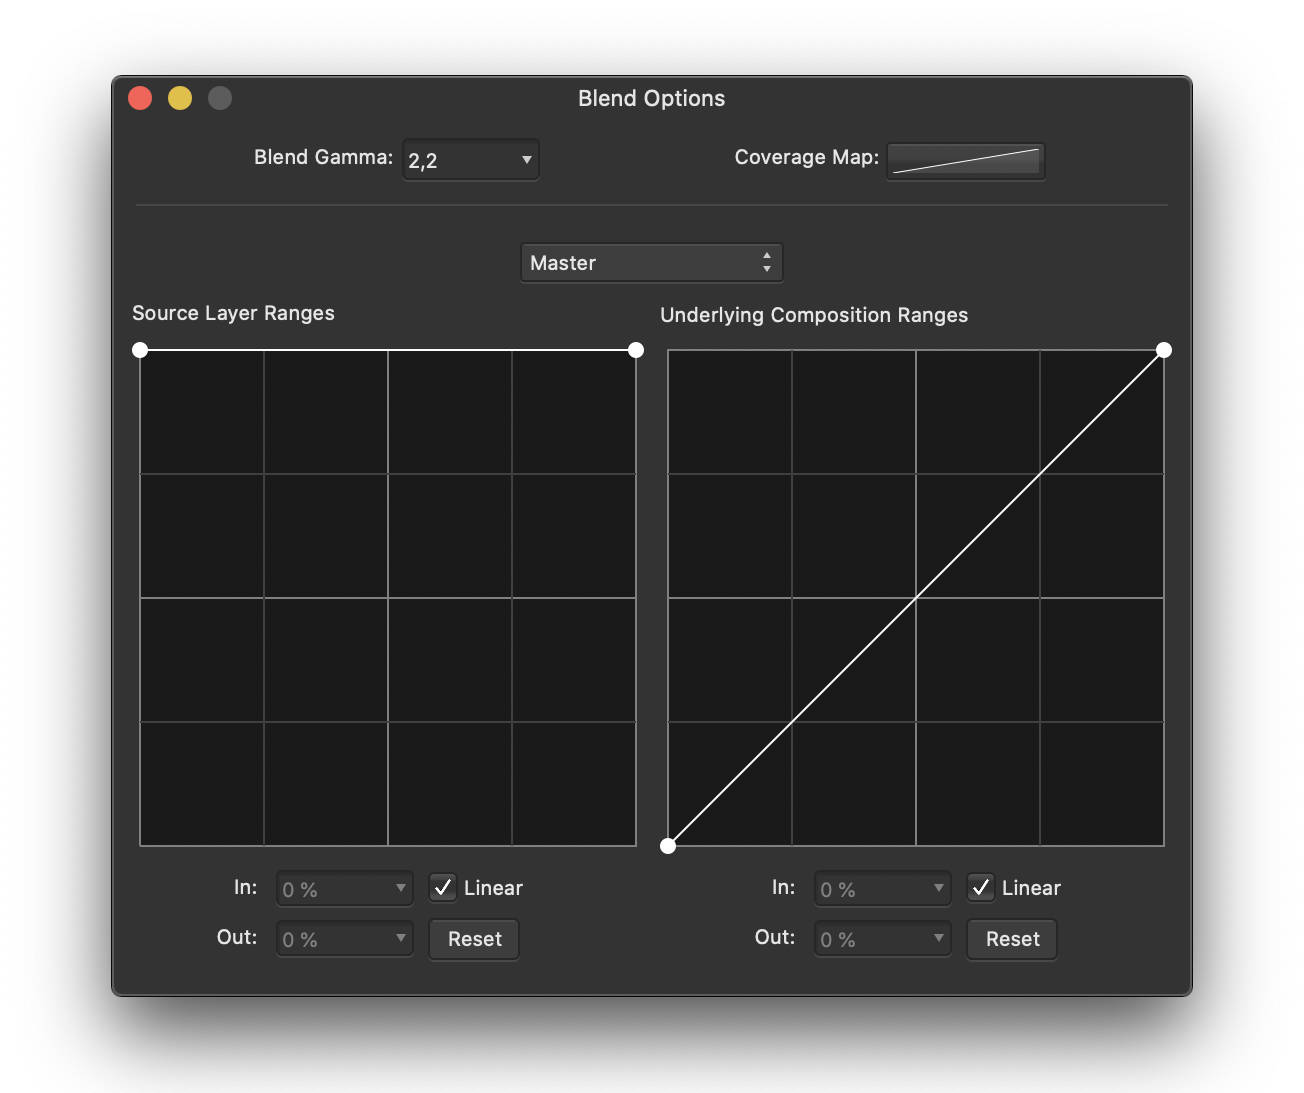
The Affinity Photo setting panel that opens shows two graphs that look like the tone curves we are now familiar with. They work similarly. Let’s pay attention to the diagram on the right “Underlying Composition Range“. It allows you to specify which tone ranges (black, dark, light, white) should become transparent (more or less) to show the underlying layers.

Like the tone curve graph, the left part of the diagram refers to dark tones and the right side to light tones. Our goal is to make the lighter parts transparent. Then the “Clarity” layer appears through only for the brighter areas, and the “Noise Reduction” layer remains visible on the darker areas where it is most useful.

  • Click on the control point at the top right of the graph (the one that affects the white areas) and drag it downwards.
  • Once at the bottom, slide it to the left as well. Watch the image to control how the noise varies to find the right setting.

The noise reduction layer no longer affects the highlights.

  • To ensure the “Noise Reduction” layer affects all the darker areas, slightly move the control point at the top left of the curve (shadows) to the right.

The graph should look similar to the illustration below.

Fig 8. Blending options to be applied to the "Noise Reduction" layer.

Fig 8. Blending options to be applied to the “Noise Reduction” layer.

This step is complete. The figure below compares the image between the beginning and end of Step 3.

Fig. 9 comparison before/after step 3.

Step 4: Adjust the colors

We have now reached the most creative step that will allow you to personalize your image with Affinity Photo.

So far, our Orion Nebula is quite pale compared to the images we are used to. Let’s enhance the colors and adjust them to get a look that suits us.

  • Select the upper layer “Curves Adjustment“.
  • Click the “Adjustments” icon at the bottom of the Layers panel and choose “Vibrance” from the drop-down menu to add a “Vibrance” adjustment layer.
  • Move the “Vibrance” and “Saturation” sliders to their maximum values.
  • Click on the “Adjustments” icon at the bottom of the Layers panel and choose “Selective Color” from the drop-down menu to add a “Selective Color“adjustment layer..

The “Selective Color” adjustment layer allows you to apply color changes to a specific hue. Since the Orion Nebula is mostly red, we will work mainly on this hue.

  • In the Selective color setting panel, select “Red” from the top color drop-down menu.
  • Set the “Cyan” slider to -100% (to remove cyan in red tones), the “Magenta” slider to +50%, and the “Yellow” slider to +100% to add each of these tones in proportion to the red tones.
  • In the color menu, choose “Magenta” then set the sliders to “Magenta” and “Yellow” to + 100%.
  • Eventually, in the Colors menu, choose black and place the “Black” slider at +5% to slightly darken the sky background and to add more contrast to the image.

At this point, the nebula appears quite pink, and we would like it to be more reddish. We can add a second “Selective Color” adjustment layer whose effects will cumulate with the first one.

  • Click on the “Settings” icon at the bottom of the Layers palette and choose “Selective Color” from the drop-down menu to add a “Selective Color” adjustment layer.
  • Select the color red from the menu and set the Cyan slider to -15%, Magenta to +35%, and Yellow to +100%.

The values given above for color correction are an example, and it is up to you to define how you want the nebula to look.

This step is complete. The figure below compares the image from the beginning and the end of step 4.

Fig. 10 comparison before/after step 4

Step 5: Put the finishing touches

Our nebula now looks very different from what it was on the smartphone or tablet display while we were observing with STELLINA: it is more detailed.

There are still some defects that we can try to eliminate or mitigate.

To begin with, the edges of the image show defects related to the capture. Let’s crop the image to remove the altered areas.

  • Select the “Crop” tool from the left side toolbar (Figure 2), then adjust the frame and click on Apply.

he lower right corner of the image still shows a kind of unsightly halo. Let’s dim it by applying a dark gradient over it.

  • Make sure that the top layer “Selective Color Adjustment,” is selected. At the bottom of the Layers panel, click on the “Add Pixel Layer” icon (see figure 2).

A new empty layer is added to the stack. Rename it “Gradient”.

  • Select the “Gradient” layer.
  • On the left toolbar, select the “gradient” tool (see figure 2).
  • On the image, draw a short gradient from the lower right corner to the upper left corner at about 1/6th of the diagonal.

A control point is available at each extremity of the gradient to choose the color.

  • Select the control handle on the bottom right corner of the image.
  • Activate the “Color” panel in the right-hand setting panels and select the black color for this control point.
  • Select the second control handle. Select the black color and a 0% opacity.
  • Adjust the position of the second control point so that the gradient covers only the concerned area, without masking the wisps of the nebula.
  • Now reduce the opacity of the “Gradient” layer to about 40%.

This step is complete. The figure below compares the image from the beginning and end of step 5

Fig. 11 comparison before/after step 5

Should we go further?

We can now consider that the processing of the Orion Nebula image from STELLINA’s 16-bit TIFF export on Affinity Photo is complete. We have managed to get a more detailed image, with colors that are quite natural. We have also preserved the heart of the nebula, which highlights many details.

When it comes to image processing, the users can be tempted to go further to see more colors, more details, accentuate further details and colors. How do you know when you should stop?

There are no laws or rules regarding image processing. However, a good indicator that the image processing is sufficient is that the image looks natural. Further processing will result in the details being more detailed. Yet, the result may not look natural even to the untrained eye. Furthermore, too much image processing may accentuate the defects in the image.
Experimenting and comparing your results with others is the key to learn how far you can go.

To end this tutorial, here is a way to improve the image a bit more while keeping the ability to balance this improvement in case you have regrets (and without having to start the processing over again).

  • Temporarily disable the “Gradient” layer.
  • Right-click on one of the layers to select the contextual menu and choose “Merge visible“.
  • Place the newly created layer between the “Gradient” layer and the “Selective Color adjustment” layer.
  • Select the new layer and rename it “Extra peps“.

We are going to use the tone mapping persona again to enhance the details on this layer.

  • In the top toolbar, click on “Tone mapping persona“.
  • Set the tone compression to 0% and the local contrast to about 20%.
  • Click “Apply“.
  • Activate the “Gradient” layer again..

By doing so, we have just created a layer of the image with enhanced sharpness. But we have also accentuated the defects.

To balance the effect, we can adjust the opacity of this layer to more or less blend with the underlying layers.

We can also set the blending options for this layer to affect only the highlights of the image where the details actually are and preserve the dark areas where defects are more easily visible. Proceed in the same way as you did with the “Noise Reduction” layer by adjusting the blend ranges.

Here is what the curve might look like:

fig.12: blending option settings for the "Extra peps" layer

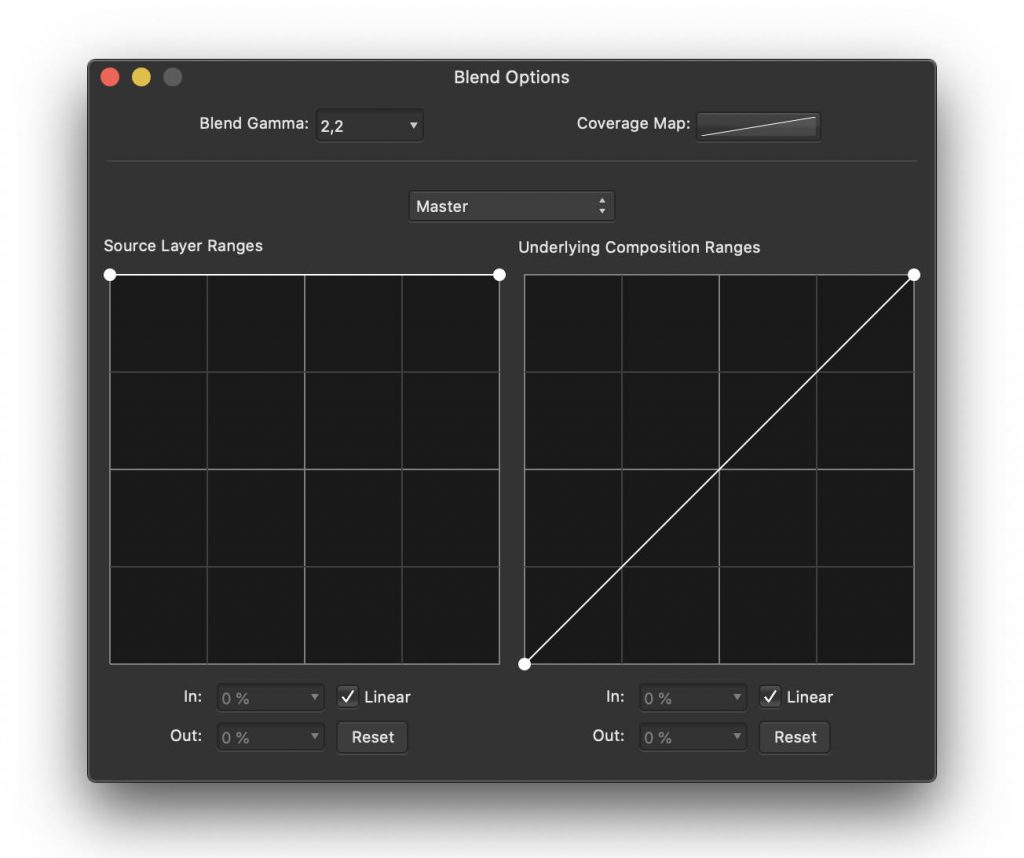
fig.12: blending option settings for the “Extra peps” layer


Congratulations, you’ve reached the end of this tutorial! Don’t forget that each celestial object is different and will require custom settings. The more time you spend on Affinity Photo, the more experienced you will become and you will see progress. Ask for feedback from fellow amateur astrophotographers.  

Please share the results of your work on social networks and in the #myStellina Facebook group.

  • To save your Affinity Photo working file, choose “Save As” from the file menu.
  • To export your image for sharing, select “Export” from the file menu.

You can download the Affinity Photo file (NB: the photo is in low resolution) used in this tutorial by clicking here..

Tips & News

Saving, sharing and editing Vaonis smart telescope images

Whether you are a beginner excited to share your exploration of the universe or a more experienced and demanding amateur astronomer, Stellina and Vespera got you covered and can satisfy everyone’s expectations.
Three methods are available to save, share, and edit the results of your observations.

ABSTRACT
1. JPEG for instant results: save or share what you see on your screen
2. TIFF for manual image processing: raw images that you can edit by yourself
3. FITS for astrophotography experts: stack and process raw images yourself


Horsehead Nebula

The HorseHead Nebula captured with Vespera. Image processed from the exported file in 16-bit TIFF. Image credit: Sébastien Aubry

For a better understanding

STELLINA and VESPERA run a real-time image stacking process. While you are observing a celestial body, the smart telescope keeps capturing new images and adds them to a “stack” to build up the final image you are visualizing. This is a commonly used process in astrophotography. Its goal is to improve the quality of the final rendering by reducing noise (a spurious signal generated by the electronics of any sensor that is randomly distributed over the image) and by highlighting the faint areas. For this reason, the longer you observe, the more the image quality improves, as shown in the video below.


fig.1: As your observation keeps progressing, STELLINA improves the image quality in real-time.

In this article, we will call each individual image that is captured and stacked together a “frame”.

Other than the very first image displayed when the observation station starts capturing, you can’t see the unstacked single frames, but only the image built up from all the pictures that have been added to the previous stack. However, it is possible to retrieve all the single frames for a specific use, as you will see later.

Each single frame refers to an exposure of ten seconds (unless you specify another setting). When the Singularity App recommends an observation time of 30 minutes (1800 seconds), this means you will have to collect 180 ten-seconds exposures (1800 divided by 10).

Note: The Moon, the planets, and the stars available via the Stellinapp object index are displayed live. There is no stacking done on these objects.

1. JPEG for instant results: save or share what you see on your screen

Overview

The image displayed on your smartphone or tablet is the result of the stacking process carried out by the smart telescope software in real-time. Our image processing algorithms automatically improves image quality and help enhance the details.

How to save the file?

Click on the “Image” icon on the top right corner of the Capture tab. You will get several options (figure 2).

fig. 2: The Image menu and its export options

fig. 2: The Image menu and its export options

You can:

  • Share Vespera and Stellina images currently displayed right on social networks,
  • Save the image in Singularity,
  • Save the image into your mobile device’s photo album.

If you plan to edit or share the image later, we recommend that you save your photo in your device.

You can save your smart telescope images at any time during your observation. You can also automatically save all generated images by plugging a USB memory stick into the battery compartment (for Stellina)  or into the telescope internal memory ( Vespera).

How to use the file?

After your observation, you may be tempted to edit your image to improve the colors or try to bring out more details.

In case you want to edit the image in a graphics software, please note that the actions you can perform are limited and may degrade the image quality. There are several reasons for this:

  • Jpeg images have already been processed.
  • Images are saved in JPEG format: in order to reduce the weight of this well-known format, a digital digital compression is applied. This compression leads to barely perceptible changes to the pixels of the image. Running a deep processing on a JPEG image will bring out those imperfections (sometimes called “compression artifacts”) and eventually degrade the image quality (Figure 4).

In order to get a better image than what you see on the screen, Singularity offers a second format you can use to pursue manual image processing: TIFF files.

Artifacts caused by JPEG compression

Fig. 4: Zooming in on the detail of an image. On the left: raw image – On the right: JPEG compression where artifacts appear (for example, around the stars).

2. TIFF for manual image processing: raw images you can edit by yourself

Overview

While you are observing, STELLINA automatically processes the captured images to provide you with bright, high-contrast, and detailed rendering.
However, the celestial objects you can observe, whether they are star clusters, galaxies or nebulae, have different features: they are more or less bright, more or less contrasted, with variable colors and show fields more or less dense with stars.

As Vespera and Stellina applies automatic processing on the images, it is not possible to handle each object’s specific feature. However, it is often possible to get better quality images by running out the image processing by yourself. This requires some learning and time, but the experience is fun, and the results can be very satisfying.

Figure 5 – Comparison between the image displayed on the screen and the result of TIF export processing.

As stated above, the images saved with the previous method can only be slightly improved. Stellinapp offers you an alternative option: the ability to export the image of your observation in a format suitable for advanced image processing: the 16-bit TIFF.

Note: This format is not available for the Moon, planets and stars available via the Stellinapp object’s index.

How to save the file?

To activate this option, you must first enable it in the app. Go to Profile > Gear icon > Settings > Enable TIFF export (figure 6).

You’ll now see the TIFF export option when clicking on the Image icon in your Capture tab during an observation.

The TIFF files will be saved on the internal memory or USB stick each time you click on “TIFF export” during the observation. Alternatively, you can save it in the photo album or a folder of your mobile device, transfer it directly to your computer or send it via email if you have an Internet connection. When you stop your observation, the smart telescope save a TIFF file as well.

fig. 6 : TIFF export options in STELLINA settings.

fig. 6 : TIFF export options in STELLINA settings.

How to use the file?

The TIFF export allows you to retrieve an image which is the equivalent of a RAW file for a DSLR camera. The telescope will automatically stack the single frames, but its image processing algorithm won’t apply and the image will remain untouched. It is raw data. The image is not compressed; therefore, the file size is more significant. It also has a higher dynamic range (number of different shades that can be rendered): 16 bits versus 8 bits for a JPEG file.

The TIFF file can be edited with any graphic design softwares such as Photoshop, Gimp, Affinity Photo, Luminar. You can also use this type of file with astrophotography dedicated software such as PixInsight.

3. FITS for astrophotography experts: stack and process raw images yourself

Overview

The images retrieved with the previous methods are a result from the automatic stacking process performed by the smart telescope in real-time during an observation.

It is possible to automatically save each single frame that builds up the stack. The purpose of this method is to manually stack the unit images by yourself to have better control over the process. This action can be performed with software dedicated to astronomical image processing such as Deep Sky Stacker.

The automatic stacking is elaborated. For example, it rejects single frames which do not comply with the required quality (tracking issues, wind, vibrations…). When it comes to saving the FITS files, the rejected frames will also be saved, allowing the users the option of using them or not.

Yet, processing the FITS files manually requires much experience and good knowledge of astrophotography. If the manual stacking is not correctly done, the final image may have a lower quality than the TIFF export made by STELLINA. Besides, it takes several hours to process.

How to save the file?

The FITS files are saved on a USB drive (Stellina) or in the internal memory  (Vespera). Go to the instrument widget and choose “file format”. Then select “RAW images ( FITS)”.

The automatic saving of FITS unit images can generate a huge amount of data. If you plan to capture several celestial objects in one night or to make very long exposures, we recommend you purchase a USB drive with at least 32 GB.

Note: This format is not available for the Moon, planets and stars available via the Stellinapp object’s index.

How to use the file?

The FITS format is widely used in amateur astronomy, as well as in the scientific field in general. Its distinctive feature is to be able to store “visual” as well as other information. However, this type of file is not usually supported by standard graphic design software and can only be opened with specific astrophotography software.

About “dark files”

During the manual stacking process, astrophotographers commonly generate images called “darks” in addition to images of the star itself. Darks are pictures taken while the telescope aperture is obstructed so that no light can reach the sensor. One would expect to get a completely black image (hence the name “dark”). Actually, this type of image contains a weak signal generated by defects of the sensor. For example, it can be hot pixels. The signal of the “darks” is subtracted from the images of the celestial body. Proceeding this way removes the glitches generated by the sensor on the final image.

Does Vaonis smart telescope take darks?
During your observation, Vespera and Stellina does not generate darks by default. When the telescope automatically applies its algorithms, it uses a predefined dark pattern that characterizes the sensor’s spurious signals and does other corrections through various processes.
If you wish to use “dark” images in your manual stacking process, you will have to capture them by yourself by activating the “expert mode”.

In a nutshell:

JPEG TIFF FITS
Audience All Intermediate Expert
Processing Automatic Manual, to be done Manual, to be done
Stacking Automatic Automatic by STELLINA Manual, to be done
Compression Yes (destructive) No No
File size About 1 Mb from 20 Mb to 150 Mo (CovalENS) from 13 to 24 Mo
Backup Smartphone, tablet, internal memory, USB stick Smartphone, tablet, computer, internal memory, USB stick internal memory, USB drive
Softwares Any photo editing software Photoshop, Affinity Photo, Luminar … DeepSkyStacker, Registax, PixInsight, SIRIL, IRIS …
Tips & News

Betelgeuse: the story of a mysterious Star

Betelgeuse could have remained just a star among stars. On December 8th 2019, though, an unusual decrease in brightness surprised astronomers worldwide. A decrease in intensity such as this had not been measured for 25 years. Ordinary classified as the tenth brightest star in our skies, Alpha Orionis has currently dropped to the nineteenth place! Is this peculiar occurance a premonitory sign of an upcoming supernova event? Let’s recap the story of the well-known star.

Sky-map of the Orion Constellation. Source: Stellarium.

The star of the stars?

Prior to the December 2019’s dimming event, Betelgeuse has been one of the most studied stars of our sky. For more than a century, astronomers have been fascinated by it and it has been compared to the rest of the stellar population in our galaxy.

Astronomer John Herschel was the first to witness the changing behavior of this star in 1836. The alternating, changing phases of brightness were later verified during the 20th century, and Betelgeuse became part of the semi-regular variable stars category: a type of star that displayed noticeable periodic intensity changes and whose cycle and amplitude vary in time. A property we will explain later in the article.

This red super-giant was not originally famous for its variable properties, which are very well-known in stellar astronomy, but for its angular diameter. Although Betelgeuse is at a distance of more than 400 light-years, its radius is about 1000 times larger than the Sun’s, which levels it up to the largest star visible in the starry sky! A superlative that was kept until 1997 when a larger angular diameter value was measured on the R Doradus star.

Image of Betelgeuse taken by ALMA. The star is here compared to the size of the Solar System. Credit:
ALMA (ESO/NAOJ/NRAO)/E. O’Gorman/P. Kervella

A star with a large angular diameter is very interesting if we want to observe details on its surface. Whereas the majority of the stars can be considered as infinitely small dots which are impossible to view with our telescopes, Betelgeuse has an angular diameter large enough to be noticeable with optical instruments!

Moreover, Betelgeuse was the first star (other than the Sun) to get an experimental estimation of its linear diameter, carried out with the recently-invented interferometric method. To do so, physicists Albert Abraham Michelson and Francis Gladheim used the Mount Wilson observatory telescope in 1921 and ended up with an angular diameter of 0.047”.

By combining light from several telescopes to increase angular resolution in the sky, this instrumental method is now being used by the most advanced astronomical observatories of the world, such as the VLTI (Chile) and CHARA (USA).

The popularity of Alpha Orionis does not rely only on this pioneer study. Betelgeuse was once again at the forefront in 1995 when the Hubble Space Telescope unveiled the very first direct image of the surface of a star.

View of the surface of Betelgeuse as captured by the Hubble Space Telescope (1995). Credit : A. Dupree (CfA), R. Gilliland (STScI), FOC, HST, NASA

In recent years, a handful of images using more developed instruments and techniques were captured. In 2017, the Atacama Large Millimeter/Submillimeter Array (ALMA) provided what is still the sharpest image of Betelgeuse ever.

A strange dimming behavior

The way Betelgeuse is getting dimmer doesn’t align either with the observations that have been gathered for the past 25 years or with the most recent theoretical models. Until now, astronomers have noticed that these brightness variations between magnitudes 0.0 and +1.3 could come from two coupled phenomena:

  • The first one would have a ~400-day-cycle and would be caused by the pulsation of the star’s atmosphere.
  • The second, whose period is much longer – a bit more than 5 years – would be the result of the motion of huge convective cells on the surface of Betelgeuse. The latter theory is likely to be tested within few months, in response to the great interest shown by worldwide observatories towards the recent changing state of Betelgeuse.
Evolution of brightness of Beltegeuse as of February, 10th 2020. Source: @Betelbot

Is Betelgeuse about to explode?

The cataclysmic phenomena of Supernovae is without a doubt fascinating for mankind due to its rarity and of the spectacular show it provides. Indeed, the most massive stars of our Galaxies like Betelgeuse should end the life releasing part of their matter in the form of luminous energy. A star with such bright intensity could be visible in a daytime sky for several weeks. The 1504 supernova from French astronomer Charles Messier’s catalog (M1) would be a historic example of a supernova humans were able to witness. The Crab Nebula was born from it.

Infrared image of Betelgeuse photographed by an adaptive optics system at the VLT. It shows giant structure of circumstellar gaz around the photosphere (2009). Credit:
ESO and P. Kervella

Nevertheless, today’s astronomers are not entirely convinced that a simple and progressive dimming in brightness will result in an immediate explosion of Betelgeuse. Observing light variations coming from the surface only does not necessarily contain all the information of the change that could occur inside the stellar core. Betelgeuse will very likely end up in a supernova. Even if it is currently getting dimmer, astronomers still struggle to equate this change as an indicator that could inform exactly when this explosion may occur.

Certainly no hypothesis is entirely off the mark, and professional astronomers as well as amateurs should be ready at anytime. Betelgeuse has not unveiled all its secrets yet, and could still surprise us as it has in the past. So, observe this red super-giant while it is still possible!

Photographing Betelgeuse with the STELLINA smart telescope

Betelgeuse is so bright in the sky that you can observe it in many ways: with the naked eye, using a pair of binoculars or a telescope… In order to give STELLINA‘s users the possibility of monitoring the variations in the red supergiants’ brightness, the Vaonis team added the star to its catalog of objects in its February 2020 software update (MAJ Stellinapp 1.17). Users are now invited to follow the evolution of the star over the weeks or months, in the hope of witnessing an exceptional supernova.

Betelgeuse STELLINA
Betelgeuse captured by the STELLINA smart telescope in February 2020
Tips & News

STELLINA x Gitzo

After several years spent looking for the perfect stand (tripod) for our space travel companion, we are pleased to announce our new partnership!
What company was the worlds’ best to create a tripod reflecting the aesthetics and quality of STELLINA as well as the ethical values of Vaonis? Our mission and high standards led us to meet the world’s most respected tripod manufacturer: Gitzo.

In September 2019, Vaonis teamed up with the Gitzo brand to equip all of its STELLINA observation stations. Renowned for its excellence, this historical brand is considered the world’s best tripod manufacturer. All Gitzo products are made with high quality materials and assembled by hand in Italy, north of Venice. Combining its French origins with Italian design, Gitzo offers state-of-the-art camera stands using innovative materials such as lightweight, high-strength aluminum alloys to ensure stability and efficiency.

When design meets excellence

A tripod inspired by the Systematic range

Despite their vast range, the specific needs of astronomical instruments required working to design a unique model in the world entirely dedicated to STELLINA. After many echanges and a meeting with Gitzo’s R&D team, the GT3520S-VS model, inspired by the Systematic range, was born.

Systematic is Gitzo’s top range of tripods, perfect for professional photographers using long lenses and heavy equipment. Systematic tripods are the strongest and most stable tripods, they are also modular and can be quickly set up in different configurations both as photography or videography supports. Made with 100% Carbon fibre eXact tubes and innovative design they represent all Gitzo’s high quality and performance. Systematic accessories can be used to adapt to any situation or environment.

Design of a made-to-measure tripod

With its extraordinary stability and perfect aesthetics, this tailored tripod perfectly illustrates the collaboration between 2 brands and their search for perfection.

The first necessity was to reduce the length of the tripod’s legs to increase its stability.

Subsequently, the team’s work focused on tailor-made finishing of aluminum parts injected at low pressure. This injection technique significantly increases the mechanical quality of the part, preventing the appearance of air bubbles that could weaken it. This piece was then treated specifically to get closer to the visual identity of STELLINA.

The next step focused on the bubble level.  If it was too close to STELLINA, visibility in a dark environment could be poor. We decided to create a custom level plate apart so that the bubble level is easily visible during installation.

Finally, the screw tightening locking levers were carefully studied to make their use simple and easy while guaranteeing the overall rigidity of the tripod.

After many prototypes and exchanges between teams of engineers and designers, STELLINA’s ideal partner was created.


STELLINA’s tripod zoom-in

The Gitzo Series 3 Systematic Tripod is a powerful, 3-section, professional carbon fibre tripod designed to safely hold longer lenses and heavy cameras. It is the perfect combination of minimal weight, durability, and uncompromising stability. The tripod weighs only 1.93kg and secures an impressive payload of 25kg. It reaches from as low as 9cm up to 130cm and folds down to 61cm. A highly reliable, versatile solution that’s easy to take anywhere, this model features Gitzo’s Carbon eXact tubes with G-Lock Ultra twist-locks that solidly connect the leg sections and protect them from dust and dirt damage. New, ultra-stable, removable feet make this support even more secure. With a top leg diameter of 32.9mm, this Series 3 model is the perfect choice for exacting professionals who want to travel light but require the adequate levels of stability for professional equipment.


Carbone eXact
The new Carbon fibre eXact tubes are revolutionary and even stiffer to maximize rigidity and image stability. Carbon eXact optimizes the fibre composition for each tube size.

Removable Feet
This functionality allows you to easily replace used feet and to put other attachments such as spikes.

G-Lock locking system
Gitzo entirely redesigned its G-Lock system. G-Lock Ultra offers new ergonomic and resistance performances. It brings a smoother use and efficiently protects the tripod from dust.

Tips & News

Spring-Summer 2019: Astronomical events not to be missed!

For astronomy lovers, the end of winter means the beginning of a new Milky Way season. However, stargazers will need to wait mid-spring to meet the suitable conditions for Milky Way observation. Here is our selection of the best moments you should not miss, from objects to catch through your binoculars or telescopes, to major astronomy events.


A Galactic triplet – March 2019

Leo Triplet. Credit: Philippe Durville

Observing several galaxies within a same field-of-view is not usual. You must already know the famous M81 M82 couple, visible in the winter sky. But, have you ever heard of this 3-spiral-galaxy-composed cluster – M65, M66 and NGC 3628 ? It is called the Leo Triplet, located in the constellation owning the same name. This 3-in-1 target always provides curiosity to observers whatever their skill level. Although they are distant 35 million light-years away from us, these galaxies reveal a lot more details in photography. A fascinating object not to forget!


The Sombrero Galaxy – April 2019

Sombrero Galaxy. Credit: NASA, ESO , NAOJ, Giovanni Paglioli – Processing: R. Colombari

Between the Virgo and the Corvus constellations, a deep sky object is hiding away: in contrast to the majority of face-on galaxies we can usually observe, M104 can only be seen from the side. Using a small-diameter telescope, this strange orientation enables us to focus on its dust line which make up its galactic plane. Located at a distance of 29 million light-years, this 8th-magnitude diffuse galaxy reminds the shape of Mexican hat. Can you see the sombrero too?


The Beehive stellar Cluster – April 2019

M44. Credit: Bob Franke

The Beehive Cluster (M44), also known as Praesepe is a stellar group within the Cancer constellation, composed of relatively young stars whose age is estimated to 600 million years. As a comparison, our Sun is much older, about 4.5 billion years. This wide and bright open star cluster covers a region of the sky which could contain 3 full moons, and shines with a 3.7 magnitude. Easily detectable to the naked eye as a scattered spot, a telescope will unveil its beauty. Notice that an image helps to make out the different colors of the stars, from blue to orange.


The Pinwheel Galaxy – May 2019

M101 galaxy

Located in one of the most popular constellations, Ursa Major, the Pinwheel Galaxy (or M101) is a face-on spiral galaxy. Evolving at 20 million light-years away, this aggregate is made of about one billion of a billion of stars and is about twice as wide as our Milky Way. Featuring a poor brightness, it is recommended to capture it with a telescope in order to identify its spiral arms and internal structures clearly.


The Great Globular Cluster in Hercules – June 2019

M13. Credit: Adam Block, Mt. Lemmon SkyCenter, U. Arizona

M13 is the most brilliant globular cluster we can observe from the Northern hemisphere. A refractor or reflector telescope will emphasize the natural beauty of this target! Containing more than 100 000 suns, its density is so high that it remains difficult to resolve its individual stars to the naked eye. Hercules cluster is part of the unavoidable summer targets to observe and photograph.


The Ring Nebula – July 2019

M57. Credit: H. Bond et al., Hubble Heritage Team (STScI /AURA), NASA

Despite its small angular size and low brightness – 8.8 magnitude – M57 is a planetary nebula which can surprise your mind with its sharp and contrasted edges, both in visual astronomy and astrophotography.  Resulting of a dying star’s explosion, planetary nebulae emit light in a peculiar way: by spectral lines – or colored lines. The highest throughput line is found in the green and is associated to a specific chemical element: Oxygen III. This Oxygen line fits almost perfectly to the highest sensitivity color of the human eye. Therefore planetary nebulae are always spectacular to observe in a telescope, compared to galaxies.


Total Solar Eclipse – July 2nd 2019 (South America)

This image shows the totally eclipsed Sun during the eclipse of 9 March 2016. Credit: ESO/P. Horálek/Solar Wind Sherpas project

Total solar eclipses will forever remain the most popular astronomical phenomenon all over the world. On July 2nd, only observers based over the Pacific Ocean, Chile or Argentina will be able to enjoy it. To join the event, we invite you to follow the adventures of Astroguigeek, editor for Vaonis, during his trip to Chile in partnership with the European Southern Observatory (ESO).


On the Moon Again – July 12/19 2019

On the Moon Again international event

For the 50th anniversary of the first men on the Moon, an international celebration event was launched by French scientists. On the Moon Again event invites telescopes owners to install their instruments on a corner of a street or in a public park to give the opportunity to anyone to look at the beauty of the Moon.

The mission of this event without borders is the occasion to celebrate the date of 12 July 1969, when 600 millions people around the world followed the most extraordinary moment in space exploration. So, will you be part of this event? More details here.


The Eagle Nebula – August 2019

M16. Credit: MPG/ESO (main image); NASA/ESA/STScI (Hubble); VLT/ISAAC/AIP/ESO (near-infrared)

Summer is the best time to enjoy the Milky Way, and more particularly its bright galactic bulge. In this region, a dozen of objects can be easily visible with a simple binoculars. Among them is the magnificent Eagle Nebula (M16), in Serpens constellation. In its core, a region of interest can be found, called the “Pillars of Creation” originating from a famous Hubble’s picture. This accumulation of hot and dense gas fall down by themselves because of gravity. The energy released is then used in the formation of sun-like stars.
With a small telescope, the Eagle nebula still reveals about twenty stars.


The Summer Triangle – August 2019

Although this geometric shape is an unofficial constellation, it serves as a useful indicator if you are looking for the position of the Milky Way in summer nights. Once you recognize the 3 stars forming it – Deneb in Cygnus constellation, Altair in Eagle constellation and the giant blue Vega in Lyra – this triangle informs you that our galactic arm is passing by Deneb and cutting the fictive line Altair-Vega.


The Perseids Meteor Shower – August 13 2019

Night of the Perseids. Credit: Petr Horálek

This year, the activity peak of the Perseids meteor shower (one of the most popular stargazing annual event) will take place on the night of August 12 to 13. The moon will shine strongly – 94% illuminated – but the brightness of the meteors will be high enough so that their burning phase in the atmosphere will not be compromised by natural light pollution.

Tips & News

Stellina honored with a Red Dot Design Award

The Stellina smart telescope receives the highest award from Red Dot Design, the most prestigious product design competition in the world.

Stellina Red Dot Design Award Best of the Best 2019

Vaonis is thrilled to announce that its revolutionary Stellina telescope won the Red Dot Design Award, “Best of the Best” in the Photography & Equipment category, on March 25, 2019. This is the 4th design prize awarded to Stellina, after the Observeur du Design (2018) and the Janus de l’Industrie (2017 and 2018). By winning this prestigious award, Stellina will gain further international recognition. The product, whose design is widely acclaimed by both professionals and the amateur public, also received the CES Innovation Award in the same category in January 2018, which recognizes the best technological innovations.

The Red Dot Design Award, a world-renowned distinction

The Red Dot Design Award is an international design competition for product and communication design, whose origins date back to 1955 in Germany. Receiving more than 6,000 applications every year through 48 categories of products, it is the most prestigious design competition in the world. The jury comprises some 40 international experts who test, discuss and evaluate the quality of each product on the basis of criteria such as the degree of innovation, aesthetics, functionality, ergonomics, durability or symbolic and emotional content. Award-winning products are presented at an annual ceremony and then exhibited at the Red Dot Design Museum located in Essen (Germany), and at the Red Dot Museums in Singapore and Taipei.

The Best of the Best honor is awarded for ground-breaking design and is the top prize in the Red Dot Award Product Design competition. This prize is reserved for the best products in a category. Last year, only 1,1% of all entries (69 products over 6000+) received this honor.

Behind the design: the story of Stellina’s inspiration

The design of this new generation telescope, whose idea emerged in 2013, is the result of a collaboration with Ova Design, an industrial design agency specialized in the study of usability and user experience. Based in Paris, the company has been rewarded for several of its achievements with prizes such as L’Observeur de Design, the Janus de l’Industrie or CES Innovation Awards. In 2014, Cyril Dupuy had already imagined Stellina in the monoblock form that we now know. The creator of the next-gen telescope asked Ova Design to help refine a few details of the design. The design team quickly identified the product vision desired by Cyril Dupuy, as well as its requirements and constraints. Through their research and hard work together, they have made Stellina one of the most innovative and aesthetic products in its category.

« We wanted to break with conventional telescopes. Stellina is a new generation of telescope, and as such we wanted a unique form factor. When closed, it has a refined and simple shape, which comes to life automatically as soon as the optics arm opens to position itself in the direction of the stars to be observed. We wanted to create a surprise when Stellina unfolds. The object wakes up and comes to life, the connected object becomes a companion to help its users live a new viewing experience.

Voluntarily there are few buttons on the product (only one in fact) a way to show the ultra-simple and guided use. The identity of the object makes it accessible to everyone, it does not have an over technological appearance (like conventional telescopes), it is a robotic object but it is not scary.

We also wanted to add the notion of autonomy and simplicity of use. Both can be found in the very sleek form and in the overall user experience. And above all, we wanted a little mystery in this new technological object, its monolithic shape attracts attention when closed, as does the blue ring that acts as the button.

To sum up, it was in robotics that we found inspiration combined with high precision technology and the elegance of a unique silhouette. »

Benjamin Sabourin & Nicolas Marquis
Co-founders of Ova Design

Our online buy steroids store specializes in delivering steroids across the US.