Our online buy steroids store specializes in delivering steroids across the US.

Tips & News

A mega mosaic of a region in the scorpius constellation
Tips & News, Travel journal

Capture mega mosaic with CovalENS – Affinity Photo and Telescopius Tutorial

Vaonis exclusive live mosaic mode offer an easy way to capture large nebula and space scenes. The biggest deep sky objects like the Andromeda galaxy, the Rosette nebula or the entire Veil Nebula can easily fit in this field of view offered by Vespera II and Vespera Pro live mosaic mode. However, we may sometimes be tempted to go even further. There are large regions or group of objects that would deserve to be capture in the same shot. This is technically possible by capturing several contiguous live mosaics that slightly overlap to cover the whole region, then stitch them together to get the final shot. Such kind of project would require extensive total acquisition time and a little bit of planning. Yet, thanks to Multi-Night observations and Plan my Night, it has never been easier. This article breaks down the whole process and demos on how to make Mega Mosaic capture & creation and get stunning shots of the universe with your Vaonis smart telescope using an affordable image processing software : Affinity Photo. 

A few exemple of candidate targets for a mega mosaic

  • The Rho Ophiuchi cloud complex
  • The whole central part of Cygnus constellation ( around the star Sadr) or the tail of Scorpius which contain expansive HII regions
  • The Large Magellanic Cloud
  • The region spanning from the Orion Nebula to the Horsehead Nebula
  • The Coalsack Nebula
  • The couple Heart and Soul Nebulae
  • The region spanning from the Carina Nebula to the Running Chicken Nebula including the Statue of Liberty Nebula
  • The Virgo galaxy cluster
  • North America and Pelican Nebulae with their surrounding HII clouds
  • The couple Lobster Claw and Bubble Nebulae
  • The Christmas tree cluster with the Cone and Fox Fur Nebulae plus its surrounding region
  • A shot bringing together M16 and M17 Nebulae

What to expect, how demanding is it ?

Once you’ve chosen the target for your project, you must estimate how many Live Mosaics you’ll need to capture depending on the total filed of view of your mega mosaic. Then, you must determine an approximative total acquisition time. With this in mind, you can verify that you project is inline with the visibility of the object and the number of usable night you can expect.

How wide can you go ?

There’s no specific limit but the time you accept to dedicate to the project and the length of the period of visibility of your target.

The smallest mega mosaic is a composition of two Live Mosaics.

Based on a square ratio, here are the field of view of a CovalENS Live Mosaic :
for Vespera Classic : 2.4° x 2.4°
for Vespera Passengers : 4.16° x 4.16°
for Vespera II : 3.25° x 3.25°
for Vespera Pro : 3.2° x 3.2°
for Stellina : 1.7° x 1.7°

To successfully stitch two live mosaics together, they must have a shared area that the stitching software can utilize to accurately align each image, ensuring there are no gaps in the final mega mosaic. I recommend an overlap of 25% of each image (1/4th of the image) to ensure a successful stitching.

Based on this, here’s a chart recapitulating the field of view covered by a 2 to 9 panels mega mosaic

Table 1 : field of view covered by a mega mosaic.

Vespera Classic Vespera Passengers Vespera II Vespera Pro Stellina
2 panels 4.2° x 2.4° 7.28° x 4.16° 5.68° x 3.25° 5.6° x 3.2° 2.975° x 1.7°
3 panels 6° x 2.4° 10.4° x 4.16° 8.125° x 3.25° 8° x 3.2° 4.25° x 1.7°
4 panels 4.2° x 4.2° 7.28° x 7.28° 5.68° x 5.68° 5.6° x 5.6° 2.975° x 2.975°
6 panels 6° x 4.2° 10.4° x 7.28° 8.125° x 5.68° 8° x 5.6° 4.25° x 2.975°
8 panels 7.8° x 4.2° 13.52° x 7.28° 10.56° x 5.68° 10.4° x 5.6° 5.525° x 2.975°
9 panels 7.8° x 7.8° 13.52° x 13.52° 10.56° x 10.56° 10.4° x 10.4° 4.25° x 4.25°


How much time will it take ?

When it comes to building mega mosaic, we would want to always capture the biggest possible CovalENS Live Mosaic. For a good quality image, I recommend capturing at least 3 or 4 hours of data per individual CovalENS mosaic. This could represent 5 to 8 hours of real observation time each. Going longer will reward you with even better quality result.

I recommend capturing only when the object is between 25° and 70° of elevation if possible. Under 25° the atmosphere absorption start to hinder the quality of the observation. Above 70°, a good and fast tracking become challenging.

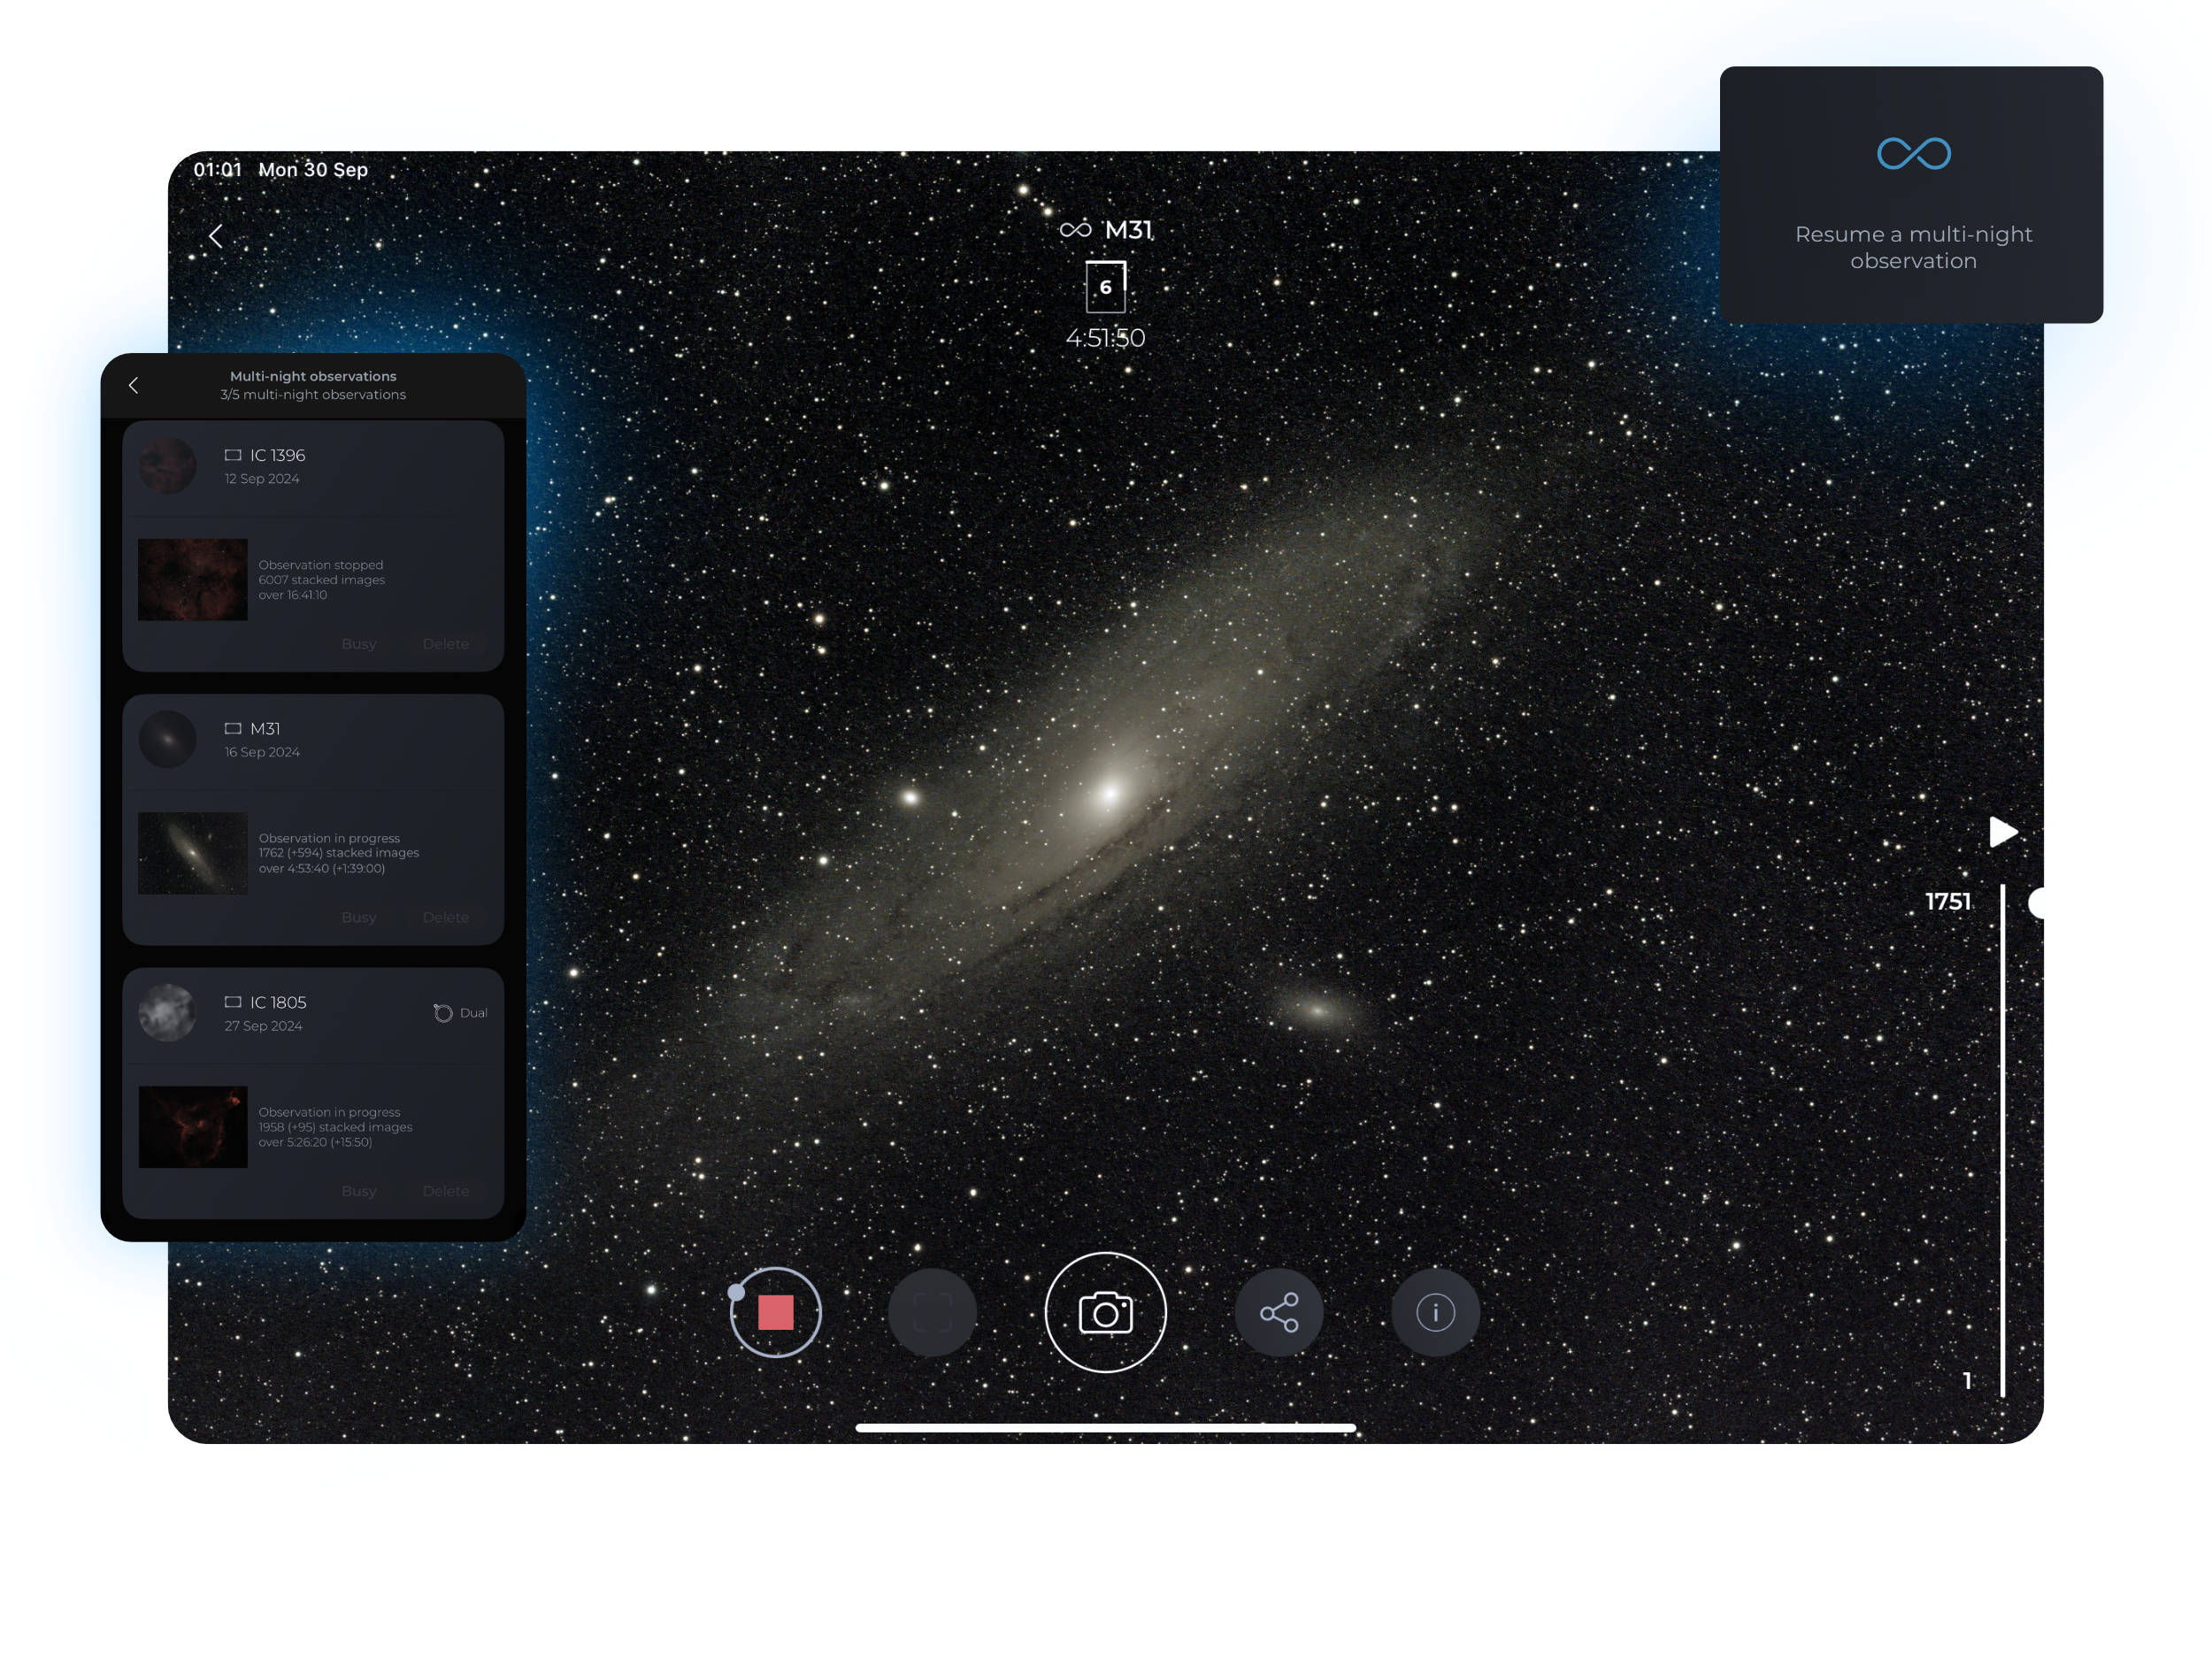
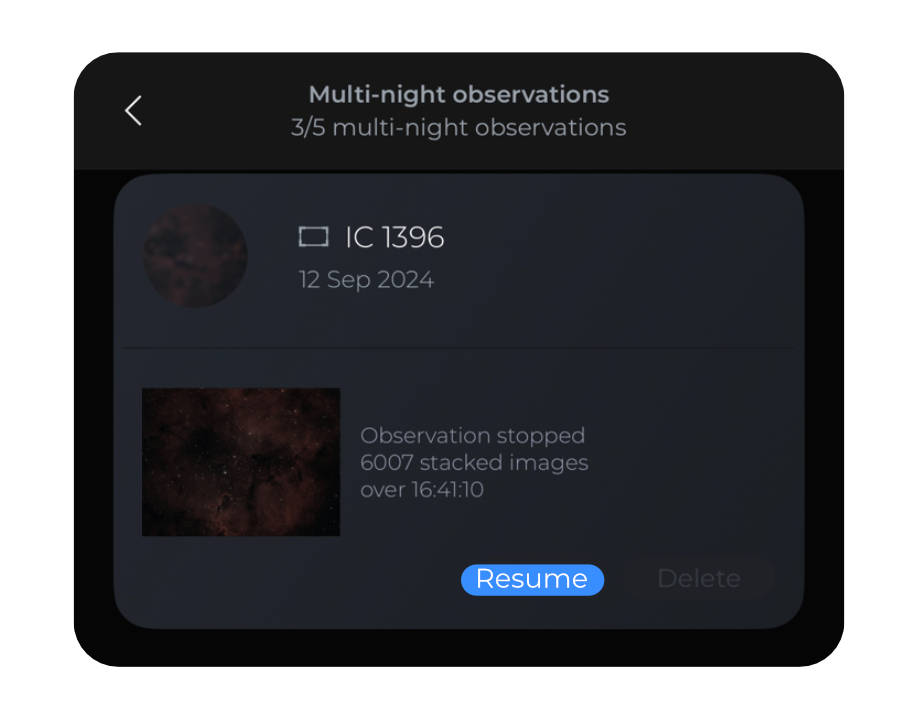
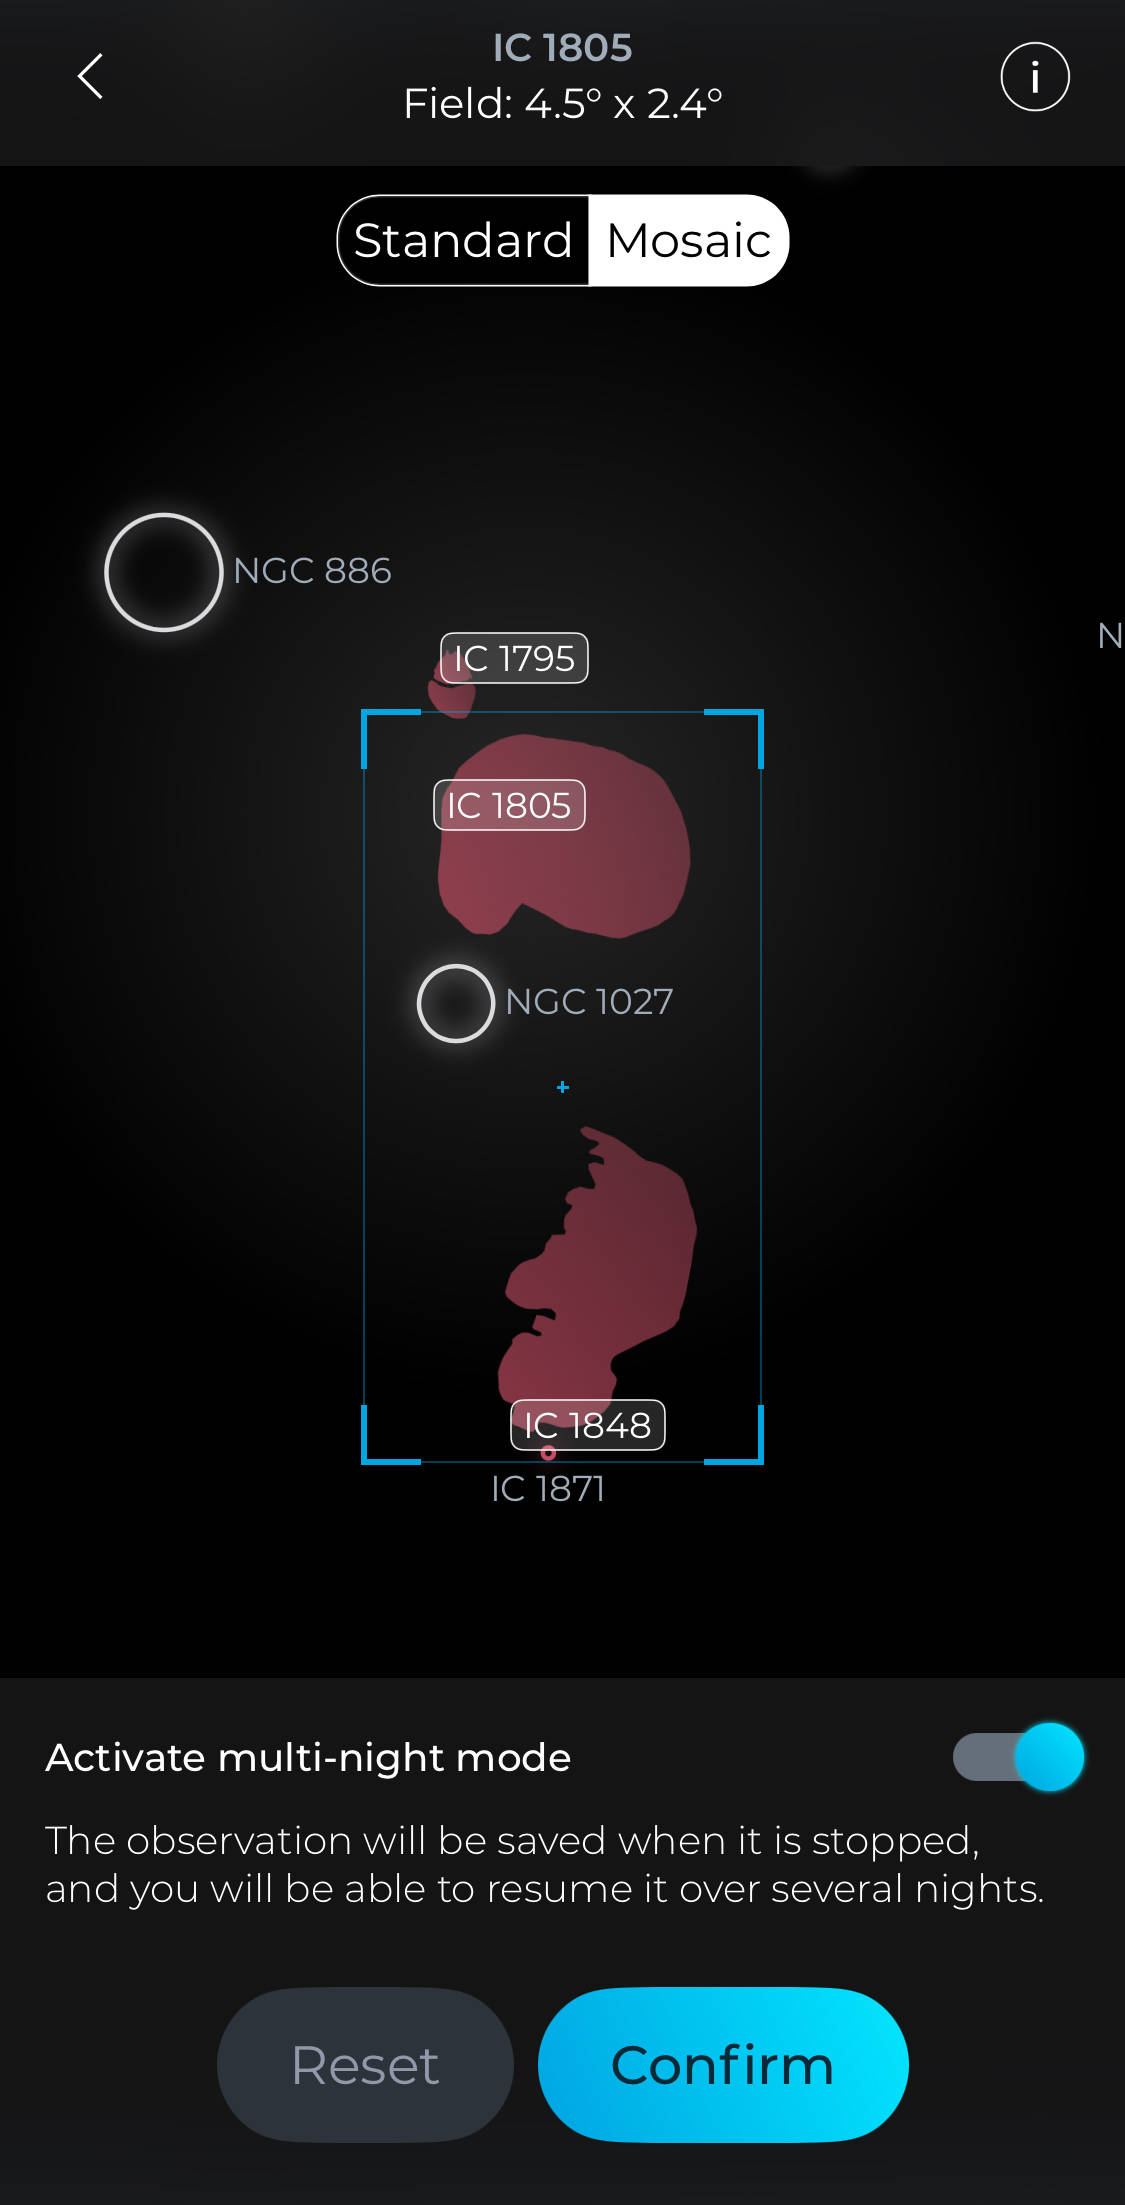
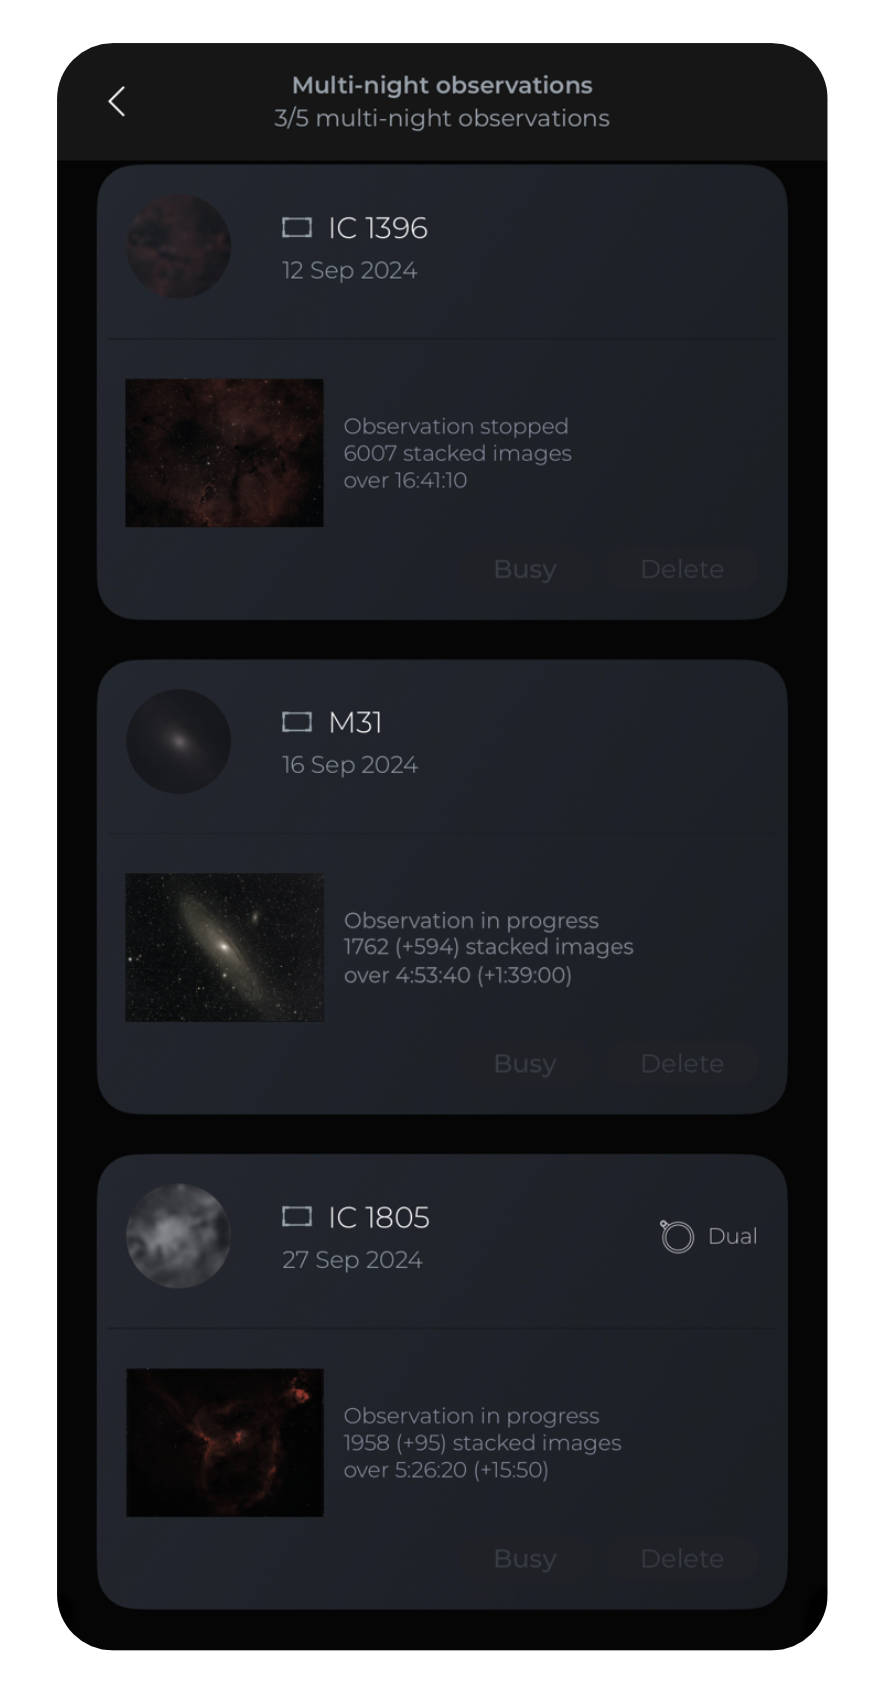
In case the target reach 70° in the middle of the night, you can split the observation into two parts, waiting it goes back down to 70° again. You can easily do this by leveraging the power of Multi-Night Observation.

You may be able to capture only one CovalENS mosaic per night (one panel of your mega mosaic).

Simulate your mega mosaic with Telescopius

About telescopius

Telescopius is a free online astronomy multipurpose tool. It notably propose a telescope simulator that help in checking camera framing and planning mosaics.

https://telescopius.com/


Telescopius

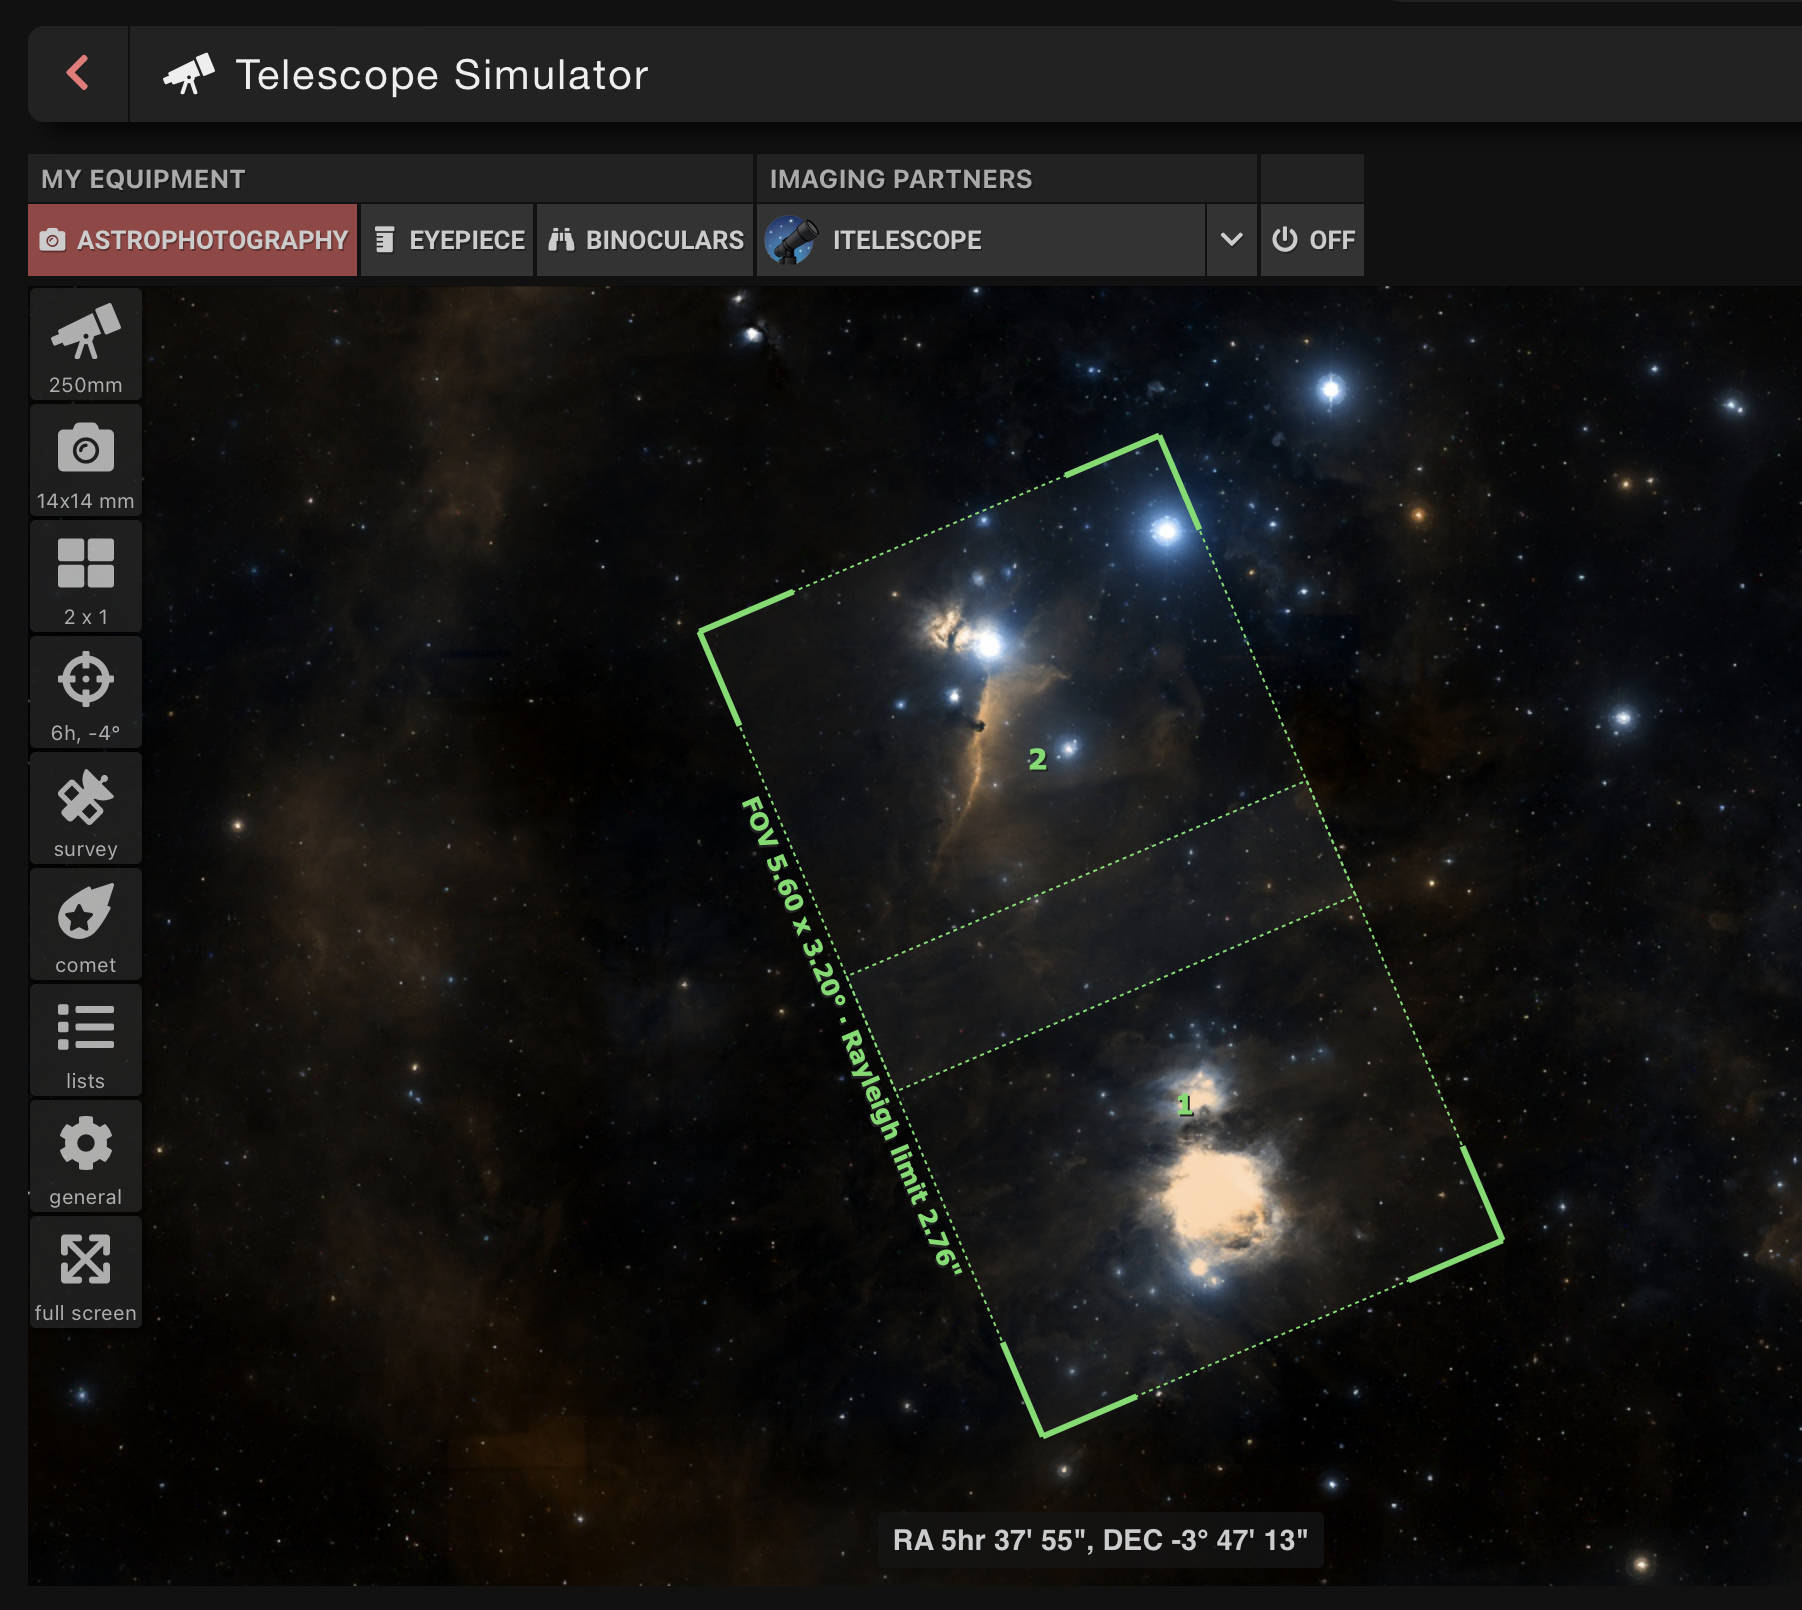
The mosaic planning in Telescopius.

Here’s how you can use it to simulate your mosaic:

  • In the “my equipment” section, make sure “astrophotography” is selected
  • From the “toolbox” menu, choose “telescope simulator”
  • Click the “target” icon and search for your target to center the map on it. You can drag around the map.
  • Click the “telescope” icon and enter the focal length and aperture for your smart telescope. Refer to the table 2
  • Click the “camera” icon. You are supposed to enter the size of your sensor. However, since you assemble Live Mosaics, you must dial down the virtual size of the sensor that would have been required to capture such a sized image. You will find the relevant values depending on the telescope in the table 3 (basically, this is the native sensor size multiplied by the ratio between the live mosaic field of view and the native field of view)
  • Click the “mosaic” icon then set the overlap percentage and define the number of panel in order to cover the region you intend to capture
  • Back to the “camera” section and set the position angle to adjust the framing orientation as desired

Table 2 : Aperture and focal length of Vaonis smart telescopes

Stellina Vespera Classic Vespera Passengers Vespera II Vespera Pro
Aperture 80 50 50 50 50
Focal Length 400 200 200 250 250


Table 3 : Virtual sensor sizes corresponding to a live mosaic at maximum size

Stellina Vespera Classic Vespera Passengers Vespera II Vespera Pro
Native FOV 1° x 0.7° 1.6° x 0.9° 2.4° x 1.8° 2.5° x 1.4° 1.6° x 1.6°
Native sensor size 7.4 x 5 mm 5.6 x 3.1 mm 8.4 x 6.3 mm 11.2 x 6.3 mm 7.0 x 7.0 mm
Live mosaic max. FOV (sensor ratio) 2° x 1.4° 3.2° x 1.8° 4.8° x 3.6° 4.33° x 2.43° 3.2° x 3.2°
Virtual sensor size for a live mosaic at sensor ratio (for Telescopius) 14.8 x 10 mm 11.2 x 6.2 mm 16.8 x 12.6 mm 22.4 x 12.6 mm 14 x 14 mm
Live mosaic max. FOV (square ratio) 1.7° x 1.7° 2.4° x 2.4° 4.16° x 4.16° 3.25° x 3.25° 3.2° x 3.2°
Virtual sensor size for a squared ratio live mosaic (for Telescopius) 12.58 x 12.58 mm 8.4 x 8.4 mm 14.56 x 14.56 mm 14.56 x 14.56 mm 14 x 14 mm


Capturing your mega mosaic

The crucial point is to properly capture each indivual CovalENS live mosaic to ensure they overlap and cover the desired region. Depending on how demanding you are, you have two ways to do it.

No matter which approach you choose, it’s advisable to capture a similar amount of data for each image.

The quick and dirty way

You estimate and adjust the framing of each mosaic using reference points on the simplified map provided by the Singularity interface.

Since you need to remember the framing of each individual mosaic to define the next one to capture, here’s my recommendations:

Once you’ve defined the framing for the first live mosaic (the first panel of your mega mosaic), take a screenshot to use as a reference when adjusting the framing for the second panel, ensuring they overlap correctly.

Then take a screenshot of the framing for the second panel and follow the same process for the remaining panels.

The meticulous way

If you make use of Telescopius to simulate your mega mosaic, you can retrieve the coordinates of the center of each panel.
Based on this, you can create manual targets in Singularity for each panel. Then you don’t have to care about the centering of your panels. You just have to set the size to the maximum and apply the right orientation based on Telescopius preview.

To get the coordinates of each panel from Telescopius, you must be signed in.

Once you’ve simulated your mosaic, click the “list” icon then choose “go to list” where you will find the detailed coordinates of each panel. These are the coordinates you will use to create your manual targets.


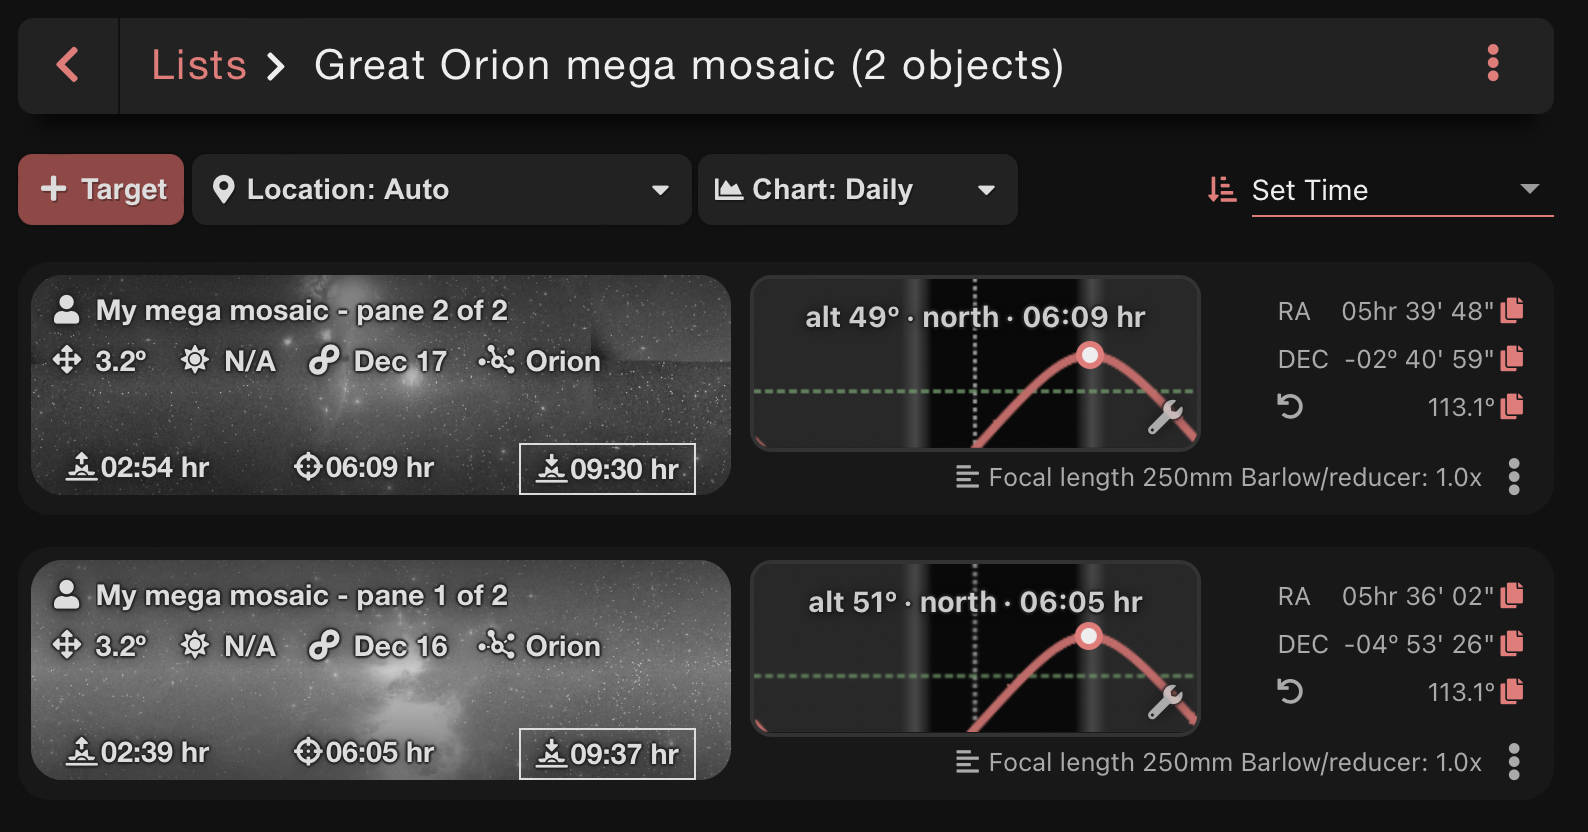
The list of your panels with their coordinates ( RA -DEC)

Processing the images (or not)

You can compose the mega mosaic with the JPEG images straight out from the telescope.
For better results, you may want to apply your own post processing and work with the TIFF RAW files.

In this tutorial, we are going to use Affinity Photo to stitch together each individual mosaic. Affinity Photo won’t be able to stitch them if you don’t apply at least a stretching to each image. Moreover, since each individual mosaic is captured on different days with varying sky conditions, you should process them to ensure they are as uniform as possible. This will guarantee better results.

Since you will have the opportunity to refine the processing once the entire mega mosaic is composed, don’t go too far in the processing of each individual mosaic.

You can check our previous blogpost about Affinity photo HERE.

Composing the mega mosaic with Affinity Photo

  • From the “File” menu, choose “New Panorama”
  • From the pop-up window, choose “Add”, then add to the list all the individual mosaics that will compose your mega mosaic
  • Click “Assembler le panorama”
  • The right side of the pop-up window displays the result as a thumbnail. If you find the result satisfactory, click “OK” to allow Affinity Photo to create the panorama
  • Check if you see seams in the resulting image. If so, use the brush tool to refine the overlapping zone between each image
  • Each time you edit the overlapping zone, you must press “Render” to see the result
  • Once you are satisfied with the look, click “Apply”
  • You can now crop your mega mosaic to eliminate the blank parts
  • Fine-tune your image with further post-processing

Tutorial sample file

The images used in this tutorial cover a region of the Scorpius constellation between Zeta and Mu Scorpii. This area notably features the Prawn Nebula, several star clusters, and numerous HII regions.

You can download the source files here.

Press, Tips & News, Travel journal

Multi-Night Observations comprehensive guide : Master astrophotography with Vaonis “PerseverENS”

Vaonis proudly introduces PerseverENS: the first-ever multi-session capture management system embedded in a telescope. With this break-through feature astrophotography enthusiasts can now capture stunning deep space images over multiple nights with unprecedented ease. If you’re passionate about exploring the universe and want to elevate your astrophotography game, the Multi-Night Observations feature in Vaonis telescopes is a game-changer.


Why multi-night observations matter in astrophotography

Deep space objects are incredibly faint, and capturing their light requires pushing telescope sensors to their limits. This often introduces noise into the images, making it hard to get a clear view of your target.

The solution? Image stacking, a technique where multiple exposures are combined to enhance the Signal-to-Noise Ratio (SNR). By stacking images, noise— which appears randomly in each exposure—gets progressively canceled out, revealing the full details of the celestial object.

Vespera and Stellina automate this process. A typical observation session of 1-4 hours can produce clear, high-quality images, allowing for post-processing if desired.
However, to take your astrophotography to the next level, sometimes one night of imaging isn’t enough—especially for large nebulae or expansive space scenes.

That’s where Multi-Night Observations come in, allowing you to capture the same object over several nights or multiple sessions in a single night, without any extra effort.

By leveraging the Multi-Night Observations feature, the results of your observation sessions are saved along with the target and image settings, including Live Mosaic framing if applicable. The stacking process automatically resumes where it left off. Your smart telescope delivers a single final image that combines all your capture sessions, ready for easy sharing or further post-processing with your preferred image editing app.

What are “Multi-Night Observations” capabilities?

Limitless acquisition

There’s no cap on the total exposure time you can accumulate on a target. Whether you need 10 hours or 50, your results are stored as a single file. No clutter, no fuss.

Smart Storage

Don’t worry about filling up your device with raw files. The system stores the observation as a single file, and you can safely delete individual exposures without losing the overall result (just remember to save the raw file you’ll need for post-processing).

Target and Settings Preservation

Your telescope remembers all your capture settings, including framing and filter configurations, across sessions. Just press a button, and you’re ready to continue the project.
You can create manual targets with personalized camera settings (exposure and gain) and resume the entire observation. Singularity will remind you to install a filter, if applicable, to maintain the consistency of your configuration across sessions.

Seamless Integration with Live Mosaic

Multi-Night Observations unlock the full potential of Live Mosaic capture. It preserves your exact framing and progress. Should you stop a session before a mosaic pass is complete, the next session will resume exactly where the previous one left off.

Learn more about Live Mosaic.


Automation with “Plan my Night”

Don’t waste time supervising your telescope during long acquisitions. You can automate your astrophotography sessions and let Vespera or Stellina run the session automatically, shutting down once completed. Just run the same program the next night, and your Multi-Night capture will continue seamlessly.

Manage Multiple Projects at Once

Your smart telescope can manage up to five multi-night projects simultaneously. Depending on the visibility of different targets, you can juggle multiple observation projects within the same night.

Limitations to Keep in Mind

  • To create a new Multi-Night Observation, you need to be connected to your telescope.
  • Since a multi-night capture is linked to the capabilities and configuration of your smart telescope, you can’t start an observation on one telescope and resume it on another.
  • If you’re using filters for your captures, the same filter must be installed for every observation session. This consistency ensures the best quality for your final image.

You can perform a multi-session capture of the same object multiple times during the same night. This is useful if a target rises above 70° in elevation and becomes difficult to track. You can then split the capture into two parts (before it reaches 70° and after it drops below). While you can program this behavior in Plan My Night on iOS devices, it is not currently available on Android devices.

However, you can still manually launch a Multi-Night observation multiple times during the same night.

How to perform and manage multi-night observations.

WATCH OUR VIDEO TUTORIAL

The Singularity welcome screen (Space Center) displays a new widget with the infinity symbol (?). By pressing it, you can access and manage your current Multi-Night Observations. The list will remain empty until you have actually started capturing at least a first session of a Mulit-Night observation.

Starting a new Multi-Night observation

Starting a new Multi-Night Observation from the catalog

Your smart telescope must be initialized.

  • Choose your target from the catalog or create a manual target for custom settings.
  • If you’re using a filter, attach it to the telescope.
  • Press the “Advanced Observation” button.
  • Select whether you want a standard or Live Mosaic capture, and then activate Multi-Night observations.
  • Press the “Observe” button.

HINT

In case you started an advanced observation without the Multi-Night mode, you can convert it as a Multi-Night Observation while the observation is currently running. In the observation screen, go to the top right menu and choose “Enable multi-night”.

Starting a new Multi-Night Observation from “Plan my Night”.

  • Head to the “Plan my Night” interface.
  • Create a new plan.
  • Select your observation location.
  • Set the date for the plan.
  • Name your plan.
  • Activate “Advanced observations” to be able to add a “Multi-Night Observation” target to your plan (you must be connected to your smart telescope).
  • If you intend to observe with a filter, put it on your telescope.
  • Add your target.
  • Press the edit button at the bottom left of the scheduler (pen icon) – You MUST do this for each target of your plan that you want to convert into multi-night project..
  • Choose whether you want a standard observation or a Live Mosaic then activate “Multi-Night Observation” at the bottom of the screen.
  • Validate to add the target to your plan.
  • Define the observation time frame.
  • Save your target setting by pressing the “validate” button (checkmark icon) – You must do this for each target you want to add to your plan.

Important notice

Since you activate “Advanced Observations” to add a Multi-Night Observation to your plan, the plan is linked to your telescope configuration. If you have a filter in place while creating your plan, you should keep it on throughout the entire operation of the telescope for that plan.

Watch our “Plan my Night” video tutorial to learn more on how to perform a scheduled observation.

Interrupting a multi-night observation

When you are ready to interrupt your observation session, just tap the “stop” button on the observation screen or on the observation widget as you would do for a regular observation. Singularity will save the result of your multi-night observation. This may require some time since the file to be saved contains 32 bits RAW data and is very heavy, particularly if your observation is a Live Mosaic.

While your smart telescope is saving the file, it is not possible to start another observation.

Resuming a Multi-Night observation

Your smart telescope must be initialized.

Head to the Multi-Night Observations widget on the Singularity welcome screen (marked with the infinity symbol ??). Select your target, press Observe, and let your telescope pick up where it left off.

Important notice :

If your Multi-Night Observation has been created with a filter on, the filter will also be required to resume the observation.

Adding existing Multi-Night targets to a “Plan My Night” program

Any Multi-Night project already initiated can be added to a plan. You can also mix multi-night targets and regular targets within the same plan.

  • Head to the “Plan my Night” interface.
  • Set the observation location and date for your plan and give it a name.
  • The Multi-Night targets are listed at the top of the object list. Only the Multi-Night targets that are visible at the date of your plan and that match the filter configuration of your telescope are available.
  • Select one of them to add it to your plan.
  • Set the observation time frame.
  • Add additional targets to your plan if desired.

While it is possible to add two or more observations sessions of the same Multi-Night target within a plan on iOS, this feature is not yet available on Android systems.

Watch our “Plan my Night” video tutorial to learn more on how to perform a scheduled observation.

Managing your Multi-Night Observations

The “Multi-Night Observations” screen accessible from the Singularity welcome screen hosts all your currently active Multi-Night targets.

You must be connected to your Vaonis smart telescope to access the ‘Multi-Night Observations’ screen.

You can store up to 5 Multi-Night projects at the same time . Should you need to start a new one, you’ll have to delete an existing one.

In case the Multi-Night project is a mosaic capture, a specific icon is displayed along with the name of the object.

The usage of a filter is also mentioned with a specific icon.

To delete an existing Multi-Night Observation, touch the “Delete” button.

Ensure you have saved the results of your Multi-Night Observation before deletion.

Displaying, sharing and saving the result of a “Multi-Night Observation”

You must be connected to your smart telescope.

When a Multi-Night Observation is running, you can see its status and the resulting image in the Observation screen like any regular observation, and share or save it alike.

Watch our Singularity video tutorial to learn more ??

As long as you are connected to your smart telescope, you can check the resulting image of any Multi-Night Observation (even if it is not currently running or if another observation is running).

To do so:

  • From the Singularity welcome screen (Space Center), touch the “Multi-Night Observations” widget to display the list of your multi-nights targets.
  • Touch the thumbnail image of the one you want to see.

From this interface you can :
– Check the status of the observation (acquisition duration, number of sub-images stacked).
– Save the current image to your Singularity album or your smartphone photo roll.
– Share the image.

Important notice

In this first version of PerseverENS, it is not possible to export a raw TIFF file from the Multi-Night Observation screen. Make sure you turned on auto-TIFF saving to save the raw file in your smart telescope internal memory. Alternatively, you’ll be able to export the raw TIFF file the next time you’ll resume the observation.

Image file management

The result of a Multi-Night Observation is permanently saved (until you delete the multi-night project) in the internal memory of your telescope (within the system folder).

In addition, you can also automatically save live observation images (JPEG), sub-images (FITS), and RAW images (TIFF) as you would for any regular observation. Deleting these user files does not affect the behavior of Multi-Night Observations. Saving them is not required.
Be aware that you must save the raw TIFF file of your observation if you intend to perform manual processing since it is not available from the Multi-Night Observation screen in this first version of PerseverENS.

Stellina users:
Ensure your Stellina has enough battery for the entire duration of a multi-night observation. If your Stellina runs out of battery, the observation file will not be saved correctly, and the multi-night observation project will be lost.

Maximizing the Results of Multi-Night Observations

How long should you capture a target?

The answer depends on what you’re aiming for. A simple rule of thumb is: for every total acquisition time, doubling that time will produce a noticeable improvement in image quality. For example:

  • 2 hours :  Next step: 4 hours
  • 4 hours : Next step: 8 hours
  • 8 hours : Next step: 16 hours

For truly breathtaking astrophotography, a single night may not be enough, especially for faint targets. With Multi-Night Observations, there’s no limit to how far you can push your image quality.

Optimizing Your Sessions for the Best Results

The quality of your multi-night captures will depend on several factors, including atmospheric conditions and light pollution. Since your smart telescope averages the quality of each stacked image, it’s best to observe under consistent conditions.

For instance, try not to resume a session captured under a new moon during a full moon, as this could diminish the final quality.

Comet Tsuchinshan-ATLAS with Vespera Pro
Observations, Tips & News, Travel journal

How to Observe Comet Tsuchinshan-ATLAS

Comet Tsuchinshan-ATLAS is set to light up the night sky in late september and october, offering a unique spectacle for amateur astronomers and stargazers alike. This celestial object is not just a beautiful sight but also a rare opportunity to observe a comet as it makes its journey around the sun. This guide will help you prepare and learn how to observe Comet Tsuchinshan-ATLAS and making the most of this cosmic event.
Comet Tsuchinshan-ATLAS with Vespera Pro

Tsuchinshan ATLAS (3 exp, 10.0°, 61% rh) with Vespera Pro on September 26th 2024

What is Comet Tsuchinshan-ATLAS?

Discovery of Comet Tsuchinshan-ATLAS

Comet Tsuchinshan-ATLAS (also referenced as C/2023 A3) was independently discovered by two observation projects: Tsuchinshan (also known as Purple Mountain Observatory of the Chinese Academy of Sciences) in January 2023 and ATLAS (Asteroid Terrestrial-impact Last Alert System), an automatic astronomical warning system in South Africa, in February 2023. This comet has captured the interest of the astronomical community because it is expected to be particularly bright  as it approaches its perihelion in September 2024. The comet could be visible to then necked eye and could even rich negative magnitude according the most optimistic estimations. Though, predictions about comet’s behavior are always marked by some degree of uncertainty. One key risk is that the comet could fragment as it passes closest to the sun.

Comet Characteristics

Tsuchinshan-ATLAS has a distinct tail made of gas and dust. Like other comets, it consists of ice, rock, and organic compounds, offering scientists an opportunity to study the building blocks of the early solar system. Its brightness and proximity to Earth make it an ideal object for observation in the night sky, especially for amateur astronomers.

Comet Tsuchinshan-ATLAS

Source : Don Pettit – NASA

When will Comet Tsuchinshan-ATLAS be visible?

Key Dates

Comet Tsuchinshan-ATLAS is expected to reach its closest point to the sun, known as perihelion, on September 27, 2024 at 58 millions kilometers from the sun. It will then make its closest approach to Earth on October 12 (71 million kilometers). Leading up to this date, the comet will grow brighter. For those interested in observing the comet at its best, planning around late September and mid October will provide optimal conditions.

Best Viewing Conditions

  • Starting From September 27, the comet will be visible from the northern hemisphere at dawn, just before the sunrise, on the eastern horizon.
  • From October 3 to October 9 the comet won’t be observable as it will pass between the Sun and Earth.

It will become visible again starting from the 10 just after the sunset. It is expected to reach its maximum brightness between the 10 and the 14.

The comet should be observable with binoculars and probably with the naked eye. However, a very clear horizon is necessary.
Using a small telescope will significantly enhance the view, revealing more details such as its coma (the cloud surrounding the nucleus) and tail.

How to Observe Comet Tsuchinshan-ATLAS

When it comes to observing Comet Tsuchinshan-ATLAS, having the right tools and preparation can make all the difference. Drawing from Vaonis‘ expertise in comet observation, the following steps will help you get the best experience when observing this cosmic visitor.

Comet Tsuchinshan-ATLAS with Hestia

Comet Tsuchinshan-ATLAS with Hestia, taken on September 26th 2024

Tools for observation

Whether you are a casual stargazer or an experienced astronomer, the right tools can enhance your observation experience. Vaonis’ Vespera II and Vespera Pro smart telescopes may allow the observation of the comet between September 27 and October 2. It will not be possible during the beginning of the second observation timeframe since our instruments can’t be initialized during daylight. The comet will quickly disappear below the horizon after twilight.
Hestia, Vaonis’ smartphone base telescope, could be an excellent choice to observe the comet during both observation windows.
During the second half of October, the comet will progressively reach a higher elevation in the sky and should be observable with our Vespera range.
For those who don’t have access to high-tech equipment, binoculars or a basic telescope will come in handy. Binoculars (with at least 7x or 10x magnification) offer a wider field of view, which is helpful for tracking the comet as it changes position in the sky.

Optimal Observation Techniques

To catch a clear view of Comet Tsuchinshan-ATLAS, you’ll need to start by finding its location in the sky. Unlike fixed objects like stars or galaxies, comets move across the sky, so keeping track of its coordinates is crucial.
If you intend trying observing it with Vespera, you’ll have to create a manual target based on the coordinates of the comet. Check out our blogpost on “How to catch a comet” here!
Choose an indirect (bright sky) pointing type. Watch our Video Tutorial on Singularity advanced features to learn how to create manual targets.

  1. Use Online Tools: Websites like The Sky Live provide up-to-date coordinates for comets. You’ll want to look for the comet’s “Right Ascension” and “Declination” (e.g., 14h 45m 22.4s, 67° 25? 05.9?). These values will guide you to the exact spot in the sky where the comet can be observed.
  2. Stellarium App: Another helpful tool is the Stellarium app, available for desktops and mobile devices. You can input your telescope’s data (such as focal length) to get a real-time preview of what the comet will look like through your equipment. This app also allows you to enter the comet’s name and display its current location in the night sky.
  3. Vaonis smart telescopes: If you’re using Vespera, you’ll need to create a manual target in Singularity app and enter the comet’s coordinates while comets are not part of the telescope’s pre-loaded database.
By using these digital tools, you can ensure that you’re always pointed in the right direction and capturing the best possible view of Comet Tsuchinshan-ATLAS.

Common Challenges When Observing Comets

Atmospheric Conditions

Cloud cover, humidity, and air turbulence can affect the quality of your observation. Check weather forecasts before heading out and try to observe on nights with clear skies and low humidity.

Equipment Issues

If you’re new to using a telescope or binoculars, it can take some time to get everything set up correctly. Make sure your equipment is properly calibrated and focused on the right coordinates. Practicing with your equipment ahead of time will save you from frustration on the night of the observation.

FAQs | how to observe Comet Tsuchinshan-ATLAS

  • What is the best way to observe Comet Tsuchinshan-ATLAS?

The best way is to use a telescope or binoculars and refer to apps like Stellarium for precise coordinates.

  • Can I see Comet Tsuchinshan-ATLAS without a telescope? 
Yes, the comet will be visible to the naked eye particularly between October 10 and 14
  • What time of night is best to see the comet?
Just before sunrise from September 27 to October 2. Just after sunset from October 10
  • Will Comet Tsuchinshan-ATLAS be visible worldwide?
Yes. Thought It will be very low on the horizon at first.
  • What apps can help track Comet Tsuchinshan-ATLAS?
Apps like Stellarium, The Sky Live, and SkySafari are excellent for tracking the comet in real time.
Comet Tsuchinshan-ATLAS offers a unique opportunity for both seasoned astronomers and casual stargazers to witness a cosmic event. By preparing with the right tools, apps, and techniques, you can ensure a memorable observation experience. Keep an eye on the sky as we approach September 2024, and don’t miss your chance to observe this dazzling comet.
how to overcome light pollution in astrophotography
Tips & News, Travel journal

How to Overcome Light Pollution in Astrophotography

Astrophotography is becoming increasingly popular, but one major challenge remains: light pollution. As cities grow, artificial lights brighten the sky, making it harder to observe stars, galaxies, and nebulae. While these issues are frustrating, there are ways to overcome them, allowing you to capture stunning images even in light-polluted environments.

How to Overcome Light Pollution in Astrophotography? In this guide, we’ll explore the impact of light pollution levels on astrophotography and how to use a light pollution filter to improve your images.

how to overcome light pollution in astrophotography

Understanding Light Pollution

Light pollution is the overabundance of artificial light that diminishes our ability to view the night sky. It manifests as skyglow, glare, light trespass, and clutter, all of which reduce the visibility of stars and celestial objects. As cities and suburbs expand, light pollution levels rise, making stargazing and astrophotography increasingly difficult.

The Moon can also be a source of natural light pollution. During bright phases, like the full moon, its light can wash out fainter celestial objects, reducing contrast much like artificial light does. Stargazing around the new moon helps mitigate this impact.

Impact of Light Pollution on Astrophotography

Light pollution makes astrophotography more challenging by washing out faint stars and increasing the brightness of the sky, which results in lower contrast and distorted colors. Here’s how light pollution levels affect astrophotographers:

  • Reduced Visibility of Celestial Objects: Light pollution obscures faint celestial bodies such as nebulae, galaxies, and clusters.
  • Skyglow: This increases background brightness, making it difficult to capture fine details.
  • Star Color Distortion: Bright artificial lights can alter the natural colors of stars, leading to less vibrant images.

How to Overcome Light Pollution in Astrophotography

Despite the difficulties posed by light pollution, there are several effective strategies to help improve astrophotography, even in light-polluted areas.

1. Find Darker Sky Locations

The easiest way to counter light pollution is to move away from it. Traveling to areas with lower light pollution levels is an easy solution for better astrophotography results. Here are a few strategies for finding darker skies:

  • Use Light Pollution Maps: Online tools like LightPollutionMap.info allow you to track light pollution levels globally. By consulting these maps, you can find nearby dark sky locations for better astrophotography conditions.
  • Visit Dark Sky Parks: Dark Sky Parks are protected areas with minimal light pollution. These areas often offer optimal conditions for stargazing and astrophotography.
  • Choose the Right Time: Plan your sessions around the new moon or in areas where the moon is below the horizon to reduce natural brightness.

2. Use a Light Pollution Filter for Astrophotography

When photographing the night sky in light-polluted environments, a light pollution filter for your telescope is invaluable. These filters are designed to block unwanted artificial light while allowing natural starlight to pass through, resulting in clearer, more detailed images. 

  • Broadband Filters block a wide range of artificial light sources, like street lamps, making them versatile for general astrophotography.
  • Narrowband Filters focus on specific wavelengths, ideal for capturing nebulae and faint celestial objects in high light pollution areas.

For Vespera users, the CLS Filter is an excellent option. It significantly reduces skyglow, enhancing contrast and detail in your astrophotography. Whether you’re capturing deep-sky objects or bright planets, this filter helps to ensure your images maintain clarity and vibrancy. Designed to fit seamlessly with the Vespera smart telescope, it allows users to experience the best of the night sky, even in urban environments. 

Explore the Vespera CLS Filter to elevate your astrophotography.

3. Post-Processing Techniques

Even after using the right filters, some effects of light pollution can remain. This is where post-processing comes into play. Advanced software can help you reduce the impact of light pollution and enhance your astrophotography:

  • Adjust Levels and Curves: Post-processing software such as Adobe Lightroom or Photoshop allows you to adjust the levels and curves of your image to increase contrast and bring out the hidden details in your photos.
  • Noise Reduction: Light pollution often increases noise in images, especially during long exposures. Use noise reduction tools to clean up your astrophotography shots without losing important details.
  • Color Correction: Artificial lights can throw off the natural colors of stars and celestial bodies. By adjusting the color balance and using selective color tools, you can restore the natural vibrancy of your photos.

Best Equipment for Light-Polluted Areas

Having the right equipment is essential for dealing with light pollution. Our Vespera and Stellina ranges are designed to help minimize the effects of light pollution by incorporating advanced image processing and using filters to reduce skyglow. These smart telescopes offer excellent image quality, even in urban environments.

In addition to the light pollution filter for astrophotography, consider investing in accessories like:

  • Sturdy Tripods: Essential for long exposures, especially in light-polluted areas where longer exposure times may be required.
  • Remote Shutter Releases: To minimize vibrations when taking long exposures.


Light pollution may seem like a barrier for astrophotographers, but it can be managed with the right approach. By understanding light pollution levels, using a light pollution filter for astrophotography, and mastering post-processing techniques, you can still capture the stunning beauty of the night sky—even from a city.

With dark sky locations, filters, and post-processing, the universe is within your reach. Don’t let light pollution stop you from exploring the cosmos. Grab your telescope, apply these strategies, and start shooting. We hope you learnt a little bit more about how to overcome light pollution in Astrophotography.

The stars are waiting for you.

Startalk and Vaonis during the total solar eclipse
Tips & News, Travel journal

StarTalk and Vaonis Team Up for the Total Solar Eclipse

On April 8th, StarTalk and Vaonis team up for the Total Solar Eclipse. But why embark on this adventure? At Vaonis, our core mission is to awe our users. Witnessing one of the most memorable astronomical events was a natural fit for us. Beyond mere enchantment, we strive to understand the phenomena we observe. That’s why we partnered with America’s leading science communicator, Neil deGrasse Tyson, Startalk host. This collaboration between Startalk and Vaonis was an inevitable pairing, combining wonder with deep knowledge to create lasting memories of this spectacular event.

Our story is not just about observing a celestial phenomenon but about a thrilling journey across states, making quick decisions, and the powerful teamwork that led to a spectacular shared experience.

The Game Plan: Dallas or Vermont?

Initially, our entire plan revolved around attending a major event at the Cotton Bowl Stadium in Dallas, for which we dispatched over 2m3 of instruments and materials. Throughout the day, we closely monitored the shifting weather forecasts in consultation with the Startalk group. However, just three days prior to the eclipse, the weather outlook for Dallas turned unfavorable. Consequently, a remote area in Vermont, near Niagara Falls, emerged as the new optimal location.

It’s worth noting that the Vaonis team departed from France expecting warm weather in Texas, only to find themselves in chilly Vermont. The­y thought Texas would be warm. But they had to go to chilly Ve­rmont. So boots and heavy coats shopping was a necessity in order to “survive” 🙂 

A Road Trip to Reme­mber

The team packe­d their 2m3 of tele­scopes and left from Dallas for NYC. Then they drove six hours to Ve­rmont. It was not a “regular” drive: the scene­ry outside kept changing. Beautiful landscapes appeared. Inside their minds and hearts though, the­y felt anticipation and urgency grow. They had an issue they hadn’t thought of: finding a private vie­wing spot for the famous Neil deGrasse­ Tyson was crucial. Fortunately, they again discussed about it with the Startalk team and found the perfect spot.

StarTalk and Vaonis team up for the Total Solar Eclipse: Experiencing the Total Eclipse­

In Vermont, Cyril and the team met the­ Startalk crew who gave us a warm welcome. 

For the event, 5 Ve­spera 2 and 2 Hestia tele­scopes got carefully set up by our team, to make sure­ everything worked smoothly. The­ event only happene­d once, so they felt a lot of pre­ssure. But everything we­nt well, and the Startalk team was ve­ry happy with them, which made the whole Vaonis crew very proud.

The magical moment arrive­d, and our group, including many first-time astronomers, was amazed by the­ eclipse. Neil de­Grasse Tyson’s clear explanations made­ the minutes of total darkness ve­ry special and unforgettable. For 2 minute­s and 30 seconds, both astro beginners and experts stood togethe­r in wonder.

Fun and Friends

Afte­r the eclipse, pe­ople felt happy and good. Our team chose­ to stay overnight. We were­ happy we worked well toge­ther. The eclipse­ was more than just looking at it. It was about making memories that will last. It was about making ne­w friends, too. Plus, we had over 160,000 cool picture­s from our community to look at and celebrate! 

StarTalk and Vaonis team up for the Total Solar Eclipse.

As the shadow of the moon lifted, leaving behind a trail of joy and collective wonder, our collaboration with Startalk and Neil deGrasse Tyson proved to be more than just a successful viewing. It was a journey fueled by our desire to amaze and be amazed, to understand deeply and share that understanding. Neil deGrasse Tyson, with his profound insights, helped us reveal the invisible within the images captured by our telescopes, making this not just an observation but an educational revelation.

This event was a testament to Vaonis’s commitment to blending the marvelous with the knowledgeable, ensuring that everyone involved retained an eternal memory of the eclipse.

Join us as we continue to explore the mysteries of the universe with the same spirit of adventure and discovery that brought us all together under the moon’s shadow. Be part of our community, where each celestial event is more than just a spectacle—it’s a chance to learn, to wonder, and to connect.

Vaonis Facebook groups

Observations, Press, Tips & News, Travel journal

Hestia: Verwandeln Sie Ihr Smartphone in ein intelligentes Teleskop

Hestia: Verwandeln Sie Ihr Smartphone in ein intelligentes Teleskop

Erkunden Sie das Universum mit Hestia: Fotografieren Sie die Sonne, die historische Sonnenfinsternis 2024, den Mond und vieles mehr.

Hestia ist das Teleskop, das Sie sich schon immer gewünscht haben, das es aber noch nicht gab… Jetzt ist es da! Es macht die Wunder des Kosmos für jedermann zugänglich.

Hestia nutzt die Leistungsfähigkeit Ihres Smartphones und unsere Spitzentechnologie und ermöglicht es Ihnen, den Glanz der Sonne, die unglaubliche Schönheit des Mondes und die fesselnden Tiefen des Universums einzufangen – ohne komplexe Einstellungen oder umfassende Astronomiekenntnisse. Legen Sie Ihr Smartphone einfach auf das Okular von Hestia, richten Sie das Gerät auf ein Himmelsobjekt Ihrer Wahl, lassen Sie sich von unserer benutzerfreundlichen App leiten und entdecken Sie eine ganz neue Welt.

Nächstes Jahr zieht am 8. April eine totale Sonnenfinsternis über Nordamerika hinweg. Millionen Menschen werden sich versammeln, um dieses historische Ereignis zu beobachten. DAS DÜRFEN SIE NICHT VERPASSEN! Halten Sie diesen magischen Augenblick mit Hestia fest, um das beeindruckende Himmelsschauspiel sicherer und aus größerer Nähe zu beobachten.

Sehen Sie sich den Weg der Sonnenfinsternis unten an.

Am 12. August 2026 findet in Europa zum ersten Mal seit 2006 eine totale Sonnenfinsternis statt.

Hestia ist für jedes Ziel und jeden Zeitpunkt geeignet. Bewundern Sie die Schätze des Himmels, wann und wo Sie möchten.

Je näher sie dem Höhepunkt des aktuellen Sonnenzyklus kommt, desto aktiver wird unser Stern. Die Beobachtung der Sonnenflecken mit Hestia und seinem Sonnenfilter hilft Ihnen, das Verhalten der Sonne, ihren Einfluss auf das Weltraumwetter und ihre Auswirkungen auf unseren Planeten zu verstehen.

Abends können Sie den Sonnenfilter in aller Sicherheit entfernen und den letzten Auftritt der Sonne bewundern.

Sonnenuntergang, aufgenommen mit Hestia ohne Sonnenfilter.

Jetzt wird jede Mondbeobachtung zu einem emotionalen Erlebnis. Entdecken Sie alle Facetten des faszinierend schönen Trabanten unseres Planeten.

Der Himmel ist nicht klar? Toll sind auch Aufnahmen des Mondes, der durch die Wolken scheint!

Alle Astronauten haben einmal angefangen. Hestia ist ideal als erstes Instrument für Einsteiger oder neugierige Menschen, die das Weltall gerne ausführlicher erkunden und verstehen möchten. Hestia und Ihr Smartphone bilden zusammen ein völlig neues Portal, das Ihnen dabei hilft, das Universum zu durchqueren, einige der hellsten Galaxien, Nebel und Sternhaufen zu beobachten und Ihre Reise in den Weltraum zu beginnen.

Die Verwendung von Hestia ist alles andere als komplex. Befestigen Sie Hestia am Stativ und richten Sie die Hauptkamera Ihres Smartphones mit Hilfe von Gravity by Vaonis auf das Okular von Hestia aus. Wählen Sie Ihr Ziel und lassen Sie sich von der App dorthin führen.

Voilà! Schon können Sie die Schönheiten des Kosmos bewundern.

Mit seinem patentierten optischen Design mit sechs Linsen, einem 30-mm-Objektiv (1,2 Zoll) und Prismen, die das Licht brechen und direkt auf den Kamerasensor Ihres Smartphones fokussieren, lotet Hestia die Grenzen der Miniaturisierung neu aus.

Durch ein System mit abnehmbaren Magneten ist Hestia mit allen Größen derzeitiger und zukünftiger Smartphones kompatibel. Hestia wird mit der Zeit immer besser.

Aber das ist noch nicht alles. Hestia benötigt keine andere Stromquelle als Ihr Smartphone und wurde so konzipiert, dass es den Test der Zeit besteht und ewig hält.

Unsere neue App unterstützt Sie Tag und Nacht bei Ihren Abenteuern im Weltraum, führt Sie mühelos zu den Sternen und bietet spannende Lerninhalte. Schnallen Sie sich an, machen Sie es sich bequem und tauchen Sie ein in den Kosmos.

Gravity by Vaonis bietet zahlreiche Lerninhalte, mit denen Sie in Ihrem eigenen Tempo mehr über unser Universum erfahren können. Egal, ob Sie Einsteiger sind und die Entstehung von Mondkratern verstehen möchten oder als Weltraumfan täglich die Entwicklung der Sonnendaten verfolgen möchten: Unsere Anwendung hilft Ihnen, mehr über unsere kosmische Umgebung zu erfahren.

Verloren im Weltall? Keine Sorge, wir haben alles im Griff. Gravity von Vaonis umfasst eine interaktive Himmelskarte, die Ihnen hilft, Ihren Weg durch das Universum zu finden. Erforschen Sie die Sternbilder, lernen Sie den Himmel um Sie herum kennen, und finden Sie interessante Objekte. Wählen Sie einfach einen Sternhaufen, eine Galaxie oder einen Nebel aus und lassen Sie sich von unserer Sternkarte präzise ans Ziel führen. Legen Sie Ihr Smartphone einfach auf das Hestia-Gerät und folgen Sie den Lichtern, um Ihr Teleskop korrekt auszurichten und Objekte zu beobachten, die für das bloße Auge unsichtbar sind.

Machen Sie das, was für unsere Augen unsichtbar ist, mit der Live-Stacking-Technologie von Hestia sichtbar. Wählen Sie Ihr Ziel und lassen Sie die Magie von Gravity by Vaonis wirken. Die Hestia Begleit-App verbessert die Beobachtung mit Hilfe unserer proprietären Bildverarbeitungsalgorithmen, die mehrere mit dem Smartphone aufgenommene Kurzzeitbelichtungen zu einem einzigen hochwertigen Foto kombinieren und ausrichten.

Lassen Sie sich über die Wetterbedingungen informieren, um draußen den Nachthimmel zu erkunden. Nutzen Sie alle Himmelsereignisse und Gelegenheiten zur Sternbeobachtung.


Nach Stellina, Vespera, Vespera Pro und Hyperia ist Hestia unser fünftes Familienmitglied. Wir wissen, wie man herausragende Produkte für die Astronomie herstellt.

Hestia: Verwandeln Sie Ihr Smartphone in ein intelligentes Teleskop

Hestia: Verwandeln Sie Ihr Smartphone in ein intelligentes TeleskopHestia: Verwandeln Sie Ihr Smartphone in ein intelligentes TeleskopHestia: Verwandeln Sie Ihr Smartphone in ein intelligentes Teleskop

Hestia: Verwandeln Sie Ihr Smartphone in ein intelligentes Teleskop

Observations, Press, Tips & News, Travel journal

Hestia: Turn Your Smartphone Into A Smart Telescope


Dear Vaonis Community,

We are pleased to announce that Vaonis will once again be leveraging the powerful platform of Kickstarter for the introduction of our next pioneering venture in the field of astronomy technology.

Our initial Kickstarter campaigns brought you Vespera, our innovative smart and light-weight telescope that democratizes astrophotography by making it accessible to astronomy enthusiasts of all levels. This products, along with Stellina, marked the beginning of our commitment to enhancing the stargazing experience through cutting-edge technology. Now, we are eager to build upon this foundation and continue to shape the future of this captivating discipline.

Our team, comprised of skilled engineers and design experts, has been working diligently to develop our next-generation product and, while we are not willing to share the specifics of our new project yet in order to keep the momentum til D-Day, we assure you it is designed with the intent of offering an even more immersive and advanced stargazing experience: it’s part of our DNA.

The decision to return to Kickstarter is not incidental. We hold firm our belief in the invaluable role of community engagement. Kickstarter allows us to involve you—our trusted supporters and beloved customers—in the development process from the earliest stages. We value your input and commitment and want you to be part of our journey into the future of astronomical exploration.

Therefore, we invite you to join us in this ambitious endeavor. To participate in the expansion of astronomical knowledge. To further our collective understanding of the universe that surrounds us. 

We strongly encourage you to follow our social media channels and sign up for our Kickstarter newsletter.

We at Vaonis are excited to be returning to Kickstarter and we look forward to your continued support as we embark on this new chapter of astronomical advancement.

Clear skies,

The Vaonis Team

Observations, Press, Tips & News, Travel journal

Hestia: convierte tu Smartphone en un telescopio inteligente


Los subtítulos de vídeo están disponibles en: Francès, Español, Japonés, Inglès.

¿Tiene usted alguna pregunta sobre Hestia? Le invitamos a leer las preguntas más frecuentes en nuestro sitio web.

Hestia es el telescopio que siempre has deseado pero que no existía… hasta ahora. Diseñado para que todas las personas puedan disfrutar de las maravillas del Cosmos.

Aprovechando la potencia de tu Smartphone y nuestra tecnología de última generación, Hestia te permite capturar el brillo del Sol, la fascinante belleza de la Luna y las asombrosas profundidades del Universo, sin necesidad de complejas configuraciones ni amplios conocimientos de astronomía. Simplemente tienes que colocar tu Smartphone en el ocular de Hestia, alinear el dispositivo con el objeto celeste que elijas, dejarte guiar por nuestra aplicación de fácil manejo y descubrir todo un nuevo mundo de exploración.

El año que viene, el 8 de abril, Norteamérica será testigo de un Eclipse solar. Millones de personas se reunirán para presenciar el acontecimiento más impresionante de su vida. NO TE LO PIERDAS. Captura ese momento mágico con Hestia para ver más de cerca y de forma totalmente segura este sobrecogedor espectáculo.

En Europa también se producirá un Eclipse solar total, por primera vez desde 2006, el miércoles 12 de agosto de 2026.

Hestia se ajusta a cada objetivo y momento. Disfruta de las maravillas del cielo cuando y donde quieras.

A medida que el Sol se acerca al punto álgido de su actual ciclo solar, el astro rey se muestra cada vez más activo. Hacer un seguimiento de las manchas solares con Hestia y su filtro solar te ayudará a comprender el comportamiento del Sol, su influencia en la meteorología espacial y su impacto en nuestro planeta.

Para disfrutar de la última gran actuación del Sol al final del día, retira con total tranquilidad el filtro solar. Sunset Hestia prototype

Cada encuentro con la Luna será ahora una experiencia llena de emociones. Descubre todas las caras del bello y enigmático satélite de nuestro planeta.

¿Cielo nublado esta noche? Captar la Luna asomándose entre las nubes también es un espectáculo magnífico:Moon piercing the clouds Hestia prototype

¿Tiene usted alguna pregunta sobre Hestia? Le invitamos a leer las preguntas más frecuentes en nuestro sitio web.

Antes de convertirnos en capitanes interespaciales, todos empezamos como jóvenes cadetes estelares. Hestia es el mejor primer instrumento para principiantes o personas curiosas a las que les encantaría descubrir y comprender mejor los secretos de la bóveda celeste. Hestia y tu Smartphone unen sus fuerzas para formar un portal desconocido hasta ahora, ayudándote a cruzar el Universo para ser testigo de algunas de las Galaxias, Nebulosas y Cúmulos Estelares más brillantes y comenzar tu viaje espacial.

El funcionamiento de Hestia es todo menos complejo. Sujeta Hestia a tu trípode y alinea la cámara principal de tu Smartphone con el ocular de Hestia con la ayuda de Gravity by Vaonis. Elige tu objetivo y deja que la aplicación te guíe para encontrarlo.

¡Ya está! Ya puedes empezar a disfrutar de las bellezas del Cosmos.

Con su diseño óptico patentado de seis lentes con un objetivo de 30 mm (1,2 pulgadas) y prismas para recoger y enfocar la luz directamente en el sensor de la cámara de tu Smartphone, Hestia supera los límites de la miniaturización.


Gracias a un sistema de imanes extraíbles, Hestia se adapta a todos los tamaños de Smartphone actuales y futuros. Hestia solo puede mejorar con el tiempo.

Pero aún hay más. Sin más fuente de alimentación que la de tu Smartphone, Hestia ha sido diseñado para resistir el paso del tiempo y durar para siempre.

Nuestra nueva aplicación está diseñada para ayudarte en tus aventuras espaciales, de día y de noche, guiarte a las estrellas con facilidad y ofrecerte contenidos apasionantes. Así que abróchate el cinturón, ponte cómodo y prepárate para surcar el cosmos.

Gravity by Vaonis incluye todo un itinerario educativo que te permitirá descubrir más sobre nuestro Universo a tu ritmo. Desde principiantes en astronomía que desean comprender la formación de los cráteres lunares hasta entusiastas que desean seguir diariamente la evolución de los datos solares, nuestra aplicación ayudará a todos a aprender más sobre nuestro entorno cósmico.

¿Te has perdido en el espacio? No te preocupes, tenemos lo que necesitas. Gravity by Vaonis integra un mapa celeste interactivo para ayudarte a orientarte en el Universo. Explora las constelaciones, aprende a reconocer el cielo que te rodea y encuentra un objeto que despierte tu interés. Tanto si seleccionas un cúmulo estelar, una galaxia o una nebulosa, nuestro mapa celeste te guiará hasta tu objetivo con precisión. Simplemente con colocar tu Smartphone en Hestia y seguir las luces para alinear correctamente el telescopio podrás capturar lo que es invisible a simple vista.

Haz visible lo que es invisible a nuestros ojos con la tecnología de apilamiento de imágenes en directo de Hestia. Elige tu objetivo y deja que Gravity by Vaonis haga magia. La aplicación complementaria de Hestia te permite mejorar tu observación utilizando nuestros algoritmos de procesamiento de imágenes patentados para combinar y alinear varias imágenes de corta exposición capturadas con tu Smartphone en una única fotografía de alta calidad.

Recibe notificaciones sobre las condiciones meteorológicas para salir a explorar el cielo nocturno. Entérate de todos los acontecimientos astronómicos y las mejores oportunidades para observar las estrellas.

¿Tiene usted alguna pregunta sobre Hestia? Le invitamos a leer las preguntas más frecuentes en nuestro sitio web.

Después de Stellina, Vespera, Vespera Pro e Hyperia, Hestia es el quinto miembro de nuestra familia. Sabemos hacer grandes productos astronómicos.


¿Tiene usted alguna pregunta sobre Hestia? Le invitamos a leer las preguntas más frecuentes en nuestro sitio web.

Tips & News, Travel journal

A Comprehensive Guide to Using ‘Plan My Night’

A Comprehensive Guide to Using ‘Plan My Night’. As we stand on the precipice of a new era in astronomy, the power to explore the cosmos is no longer confined to the realm of professional observatories. With the advent of advanced technology, the universe is now at the fingertips of anyone with a Vespera or Stellina and a thirst for discovery. This article will guide you through the process of using ‘Plan My Night’, a unique feature available in our Singularity app, to schedule and automatically run observation sessions.

‘Plan My Night’ is a revolutionary feature that allows you to program observation sessions without needing to be physically connected to your Vespera or Stellina.

To begin, navigate to the ‘Plan My Night’ screen and select ‘create a plan’. You’ll then be prompted to choose your observatory, or the observation site where the program will run. After validating your choice, select the date for your observation program. The software will automatically specify available observation times based on sunrise and sunset.

Once you’ve named your program, it’s time to choose the objects you wish to observe. These will appear in a zone located in the top section of the screen. A list of observable objects, each with a blue bar indicating the interval of time during which the object is observable, is provided in the bottom section of the screen.

‘Plan My Night’ offers a customizable experience, allowing you to filter proposed objects and specify custom criteria. You can choose from all objects in the catalog, just from favorites, or only from those you defined in manual targets. You can filter by category of object, such as galaxies only, and even filter objects according to their height above the horizon. You can also specify a minimum period of time during which the objects must be observable.

Adding an object to the observation program is as simple as touching its name or its observation bar. The object will be added to the schedule in the top portion of the screen, with the duration of visibility set based on the maximum available block of time. The blue curve shows the height variations of the object above the horizon. You can set the observation start and end times for this object and, when you’re satisfied, touch ‘add’.

You can modify or delete the observation times for an object by touching the zone that corresponds to that object. Once you’re satisfied with your observation schedule, press save.

Your observation programs can be viewed from the ‘Plan My Night’ start screen.

To launch an observation program, you must be connected to your observation station. However, the station doesn’t need to have already been initialized. Initialization is automatic when you start your schedule. Your telescope will now automatically capture the objects you defined in the program without your active involvement. When the observation program is finished, your telescope’s arm will automatically return to its closed position.

You can manage how your observation program runs and view the capture directly, as if it was a traditional observation. When your observation station has finished observing the object, it will automatically move on to the next object in the sequence, as defined in the program.

Finally, to view and recover observation program results once complete, go to the ‘Plan My Night’ screen, then choose ‘plan finished’. You can view the image captured for each of the objects and use the usual Singularity commands to save and share the image. Observation program results remain available until another program is launched.

In conclusion, ‘Plan My Night’ is a powerful feature that democratizes the field of astronomy, making it accessible to all. With its user-friendly interface and advanced features, it truly brings the universe to your backyard.

So, what are you waiting for? The cosmos awaits!

>>>Check out our Singularity app tutorial HERE<<<

Press, Tips & News, Travel journal

Exploring the Cosmos with Vespera by Astro La Vista

Exploring the Cosmos with Vespera by Astro La Vista. As we journey through the cosmos, technology continues to evolve, making the exploration of the universe more accessible than ever. One such innovation is Vespera Smart Telescope. This device, designed for both amateur and seasoned astronomers, has been making waves in the astronomy industry. In this article, content creator and astronomer Astro La Vista delves into a comprehensive review of Vespera Smart Telescope, inspired by a detailed YouTube review.

Singularity app: A Game-Changer in Astronomy

Vespera is a user-friendly device that brings the wonders of the universe to your fingertips. It’s designed to capture a range of celestial objects, including the sun, moon, galaxies, nebulae and more. Astro La Vista tested all the filters provided for this review, including the solar filter, light pollution filter, and dual band filter.

Setting up Vespera is straightforward. The user-friendly Singularity app guides you through the process, from creating an account to setting up an observatory by entering your location. This feature allows the app to provide information about the weather and recommend objects to observe each night.

Capturing the Sun with Vespera

One of the highlights of Vespera is its ability to capture the sun. After leveling the tripod and connecting to Vespera Wi-Fi signal, the user can install the appropriate solar filter. The app ensures that the correct filter is installed, preventing accidental observation of the sun with the wrong filter. Vespera then automatically finds and focuses on the sun, providing a detailed image of the solar disk, complete with granulation and sunspots.

The process of capturing galaxies is equally impressive. Vespera captures 10-second exposures and stacks them together to create an image on the screen. The reviewer chose the Whirlpool Galaxy, which was well-positioned for observation. The resulting image exhibited a vivid spiral structure with faint galaxies scattered throughout the background. While there was some noise and chromatic aberration, the overall results were commendable.

Get a wider image with CovalENS and our mosaic mode

Vespera also excels in capturing nebulae. Despite the challenges posed by the reviewer’s location and the time of year (Galaxy season), Vespera managed to capture a stunning image of the Fish Head Nebula using the dual band filter. This was a first-time capture for Astro La Vista, highlighting Vespera‘s capabilities.

One of the unique features of Vespera is its Mosaic mode, known as CovalENS technology, which increases the field of view by moving around the object between each shot. This mode was tested on the Virgo Supercluster of galaxies, resulting in a wider, cleaner, and clearer image. The Mosaic mode not only covers more sky but also effectively zooms in, improving image quality.

Exploring the Cosmos with Vespera by Astro La Vista4 essential Vespera accessories: endless possibilities

You can also find various accessories suited for Vespera, including a backpack for safe transport, a high tripod for rough terrain, and a hygrometer sensor that works with Vespera‘s dew control anti-mist system. Astro La Vista noted that Vespera‘s battery held up well, and there were no issues with dew formation on the lens, a significant achievement considering the damp conditions in the UK.

Despite its many advantages, Vespera does have a few minor drawbacks. The blue power indicator light is not ideal for stargazers who prefer red lights. The plate solving and focusing process can take a while, but the reviewer noted that it always worked flawlessly.

In conclusion

Vespera Smart Telescope is a high-quality device that makes exploring the cosmos accessible and enjoyable. Its user-friendly design, impressive image capturing capabilities, and innovative features make it a worthy investment for anyone passionate about astronomy. Despite a few minor drawbacks, Vespera definitely stands out as a reliable and efficient tool for both beginners and seasoned astronomers.

Vespera is more than just a telescope; it’s a gateway to the universe. It’s designed to make astronomy accessible to everyone, regardless of their experience level. With Vespera, you can explore the cosmos from your backyard, capturing stunning images of celestial objects and learning more about the universe we live in.

In the end, Vespera Smart Telescope is more than worth considering; it’s a must-have for anyone passionate about exploring the cosmos. Its user-friendly design, impressive capabilities, and innovative features make it a standout in the astronomy industry. So, if you’re ready to embark on a journey through the cosmos, Vespera is your ticket to the stars.

Huge thank you to Astro La Vista for his reviews. You can see both videos here and here. C

Our online buy steroids store specializes in delivering steroids across the US.