SOMMAIRE
A few exemple of candidate targets for a mega mosaic
- The Rho Ophiuchi cloud complex
- The whole central part of Cygnus constellation ( around the star Sadr) or the tail of Scorpius which contain expansive HII regions
- The Large Magellanic Cloud
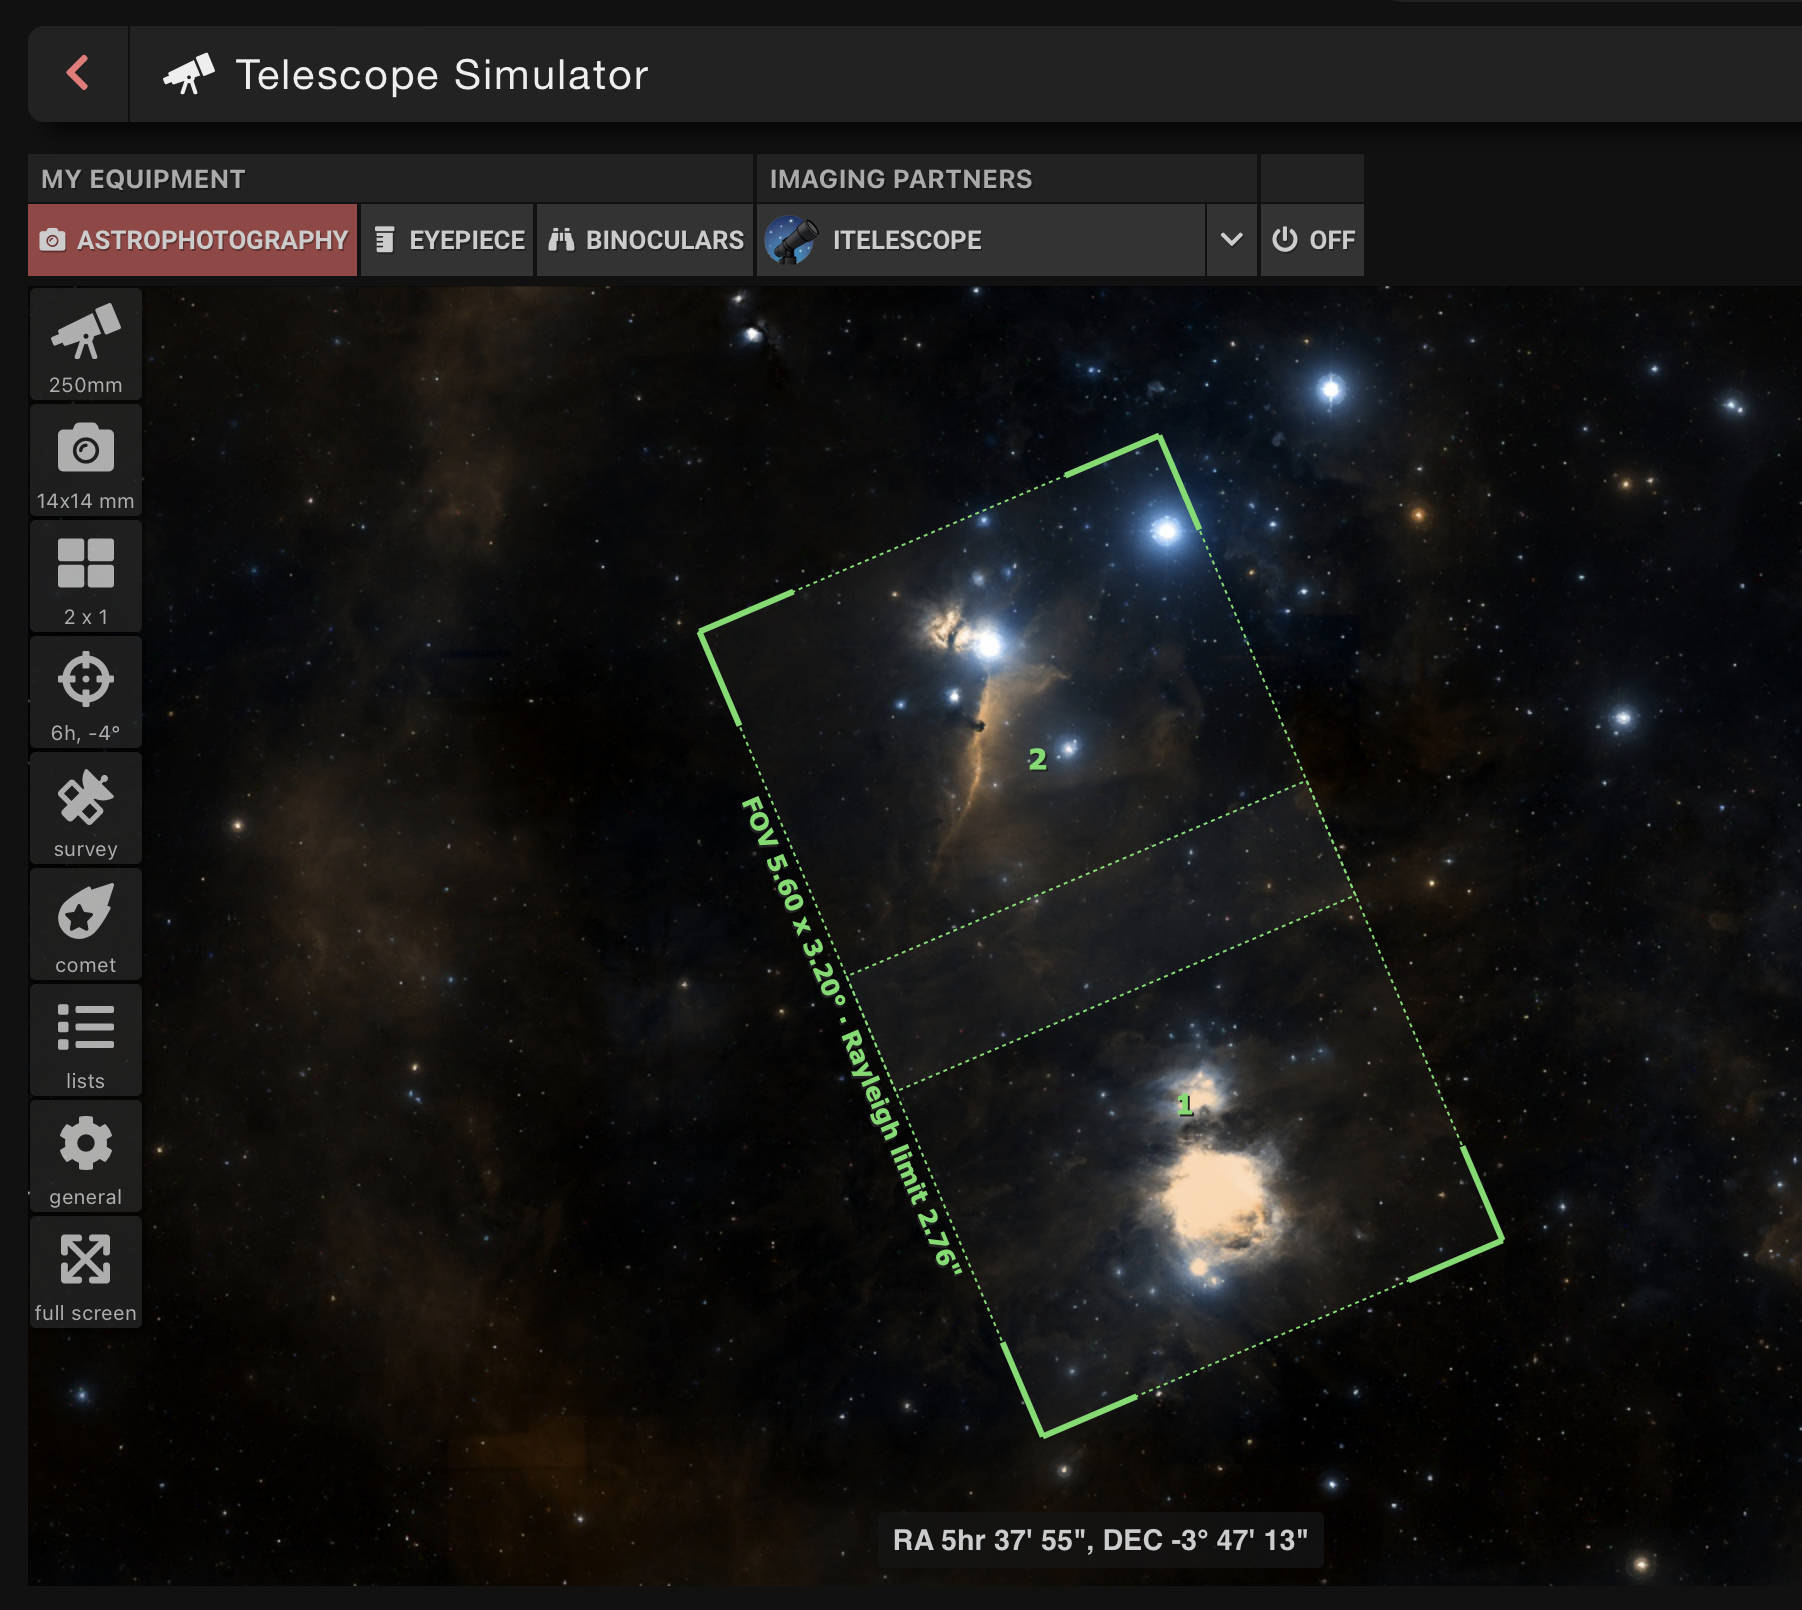
- The region spanning from the Orion Nebula to the Horsehead Nebula
- The Coalsack Nebula
- The couple Heart and Soul Nebulae
- The region spanning from the Carina Nebula to the Running Chicken Nebula including the Statue of Liberty Nebula
- The Virgo galaxy cluster
- North America and Pelican Nebulae with their surrounding HII clouds
- The couple Lobster Claw and Bubble Nebulae
- The Christmas tree cluster with the Cone and Fox Fur Nebulae plus its surrounding region
- A shot bringing together M16 and M17 Nebulae
What to expect, how demanding is it ?
Once you’ve chosen the target for your project, you must estimate how many Live Mosaics you’ll need to capture depending on the total filed of view of your mega mosaic. Then, you must determine an approximative total acquisition time. With this in mind, you can verify that you project is inline with the visibility of the object and the number of usable night you can expect.
How wide can you go ?
There’s no specific limit but the time you accept to dedicate to the project and the length of the period of visibility of your target.
The smallest mega mosaic is a composition of two Live Mosaics.
Based on a square ratio, here are the field of view of a CovalENS Live Mosaic :
for Vespera Classic : 2.4° x 2.4°
for Vespera Passengers : 4.16° x 4.16°
for Vespera II : 3.25° x 3.25°
for Vespera Pro : 3.2° x 3.2°
for Stellina : 1.7° x 1.7°
To successfully stitch two live mosaics together, they must have a shared area that the stitching software can utilize to accurately align each image, ensuring there are no gaps in the final mega mosaic. I recommend an overlap of 25% of each image (1/4th of the image) to ensure a successful stitching.
Based on this, here’s a chart recapitulating the field of view covered by a 2 to 9 panels mega mosaic
Table 1 : field of view covered by a mega mosaic.
| Vespera Classic | Vespera Passengers | Vespera II | Vespera Pro | Stellina | |
|---|---|---|---|---|---|
| 2 panels | 4.2° x 2.4° | 7.28° x 4.16° | 5.68° x 3.25° | 5.6° x 3.2° | 2.975° x 1.7° |
| 3 panels | 6° x 2.4° | 10.4° x 4.16° | 8.125° x 3.25° | 8° x 3.2° | 4.25° x 1.7° |
| 4 panels | 4.2° x 4.2° | 7.28° x 7.28° | 5.68° x 5.68° | 5.6° x 5.6° | 2.975° x 2.975° |
| 6 panels | 6° x 4.2° | 10.4° x 7.28° | 8.125° x 5.68° | 8° x 5.6° | 4.25° x 2.975° |
| 8 panels | 7.8° x 4.2° | 13.52° x 7.28° | 10.56° x 5.68° | 10.4° x 5.6° | 5.525° x 2.975° |
| 9 panels | 7.8° x 7.8° | 13.52° x 13.52° | 10.56° x 10.56° | 10.4° x 10.4° | 4.25° x 4.25° |
How much time will it take ?
When it comes to building mega mosaic, we would want to always capture the biggest possible CovalENS Live Mosaic. For a good quality image, I recommend capturing at least 3 or 4 hours of data per individual CovalENS mosaic. This could represent 5 to 8 hours of real observation time each. Going longer will reward you with even better quality result.
I recommend capturing only when the object is between 25° and 70° of elevation if possible. Under 25° the atmosphere absorption start to hinder the quality of the observation. Above 70°, a good and fast tracking become challenging.
In case the target reach 70° in the middle of the night, you can split the observation into two parts, waiting it goes back down to 70° again. You can easily do this by leveraging the power of Multi-Night Observation.
You may be able to capture only one CovalENS mosaic per night (one panel of your mega mosaic).
Simulate your mega mosaic with Telescopius
About telescopius
Telescopius is a free online astronomy multipurpose tool. It notably propose a telescope simulator that help in checking camera framing and planning mosaics.
Here’s how you can use it to simulate your mosaic:
- In the “my equipment” section, make sure “astrophotography” is selected
- From the “toolbox” menu, choose “telescope simulator”
- Click the “target” icon and search for your target to center the map on it. You can drag around the map.
- Click the “telescope” icon and enter the focal length and aperture for your smart telescope. Refer to the table 2
- Click the “camera” icon. You are supposed to enter the size of your sensor. However, since you assemble Live Mosaics, you must dial down the virtual size of the sensor that would have been required to capture such a sized image. You will find the relevant values depending on the telescope in the table 3 (basically, this is the native sensor size multiplied by the ratio between the live mosaic field of view and the native field of view)
- Click the “mosaic” icon then set the overlap percentage and define the number of panel in order to cover the region you intend to capture
- Back to the “camera” section and set the position angle to adjust the framing orientation as desired
Table 2 : Aperture and focal length of Vaonis smart telescopes
| Stellina | Vespera Classic | Vespera Passengers | Vespera II | Vespera Pro | |
|---|---|---|---|---|---|
| Aperture | 80 | 50 | 50 | 50 | 50 |
| Focal Length | 400 | 200 | 200 | 250 | 250 |
Table 3 : Virtual sensor sizes corresponding to a live mosaic at maximum size
| Stellina | Vespera Classic | Vespera Passengers | Vespera II | Vespera Pro | |
|---|---|---|---|---|---|
| Native FOV | 1° x 0.7° | 1.6° x 0.9° | 2.4° x 1.8° | 2.5° x 1.4° | 1.6° x 1.6° |
| Native sensor size | 7.4 x 5 mm | 5.6 x 3.1 mm | 8.4 x 6.3 mm | 11.2 x 6.3 mm | 7.0 x 7.0 mm |
| Live mosaic max. FOV (sensor ratio) | 2° x 1.4° | 3.2° x 1.8° | 4.8° x 3.6° | 4.33° x 2.43° | 3.2° x 3.2° |
| Virtual sensor size for a live mosaic at sensor ratio (for Telescopius) | 14.8 x 10 mm | 11.2 x 6.2 mm | 16.8 x 12.6 mm | 22.4 x 12.6 mm | 14 x 14 mm |
| Live mosaic max. FOV (square ratio) | 1.7° x 1.7° | 2.4° x 2.4° | 4.16° x 4.16° | 3.25° x 3.25° | 3.2° x 3.2° |
| Virtual sensor size for a squared ratio live mosaic (for Telescopius) | 12.58 x 12.58 mm | 8.4 x 8.4 mm | 14.56 x 14.56 mm | 14.56 x 14.56 mm | 14 x 14 mm |
Capturing your mega mosaic
The crucial point is to properly capture each indivual CovalENS live mosaic to ensure they overlap and cover the desired region. Depending on how demanding you are, you have two ways to do it.
No matter which approach you choose, it’s advisable to capture a similar amount of data for each image.
The quick and dirty way
You estimate and adjust the framing of each mosaic using reference points on the simplified map provided by the Singularity interface.
Since you need to remember the framing of each individual mosaic to define the next one to capture, here’s my recommendations:
Once you’ve defined the framing for the first live mosaic (the first panel of your mega mosaic), take a screenshot to use as a reference when adjusting the framing for the second panel, ensuring they overlap correctly.
Then take a screenshot of the framing for the second panel and follow the same process for the remaining panels.
The meticulous way
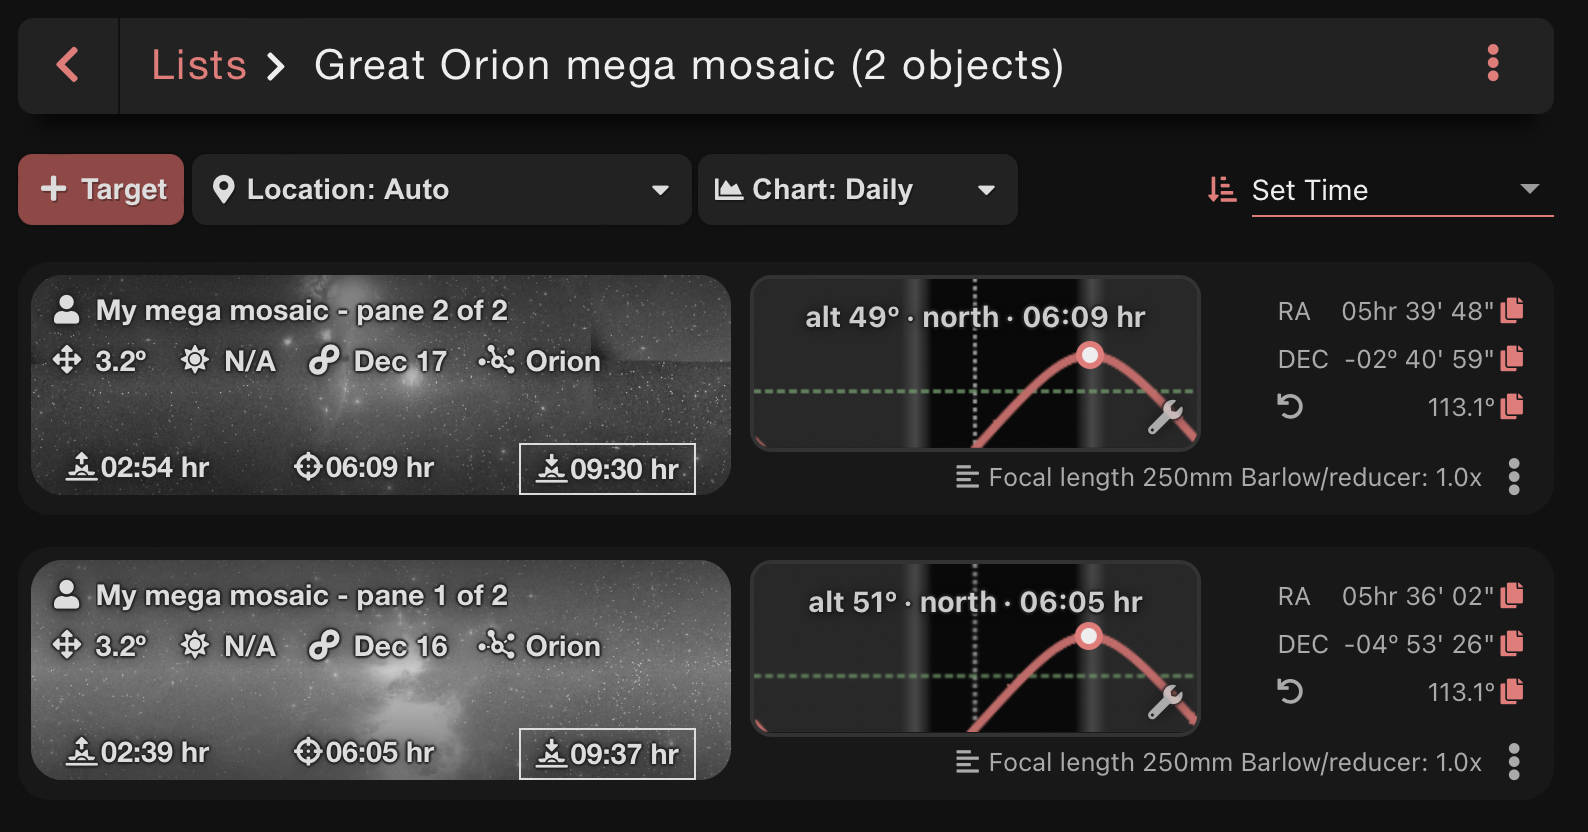
If you make use of Telescopius to simulate your mega mosaic, you can retrieve the coordinates of the center of each panel.
Based on this, you can create manual targets in Singularity for each panel. Then you don’t have to care about the centering of your panels. You just have to set the size to the maximum and apply the right orientation based on Telescopius preview.
To get the coordinates of each panel from Telescopius, you must be signed in.
Once you’ve simulated your mosaic, click the “list” icon then choose “go to list” where you will find the detailed coordinates of each panel. These are the coordinates you will use to create your manual targets.
Processing the images (or not)
You can compose the mega mosaic with the JPEG images straight out from the telescope.
For better results, you may want to apply your own post processing and work with the TIFF RAW files.
In this tutorial, we are going to use Affinity Photo to stitch together each individual mosaic. Affinity Photo won’t be able to stitch them if you don’t apply at least a stretching to each image. Moreover, since each individual mosaic is captured on different days with varying sky conditions, you should process them to ensure they are as uniform as possible. This will guarantee better results.
Since you will have the opportunity to refine the processing once the entire mega mosaic is composed, don’t go too far in the processing of each individual mosaic.
You can check our previous blogpost about Affinity photo HERE.
Composing the mega mosaic with Affinity Photo
- From the “File” menu, choose “New Panorama”
- From the pop-up window, choose “Add”, then add to the list all the individual mosaics that will compose your mega mosaic
- Click “Assembler le panorama”
- The right side of the pop-up window displays the result as a thumbnail. If you find the result satisfactory, click “OK” to allow Affinity Photo to create the panorama
- Check if you see seams in the resulting image. If so, use the brush tool to refine the overlapping zone between each image
- Each time you edit the overlapping zone, you must press “Render” to see the result
- Once you are satisfied with the look, click “Apply”
- You can now crop your mega mosaic to eliminate the blank parts
- Fine-tune your image with further post-processing
Tutorial sample file
The images used in this tutorial cover a region of the Scorpius constellation between Zeta and Mu Scorpii. This area notably features the Prawn Nebula, several star clusters, and numerous HII regions.

