Our online buy steroids store specializes in delivering steroids across the US.
Press

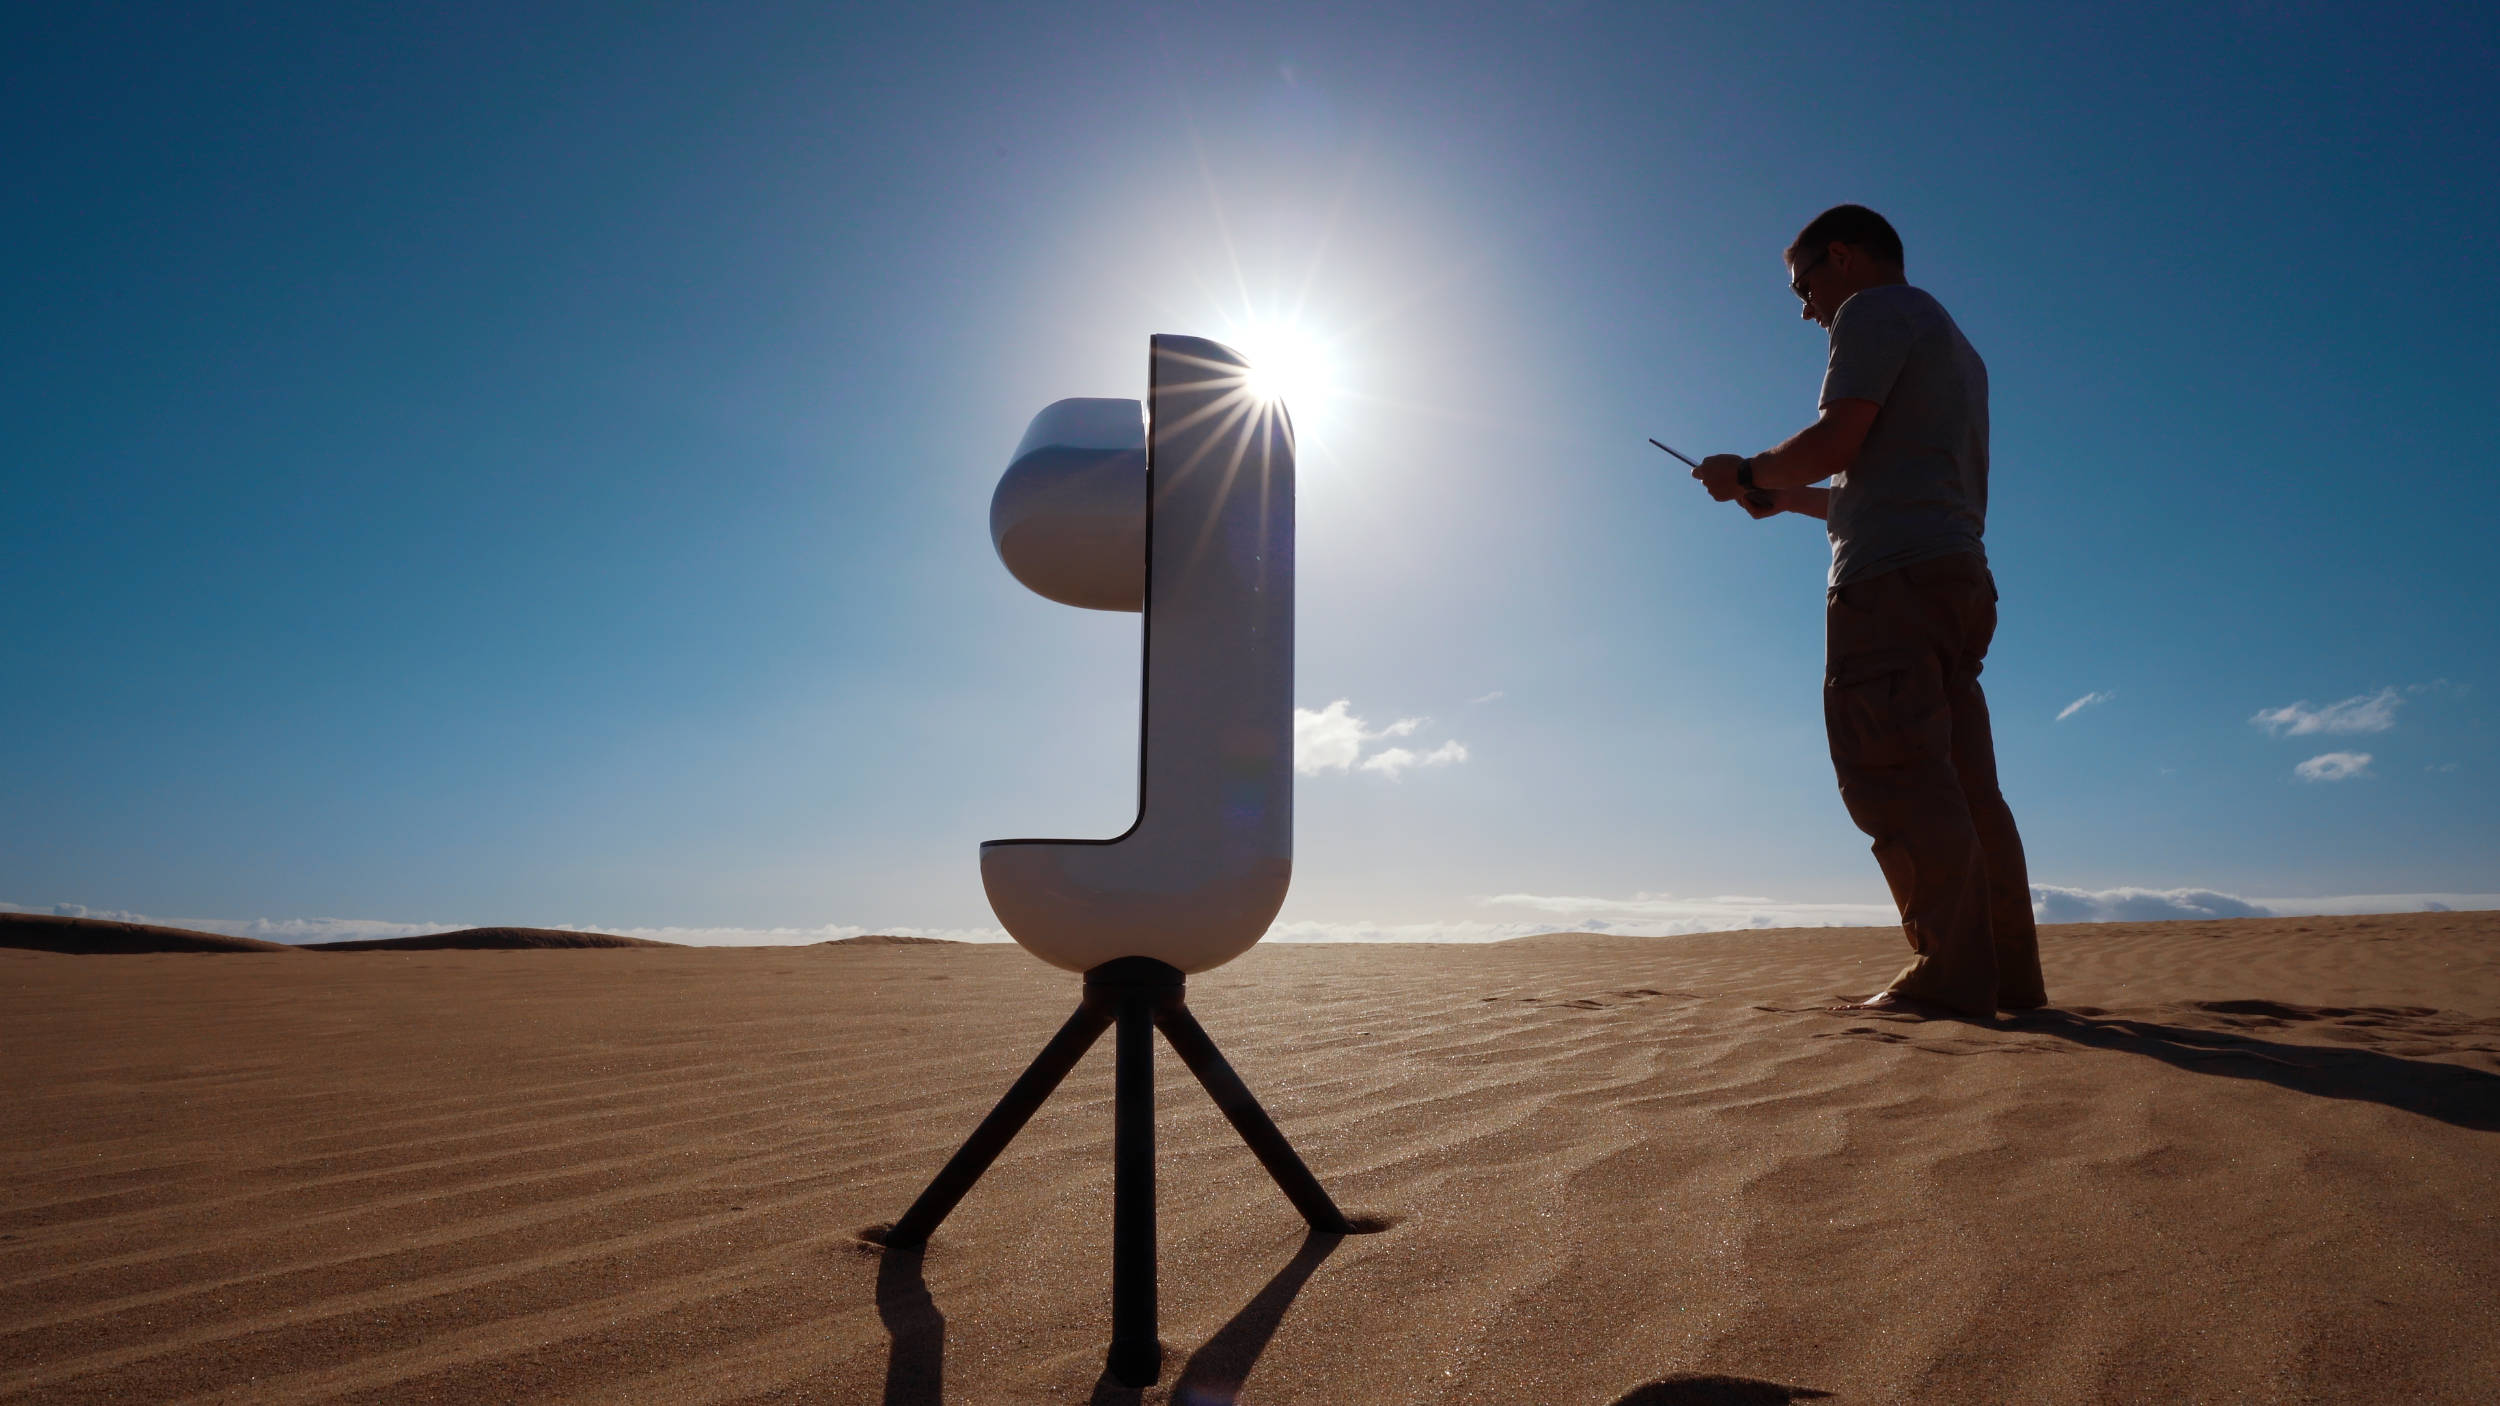
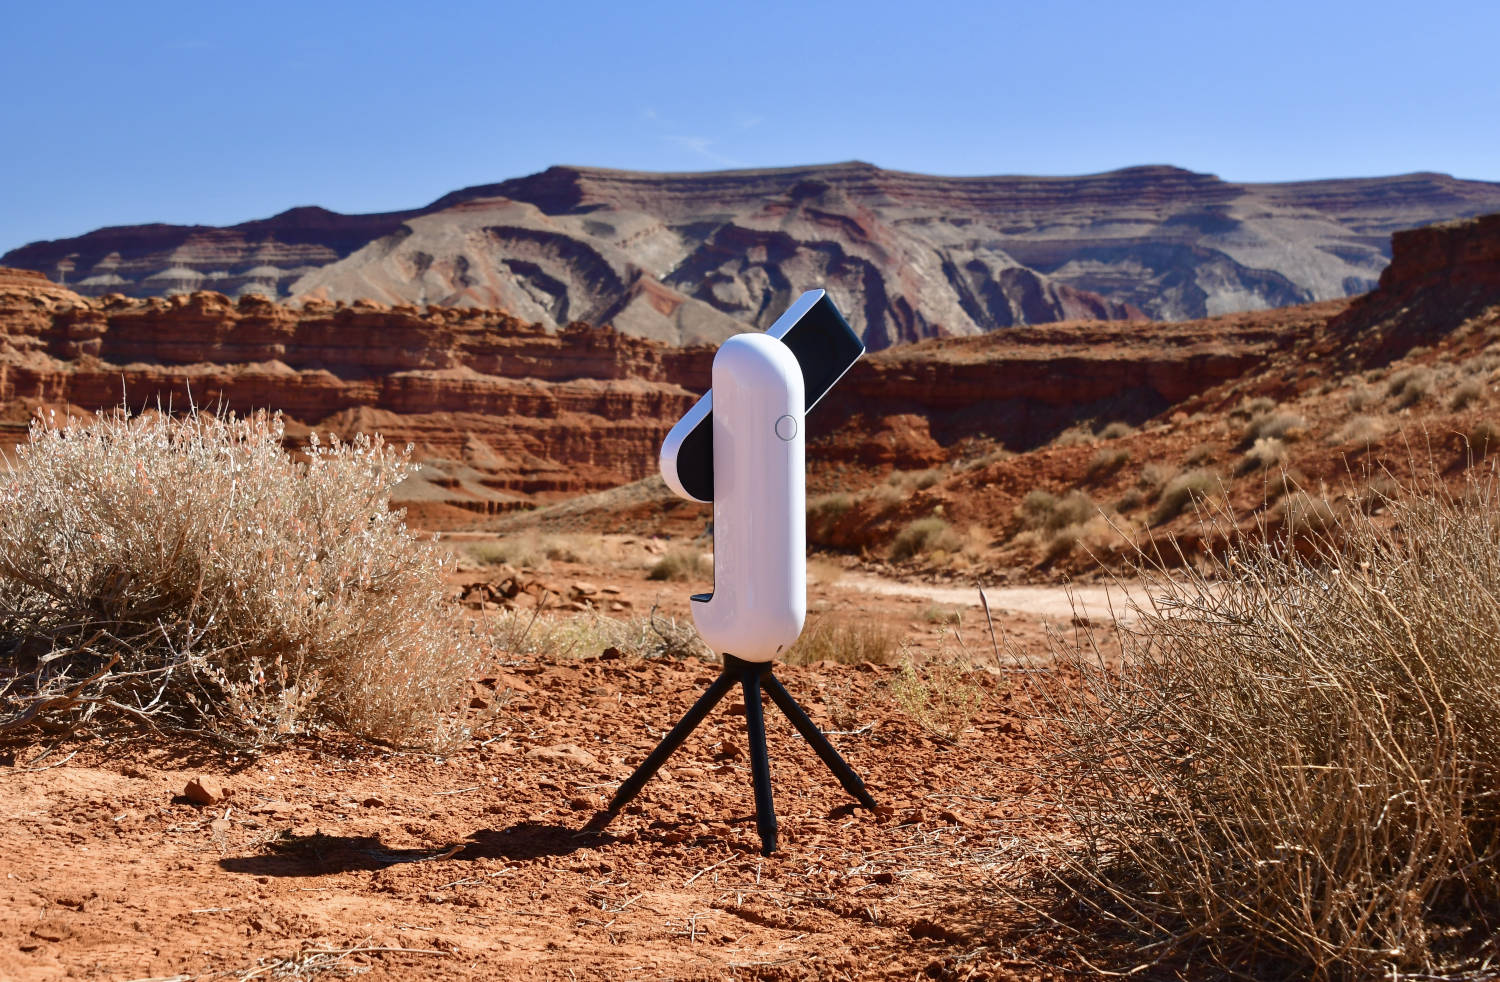
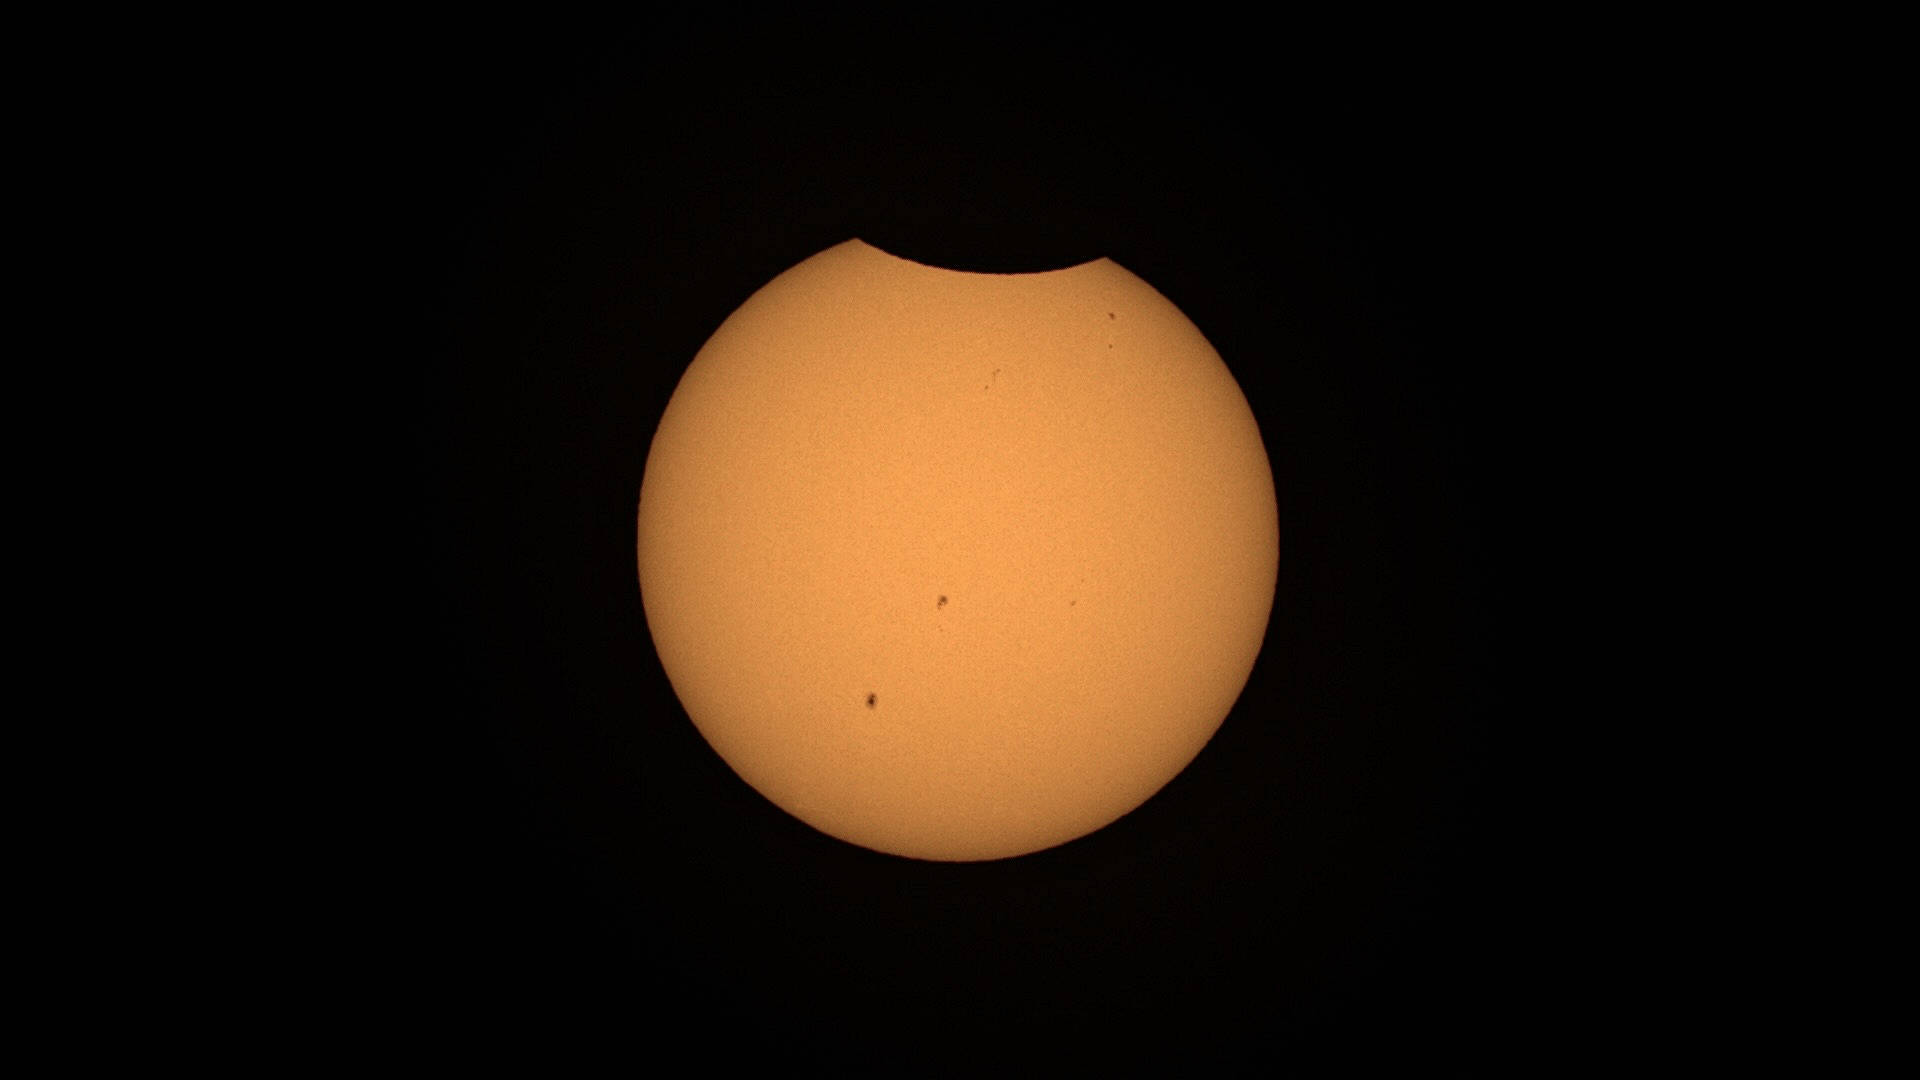
Observing the 2024 April 8th total solar eclipse with Hestia.

With its solar filters, Hestia ensures a safe environnement for Sun and Solar Eclipse observations as you don’t directly look at the sun and your smartphone is protected as well. (a prolongated direct exposure of the sensor to sunlight without a proper filter can cause damage your smartphone).However, to capture the totality phase of the eclipse, you’ll need to remove the filter since the light from the sun’s chromosphere and corona is much dimmer.Gravity offers a basic timelapse feature with additional hints when you observe in eclipse mode.
This tutorial presents the full procedure for observing the eclipse, including totality, followed by a safe scenario designed to let you enjoy every aspect of the eclipse.


Update to the latest Gravity app version to get the eclipse features.

With great power comes great responsability!

Do not directly observe the sun through an optical instrument without proper protection during the partial phase of an eclipse or when there is no eclipse.

It is only safe to observe the sun without protection during a total eclipse when the moon fully obstructs the direct sunlight.

Do not leave your Hestia unattended during an eclipse or more generally during a solar observation.


1. dos and don’ts

  • Do not remove the solar filter during the partial phase. Remove it only when the eclipse is total.
  • Do put back the solar filter as soon as the totality ends (read the “safe eclipse observing scenario” section to learn more).
  • Do check that your smartphone has enough charge, as the entire event lasts several hours and your smartphone will be highly used. Consider keeping your smartphone connected to a power bank.
  • Do check that you have enough storage space on your smartphone.
  • Do not leave your Hestia unattended during the observation.

2. Eclipse Observation tutorial with Hestia

Setting-up.

  • Firmly attach Hestia to its tripod.
  • Ensure that you have removed the protective plastic film from the lens and eye piece. Place and align your smartphone on Hestia. Use the installation assistant from the main menu.
    DO NOT POINT AT THE SUN DURING THIS STEP.
  • Once your smartphone is properly placed on Hestia, screw the solar filter onto the lens ring.
  • Attach the solar pointer to Hestia’s accessory port.

Pointing at the sun.

  • From the Gravity Space Center, tap the “observe the eclipse” button or press the camera button and select the “eclipse” camera mode from the top screen menu.Hestia eclipse mode
  • Orient Hestia towards the sun using the solar pointer. DO NOT DIRECTLY LOOK THROUGH THE HOLES OF THE SOLAR POINTER. Refer to the following video to learn how to use the solar pointer:
  • Once Hestia is properly oriented, you should be able to see the image of the sun on your smartphone.
  • Tap “expo” to manually set a correct exposure. The disc of the sun must not appear completely white (if it does, this means the image is overexposed). You can also change the ISO value. Find a good balance between ISO and exposure. Initially, we recommend setting the ISO between 200 and 400 to keep a short exposure time.
  • Rotate the front lens ring until you get a sharp image. You should be able to see sunspots on the sun’s disc.
  • Refine the focus with the focus assistant: Tap “focus,” then “focus assistant.” The assistant takes several pictures at different focus values. Use the slider to browse the images and determine which one is the sharpest, then validate.

You are now ready to capture images of the eclipse.

Removing the solar filter to observe the totality phase.

ONLY REMOVE THE SOLAR FILTER WHEN THE MOON FULLY OBSCURES THE SUN. PROMPTLY PUT BACK THE SOLAR FILTER AT THE END OF TOTALITY.

  • While holding the main lens ring (to avoid shifting the focus), gently unscrew the solar filter.
  • Adjust exposure and ISO. The total eclipse displays various features (chromosphere, prominences, inner corona, outer corona) that require different exposure values to be highlighted.
  • In case you mess up with the focus ring, you can still adjust the focus after you remove the filter.
  • As soon as the totality ends, screw back the solar filter.
  • If necessary, adjust the focus.

Recording a timelapse.

Gravity allows you to generate a timelapse from a series of images you manually capture. This feature is available in every camera mode. However, in eclipse mode, a 5-minute timer indicator and notifications will help you maintain a regular timeframe between each image. You remain free to capture images at a different rate (particularly during totality, it is useful to capture images at a higher rate).

It is advised to put your device into sleep mode between each image you capture when running a timelapse, unless you are actively observing the eclipse. This helps to save battery life.
Note that the timelapse timer will continue to run even in sleep mode.

  • Ensure that you are in eclipse mode to benefit from a 5-minute countdown timer recommendation and notifications ( 30s before to let you re-center the sun in the view).
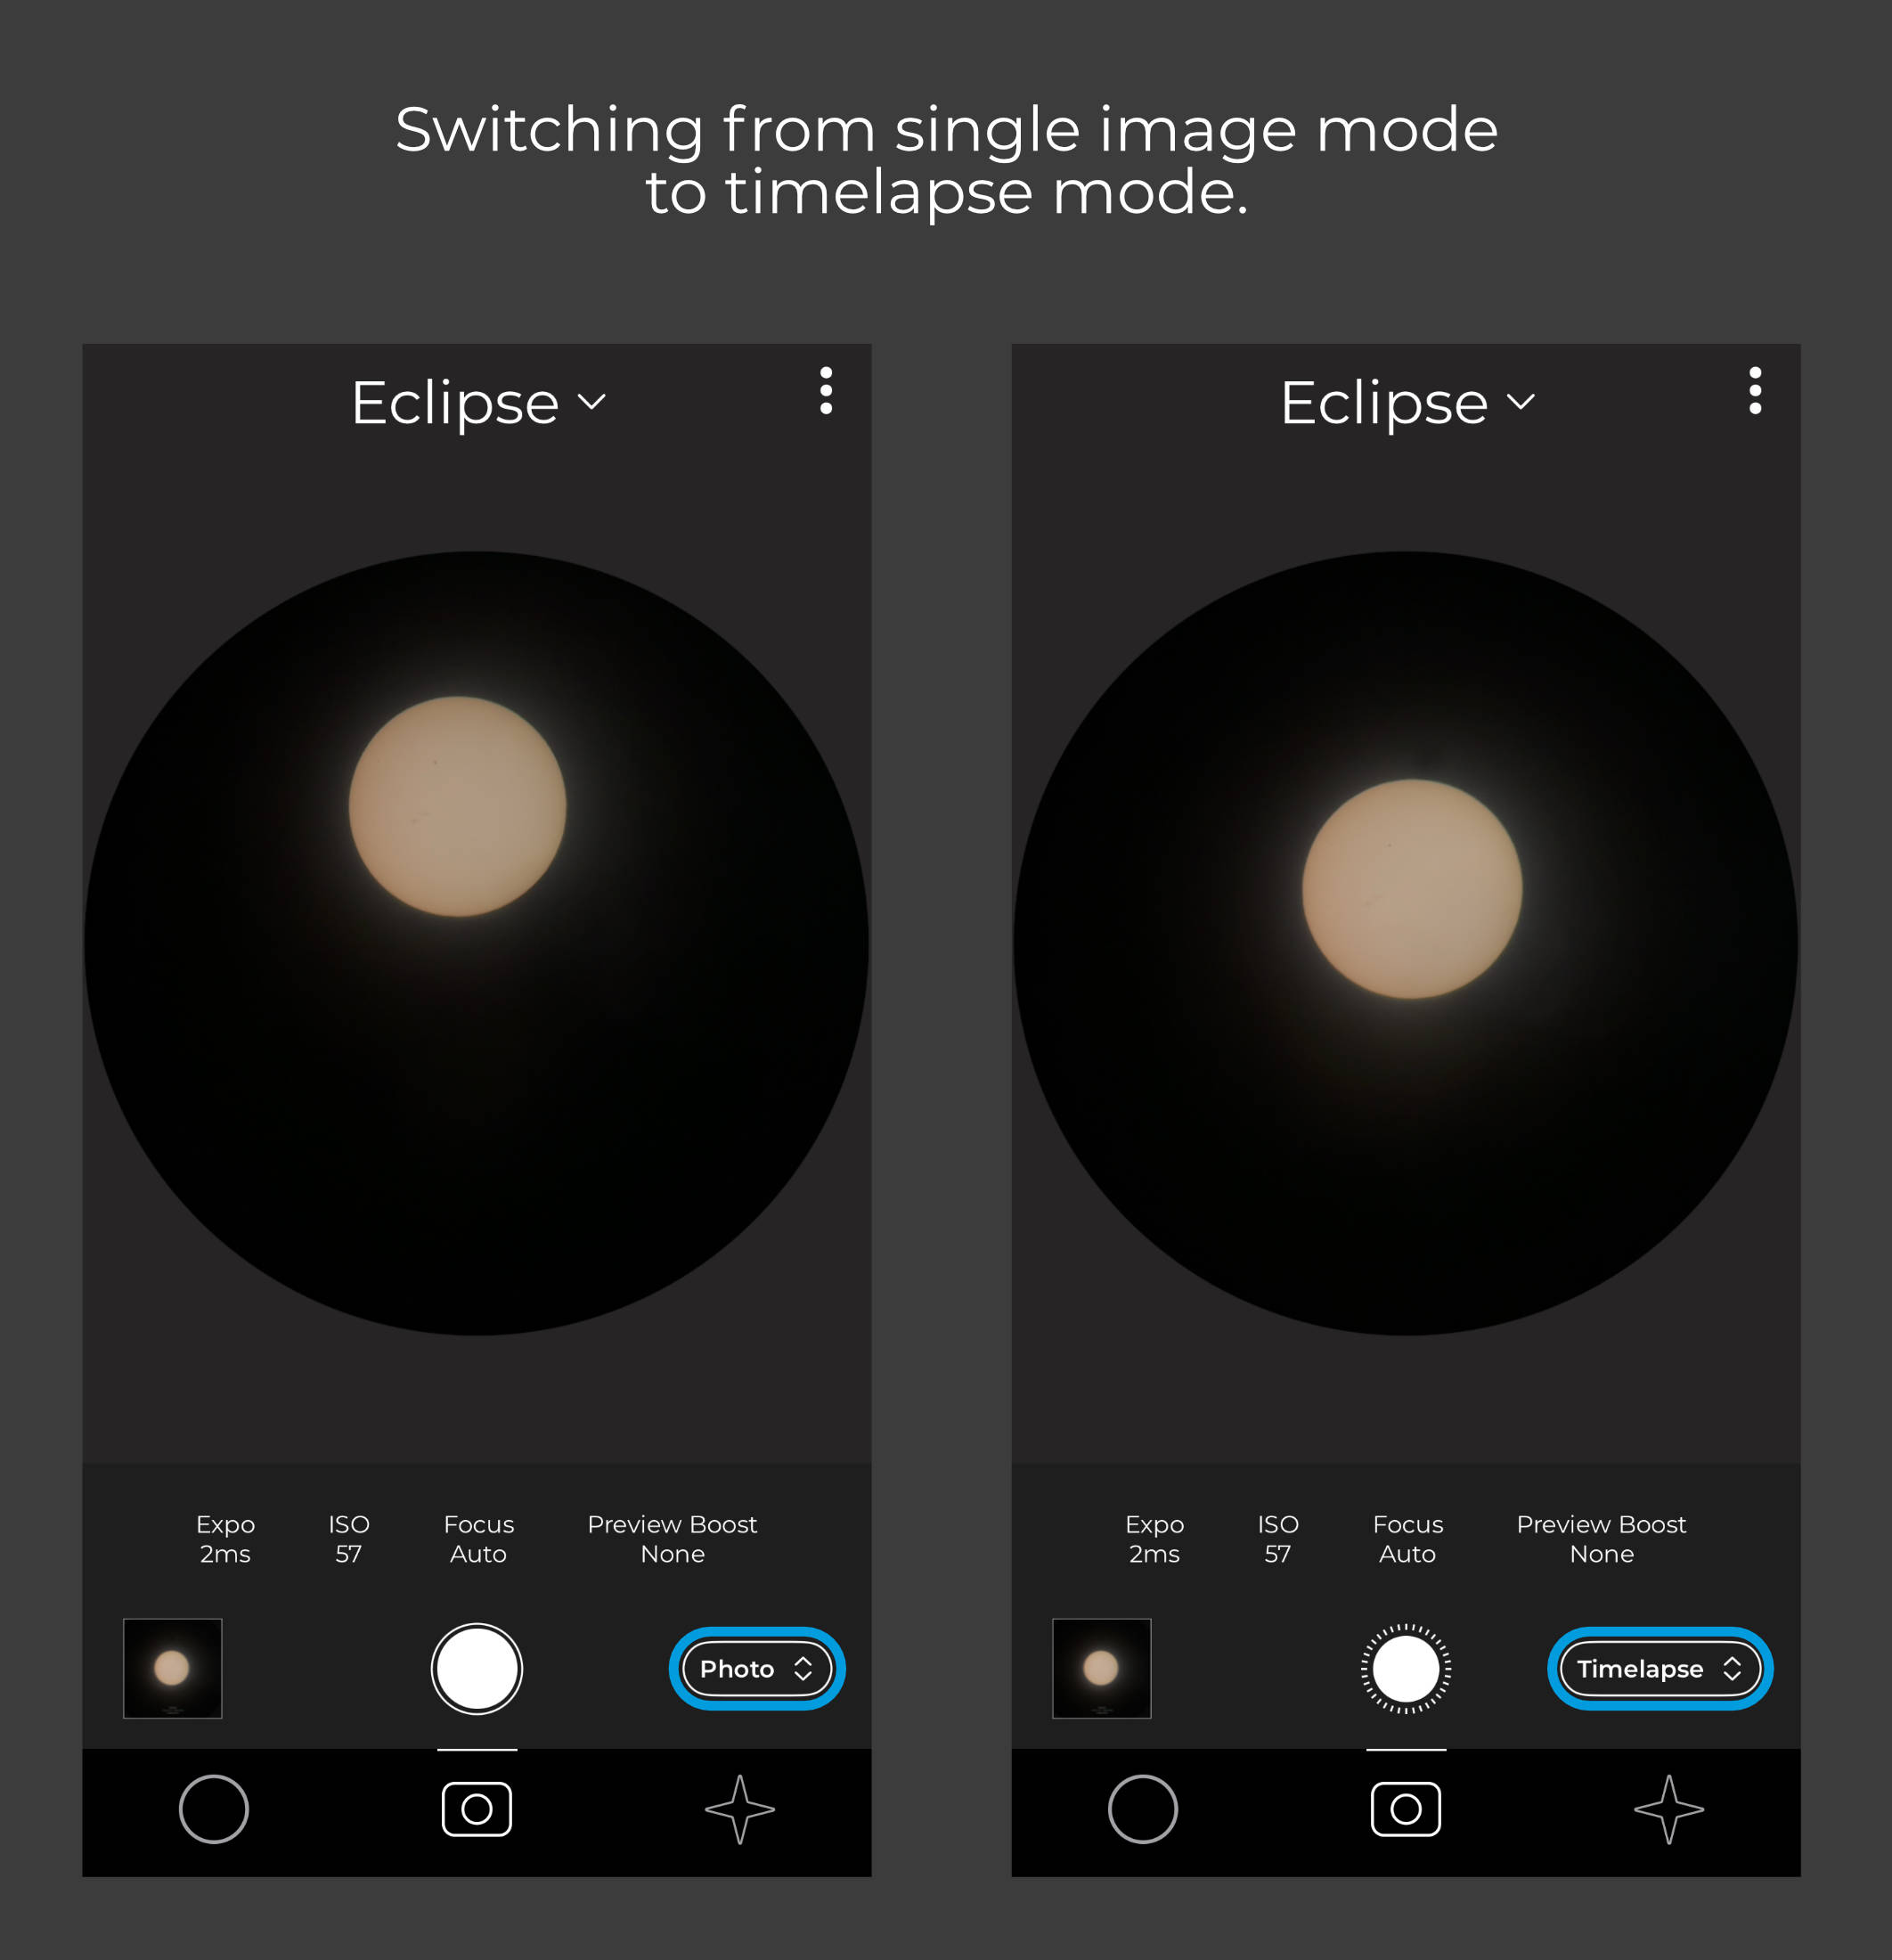
  • If you have a slider displayed for any manual setting (exposure, ISO, focus…), tap the name of this setting to hide the slider. You will then see a “photo” button.
  • Tap the “photo” button to switch to “timelapse” mode then hit “capture” to start collecting images for the timelapse. Allow your phone to send notifications. Also, check that your device is not in silent mode.
  • You have to manually capture each subsequent pictures that you want to add to the timelapse pool. Press the “capture” button to record a new image to be added to the timelapse.
    An indicator shows the number of images as well as the elapsed time since the last capture. Around the capture button, an animated indicators count down the time to the next capture with a timeframe of 5 minutes. In case you put your smartphone in sleep mode, you will receive a notification 30 s prior.
  • Once you want to stop the timelapse recording and generate the resulting video, press the “stop” button.
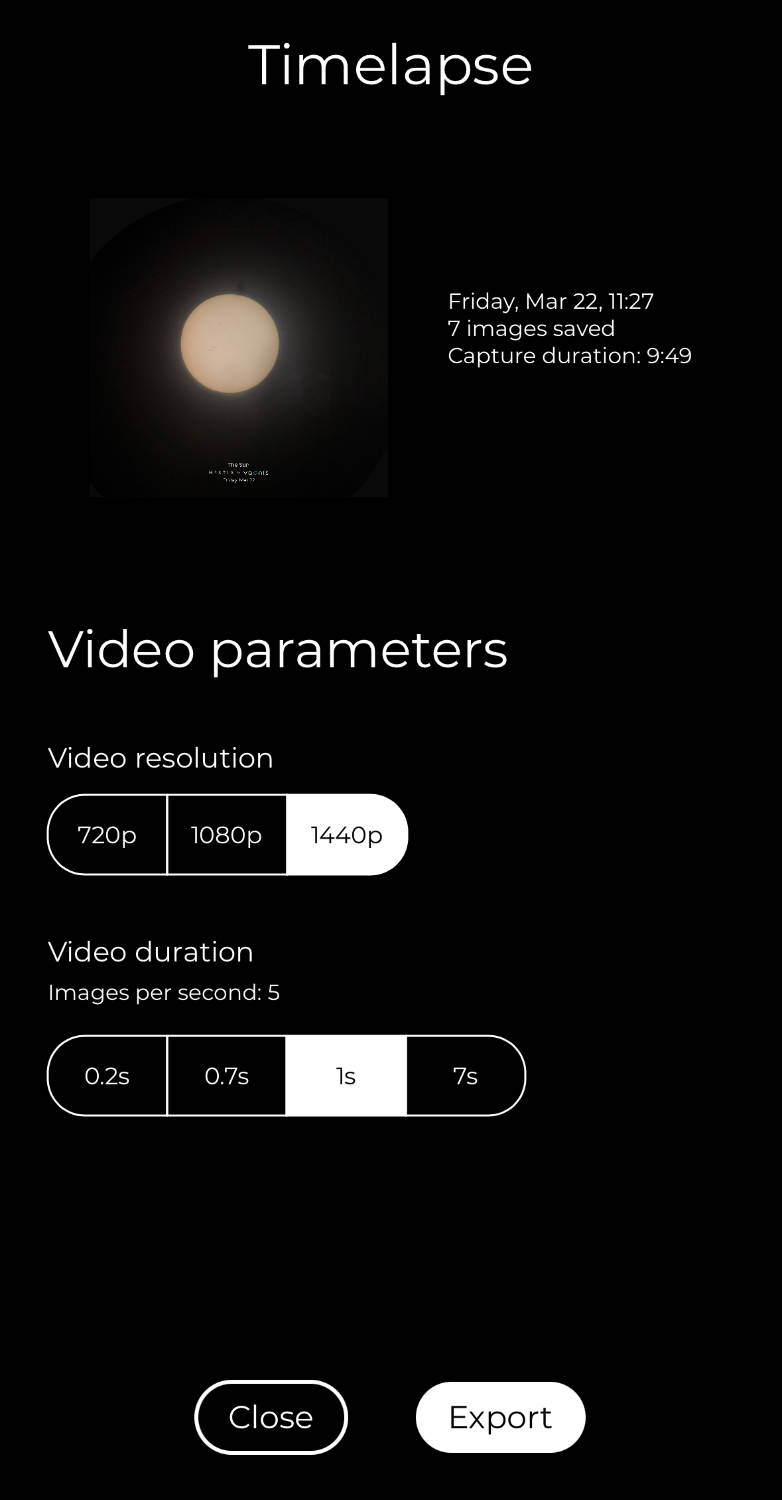
  • You will be presented with options to choose from to generate the timelapse video (video resolution and duration). Select your preferences and press export. The resulting video will be saved to your smartphone photo roll. Each photo you took to generate the timelapse is stored in the photo roll as well.

Hestia timelapse export option

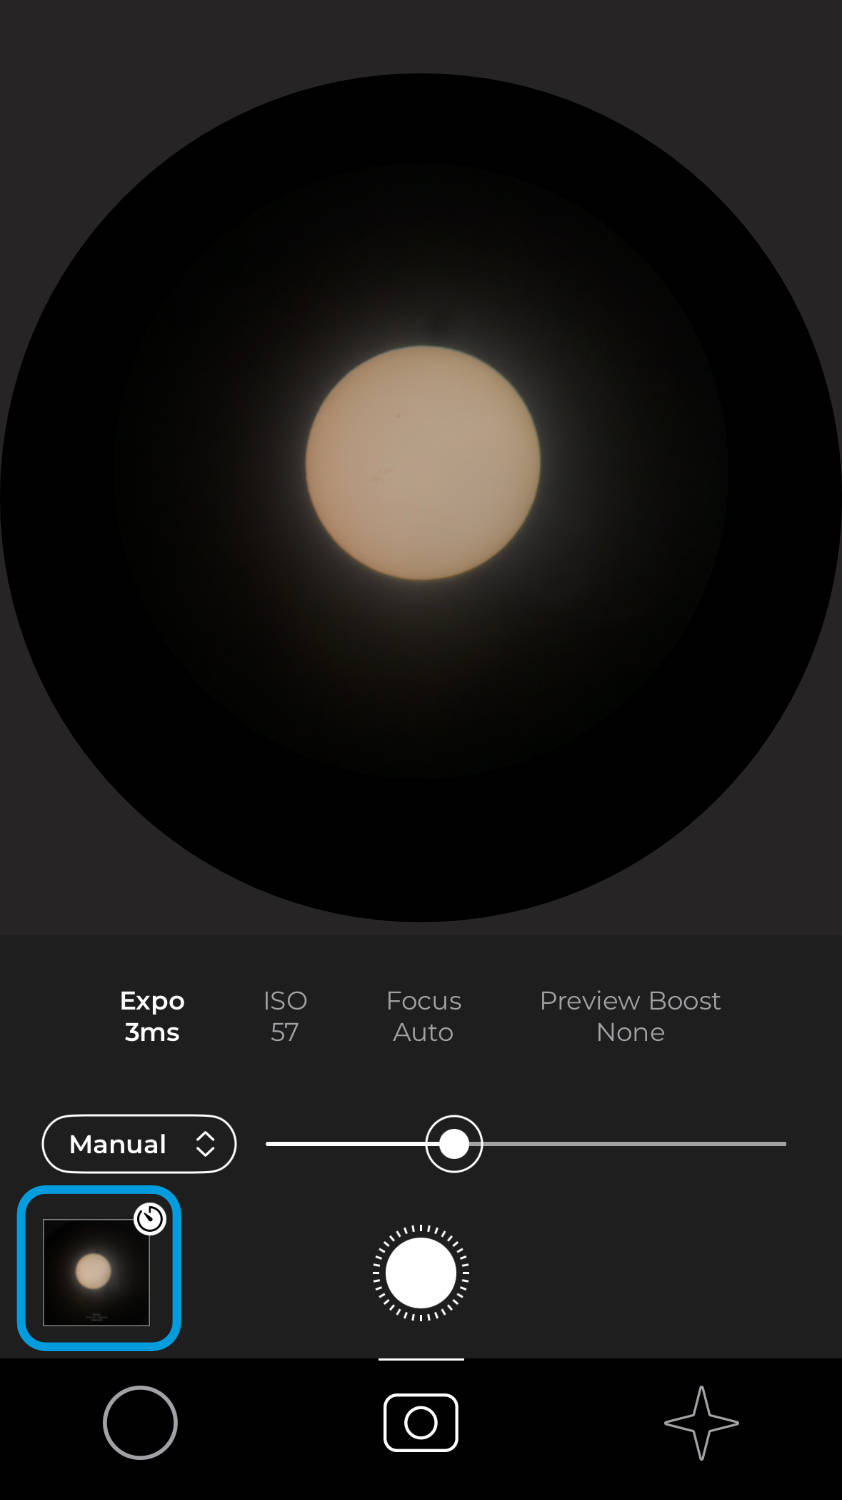
From the observation screen, the timelapse image pool remains available if you want to generate a new timelapse with different settings until you start capturing new images (image below).

Hestia timelapse creation

3. Safe eclipse observing scenario

Here is a sample scenario you can follow to enjoy every aspect of the eclipse with your Vaonis Hestia while keeping it safe. As the second part of the eclipse (from third contact to fourth contact) is a repetition of the first part in reverse order, this provides an opportunity to get various views. This scenario mainly addresses those who will experience the total eclipse.

Days before the eclipse.

  • Check that you have a solar filter and that it is not damaged.
  • Train to master a regular solar observation by using the eclipse mode (even if there’s no eclipse).
  • While NOT observing the sun, practice removing the filter without shifting the focus.
  • Get accustomed to the timelapse features. You can generate a timelapse from any camera mode.
  • Check the eclipse events timetable for your location in the Eclipse Guide .

The D day, ahead of the eclipse.

  • Check that your smartphone battery is fully charged. Get a spare external battery just in case.
  • Check that you have plenty of storage space on your device.

15 minutes before the PARTIAL eclipse begins.

SOLAR FILTER ON

  • Set up your Hestia with the solar filter
  • Start the solar observation in eclipse mode
  • Adjust exposure, gain and focus if needed.
  • Capture your first image and check everything is ok.

When the partial eclipse begins (SOLAR FILTER ON)

  • Activate the timelapse feature.
  • Take as many pictures as you want or follow the 5 minutes recommendation.

Seconds leading to the totality (SOLAR FILTER ON)

  • Progressively adjust exposure and gain to capture the Baly’s beads with the solar filter on. You will be able to capture them with the solar filter off at the end of the totality.
  • Once you’re not able to see anything while exposure and gain are high, this is the signal that you can safely remove the solar filter.
  • Gently remove the filter

During totality (SOLAR FILTER OFF)

  • Continuously Adjust exposure and gain to observe the various features of the total eclipse

You may want to reduce exposure and gain 30 seconds or so before the totality ends ( to only have the chromosphere visible) to get ready to capture the Baly’s beads without the solar filter.

Do not forget to observe the eclipse with your own eyes (only during the totality phase) and to feel the mood around. There’s many features apart from the sun itself that can be experienced during a total eclipse. Check our eclipse guide to learn more.

End of totality, Baily’s beads and diamond ring reappearing (SOLAR FILTER OFF)

  • Prepare to put the filter back on
  • Capture a few images of the Baly’s beads and the diamond ring without the filter
  • A few seconds after the Diamond ring becomes visible put yourself in front of Hestia to block sunlight and have time to gently put back the solar filter.
  • Adjust the exposure and gain if necessary.

During totality (SOLAR FILTER ON)

  • Adjust settings if needed
  • Relax, have a drink with your teammates while enjoying the rest of the show (Keep an eye on your Hestia)
  • Once the eclipse has ended, stop the time-lapse recodring to generate your time-lapse video.

Have fun !

Press

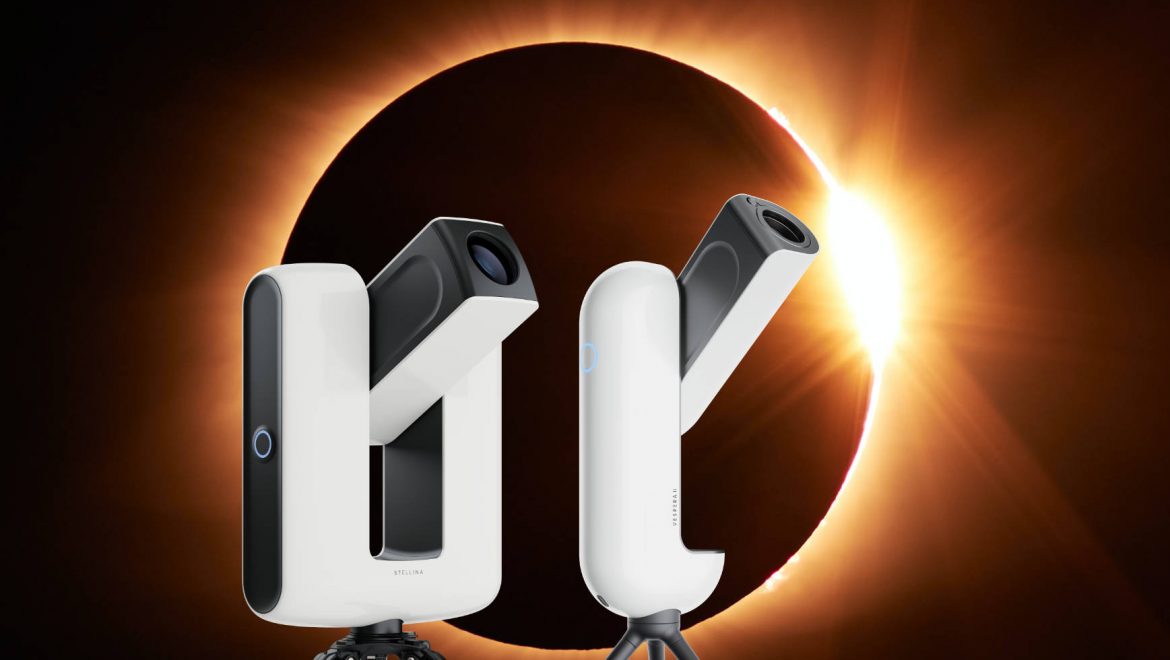
Observing the 2024 April 8th total solar eclipse with Vespera and Stellina.

Thanks to their solar filters and security mechanisms, Vespera and Stellina ensure a safe environnement for Sun and Solar Eclipse observations. Your eyes are not directly exposed to sunlight and your telescope itself is protected (direct exposure of the sensor to sunlight without a proper filter can cause damage).However, to capture the totality phase of the eclipse, you’ll need to remove the filter since the light from the sun’s chromosphere and corona is much dimmer. The Singularity app provides an eclipse mode that allows you to safely remove the filter during totality without triggering the security mechanism. This mode also offers manual settings, allowing you to select the correct exposure depending on the aspect of the total eclipse you wish to highlight (chromosphere, inner corona, outer corona).This tutorial presents the full procedure for observing the eclipse, including totality, followed by a safe scenario designed to let you enjoy every aspect of the eclipse.


Update to the latest Singularity app version to get the eclipse features.


With great power comes great responsability!

Being able to remove the solar filter requires extra caution. This action is only safe during the eclipse totality phase, when the moon completely covers the sun disc. YOU MUST NOT REMOVE THE FILTER DURING THE PARTIAL PHASE. Keep in mind that prolonged exposure of your telescope’s sensor to direct sunlight can damage it. THIS KIND OF DAMAGE IS NOT COVERED BY YOUR WARRANTY.
People observing the eclipse from a location where there is NO total eclipse must keep the filter on throughout the event.

Do not directly observe the sun through an optical instrument without proper protection during the partial phase of an eclipse or when there is no eclipse.

It is only safe to observe the sun without protection during a total eclipse when the moon fully obstructs the direct sunlight.

Damage to your telescope caused by an exposition to the direct sunlight is not covered by the warranty.

Do not leave your telescope unattended during an eclipse or more generally during a solar observation.


1 Preparations for the Eclipse

1.1 About your telescope security mechanism

Under normal circumstances, Vespera or Stellina are not able to observe the sun without a solar filter for safety purposes. Here is the default behavior:

Stellina: If the filter is removed during a solar observation and an excess of light is detected by the sensor for a few seconds, the observation will stop, and the telescope arm will move to a secure position.

Vespera: The filter has a detection system. While observing the sun, removing the filter will immediately trigger the safe move, and the arm will return to a secure position. Additionally, if an excess of light is detected by the sensor for a few seconds, the safe mode is also triggered.

The purpose of the eclipse mode is firstly to provide you with a way to bypass the security mechanism. Keep in mind that doing so is entirely your responsibility.


1.2 1.2 dos and don’ts

  • Do not remove the solar filter during the partial phase. Remove it only when the eclipse is total.
  • Do put back the solar filter as soon as the totality ends (read the “safe eclipse observing scenario” section to learn more).
  • Do initialize your telescope at least once on the night sky before you can perform a sun observation, including an eclipse. It doesn’t have to be initialized at the location you are going to observe the eclipse from.
  • Do run the sun observation initialization before the totality phase. During the totality, your smart telescope won’t be able to find and point at the sun (yet it will be able to track the sun provided that it has already been initialized).
  • Do check that you have enough battery charge for the whole event as well as enough storage space on Vespera internal memory or Stellina USB stick.
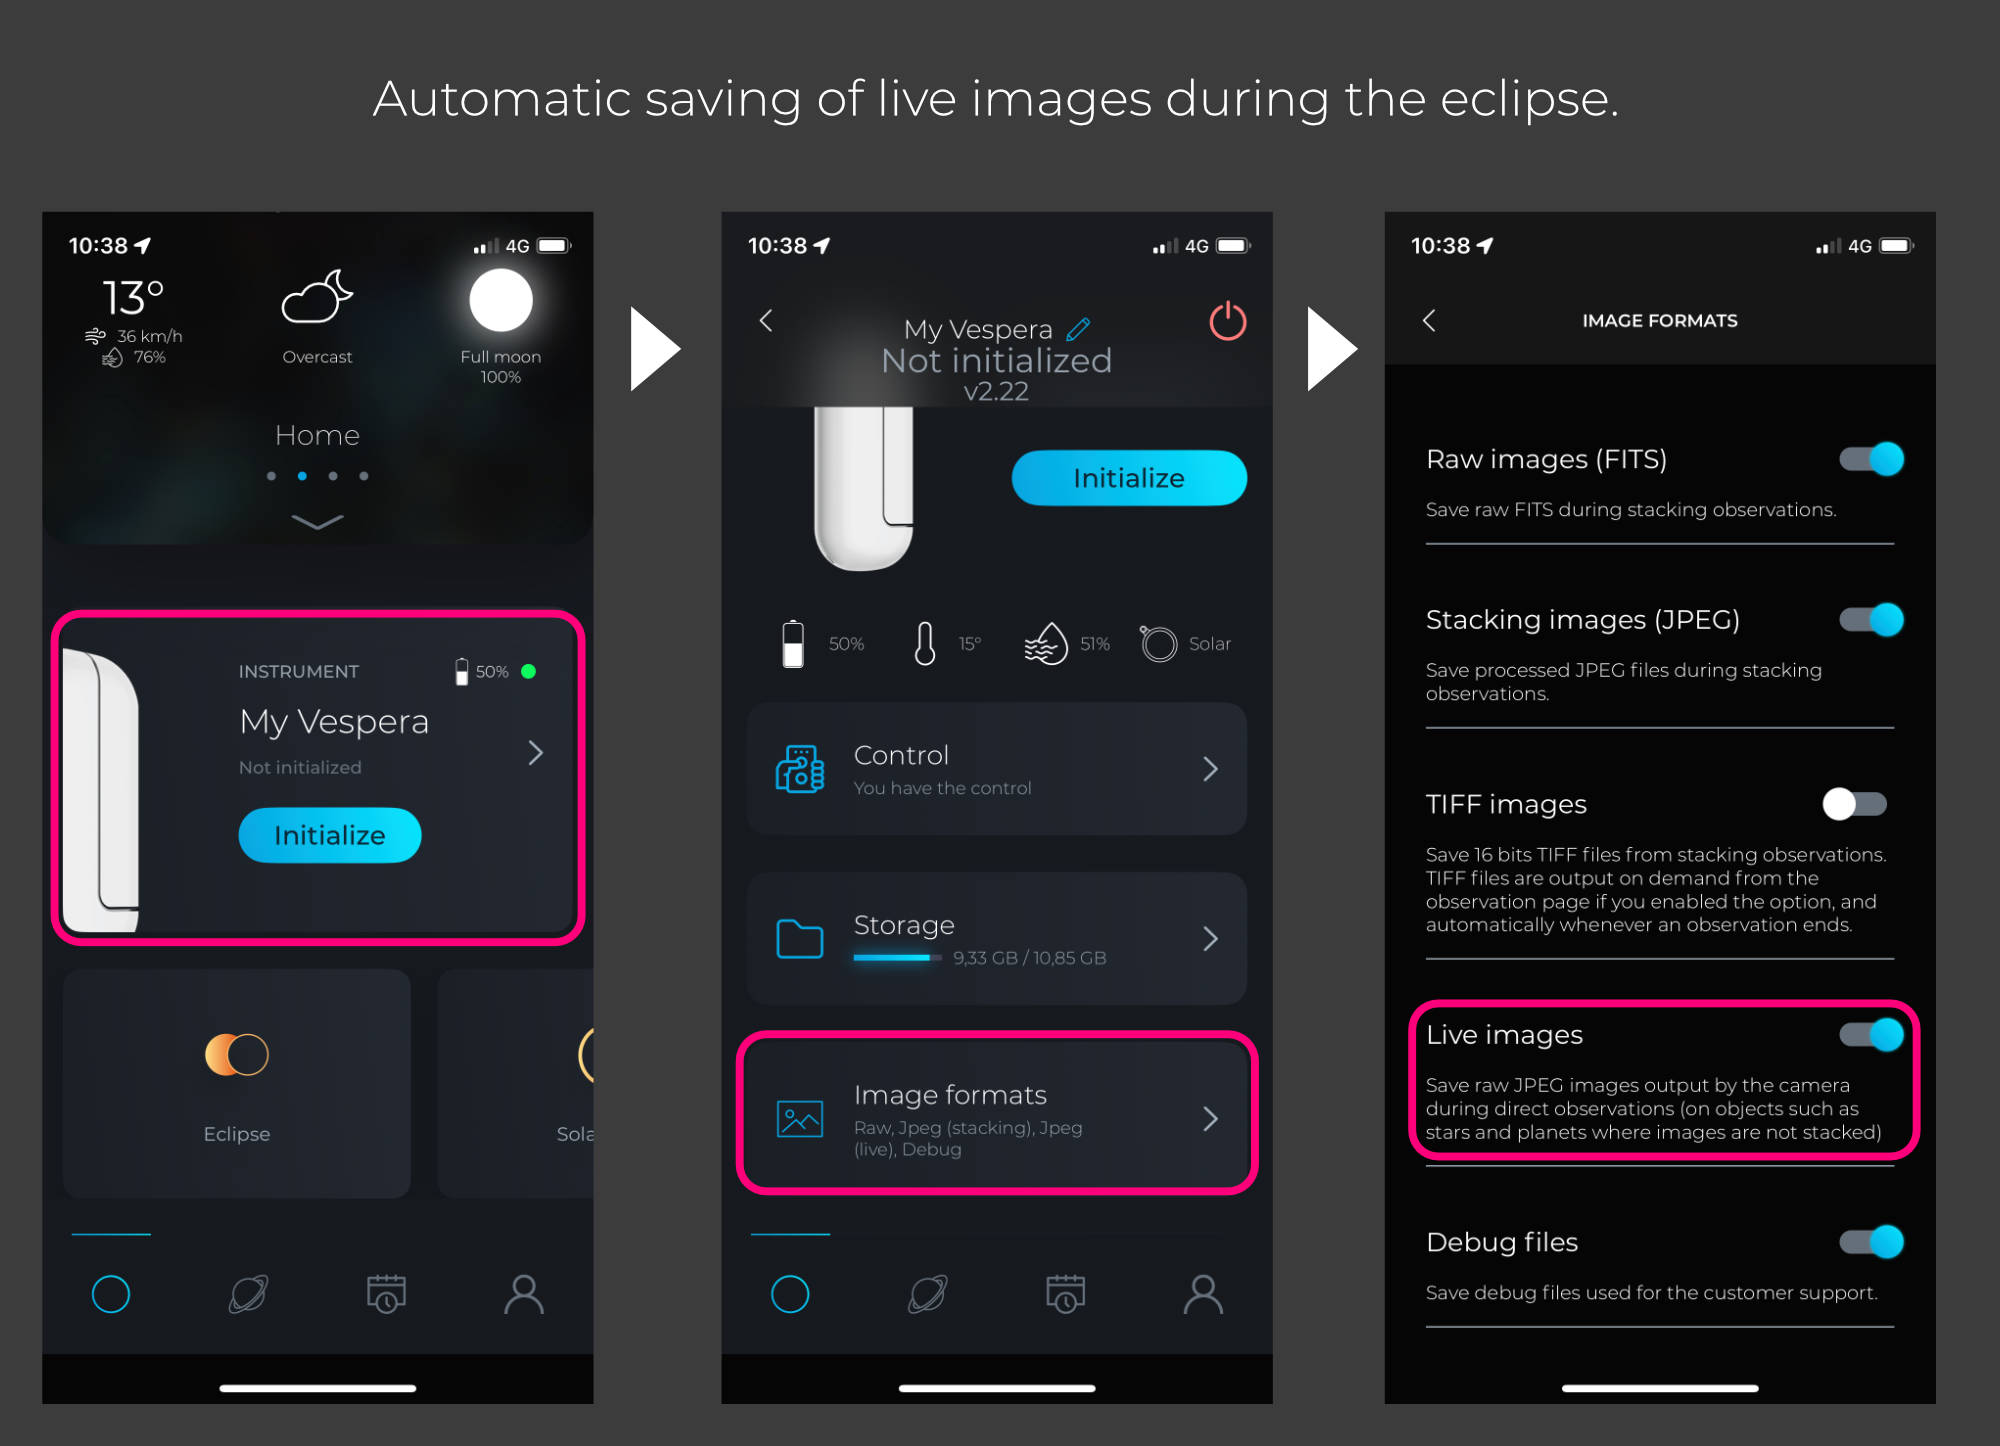
  • Do activate the “auto-save jpeg live-image” option in “image formats” from the instrument widget if you want to automatically capture the whole event.
  • Do not leave your telescope unattended during the observation.
  • With Vespera, during the totality, do not remove the filter while the security is still activated. This would cause the observation to stop and the arm to close. Ensure that the security is deactivated if you intend to remove the filter during totality.

1.3 About the Images saved during a solar and eclipse observation.

Only JPEG images are saved during a live observation, at the native resolution of the sensor (6MP for Stellina, 2MP for Vespera Classic, 6MP for Vespera Passengers, 8MP for Vespera II).
Enabling “auto-save live images” will save an image every 2 seconds (approximatively, depends on telescope model). This will allow you to compose a timelapse of the eclipse with third-party software afterwards.

Saving live images of the sun during the eclipse

Saving live images of the sun during the eclipse

2 Eclipse Observation tutorial with Vespera and Stellina

2.1 The eclipse mode

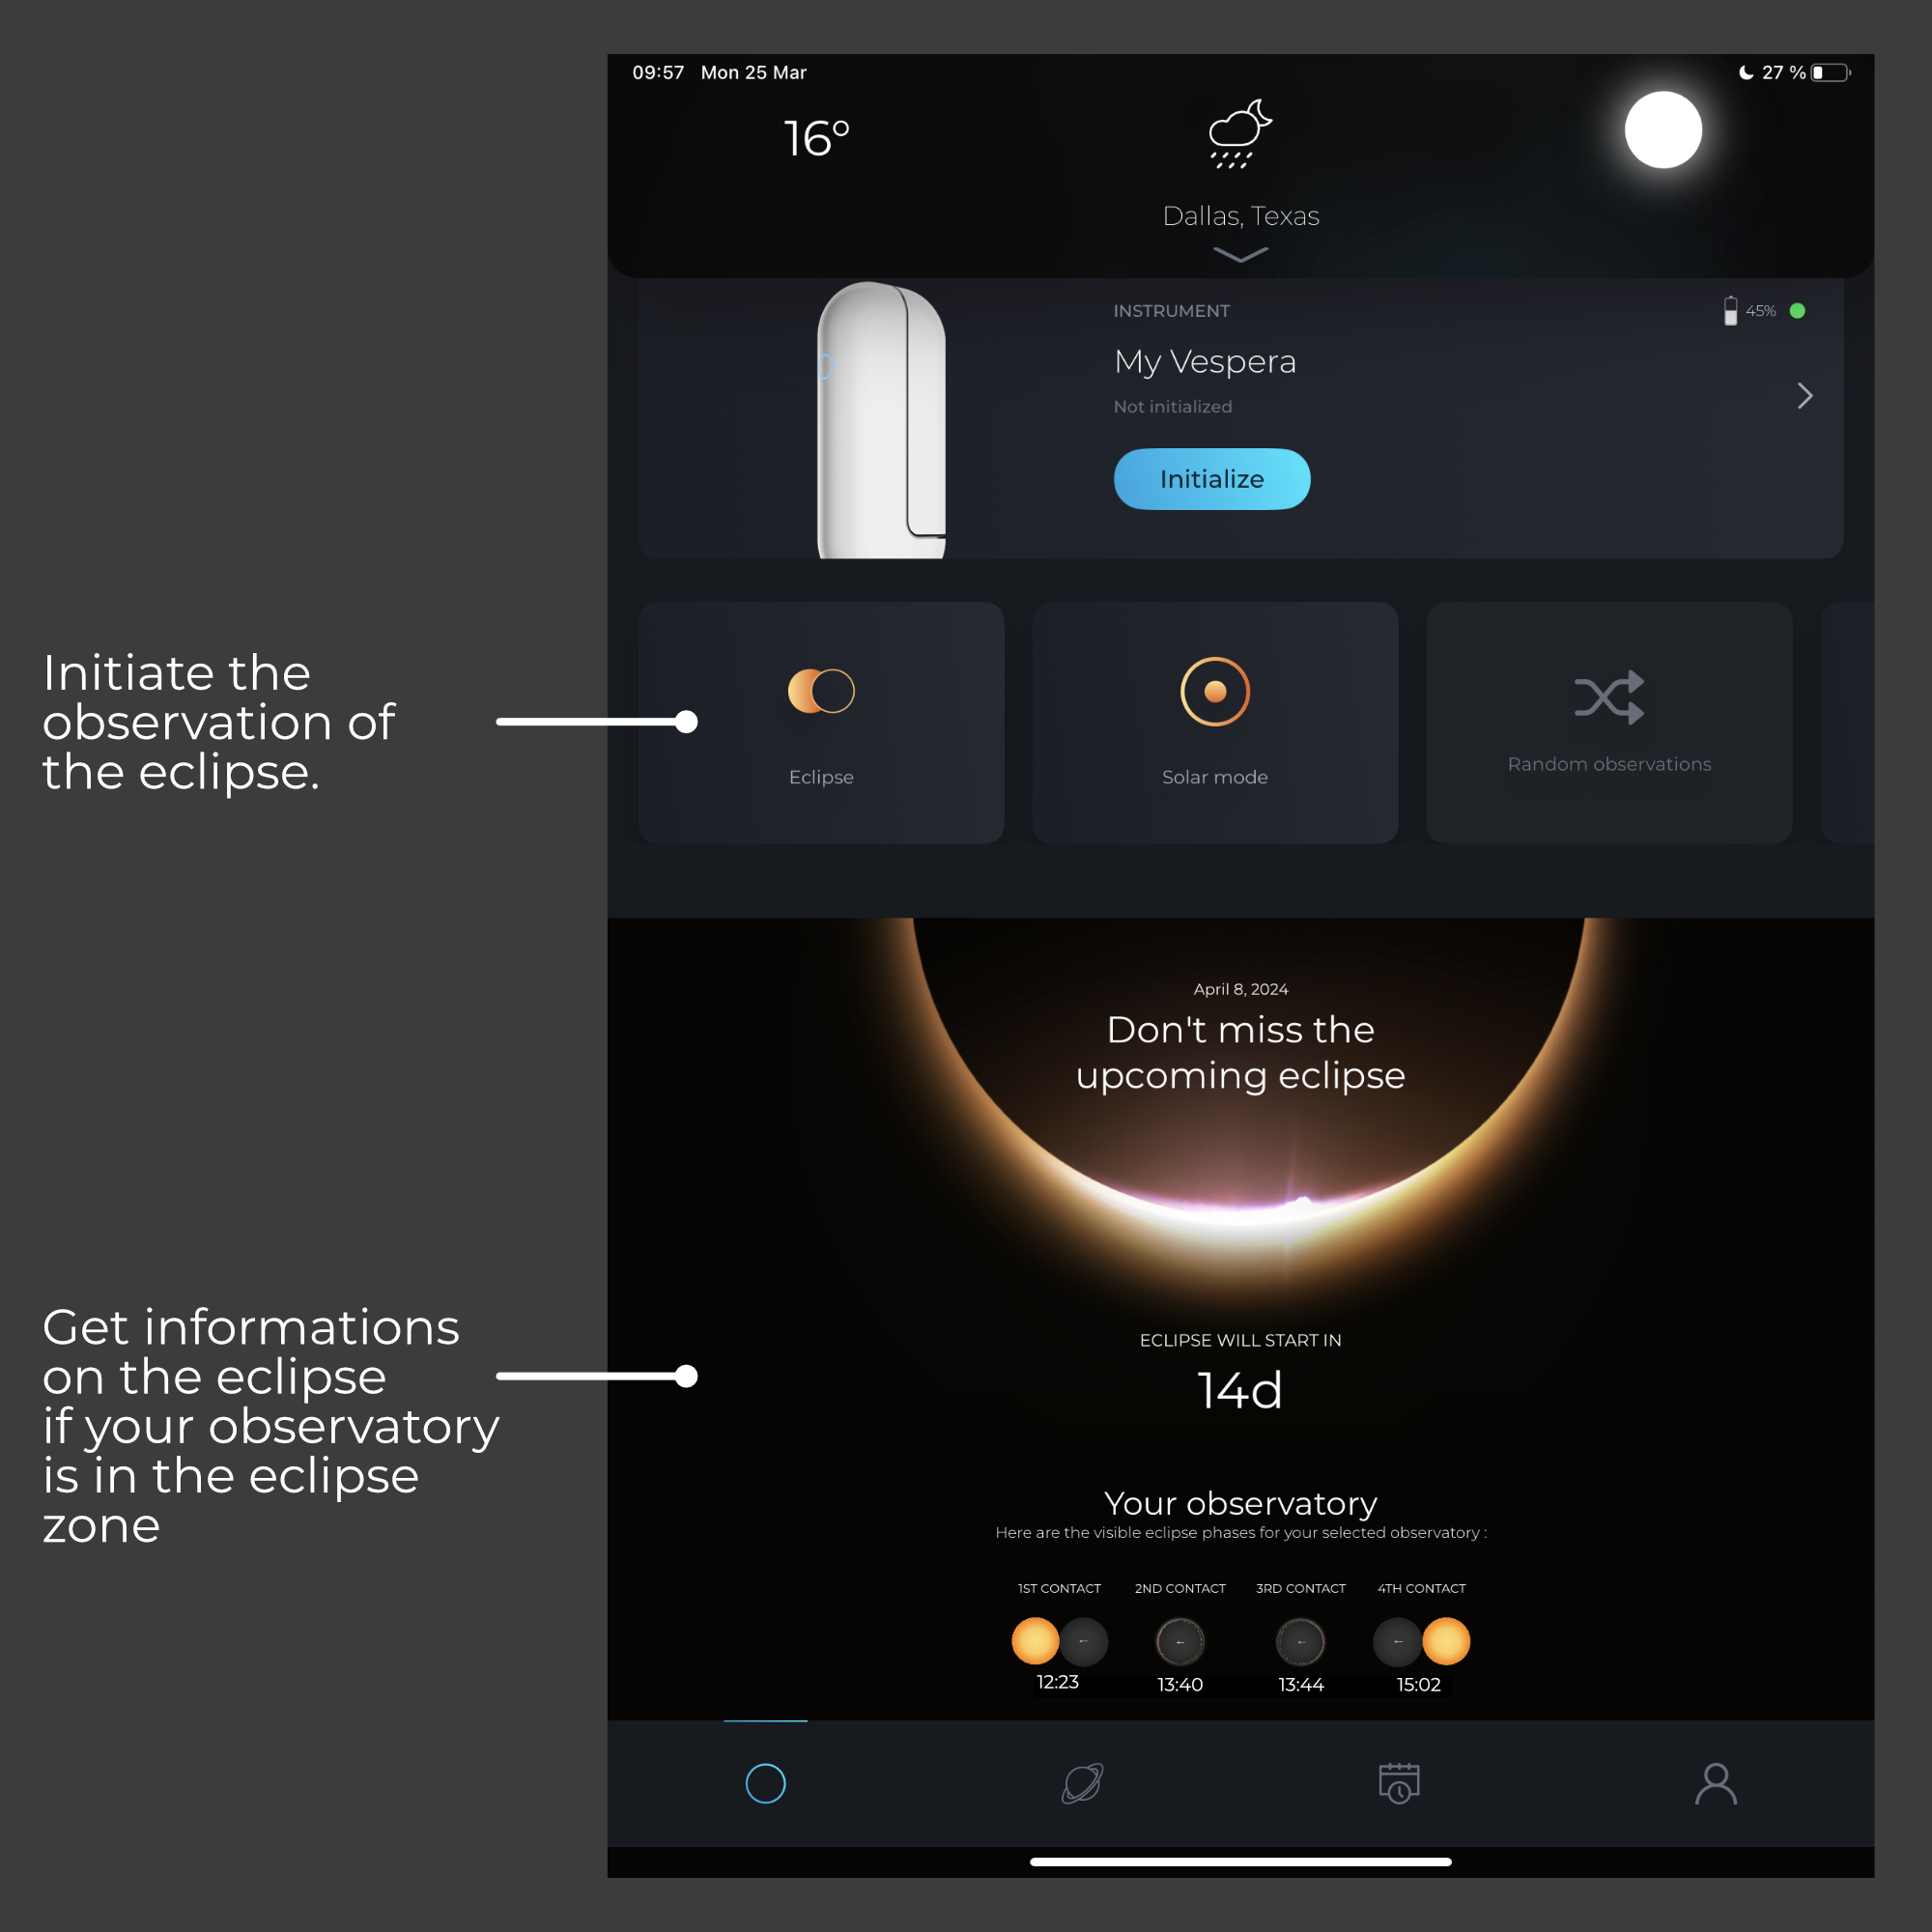
The Singularity app’s “space center” screen features a new eclipse observation mode alongside the solar mode. Additionally, it displays a countdown to the eclipse and an approximate timetable of the eclipse events based on the set observatory location (only if your observatory is within the eclipse observation zone).


The eclipse mode allows you to:

  • Bypass the security mechanism to remove the solar filter
  • Manually set exposure and gain
  • Manually adjust the focus
  • Switch between automatic and manual settings ( Vespera Only)

2.2 Initializing your smart telescope in eclipse mode

Basically, the procedure to start observing a solar eclipse is the same as the one required for a classic solar observation. Once you’re on the observation screen in the Singularity app, you’ll find the newly available features.

LEVEL UP THE SMART TELESCOPE

As with any observation, you first need to ensure your telescope is leveled. This is particularly important for a solar observation as there are no stars the telescope can plate solve on.

SET THE OBSERVATORY

Like any observation, you need to properly set the coordinates of your observation location. Refer to the Singularity video tutorial to learn more .

ENTER ECLIPSE MODE

Click the “eclipse mode” button from the space center screen. You’ll see instructions to follow. The telescope arm rotates to a safe position to allow the placement of the solar filter. Read the instructions and warnings.

Eclipse mode

PLACE THE SOLAR FILTER

As you would for a regular solar observation.
You won’t be able to initialize if the solar filter is not on.

ORIENT THE SMART TELESCOPE TOWARDS THE SUN

Manually turn the telescope on its base so that it faces the sun, as you would for a regular solar observation. You should be able to see a light streak between the body and the arm on the telescope’s shadow.

CONFIRM

Once you’ve confirmed the filter placement and the smart telescope is properly oriented, it will start to search for the sun then display the image as with a regular solar observation.

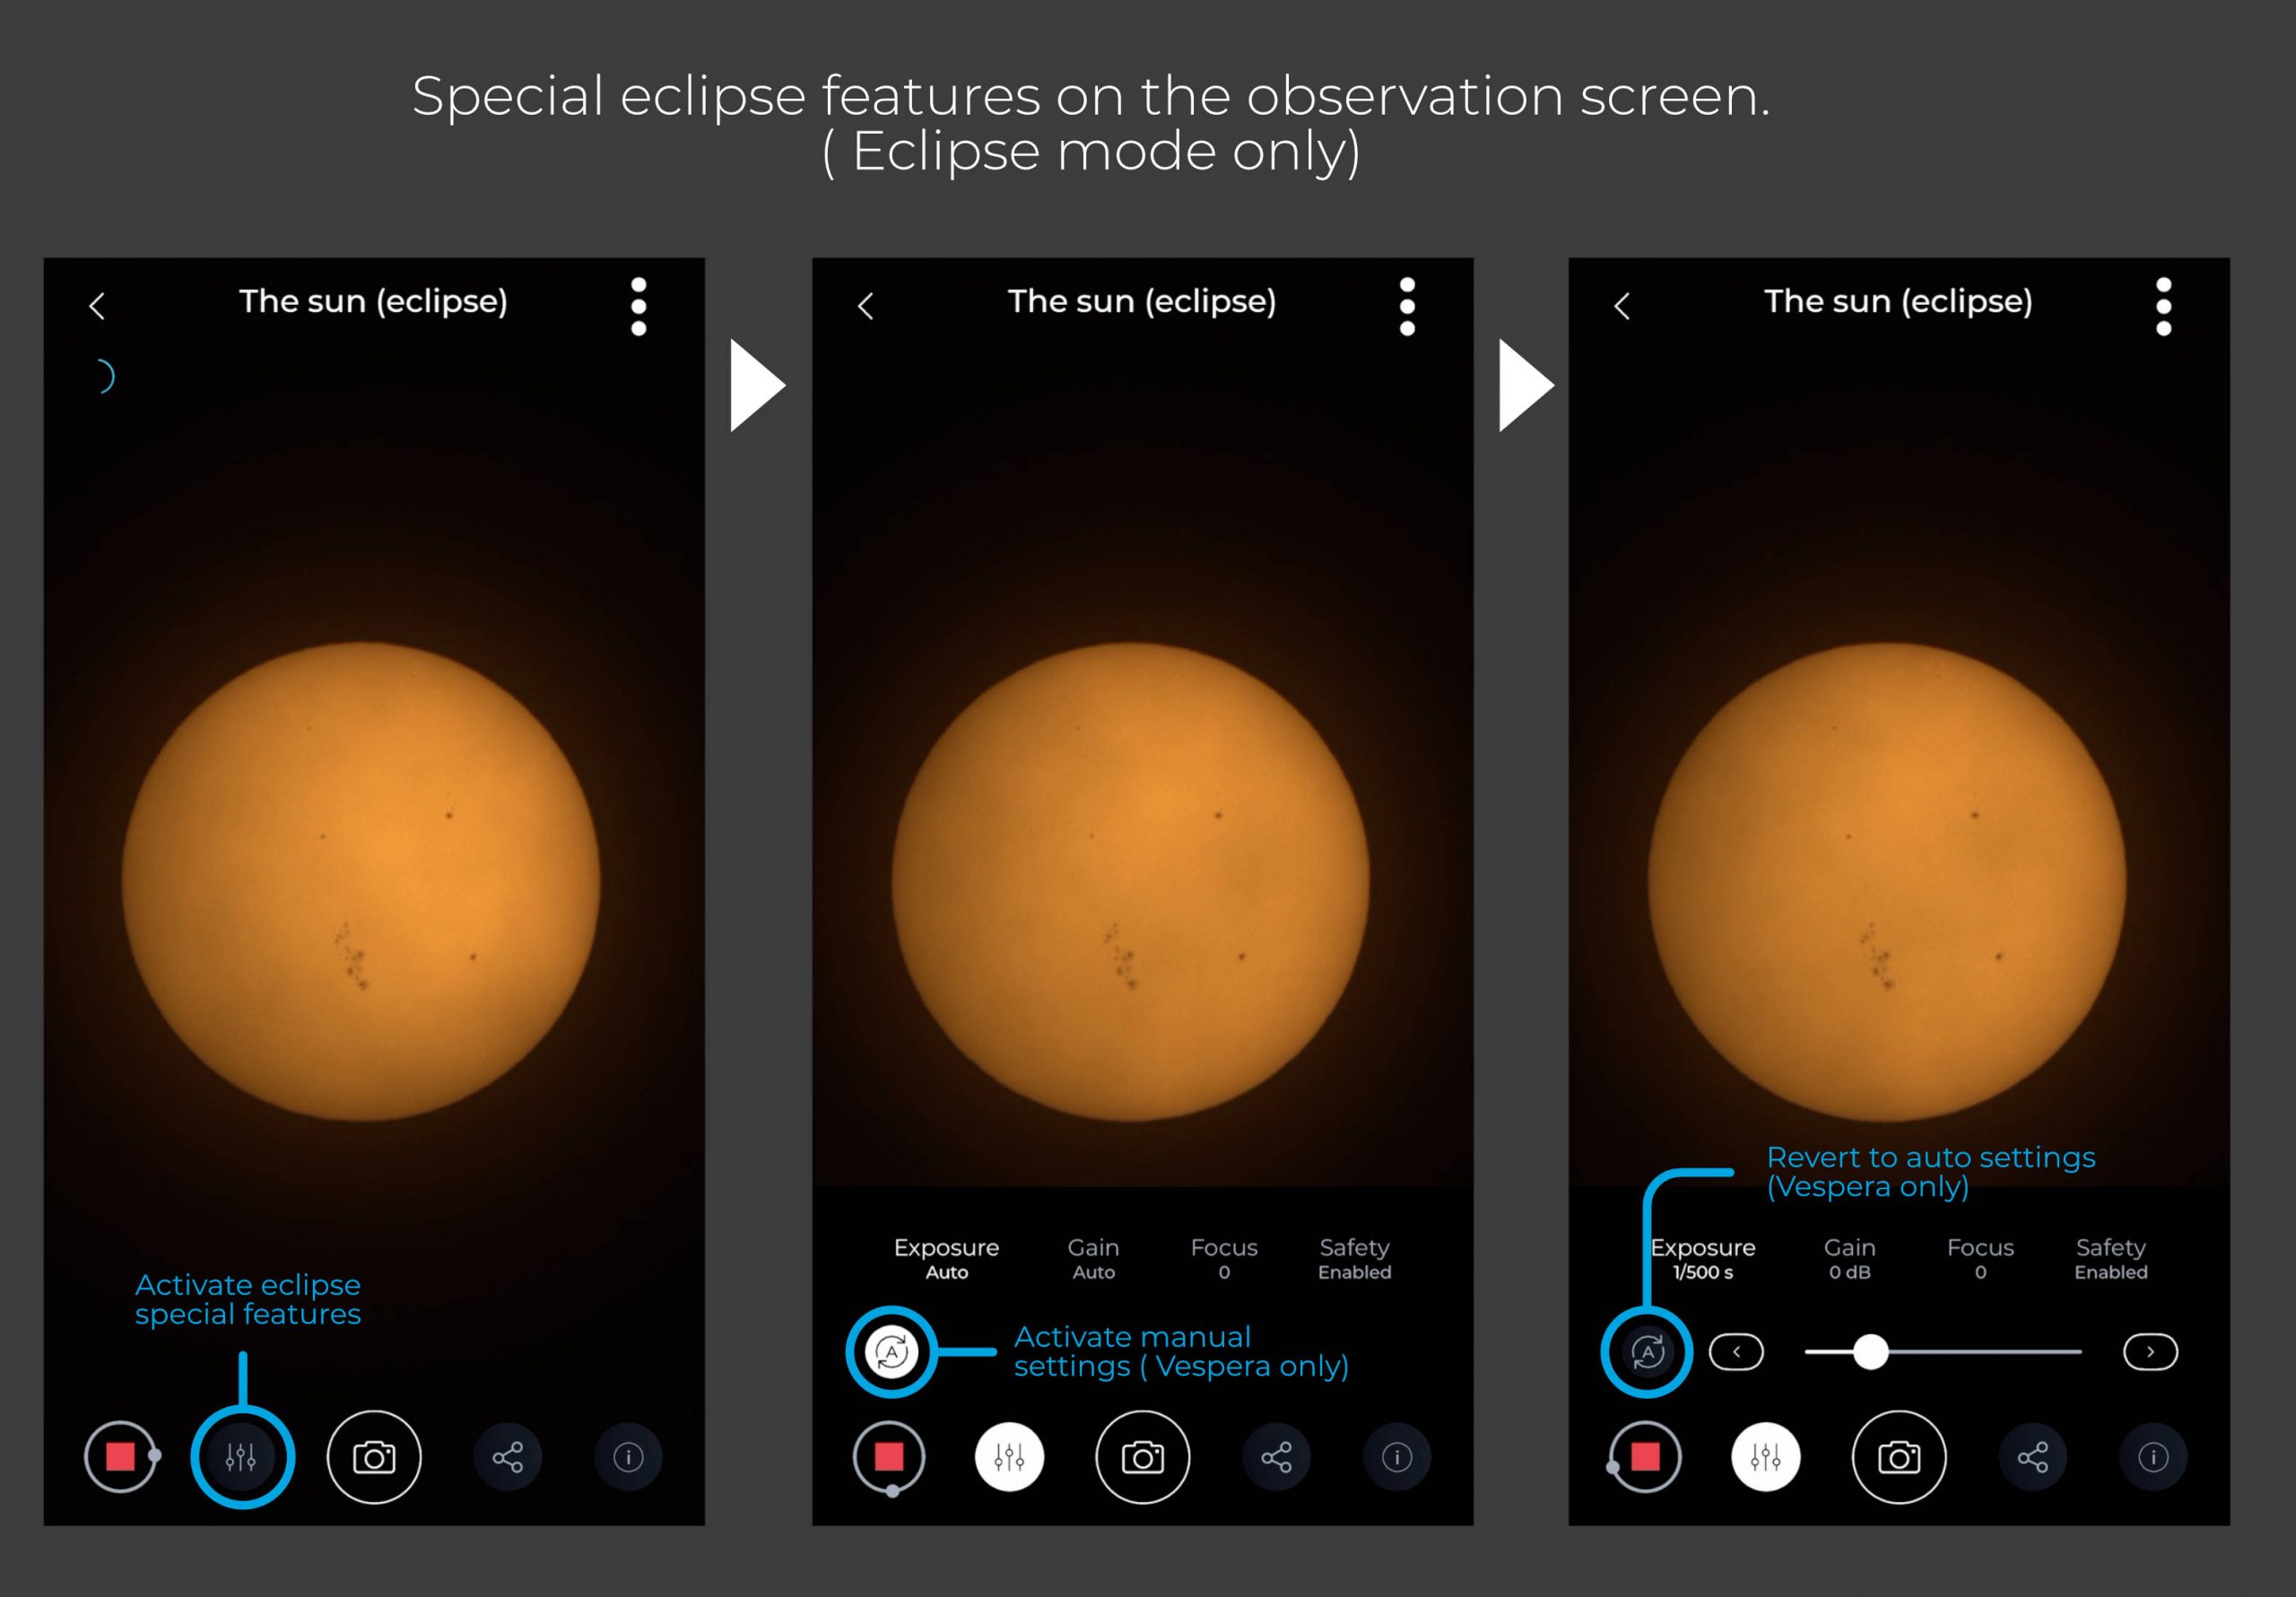
The observation screen is the regular solar observation screen with a new element:The bottom of the screen shows a new button to access the eclipse special features.

2.3 Setting exposure, gain and focus

To access the special features of the eclipse mode, once you are on the observation screen, tap the new “settings” button.

IMPORTANT NOTICE

By manually adjusting exposure and gain, you may end up with an overexposed image.
If the telescope security is activated, the telescope will enter safe mode after a few secondes, stop the observation and rotate the arm in a safe position.
Promptly revert to a correct exposure setting before the time limit to avoid this happening ( with Vespera, you can revert to automatic settings)


MANUALLY SET THE EXPOSURE

With Vespera, tap the automatic button to enter manual mode (no automatic mode on Stellina, only manual settings) Use the slider to set the exposure to the desired value. There’s a short delay for the changes to apply to the view. A dashed knob is shown at the original setting position until the final setting is applied.

MANUALLY SET THE GAIN

With Vespera, tap the automatic button to enter manual mode (no automatic mode on Stellina, only manual settings). Use the slider to set the gain to the desired value. There’s a short delay for the changes to apply to the view. A dashed knob is shown at the original setting position until the final setting is applied.

MANUALLY ADJUST THE FOCUS

You can adjust the focus relative to the default automatic position (it is not an absolute focusing value).
With Vespera, tap the automatic button to enter manual mode (no automatic mode on Stellina, only manual settings). Use the slider to set the focus to the desired value. There’s a short delay for the changes to apply to the view. A dashed knob is shown at the original setting position until the final setting is applied.

REVERT TO THE AUTOMATIC SETTINGS ( VESPERA ONLY)

At any moment, you can revert to the automatic settings (for example, if you don’t succeed in finding proper settings or lose the image because of low exposure value).
Tap the automatic button.

2.4 Deactivating the security

Proceed with caution, as there will no longer be automatic actions to prevent your smart telescope from getting damaged by direct sunlight exposure.
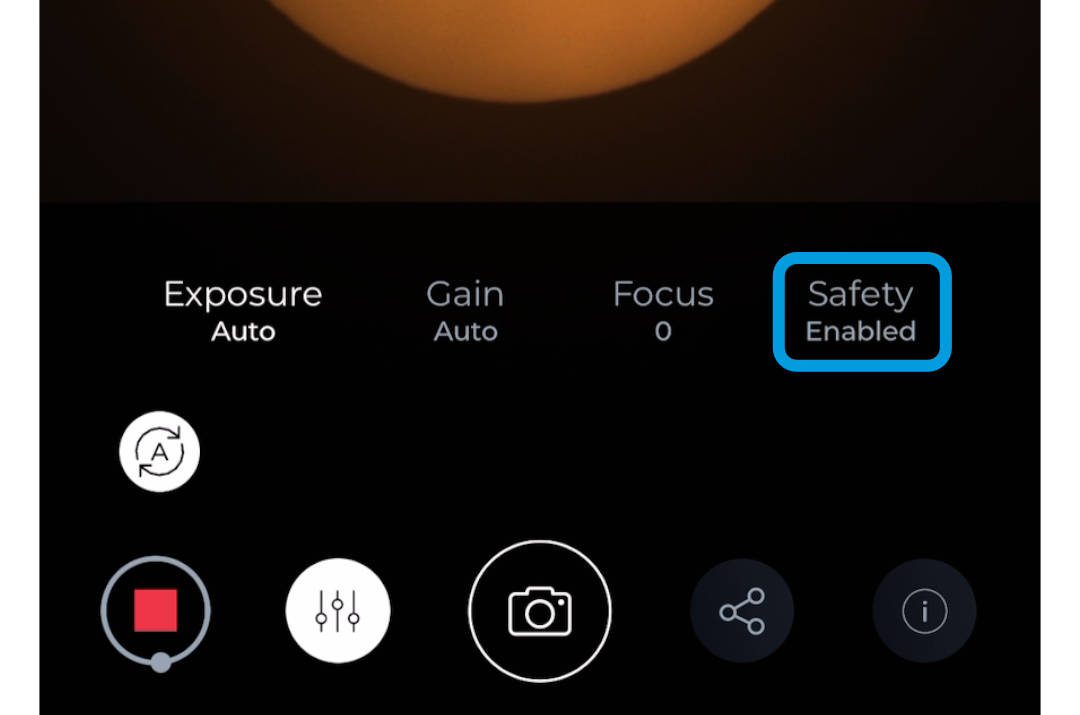
Tap “Safety” then “Disable” Read the warning that pops up then confirm if you want to deactivate the security.

2.5 Re-activating the security

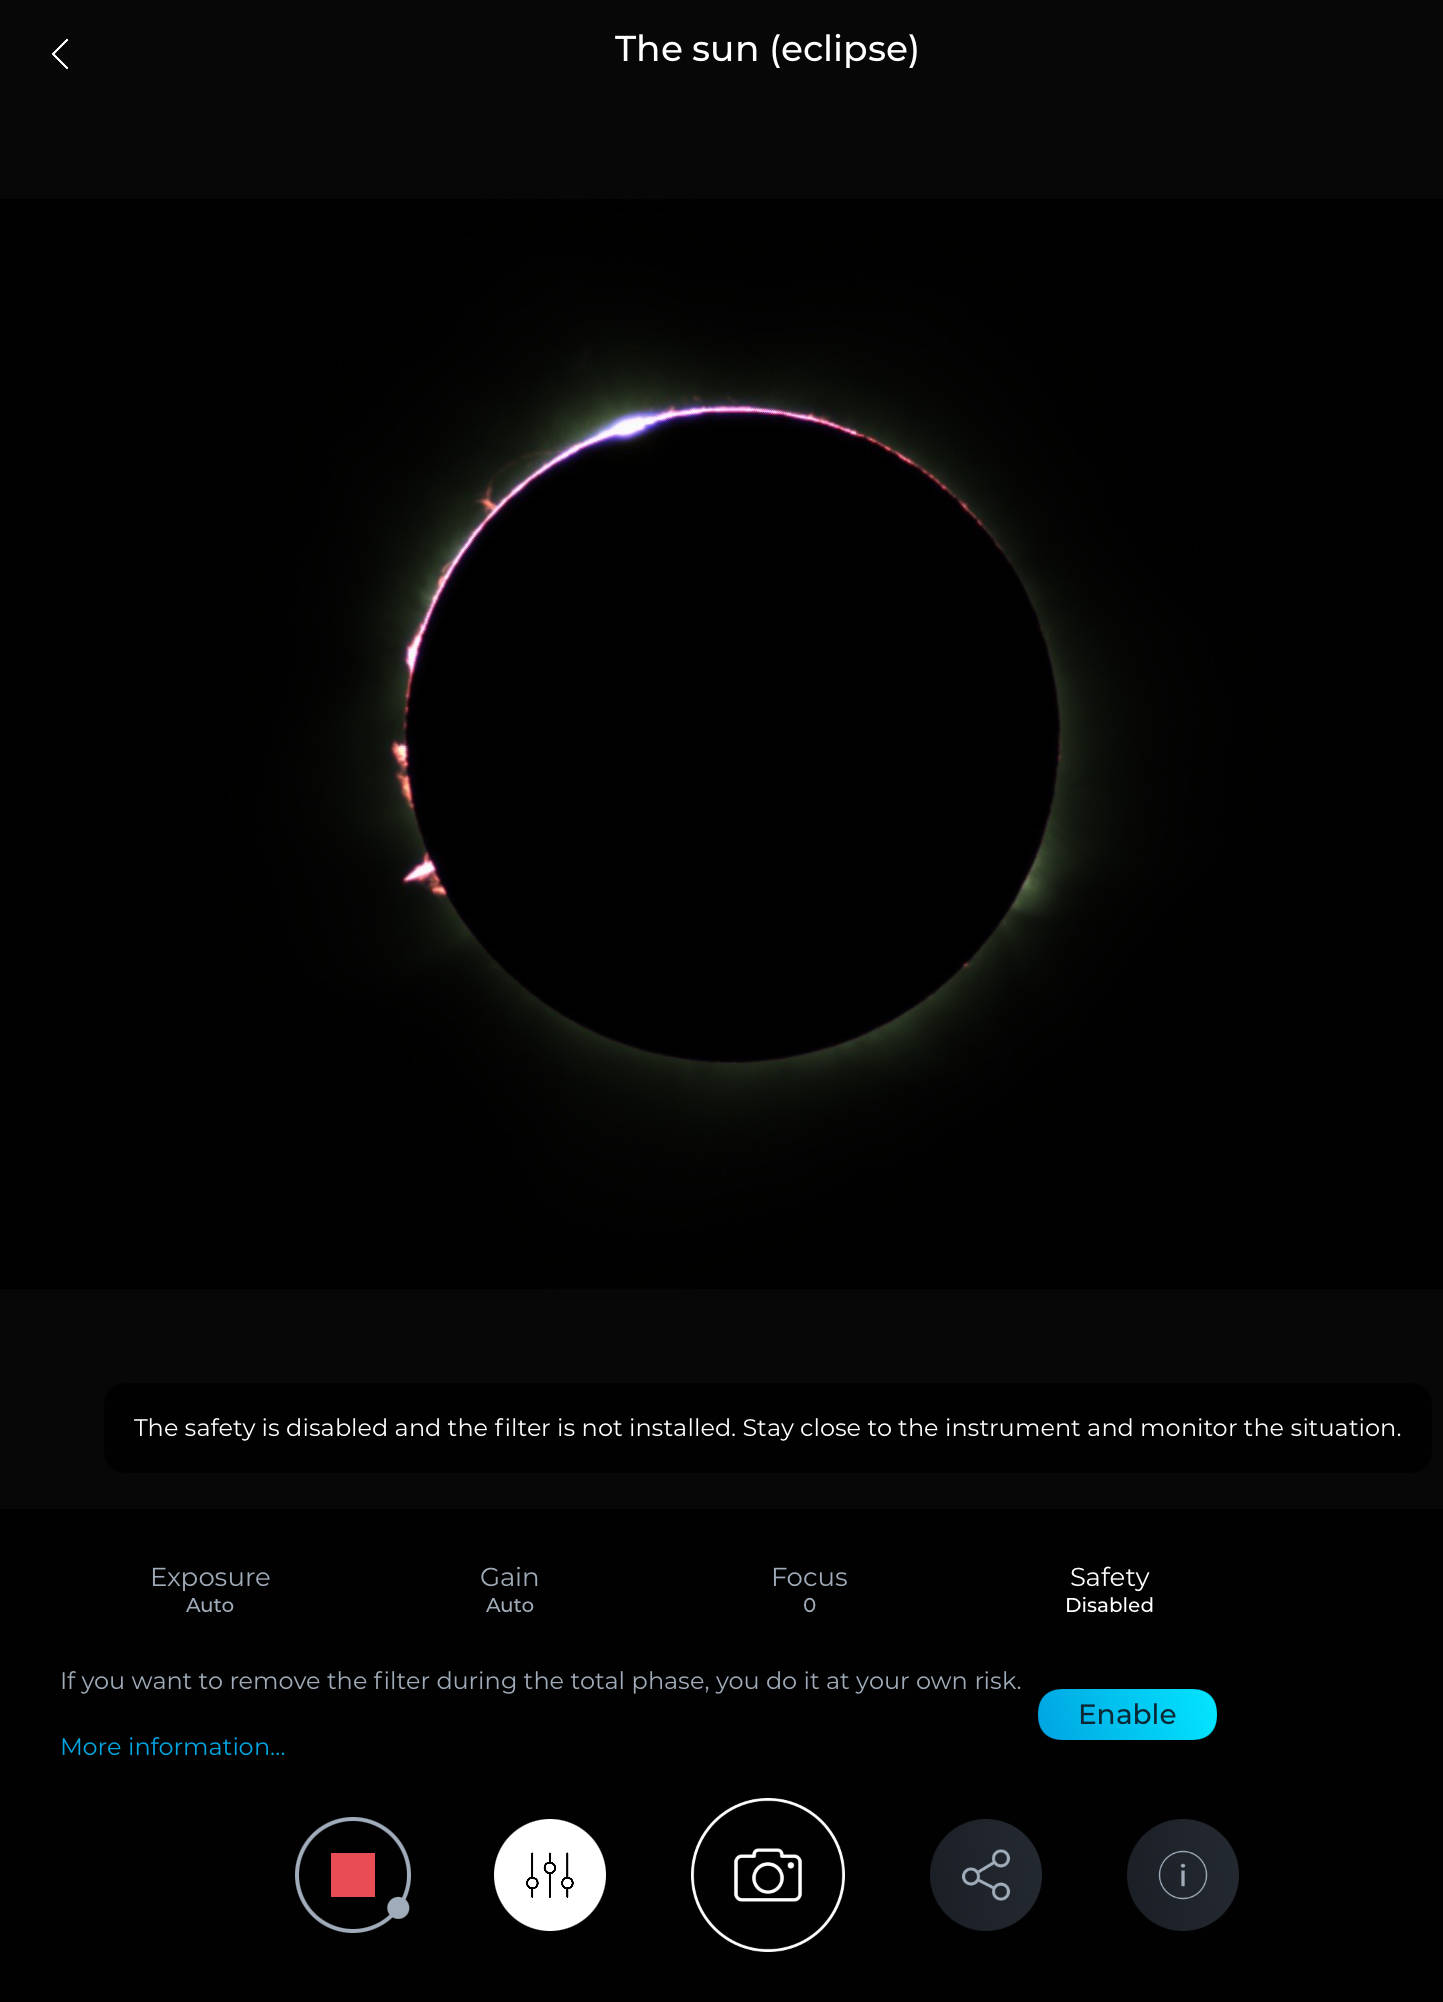
If the security is deactivated, the observation screen displays a blue “enable” button. Tap that button when you want to revert to the standard secured mode.
Please note that if you reactivate the security while the solar filter is removed (Vespera) or the image is overexposed, the telescope will enter safe mode after a few seconds and will end the observation and the arm of the telescope in a secure position.

Removing the filter to observe the totality phase

  • Deactivate the security (see above).
  • Wait for the totality phase to begin.
  • Gently remove the solar filter.
  • Manually set exposure and gain if necessary.
  • As soon as the totality ends, put back the solar filter.
  • Ensure the image is not overexposed ( With Vespera revert to automatic settings if necessary).
  • Re-engage the security mode.

Observing the eclipse with Vespera

3 Safe and no-stress eclipse observing scenario.

Here is a sample scenario you can follow to enjoy every aspect of the eclipse with your Vaonis smart telescope while keeping it safe. As the second part of the eclipse (from third contact to fourth contact) is a repetition of the first part in reverse order, this provides an opportunity to get various views. This scenario mainly address those who will experience the total eclipse.

Days before the eclipse

  • Check that you have a solar filter and that it is not damaged.
  • Train to master a regular solar observation by using the eclipse mode (even if there’s no eclipse).
  • While NOT observing the sun, practice removing a filter without moving the telescope arm (for example, you can try this while observing the moon with the CLS or dual band filter, or just the lens ring).
  • Get accustomed to the special eclipse features (manual exposure, gain, and focus) during solar observations with the solar filter ALWAYS ON. Try getting an overexposed image while security is active to experience how the telescope react (still keeping the solar filter on).
  • Check the eclipse events timetable for your location in the Eclipse Guide .

The D day, ahead of the eclipse.

  • Check that your smart telescope battery is fully charged. Get a spare external battery just in case.
  • Check that you have plenty of storage space.

30 minutes before the PARTIAL eclipse begins.  (SOLAR FILTER ON)

  • Switch on your smart telescope
  • Check your observatory is properly set
  • Ensure save “live images” is activated
  • start the eclipse mode
  • Put the solar filter on
  • Start the solar observation
  • Adjust exposure, gain and focus if needed. If you end up with an overexposed image, revert to automatic settings ( Vespera only).

20 minutes before the TOTAL eclipse begins. (SOLAR FILTER ON)

  • Deactivate the security.
  • Progressively adjust exposure and gain if necessary.

Seconds leading to the totality. (SOLAR FILTER ON)

  • Progressively adjust exposure and gain to capture the Baly’s beads with the solar filter on. You will be able to capture them with the solar filter off at the end of the totality.
  • Once you’re not able to see anything while exposure and gain are high, this is the signal that you can safely remove the solar filter.
  • Gently remove the filter.

Seconds leading to the totality. (SOLAR FILTER OFF)

  • Continuously Adjust exposure and gain to observe the various features of the total eclipse ( prominences, inner corona and outer corona require different settings)

You may want to reduce exposure and gain 30 seconds or so before the totality ends ( to only have the chromosphere visible) to get ready to capture the Baly’s beads without the solar filter.

Do not forget to observe the eclipse with your own eyes (only during the totality phase)and to feel the mood around. There’s many features apart from the sun itself that can be experienced during a total eclipse. Check our eclipse guide to learn more (link)

End of totality, Baily’s beads and diamond ring reappearing. (SOLAR FILTER OFF)

  • Prepare to put the filter back on
  • Capture a few images of the Baly’s beads and the diamond ring without the filter.
  • A few seconds after the Diamond ring becomes visible put yourself in front of the telescope to block sunlight and have time to gently put back the solar filter.
  • Adjust the exposure and gain if necessary or revert to automatic settings if you struggle to find the right settings.

After totality ends (SOLAR FILTER ON)

  • Adjust settings if needed or revert to automatic.
  • Re-activate the security mode
  • Relax, have a drink with your teammates while enjoying the rest of the show (Keep an eye on your telescope)

Have fun !

Travel journal

Solar annular eclipse with Vespera

Many users of the Vespera smart telescope aimed their instruments at the sun on October 14, 2023, to observe the annular eclipse that swept across the western United States. It was an ideal opportunity to prepare for the grand final spectacle: the total solar eclipse on April 8, 2024. Delphine, a member of the Vaonis community, travelled from Europe with her Vespera telescope as carry-on baggage to witness the event. She shares her experience, explaining how Vespera enabled her to fully enjoy this magical moment under the best conditions.

Let’s set off on an adventure

The night is still deep, and as I open the door of the room, the cold violently rushes in. It’s 5°C. Although we are in Arizona, the nights are cold and dry in October. The stars are even more radiant, and Jupiter watches over this early departure. In over 3 hours, the moon will begin to take a bite out of the solar disk.

On the road to the observation site.

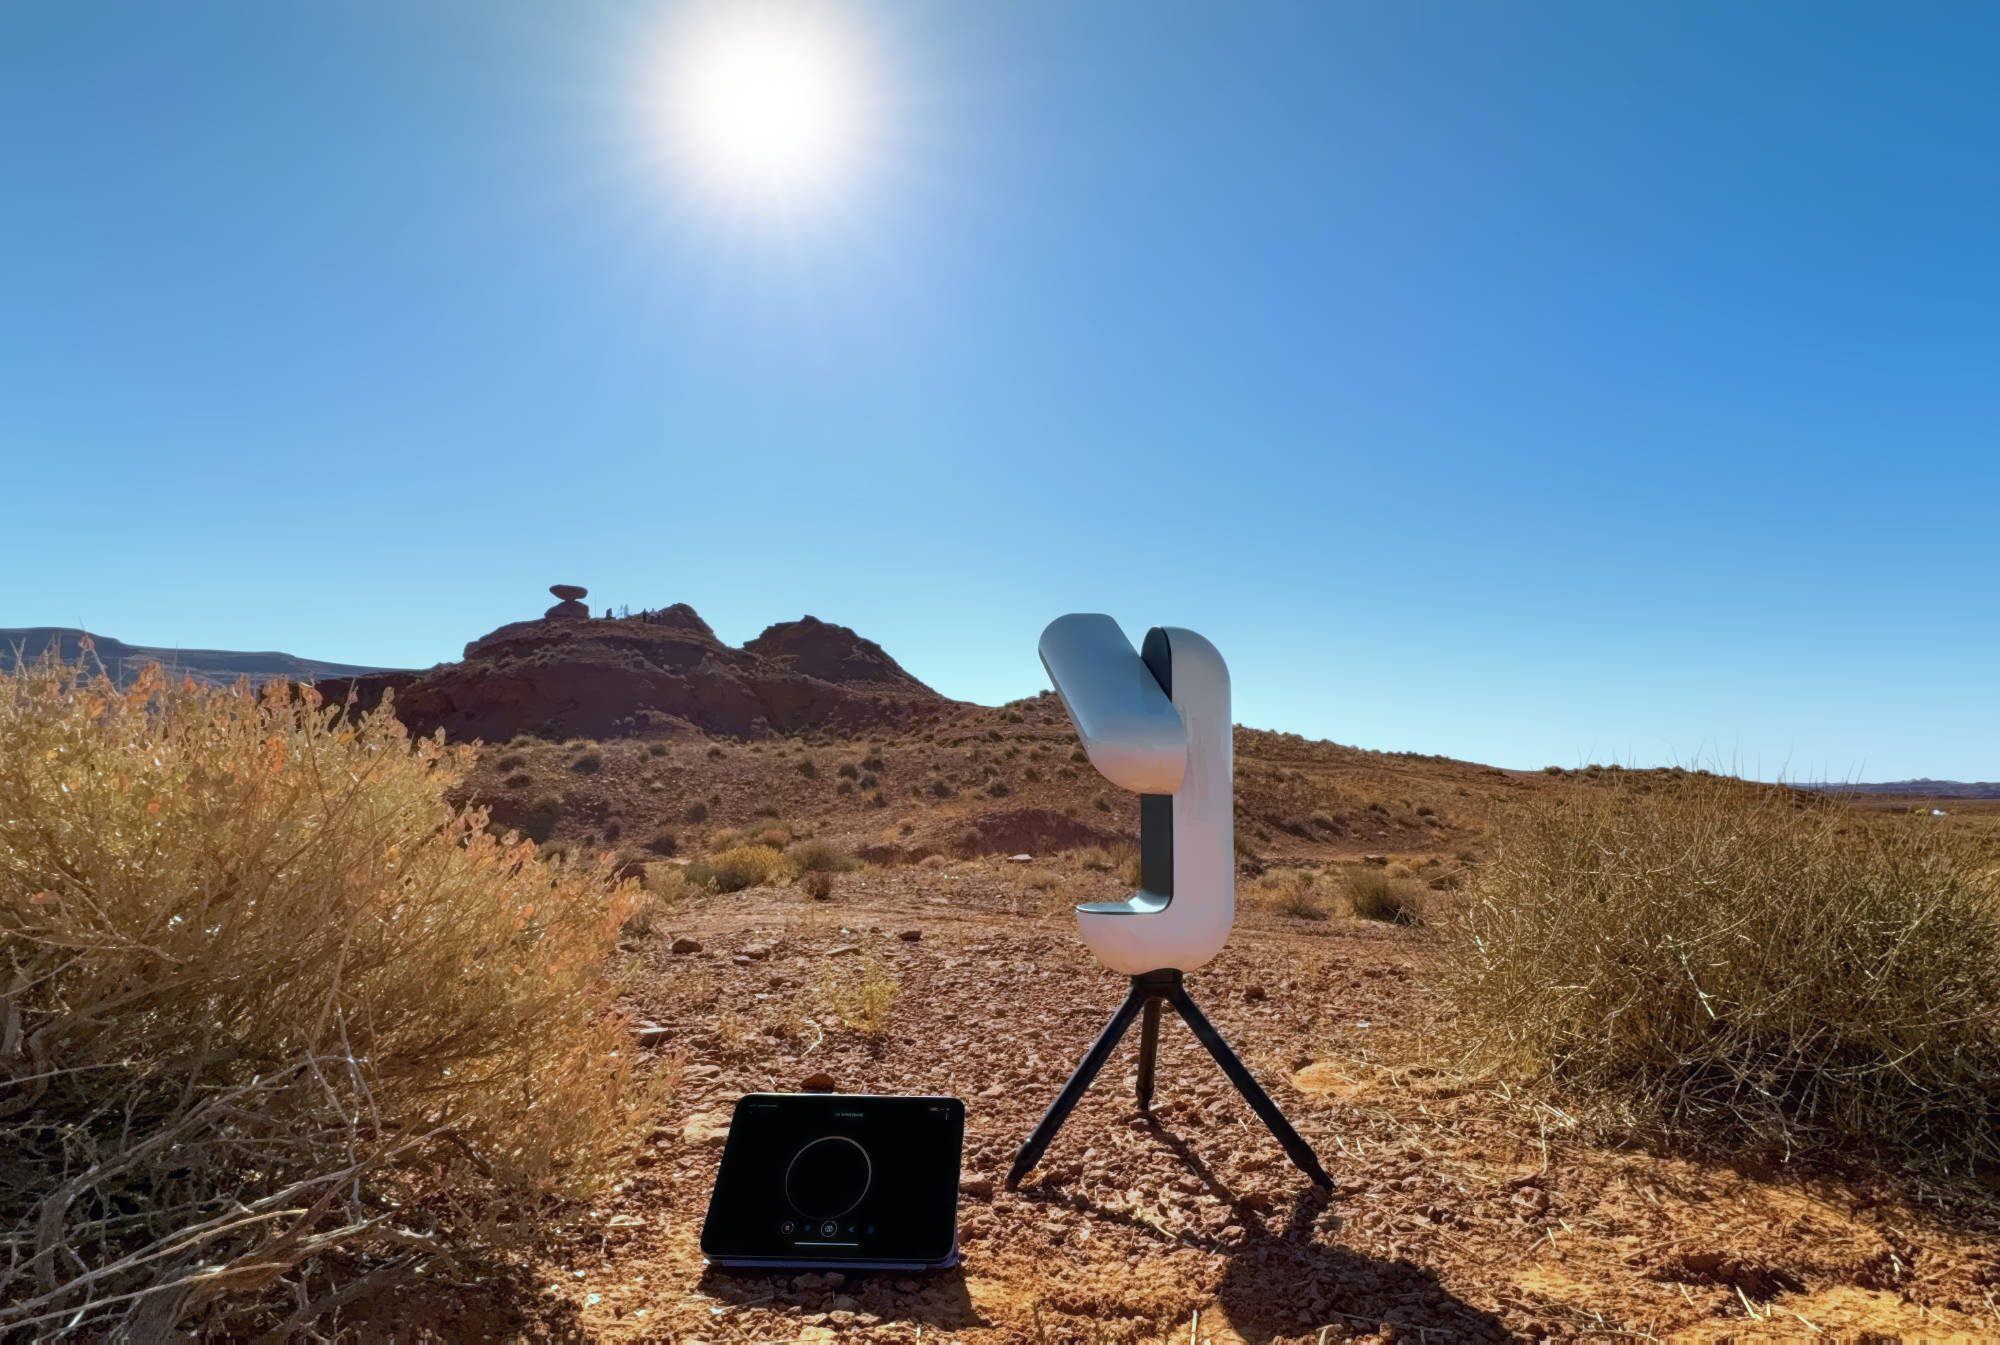
A few checks before setting out: Vespera is charged, and so are the backup batteries, cables, camera, tablet. We’re ready to go. In the minibus, no one is talking; everyone is focused on what awaits us. We head towards the Monument Valley Tribal Park, hoping to reach the most suitable spot and gain precious seconds of visibility at the eclipse’s maximum.

The Navajos informed us that the park will be closed. According to their culture, they will not observe the eclipse and will stay with their families.

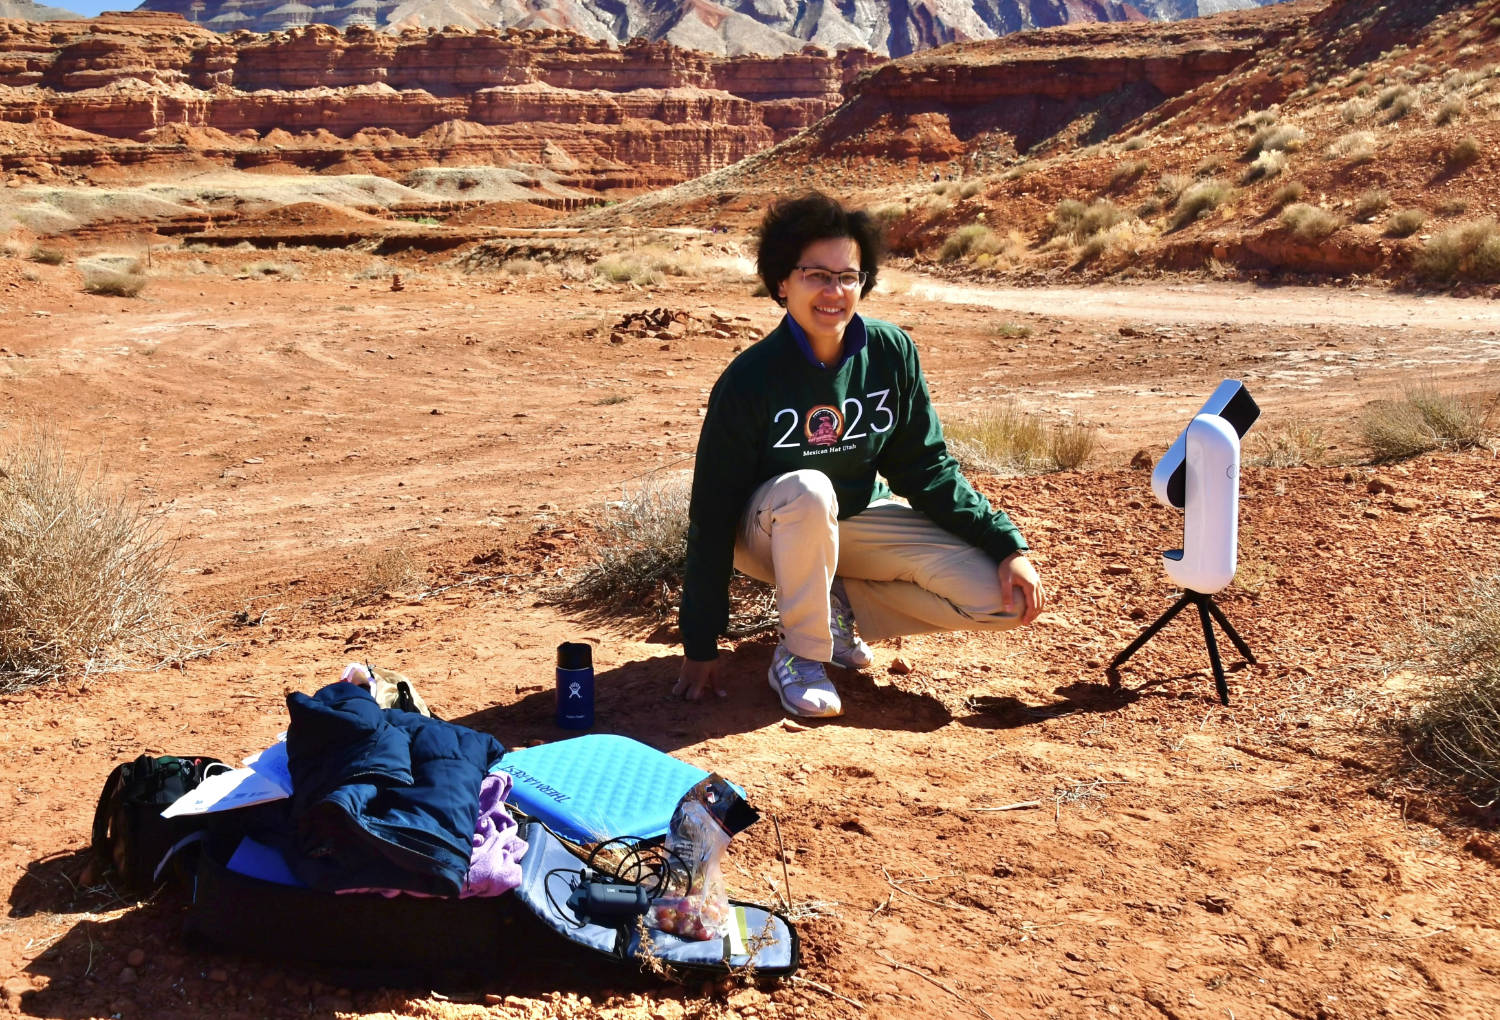
As the first light of dawn colors the horizon, we arrive at Mexican Hat. This site appeared to me to be quite suitable due to its orientation, accessibility, and panorama. Amateur astronomers who rented a spot for the night and slept under the open sky are already present on the site.

No clouds in sight. Conditions are looking perfect.

Venus on the eastern horizon, Mexican Hat, Utah.


Get the best solar gazing experience with Vaonis smart telescopes

Safe, “sunsational”, easy and memorable. Discover what makes Vaonis smart telescopes your best option to witness the upcoming solar eclipses and solar sunspots cycle. Order your Vaonis smart telescope now and get ready for the Total Solar eclipse on April 8, 2024 and the solar maximum activity in 2024 and 2025.


First contact: excitement builds up

I take out Vespera and position it in front of the group; it will serve as the figurehead of our adventure.

I start the smart telescope’s initialization, and within a few minutes, I’m operational. As a guide, I am the “timekeeper,” and I announce: T-10 minutes; -5 minutes; -2 minutes; -1 minute; -28 seconds… “First contact!”

Vespera ready for action.

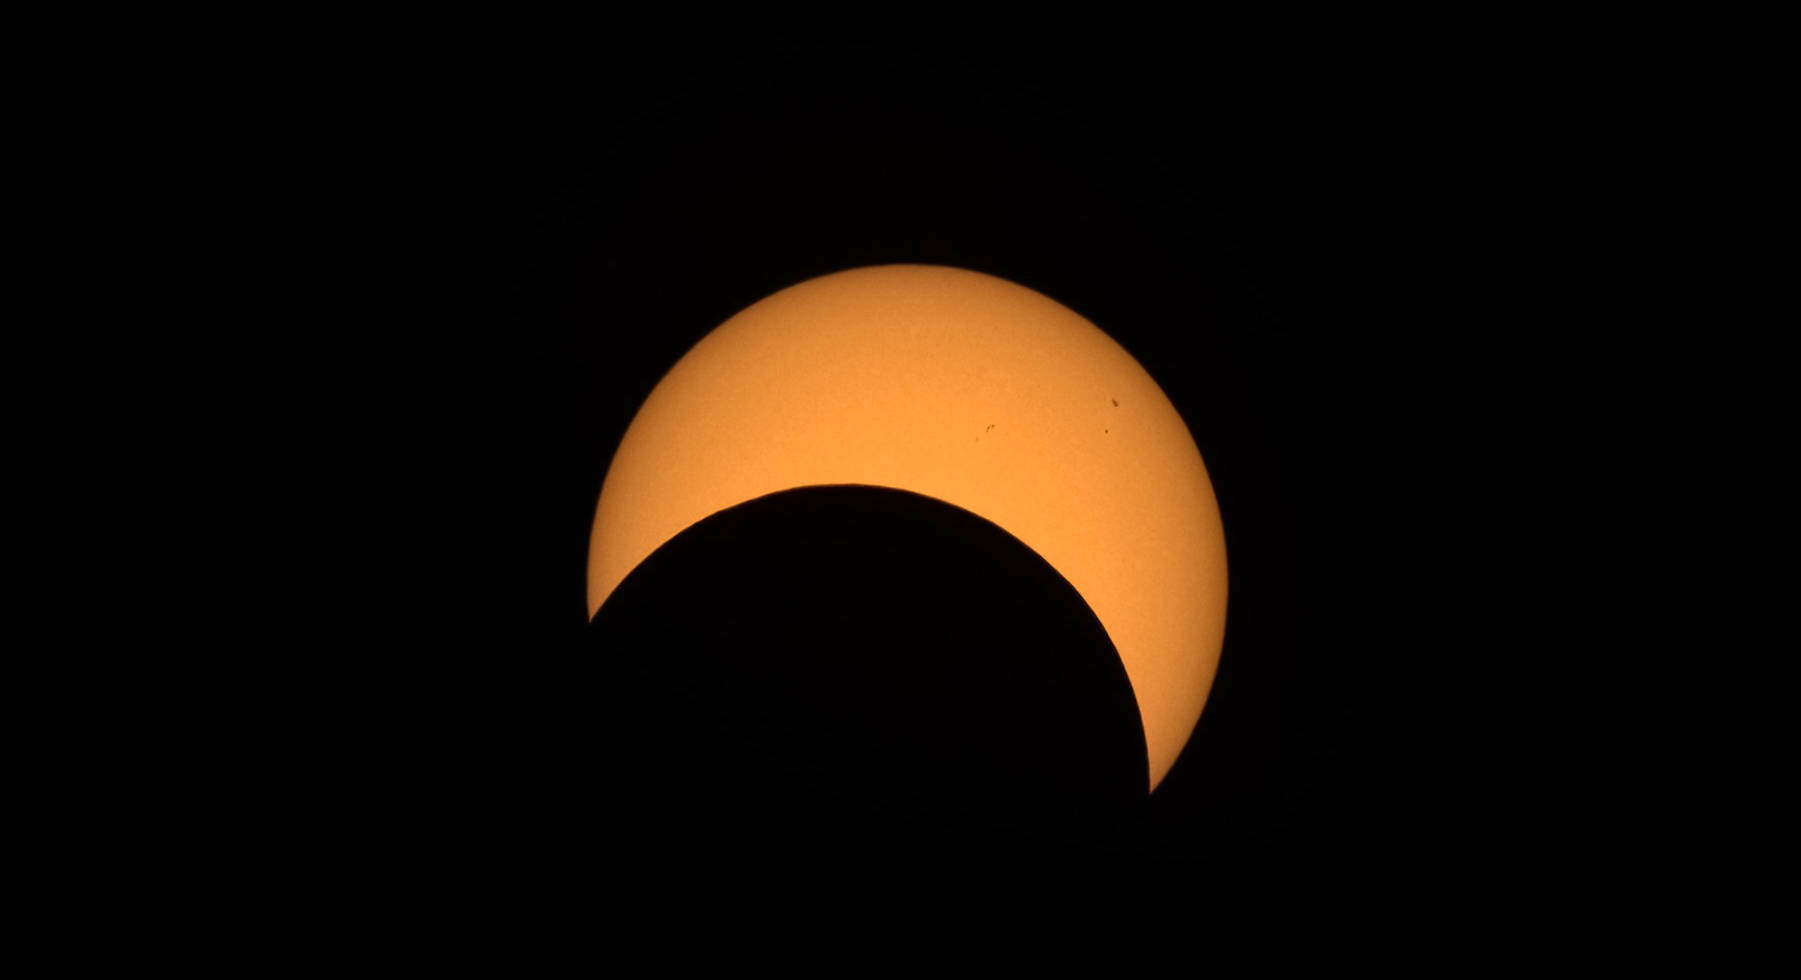
With the naked eye, the first contact (the moment when the moon begins to take a bite out of the sun) is not easy to discern, but on the tablet screen, where I observe the images taken by Vespera, it’s very clear. “I’ve got it!” Those observing with the naked eye then gather around Vespera. Excitement is at its peak.

Solar annular eclipse with Vespera smart telescope

A few moments after the first contact. Captured with Vespera.

The Moon continues its progress, and we eagerly await two well-positioned sunspots to be occulted by the moon’s advance. The atmosphere is so pure and dry that the sharpness of the sunspots is impressive in the image displayed in the Singularity app.

The second contact is approaching. In the group, we’re finalizing our eclipse projection setup, while tension is rising among the photographers.

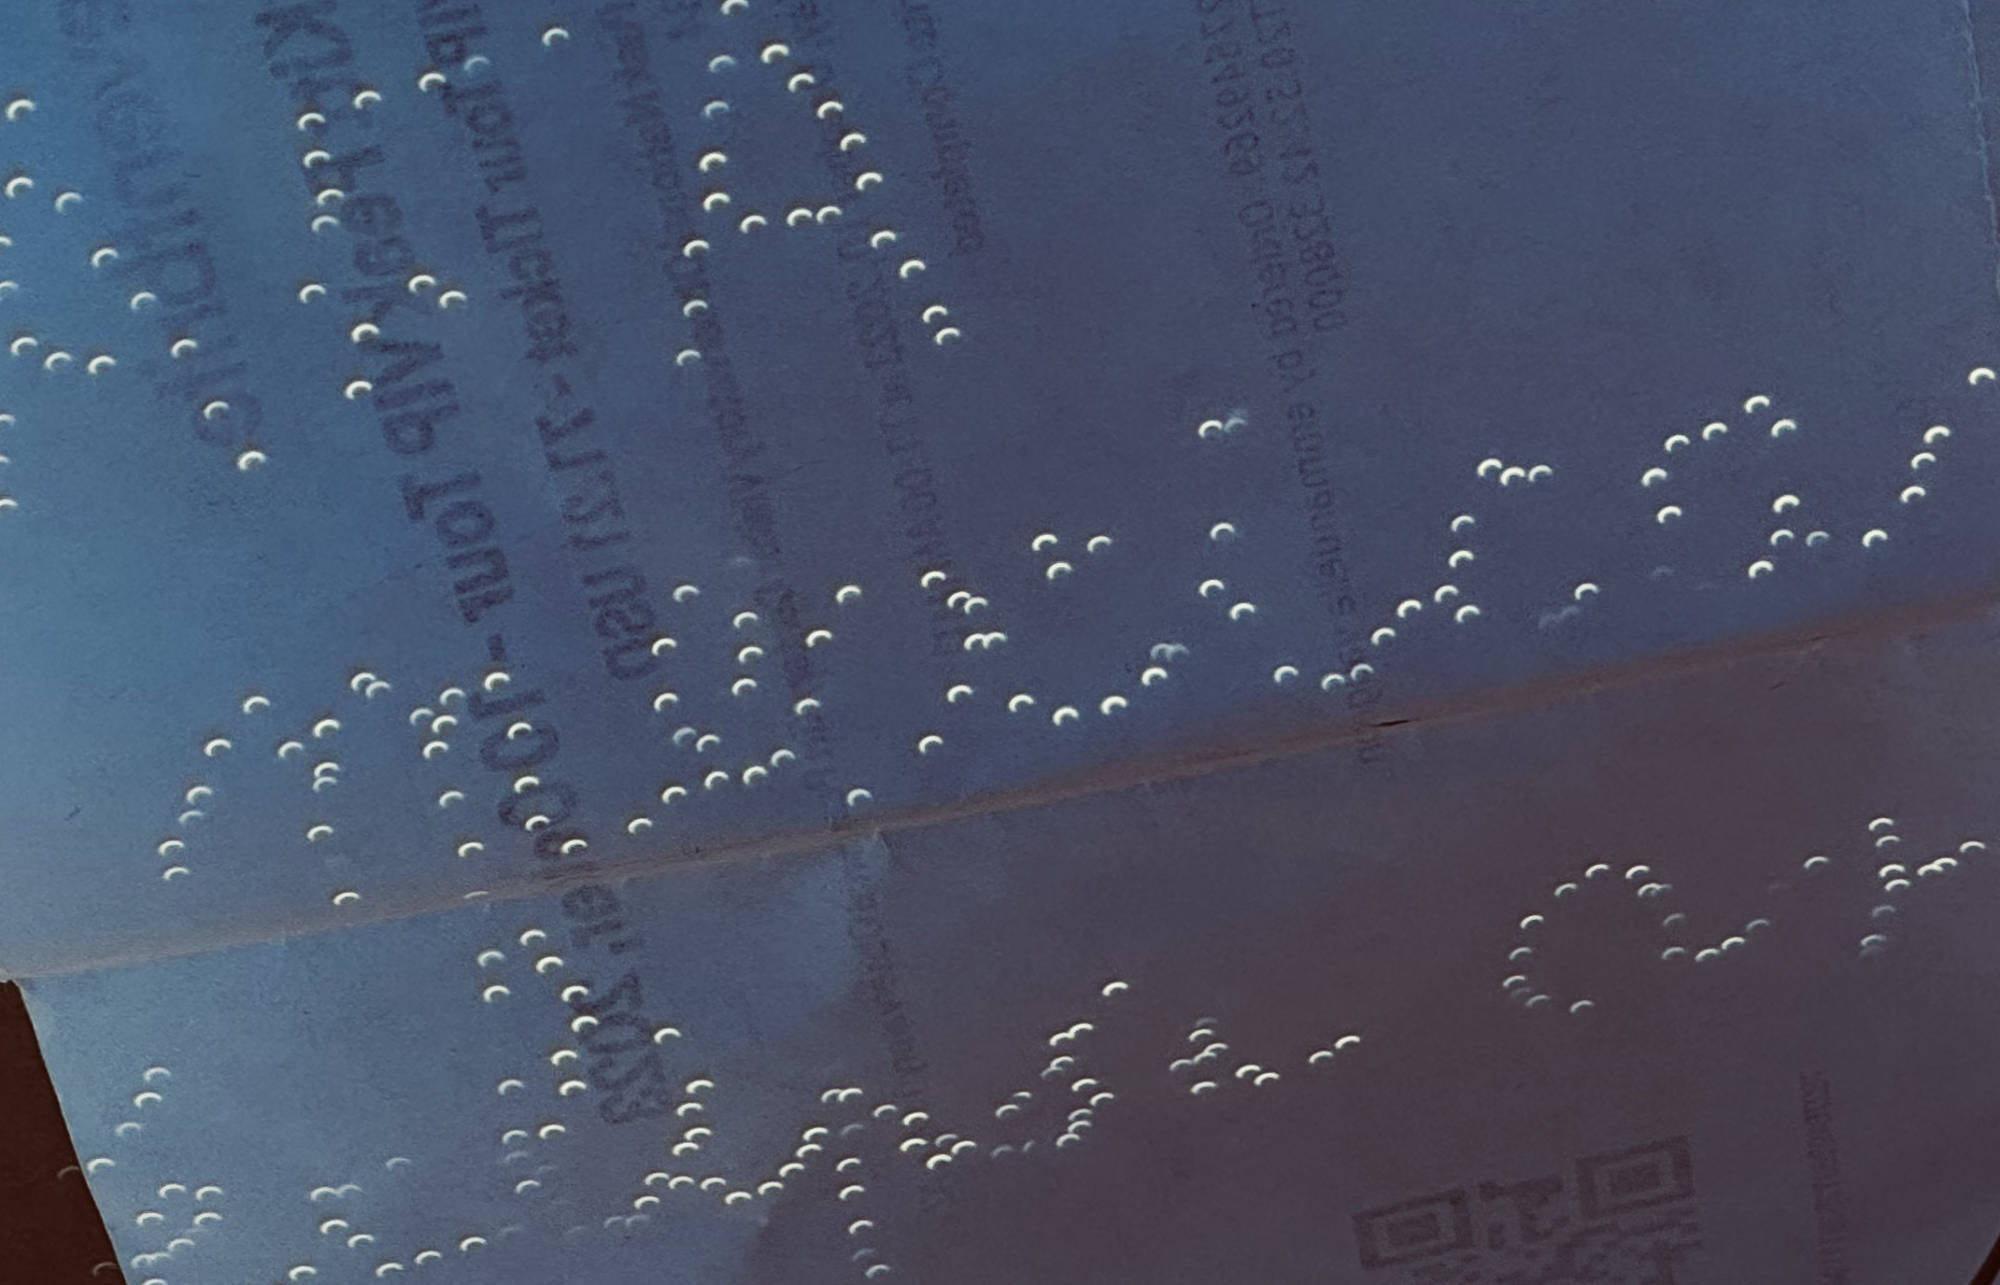
By making small holes in cardboard, we also follow the phenomenon by projection.

Observing the sun through projection: the pinhole effect.

For the first time, I’m very relaxed: Vespera is working perfectly, and after more than an hour, the battery displays 85%. I won’t need external batteries to observe the entire phenomenon.

The crucial moment, as intense as it is short

“T-3 minutes!” The light, so warm just moments ago, becomes twilight, veiled. A shiver runs through us; it’s not just emotion, but the temperature is dropping significantly. The desert didn’t have time to warm up, and we’re back to the same cold we had upon arrival; some put on their gloves and hats.

I try to capture this grayish light while announcing the countdown.

“T-2 minutes; T-1 minute; 24 seconds; 2nd contact!” There it is! The seconds contact, and the ring of fire takes shape.

Solar annular eclipse with Vespera smart telescope

Second contact captured with Vespera.The irregular relief of the moon’s outline can be seen against the sun’s disc.

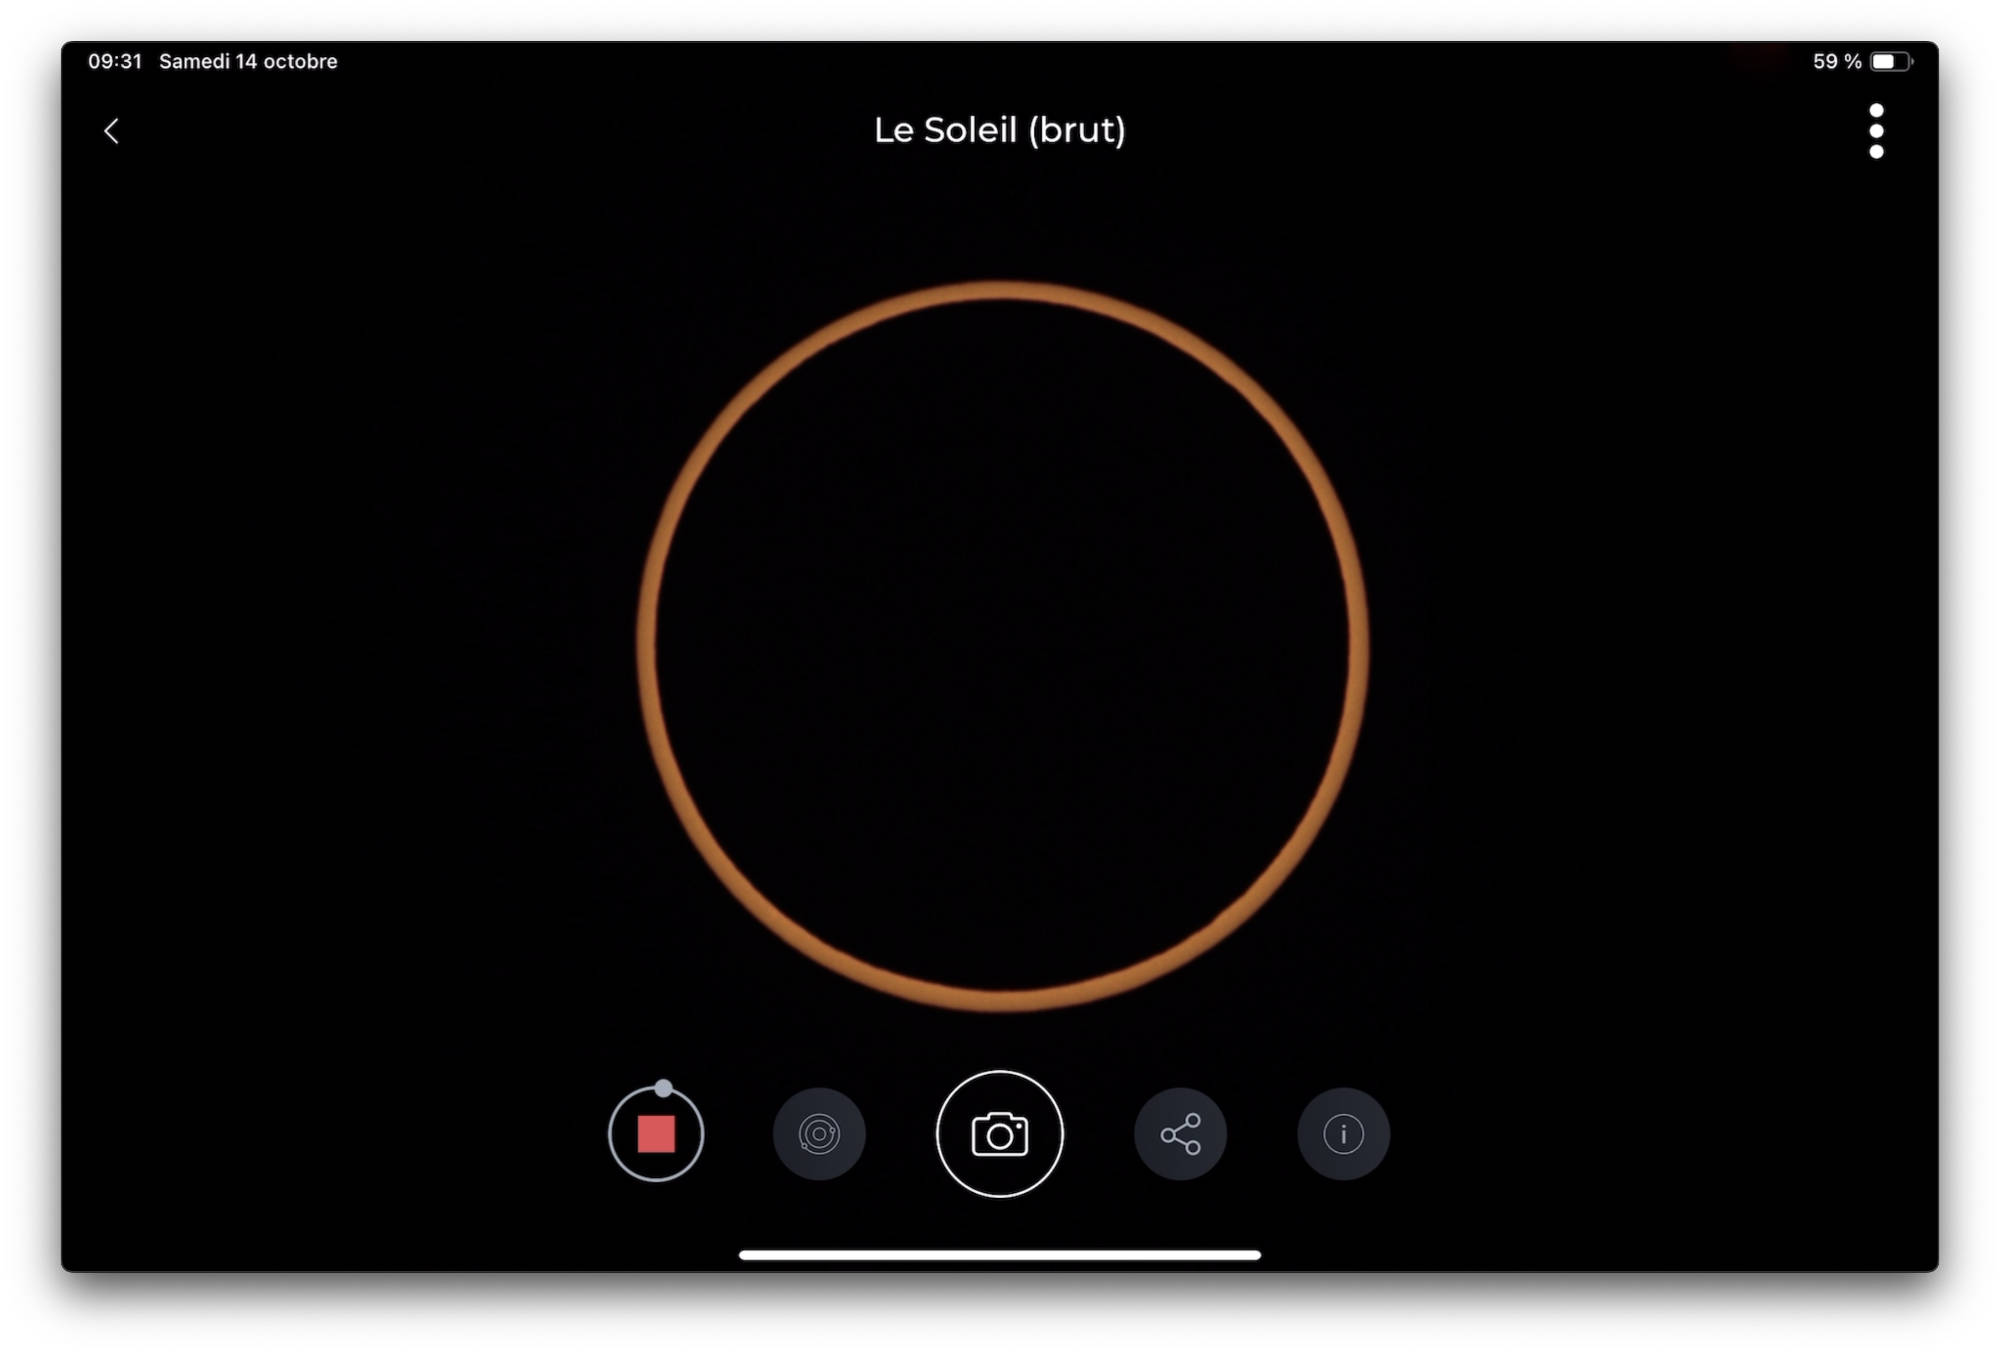
In 2 minutes and 22 seconds, the solar ring will be perfect. We must not miss the moment. I pass the tablet displaying the image captured by the smart telescope from hand to hand. Vespera offers us a shared moment as a group: the image is large enough on the tablet for several people to enjoy simultaneously. At the same time, I use my phone, which is also connected to Singularity, to regularly take photos through the app. No stress about the result: I see what I’m capturing. I notice the difference compared to the previous total eclipse I experienced in 2017, where I couldn’t have any certainty about the photos until afterward. I take advantage of this serenity to take ambient photos.

Finally, there it is! The eclipse is at its peak. A perfect orange circle appears, and I can’t help but notice the nod to Vespera’s glowing button!

The crucial moment witnessed with Vespera.

Now, it’s really cold. “Just one more minute! … There it is: the 3rd contact!” Applause and a few cheers erupt from all directions.

Everyone is radiant. Gradually, the light regains its warm hue, and the temperature rises.

Solar annular eclipse with Vespera smart telescopeExperiencing the Eclipse with Peace of Mind Thanks to Vespera

We sit down, content, but realizing that it all happened so quickly. For everyone else, the realization is the same: it’s always too short. There’s not enough time to take all the planned shots! An automatic system is needed to succeed in capturing photos, free the mind, and better enjoy the moment. For me, the solution is immediately found: it’s Vespera. I was able to capture the entire eclipse sequence and fully enjoy the show.

The partiality continues, the excitement subsides, and hunger awakens. While sharing coffee and snacks, I answer questions about this little telescope that intrigues many. I show the photos I took on my smartphone, and I share the one from the peak with anyone interested. What a pleasure to be able to send such a memory just minutes after the eclipse!


Solar annular eclipse with Vespera smart telescope

It’s soon time to pack up and conclude this first eclipse experience with my Vespera. All my initial concerns have disappeared. Air travel went smoothly, and passing through security was easy. Despite the lack of network, the initialization was perfect. The battery held up well and still shows 75% after the 4th contact. Most importantly, the captured images are beautiful, and Vespera allowed us to have a true shared moment around the tablet, without the fear of an accidentally falling filter, and with the serenity needed to savor every moment.

For our group of travelers from the French Astronomy Association, the journey continues to the Grand Canyon. Looking forward to the next eclipse!

Delphine Nguyen
Association Française d’Astronomie

Rho Ophiuchi cloud complex
Travel journal

Vespera & the Milky Way: A High-Definition Adventure

Welcome in this new story called “Vespera & the Milky Way: A High-Definition Adventure”. Equipped with cutting-edge technology and innovative features, Vespera and Stellina stand out as the best smart telescopes for astrophotography. By streamlining the capture process and automating tedious tasks, Vaonis is making astrophotography more accessible than ever. One of our ambassadors, “Adventurer Of The Third Planet,” embarked on a journey to one of the world’s premier stargazing destination with Vespera. The goal? To put Vespera to the test and uncover its full potential.

Vespera & the Milky Way: A High-Definition Adventure on The Best Observation Site

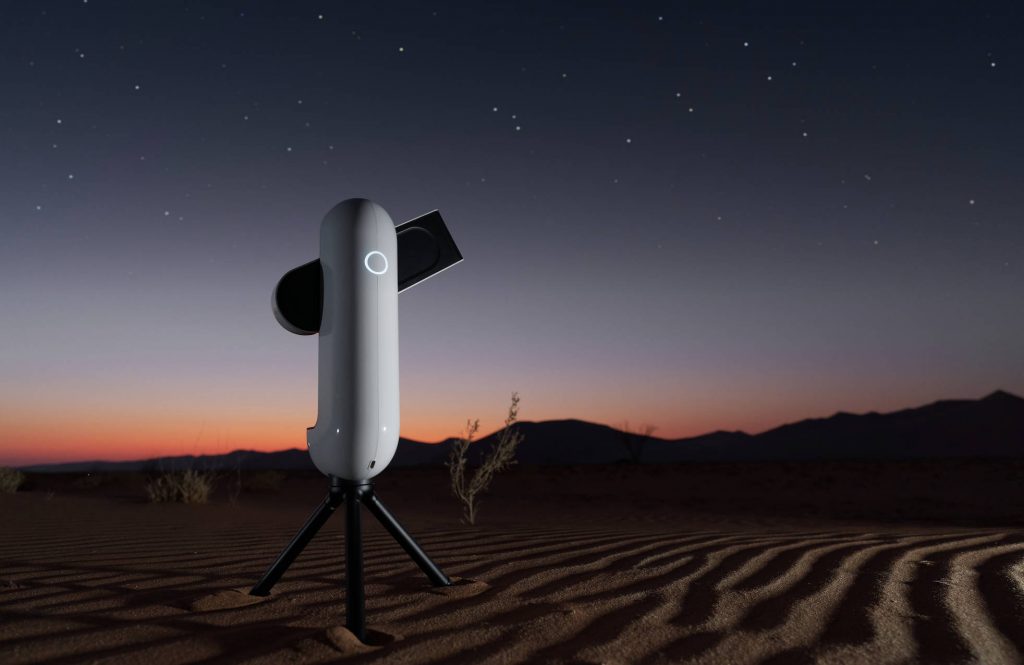
On June 10th, at Hosea Kutako International Airport in Namibia, after a neverending flight, I finally arrive at my destination for two weeks dedicated to observing and astrophotographing the southern sky. I pick Vespera from the plane’s luggage compartment. It’s the perfect smart telescope for this kind of journey. Compact and lightweight, it’s easy to carry as carry-on luggage.
I grab a taxi to reach the capital, Windhoek. Along the way, a group of baboons take over the road and decide to disrupt traffic. Quite a welcoming committee, albeit a friendly one.

If we were to create a top 3 list of the best astronomical destinations in the world, Namibia would undoubtedly be among them. It boasts weather conditions that result in an exceptionally clear sky. It’s one of the least densely populated countries on the planet, with no light pollution. In the western part of the country, facing the ocean and home to the world’s oldest desert, it hardly ever rains, offering over 300 days of sunshine per year.


Observation with Vespera from the Namib Desert

An “All-Terrain” Smart Telescope in the Namib Desert


I hit the road towards my first observation site. After several hours on bumpy, dusty tracks, I arrive at my destination at night. I turn off the headlights, step out of the car, and turn my gaze towards the sky. Wow!!

My eyes aren’t used to the darkness yet, but it’s imposing itself upon my vision, brilliant and perfectly defined, stretching across the sky from one horizon to the other: the Milky Way. This isn’t my first time observing the sky from Namibia, and I’ve also experienced the skies of Chile. However, what I see here is even more spectacular than what I can remember.
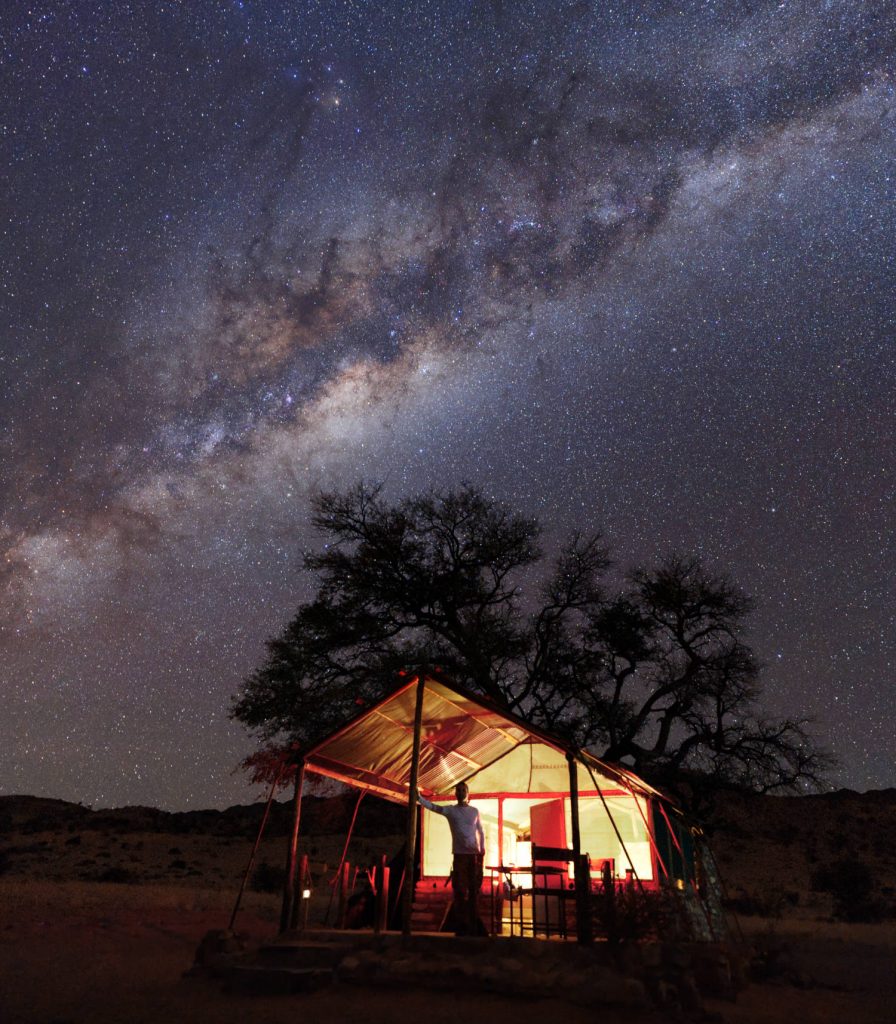
I make my way to the hut I’ll be staying in for the first part of my journey, amid of a vast plain dominated by the arch of the Milky Way.


Vespera & the Milky Way: A High-Definition Adventure

My observation site for the first part of the stay.

Vespera & the Milky Way: A High-Definition Adventure & The most beautiful place in the galaxy

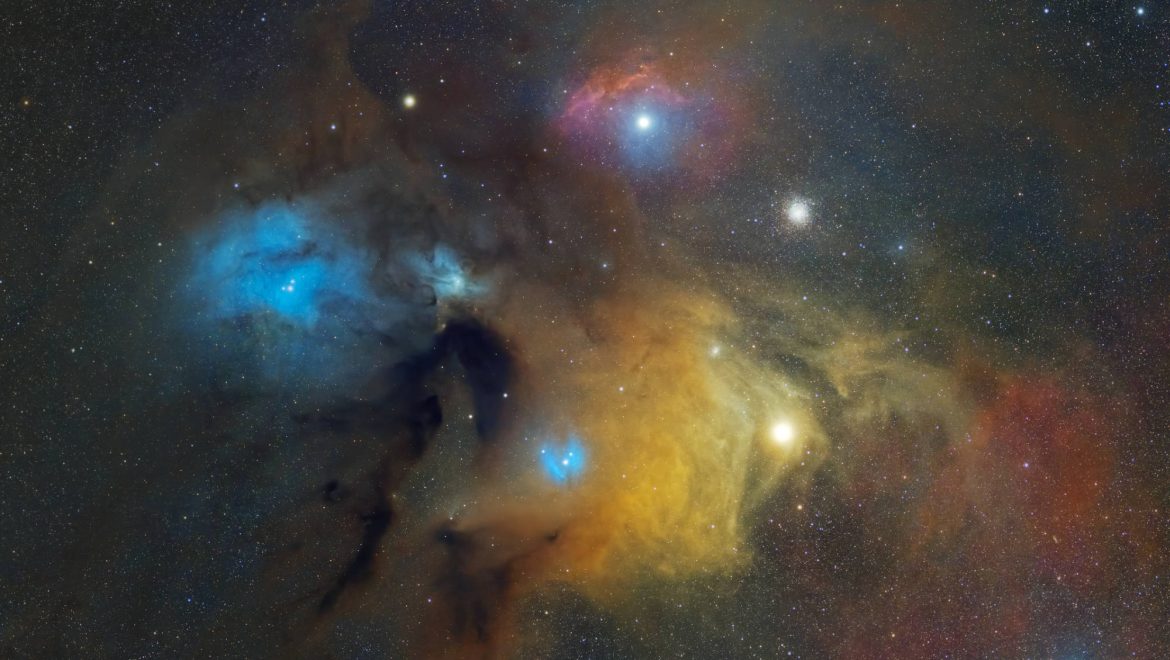
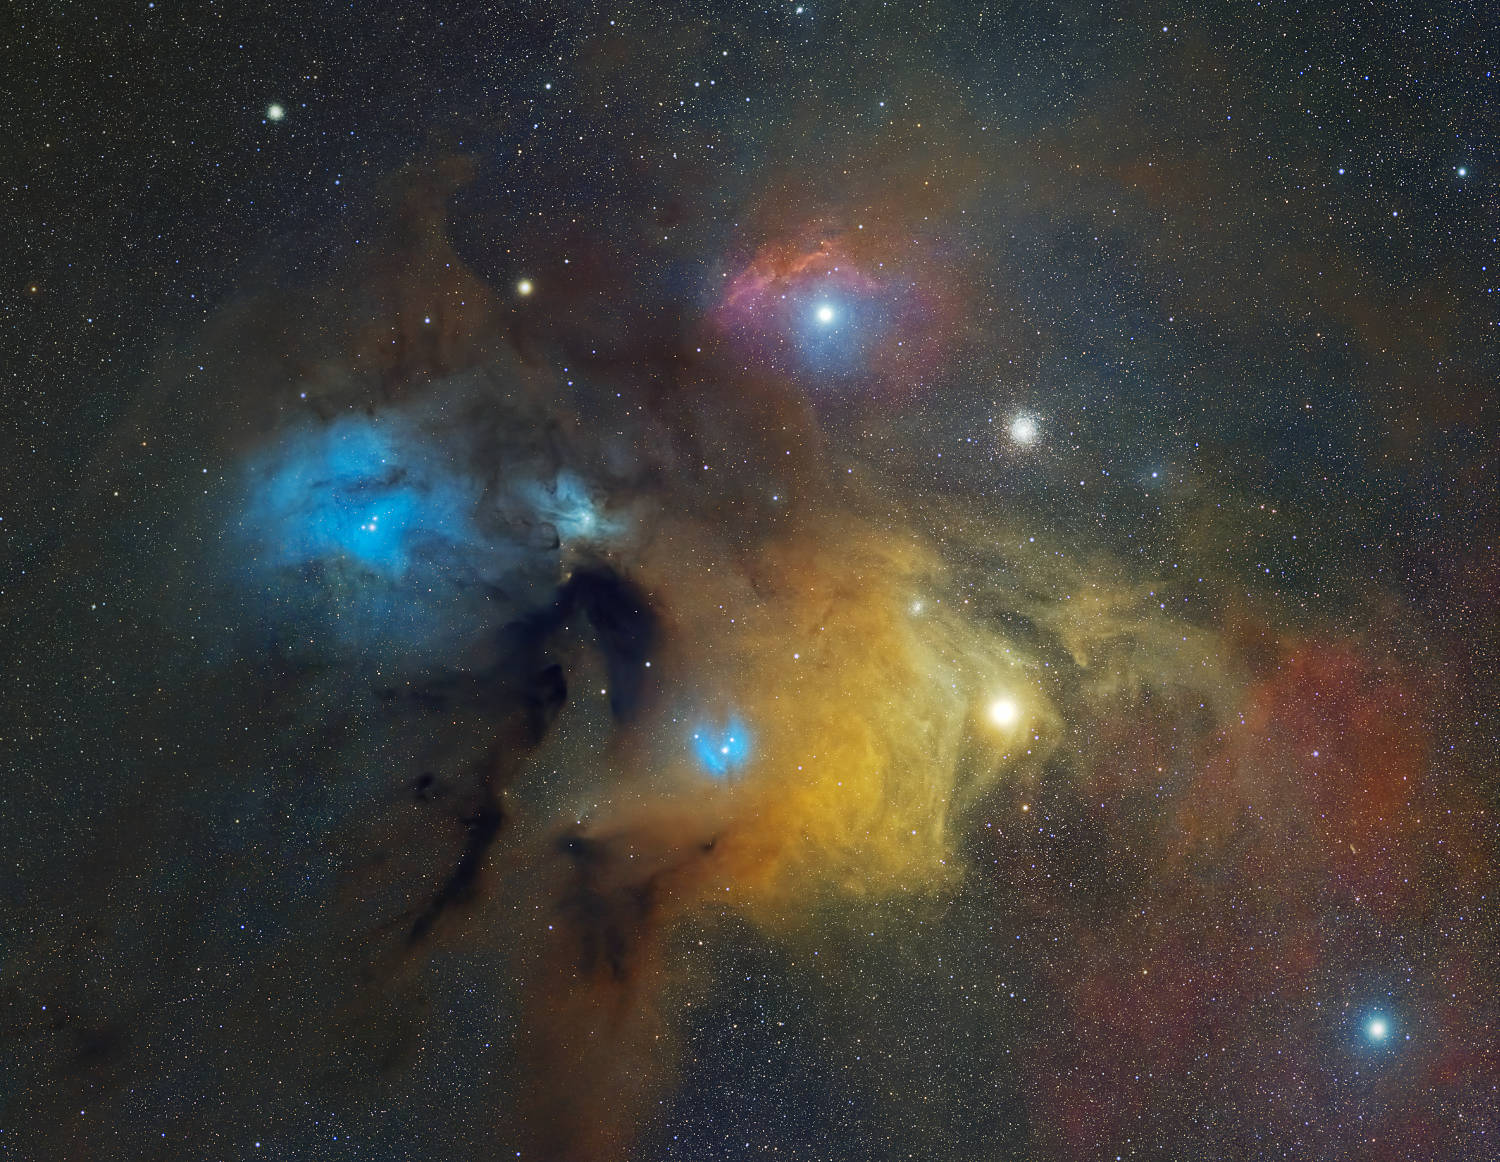
The main goal of coming to Namibia is to capture high-definition astrophotography of a region of the sky that I consider the most beautiful in the Milky Way: the cloud complex around Rho Ophiuchi and Antares. This consists of pink, blue, and yellow nebulae intertwining, streaked with dark nebulae, dotted with globular clusters, and illuminated by the intense brilliance of Antares. A true fireworks display in the galaxy.


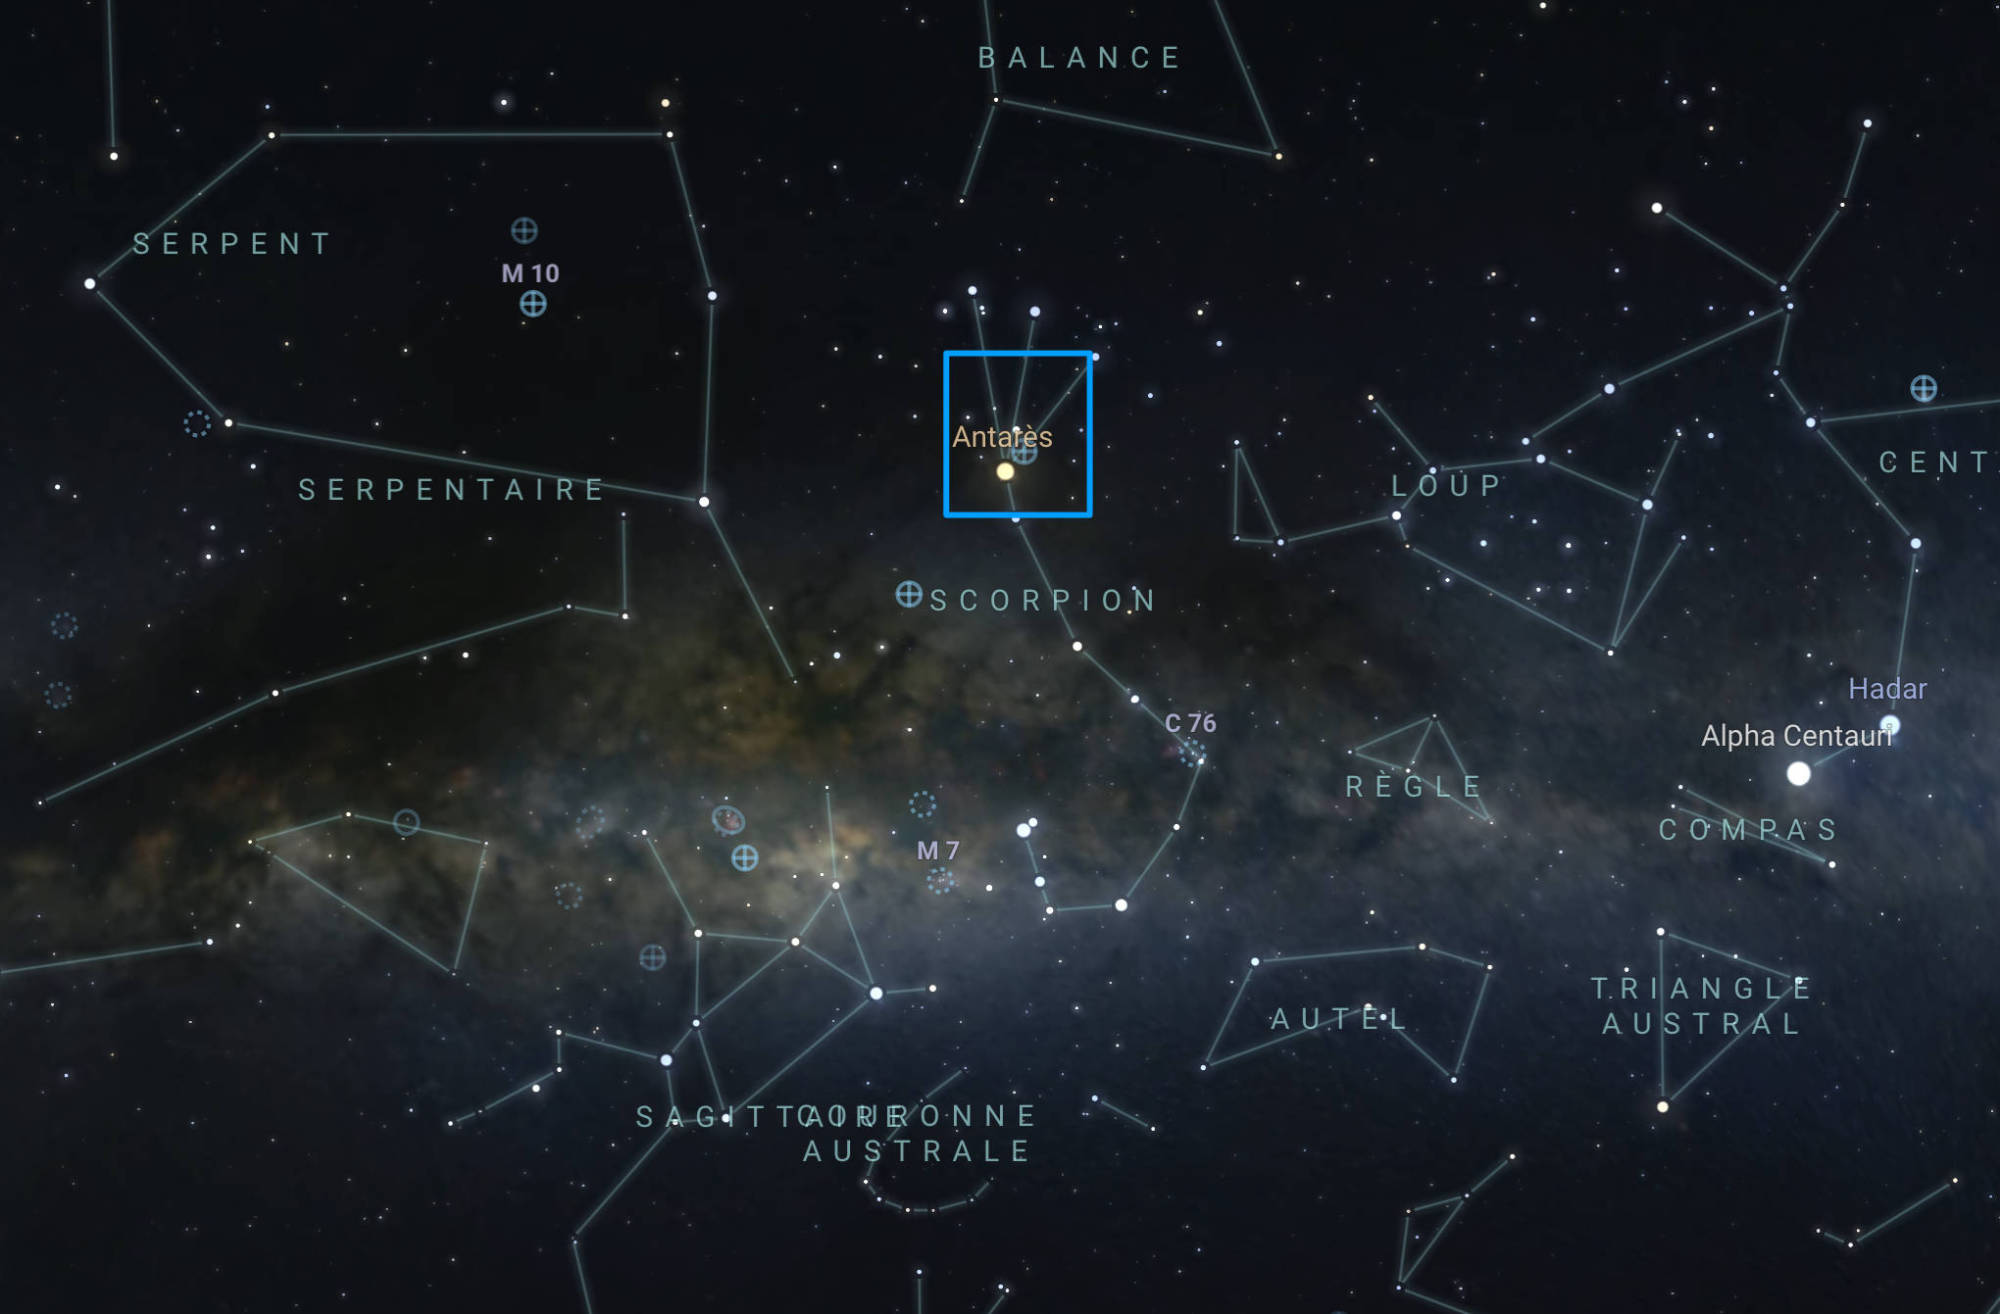
Star chart to find Rio Ophiuchi

Location of the Rho Ophiuchi cloud complex.


This part of the sky is observable from the Northern Hemisphere. However, the Scorpius constellation remains very low on the horizon. In the Southern Hemisphere, the Milky Way stretches across the sky from horizon to horizon, and its center nearly reaches the zenith at one point during the night.


Discover what makes Vespera the best smart telescope for astrophotography.

Visit our dedicated Astrophotography page to learn more.


The journey is yet exhausting, and I decide not to dive into this project on the first night. I need some sleep, especially with the upcoming nights ahead. However, I won’t waste such a beautiful sky. Plus, I need to make sure Vespera has handled the Namibian tracks well.

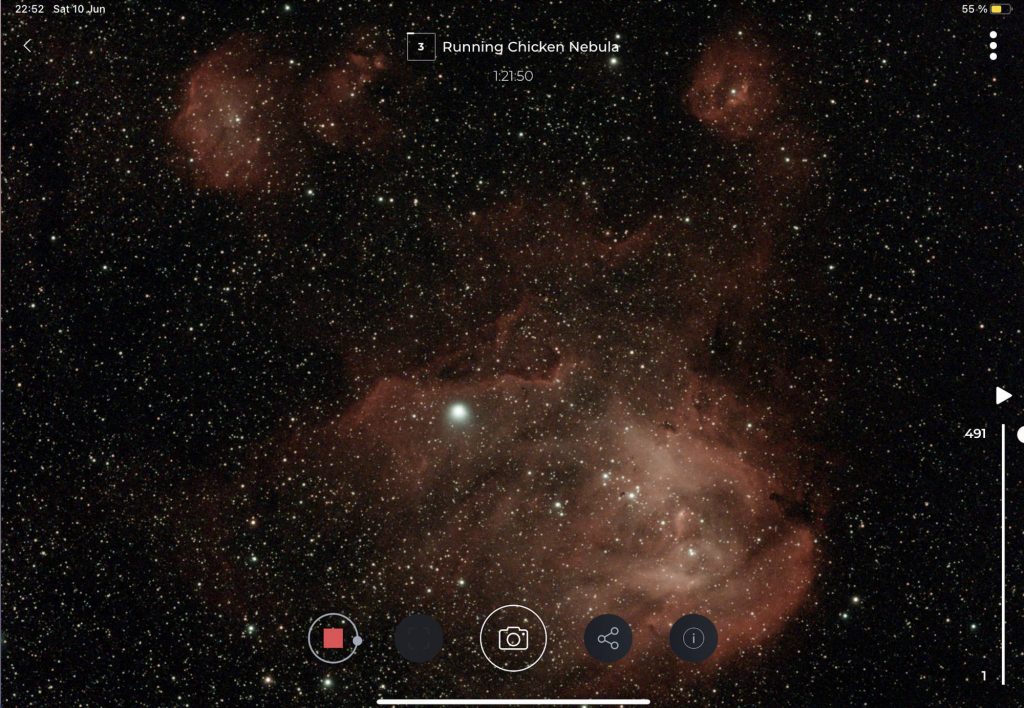
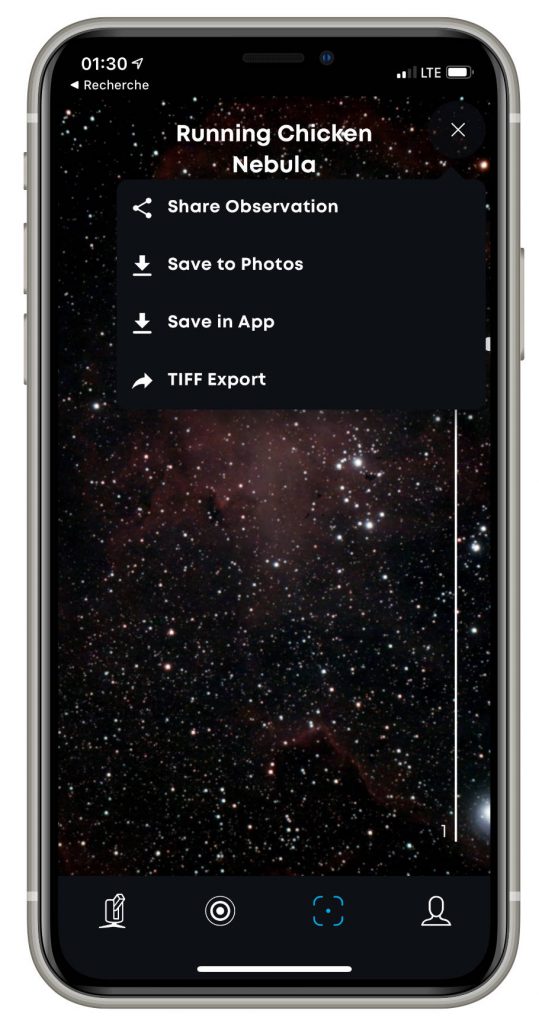
Vespera is ready to operate within a few minutes. It’s perfect for a quick sky check even at the end of a long day. As a target for this first night, I choose the “Running Chicken Nebula.” I let Vespera gather light while I settle into my hut, occasionally glancing at the real-time stacking result. In the Singularity app, on the live observation screen, the nebula is clearly revealed pretty quickly. Even without processing, the view is already spectacular.


Vespera & the Milky Way: A High-Definition Adventure

Live observation of the Running Chicken Nebula.

Vespera & the Milky Way: A High-Definition Adventure | Wide-Field Astrophotography using Vespera

The complex of nebulae around Antares and Rho Ophiuchi covers a vast area of the sky, spanning over 5°. Vespera‘s native field of view is 1.6° x 0.9°. Vaonis smart telescopes feature an exclusive automatic panorama capture mode. In the Singularity app, I can define an area of up to 3.2° x 1.8°, and the telescope will automatically capture the full image. This allows for photographing most large deep-sky objects in their entirety, including the Andromeda Galaxy, the Rosette Nebula, the Horsehead Nebula region, the Pleiades star cluster, the North America Nebula, and more.

The First Panorama Mode Integrated into a Telescope!

Discover the CovalENS technology available exclusively on Vaonis telescopes for obtaining wider field images, improved quality, and the freedom to choose your framing.

However, it won’t be enough to capture the entire region I’m aiming for. I need to create a mosaic. I first plan to assemble 6 images, with about a 25% overlap between each image to facilitate the mosaic assembly. To achieve good image quality, I also plan to capture between 2 and 3 hours of data for each image. Lastly, I set a minimum height of 25° above the horizon to begin the acquisition. Below 20°, atmospheric absorption degrades the quality of observation. In practice, I can only capture a single portion of the mosaic per night (taking into account the presence of the moon in the second half of the night).

A Star 800 Times Larger Than the Sun

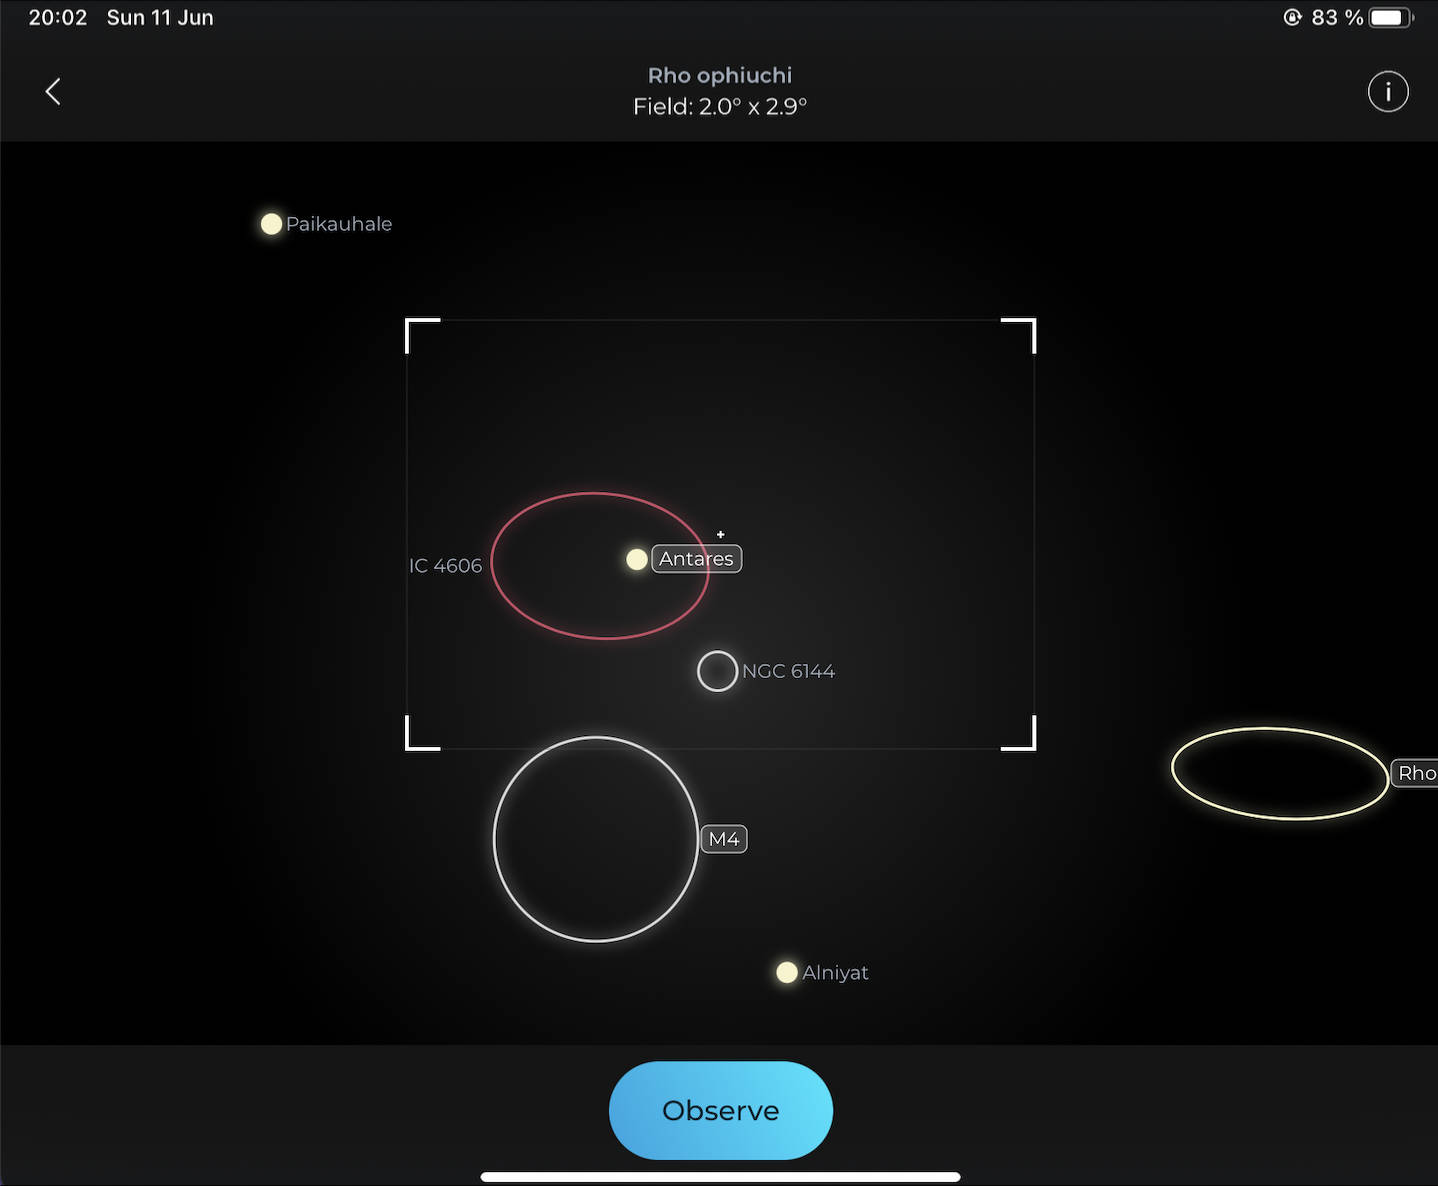
Let’s start the project on this second night. For the first part of the mosaic, I choose to start with Antares. It’s a supergiant star, one of the largest in our galaxy. It illuminates the surrounding nebulae with a yellow-orange color, a very rare tint for nebulae. In the Singularity app that controls Vespera, I define the widest possible field around Antares and start the observation.


Vespera & the Milky Way: A High-Definition Adventure

Field and Framing Selection in the Singularity App.


This is the first time I observe this region with Vespera, and I can’t remember ever seeing an image of it captured with a smart telescope before. I have no idea about what kind of result I’ll get. So, here I am, watching the capture progress with a certain excitment as the live stacking goes on. In Electronically Assisted Astronomy, faint nebulosities are not always easily visible. Revealing them requires the image processing step typical of astrophotography.
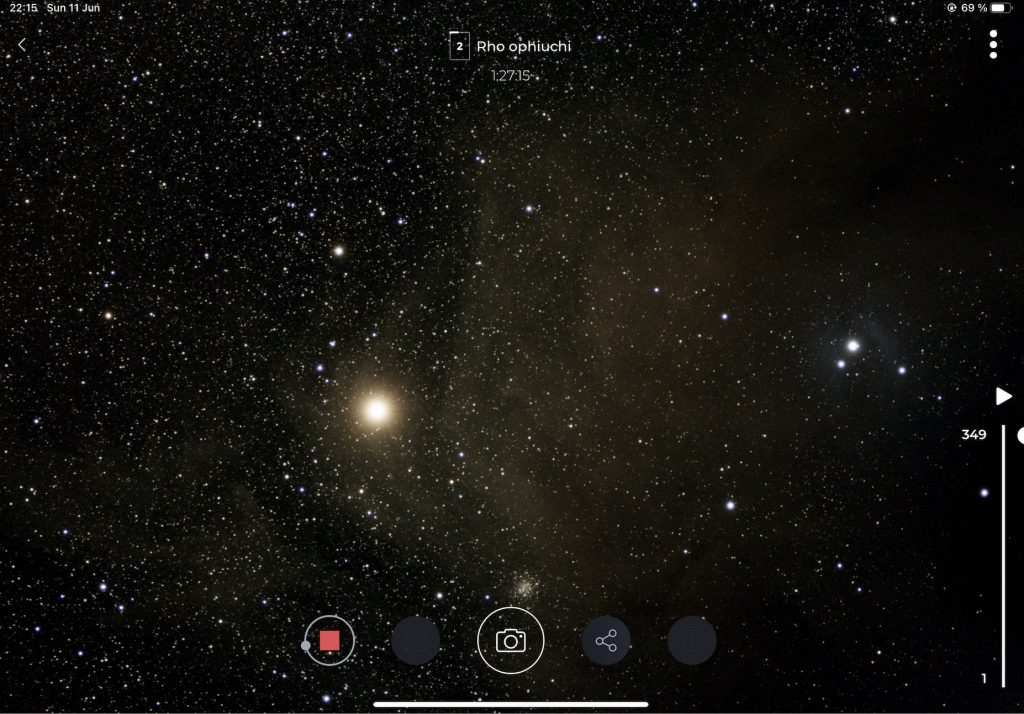
After a few dozen minutes of observation, there’s no doubt: the nebulosities around Antares are clearly visible and showcase the characteristic yellow color.


Observing Antares with Vespera

Direct Observation of Nebulosities Around Antares.

Life to the Rhythm of the Night

One night under the Milky Way follows another. I dedicate about 3 hours each night to work on the mosaic. The sky is perfect, and there’s so much to observe: the Carina Nebula, the Centaur Globular Cluster, the Small Magellanic Cloud, the Eagle Nebula, the Omega Nebula. I also take the opportunity to discover objects I’ve never observed before, like the Figthing Dragons Nebula (NGC6188 – Ara constellation).
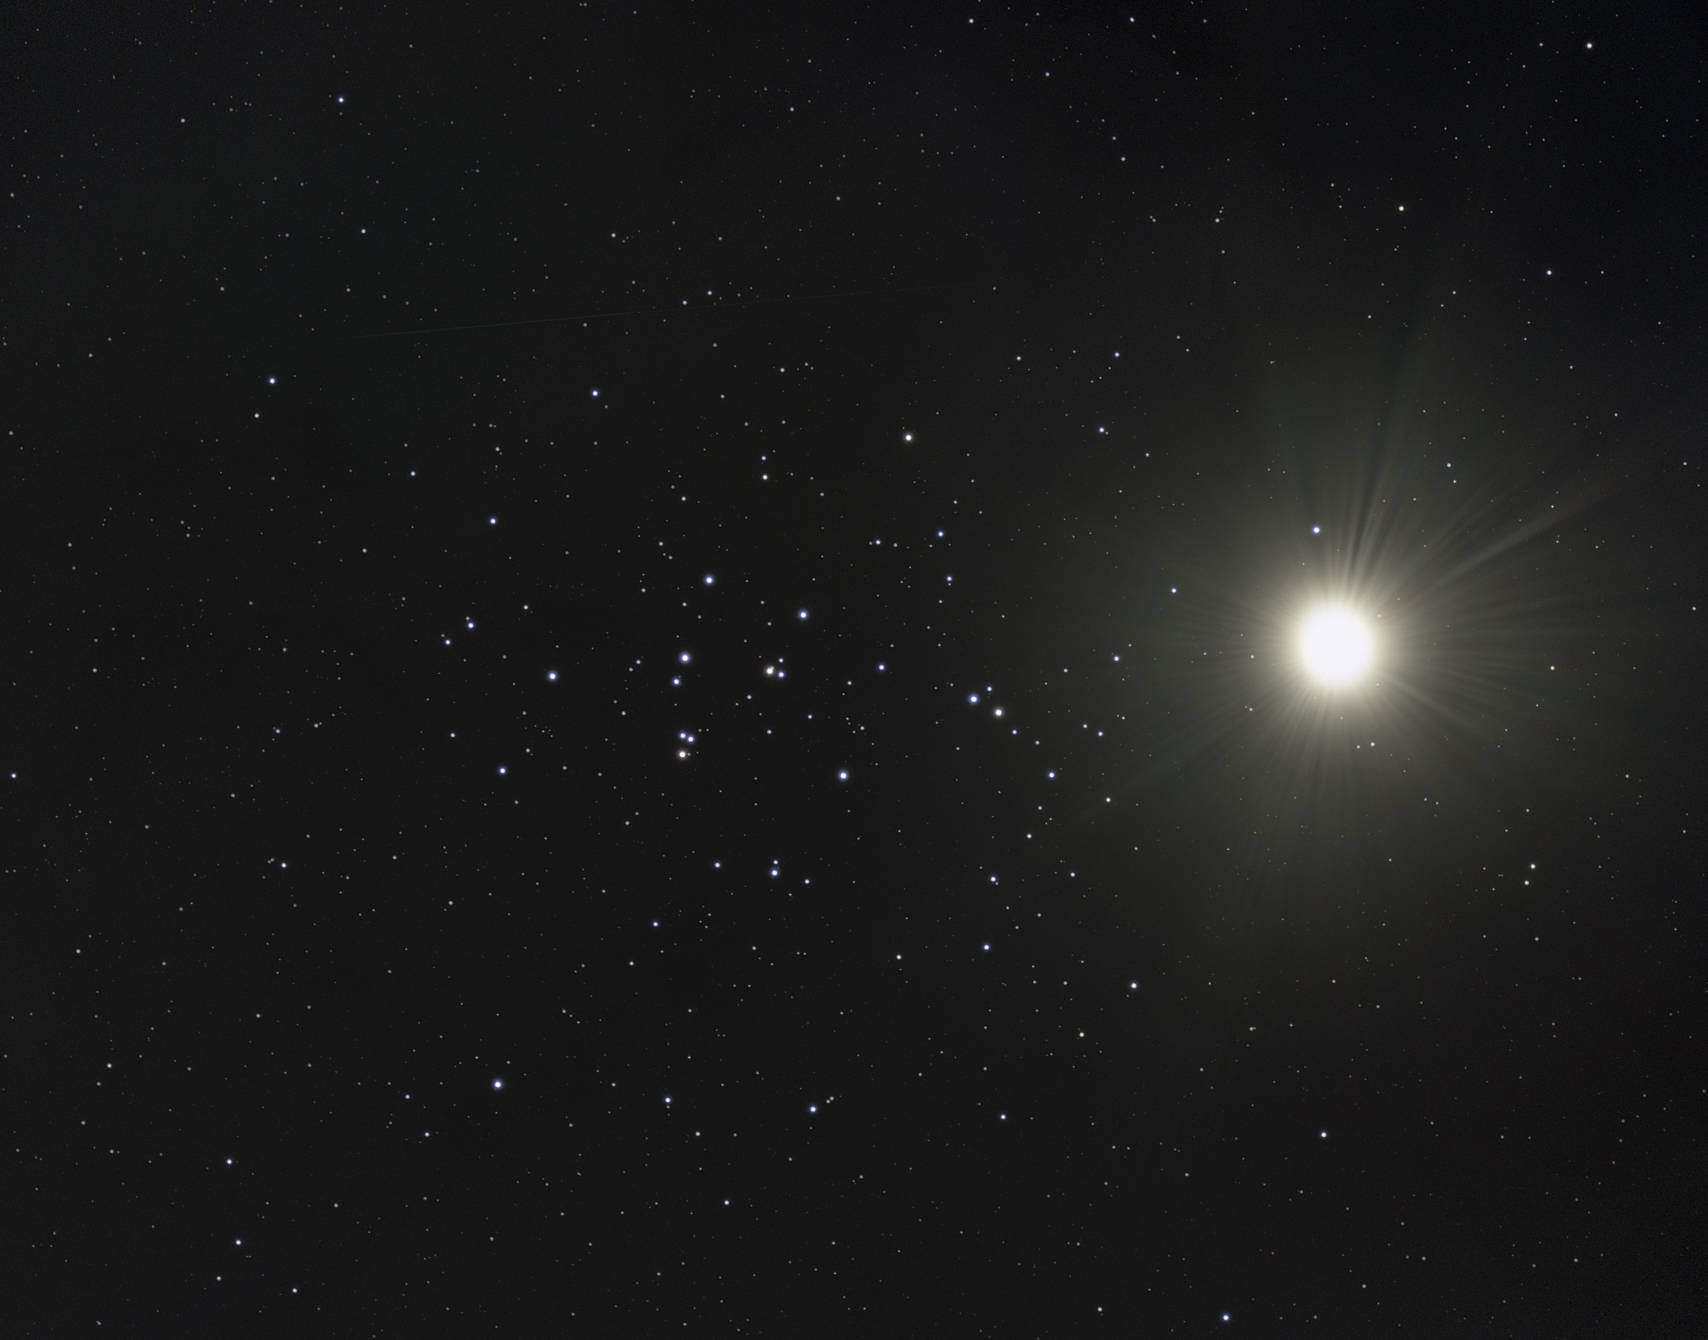
The night starts quite early because Namibia’s sunsets are simply unmissable. I also enjoy transitory astronomical phenomena such as Venus passing through the Beehive Cluster.


Vespera & the Milky Way: A High-Definition Adventure

Venus transiting through the Beehive Cluster / Vespera

Long story short : I get very little sleep at night. Additionally, I’m eager to start processing the first captured images to see how they turn out. And, the landscapes of Namibia are truly something! It would be a shame not to explore them during the day. So, I don’t get much sleep during the day either.

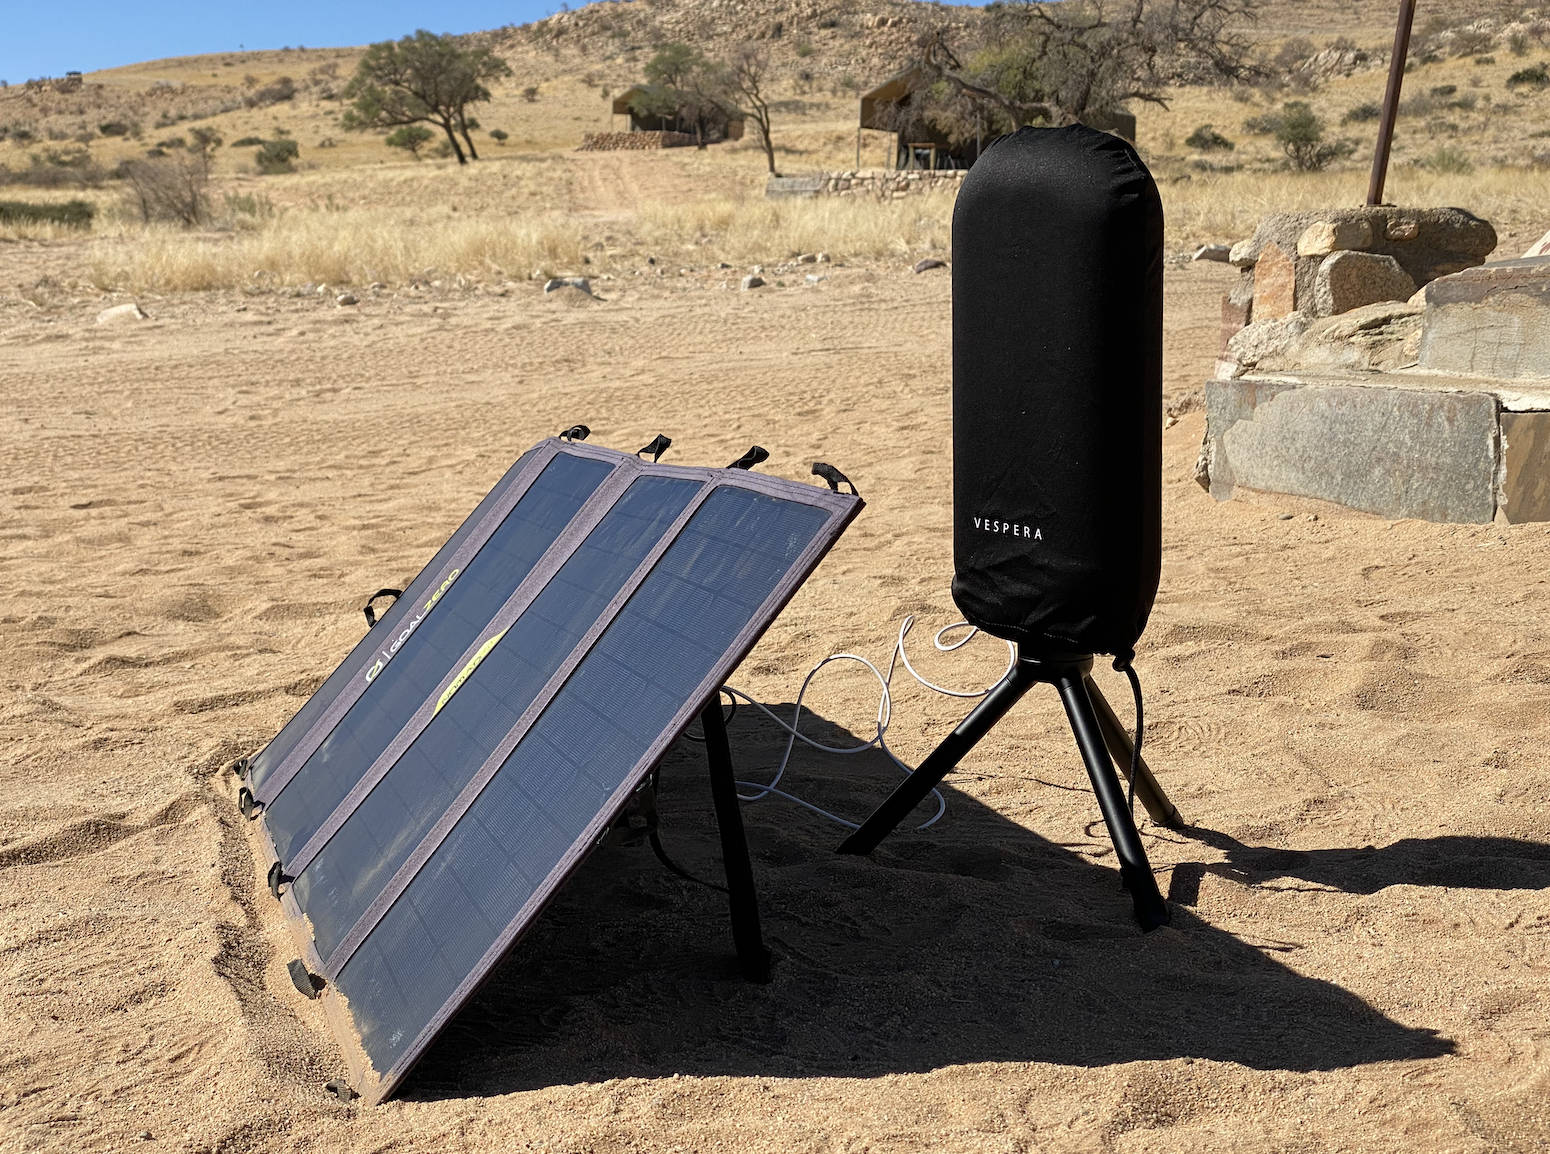
Vespera is running at full capacity. During the day, it can rest and recharge its battery. Where I am, there is simply no electricity. I use LED lamps for lighting, and the shower water is heated with a wood fire. Fortunately, in Namibia, there is an abundance of sunlight and the energy it provides. In just one day, my portable solar panels are able to recharge Vespera and the tablet that has the Singularity application.


Charging Vespera with solar panels

Charging Vespera’s internal battery with solar power.

Need more!

I manage to capture the 6 parts of my mosaic after 5 nights. The processing done on the first images and a basic stitching suggest a spectacular result. However, it’s obvious: the final framing is too tight, and the overall composition lacks more space.
We need to make the mosaic bigger and wider. If I want to extend it a bit on all sides, I estimate that I will need to switch to a 12-image mosaic.

I’m up for the challenge!

Vespera & the Milky Way: A High-Definition Adventure

Image processing and mosaic stitching.

I take the opportunity to change my observation site and head to the Namib Naukluf National Park a bit further south. This region is designated as an International Dark Sky Reserve.
This time, I have a bit more comfort with electricity. The landscape is just as enchanting, and the sunsets are still spectacular.
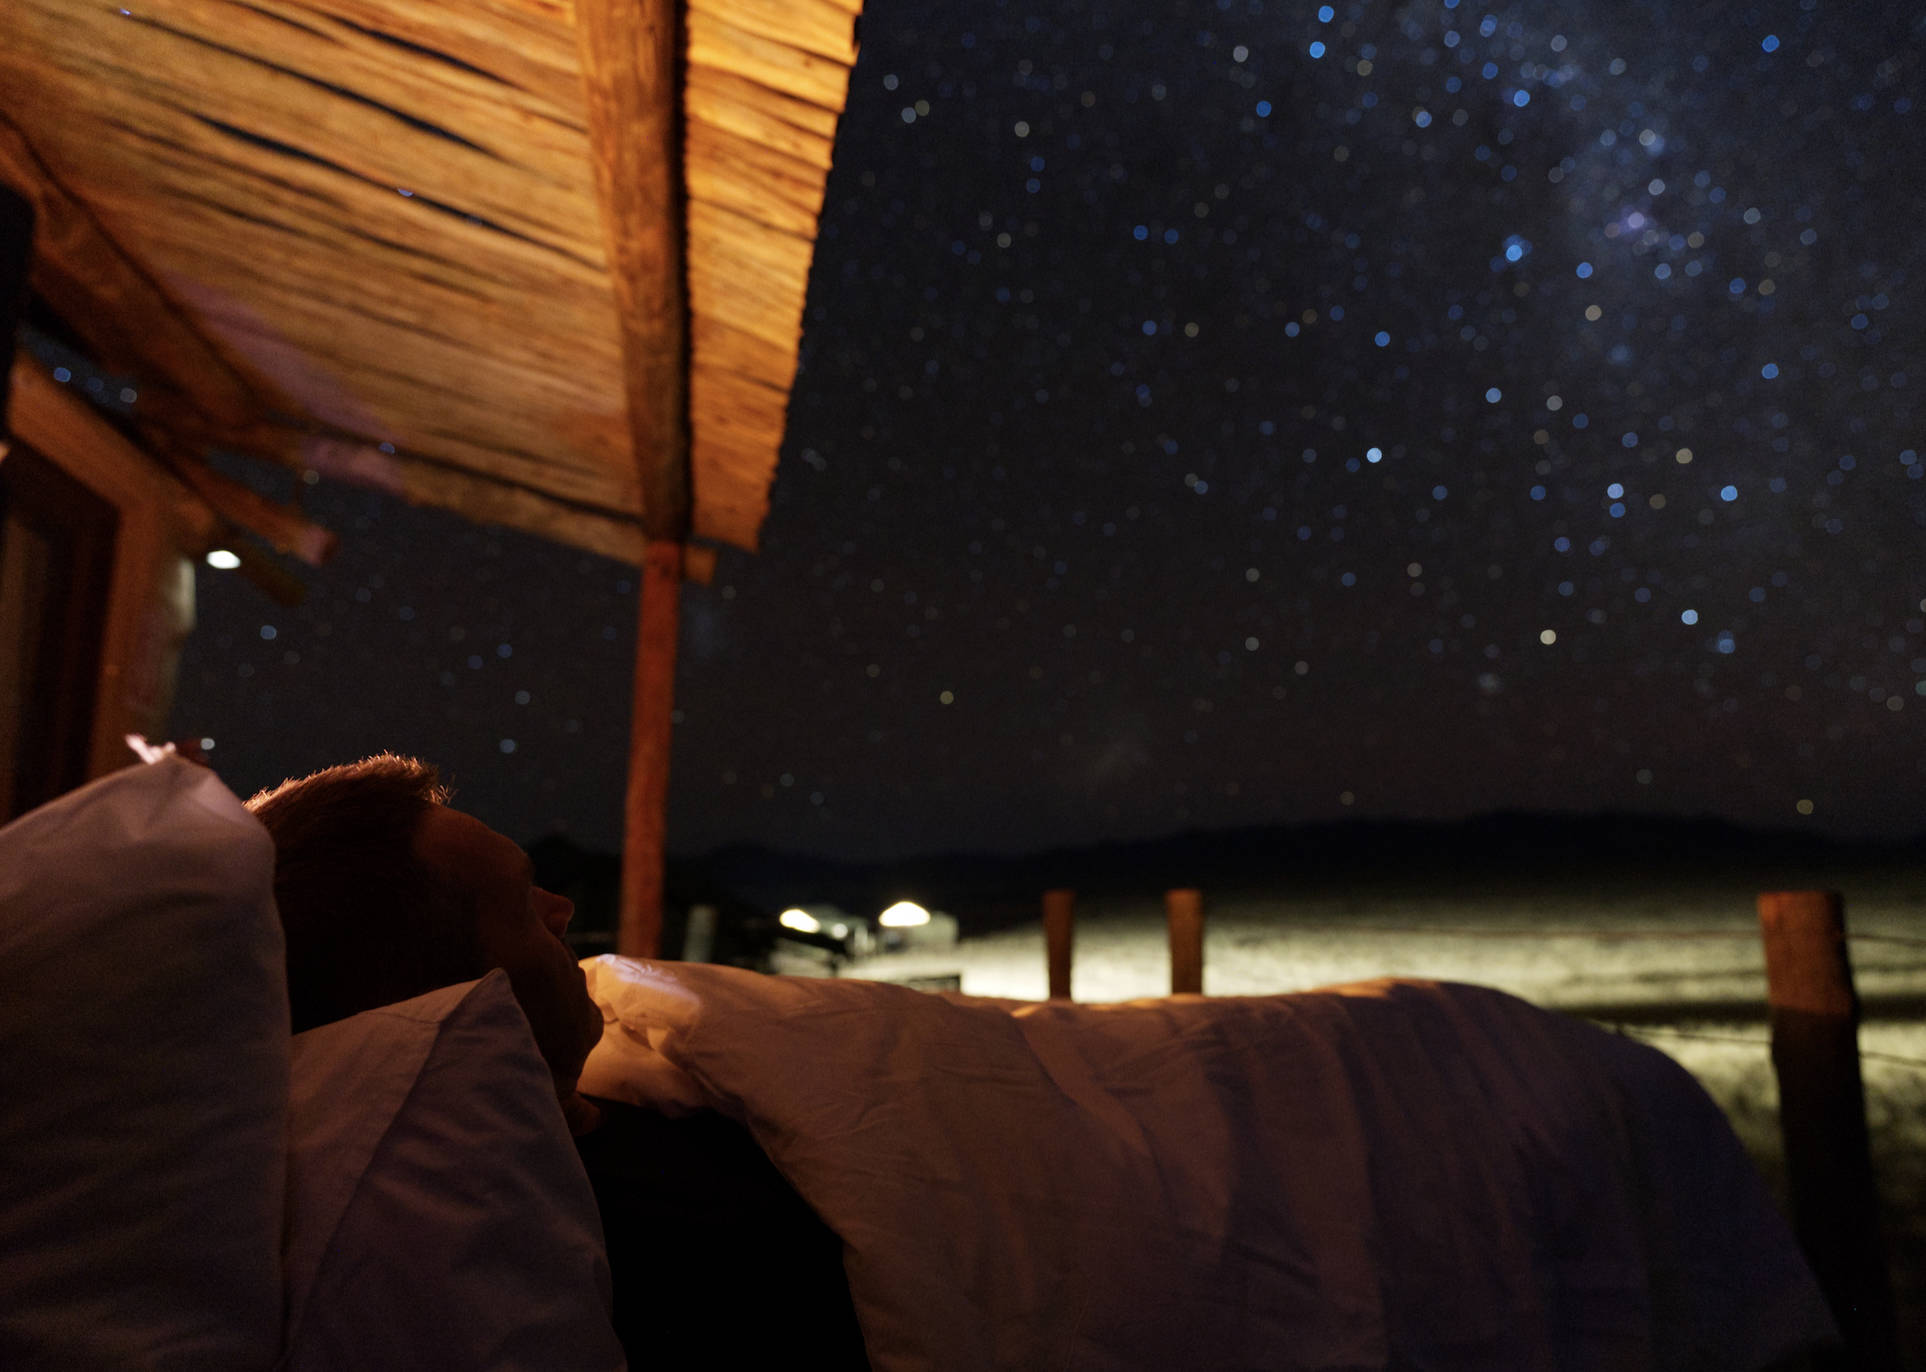
There’s a huge wooden deck that allows me to roll out the bed, cleverly set up on wheels. Despite the cool nighttime temperatures at this time of year, I get to experience starry nights in the utmost comfort. What more could one ask for!

sleeping under the stars

A unique stargazing experience.

Image processing and mosaic assembly

It will ultimately take me 11 consecutive nights to capture the 12 tiles needed for the mosaic. For this kind of project, the more consistent the conditions are from one night to the next, the better the result.

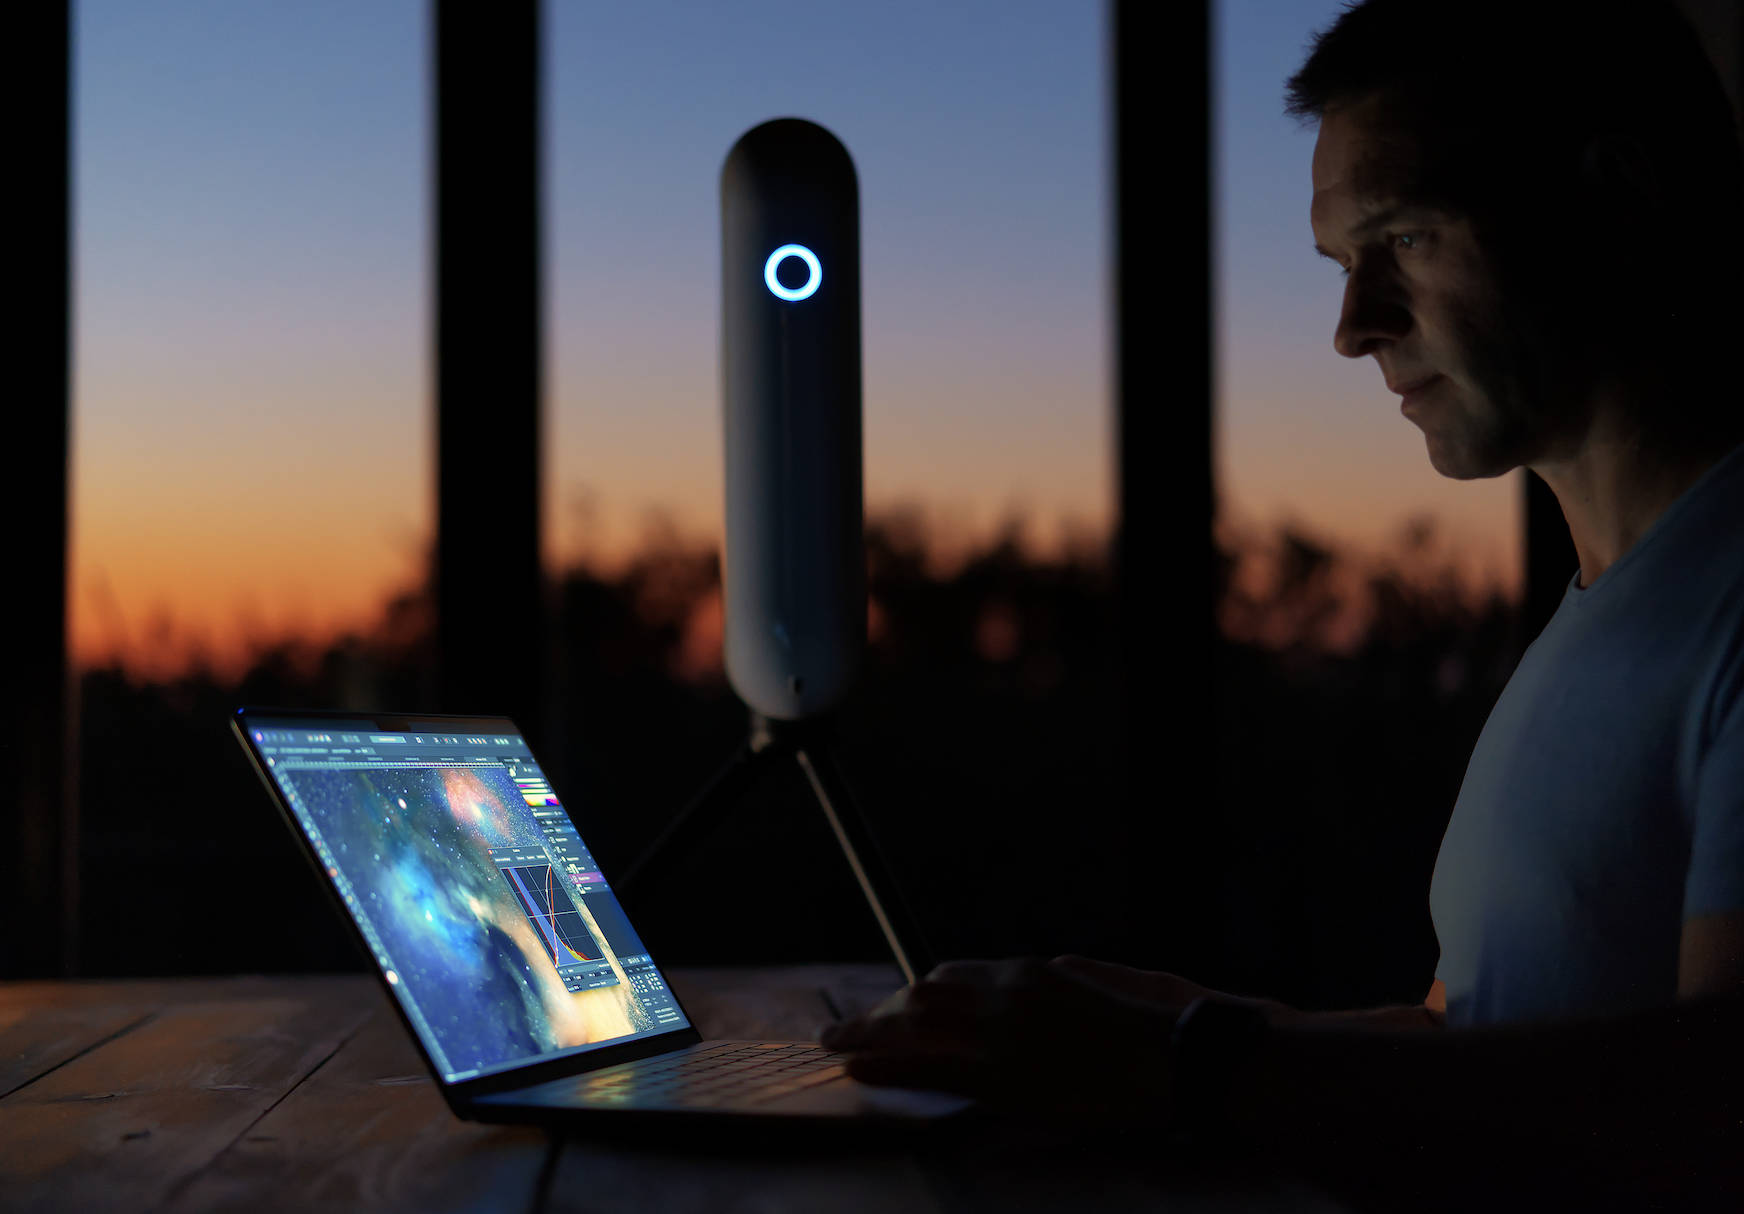
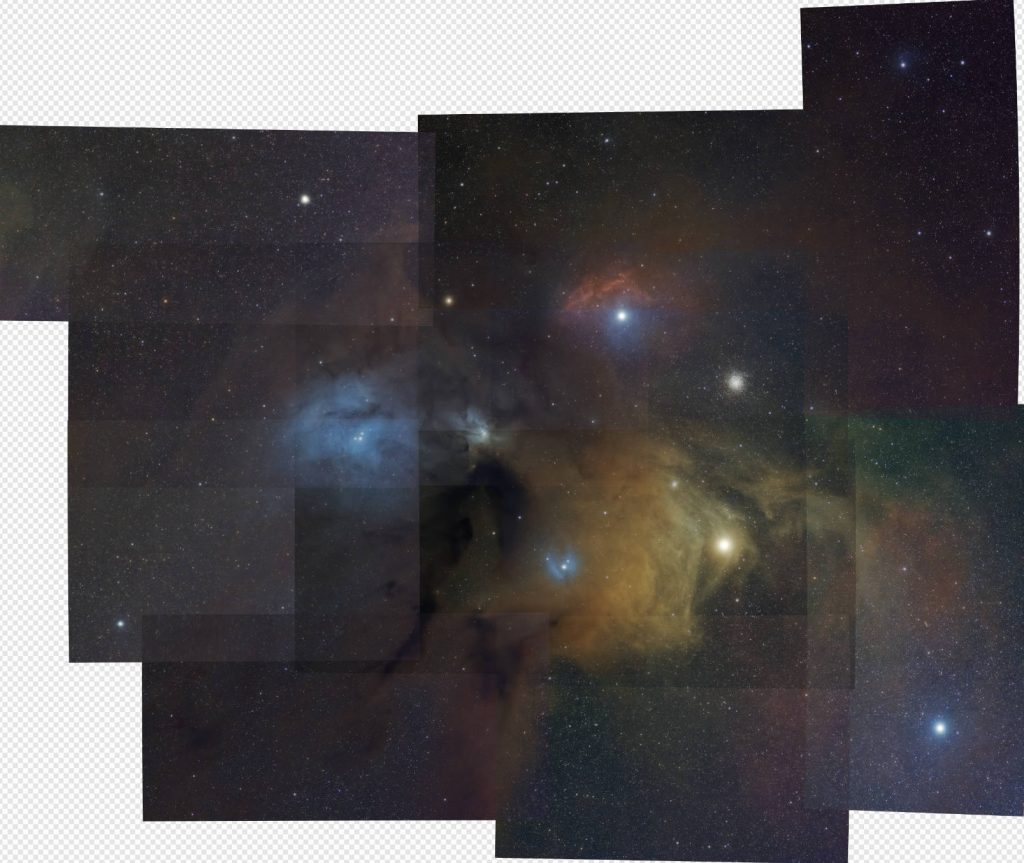
I first perform a preliminary processing of each image from the 16-bit RAW file pre-stacked by Vespera. This is a huge time-saver since I don’t have to manually do the stacking (not to mention that this part of the process isn’t particularly exciting). The processing must also be as consistent as possible. If images have significantly different renderings (brightness, contrast, color, noise, details), seams can be visible in the final image. As shown in the illustration below, despite my precautions, some differences still exist, but they are relatively minor and can be handled by the software used for stitching the panorama.
Once the mosaic is assembled, I finalize the processing on the full image.


Rho Ophiuchi mosaic stitching process

Stitching of the 12 images composing the mosaic.


The final image covers a field of view of about 7°x5.5° with a resolution of over 56 megapixels. With another smart telescope that doesn’t have the field expansion technology that is exclusive to Vaonis telescopes, it would have been necessary to capture at least four times more images to create the same mosaic, which is 48 images – and thus at least 48 nights. In other words, a project nearly impossible to accomplish.


Vespera & the Milky Way: A High-Definition Adventure

The final image.


About the image processing

Affinity Photo software was primarily used for most of the processing and for assembling the mosaic, along with StratNet 2 for star separation.

Click here to download the raw images in 16-bit TIFF format (330 Mo)  and practice image processing or test your own techniques.

Vespera & the Milky Way: A High-Definition Adventure

Embrace a new stargazing experience with Vaonis smart telescopes

Hoping you enjoyed reading our “Vespera & the Milky Way: A High-Definition Adventure” article : feel free to share and comment your thoughts about the end result.

Affinity Photo image processing
Observations, Tips & News, Travel journal

Affinity Photo image processing tutorial

New 2023 version

How to process Stellina and Vespera Raw Images with Affinity Photo

Did you know that you can now export the images of your observations in a 16-bit TIFF format? This raw file allows you to apply your own image processing settings and edit the images at your convenience. By doing so, you will get better image quality and personalize the results without the hassle of stacking files yourself on astrophotography software. This tutorial explains how to process raw images with Affinity Photo, being suitable for beginners who wish to learn astronomical image processing techniques.


CONTENTS

  1. Introduction
    1. Requirements.
    2. About the technique used in this tutorial
  2. Processing steps
    1. Tone stretching.
    2. Noise reduction.
    3. Details enhancement.
    4. Star reduction
    5. Color grading
    6. Final touch
  3. Can we proceed further?

Affinity Photo image processing: how to process Stellina and Vespera raw images | introduction

Requirements: Affinity Photo software

Affinity Photo image processing: here’s a tutorial on how to process Stellina and Vespera raw images with Affinity Photo to optimize your astrophotography skills.

Affinity Photo is a raster graphics editor similar to Photoshop. It can export and read Photoshop files (.psd) but is more accessible than Photoshop because of its price, and its interface is more user-friendly. It’s available for Windows and macOS systems. An iPad version is also available.

Affinity photo is packed with features dedicated to astronomical photos, such as native support for FITS images and stacking with the use of calibration images.

The price is about 50€/$50 for a one-time purchase.

While this tutorial is made with Affinity Photo version 2, all the actions presented can also be performed with version 1. The screenshots differ mainly in the new design of the icons. For those of you using Photoshop, most of the features are similar to what you’ll see below.

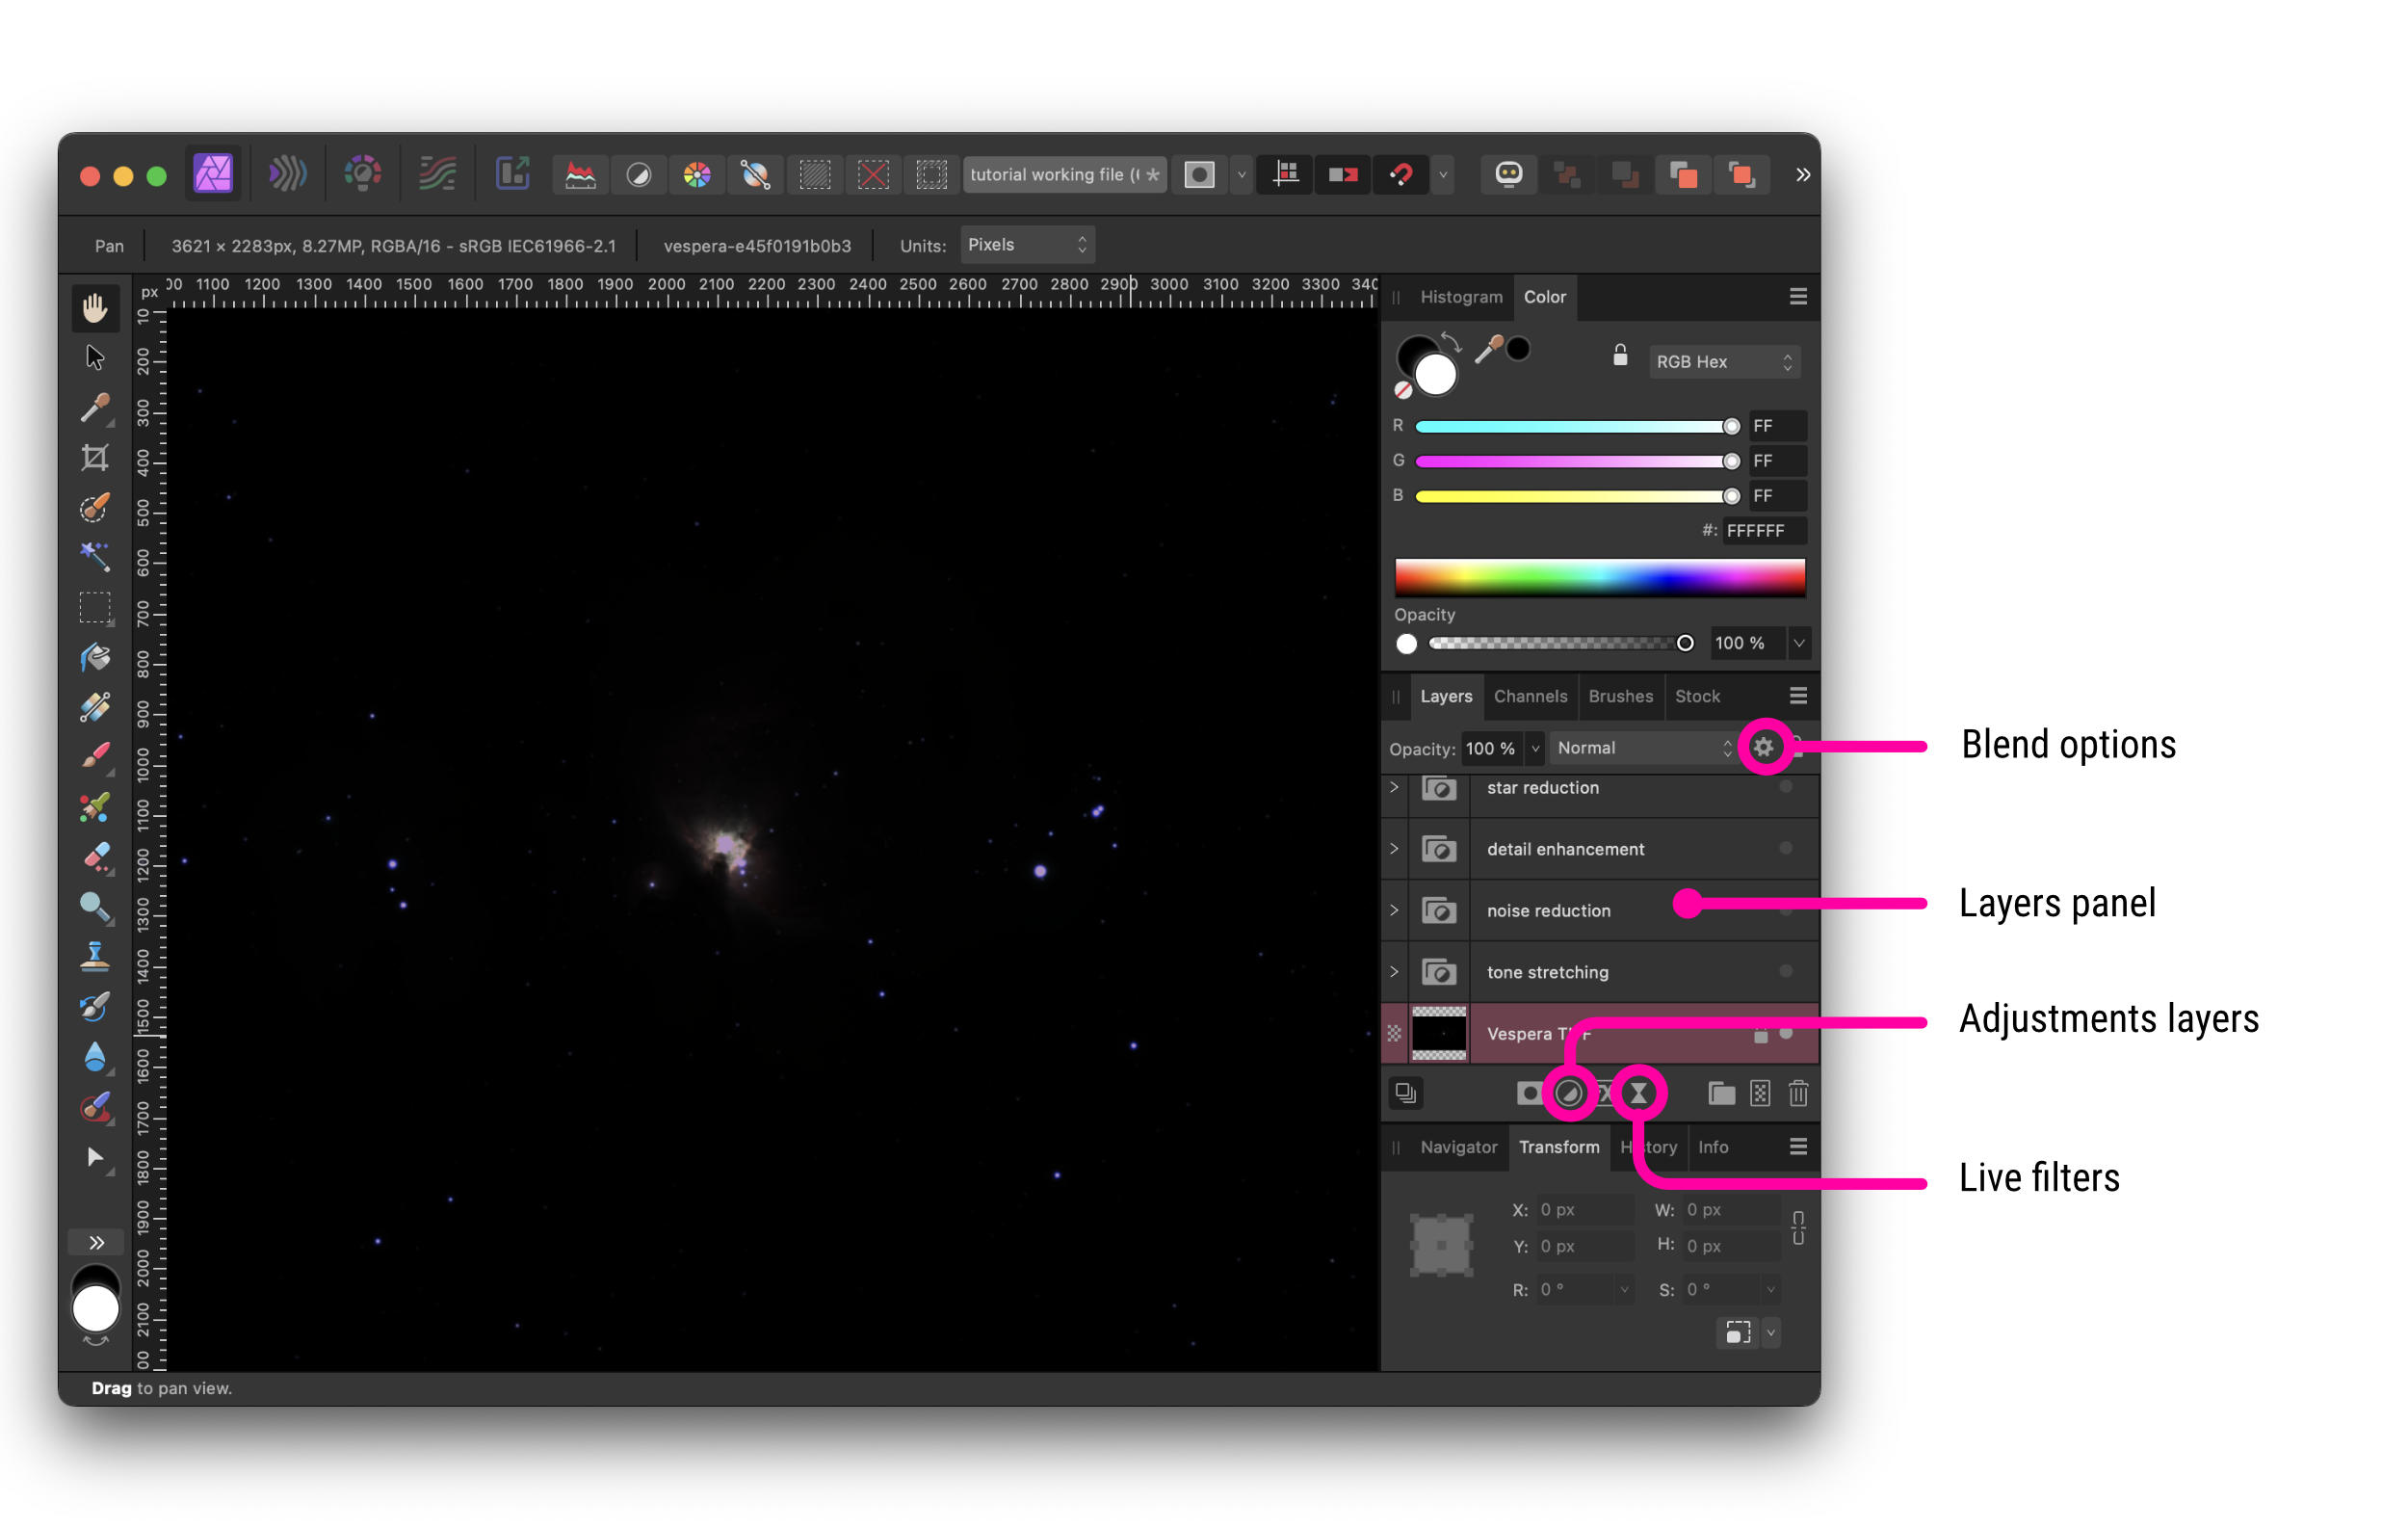
The screenshot below (fig. 2) shows the main elements of the Affinity Photo interface that we will use.

How to process Stellina and Vespera Raw Images with Affinity Photo

Fig. 2 – Affinity photo interface.

Affinity Photo image processing: how to process Stellina and Vespera raw images with Affinity Photo | the example file

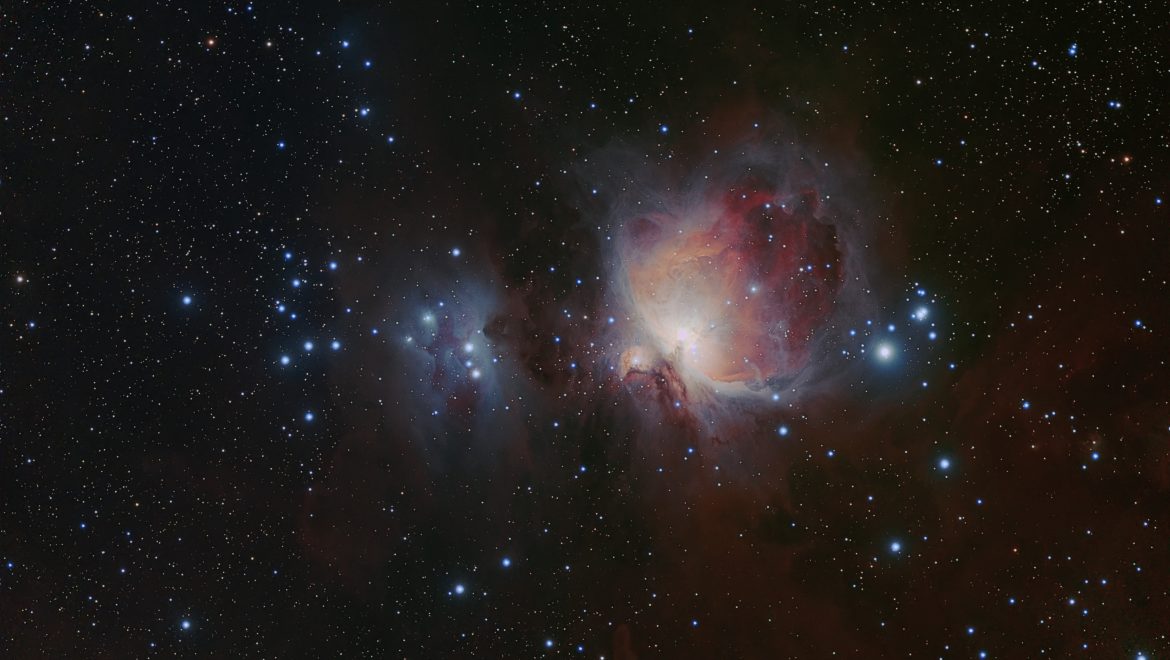
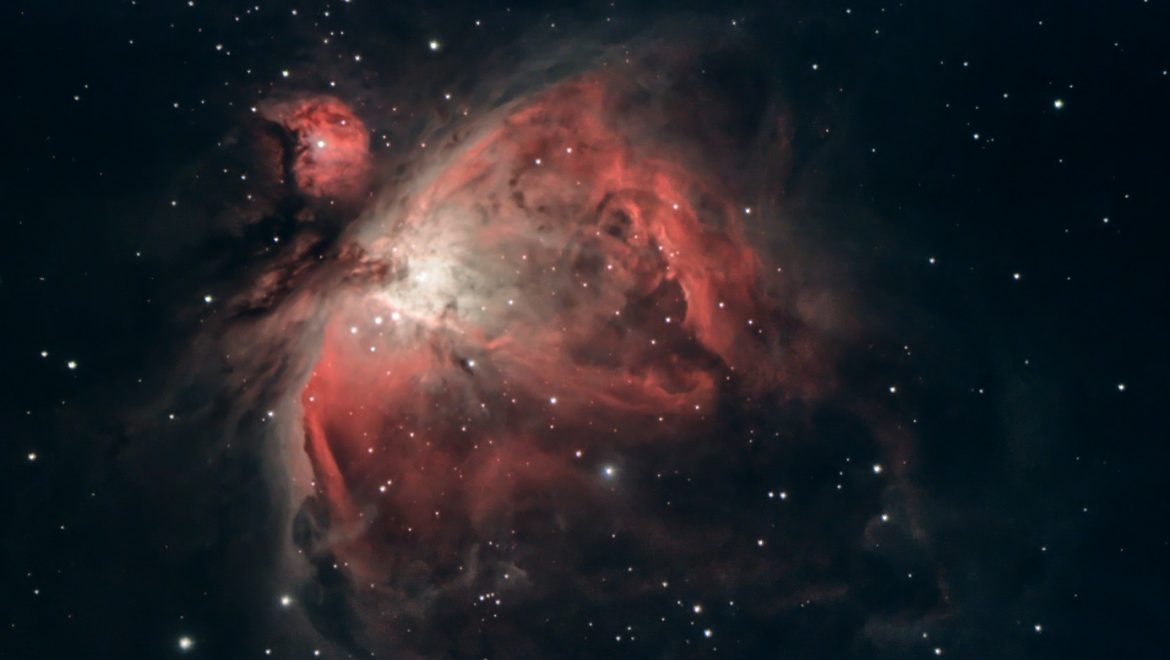
This tutorial is based on an image of the famous Orion Nebula (M42). You can download the original TIFF file (as you would retrieve it during your observation) by clicking here.
This image was captured with Vespera using our CovalENS mosaic mode, with the integration of 900 exposures of 10s (2h30 in total).

You can of course apply this tutorial to your own images. To do so, you need to make a TIFF export of the images you capture (read this article to learn more).

The better the image captured, the better the final result of the process. You may want to read the 14 tips for optimizing the performance of your observation station.

About the technique used in this tutorial

There is no unique way to process an astronomical image. The vast array of software available on the market and their various functionalities offer many ways to achieve a result.

Note that the settings required to process a particular celestial object may significantly differ depending on whether they are nebulae, galaxies, or star clusters. Celestial objects can show very different characteristics, even within their category. The advantage of manual processing over Stellina’s or Vespera’s automatic processing is precisely to allow for the treatment of objects differently depending on their features. It is important to understand that this article is not about strictly following the step-by-step tutorial, but rather understanding the notions related to image processing and being able to apply the concepts to other cases.

Affinity Photo image processing tutorial: Non-destructive processing

Most of the actions described in this tutorial are non-destructive. At any point in the process, it is possible to easily go back to previous settings, adjust them and get the result in real-time while preserving the rest of your work. The original image remains available without being directly altered.
This method offers more flexibility but also requires a more powerful computer configuration.
If at any stage of processing, your computer becomes too slow, you can “flatten” the result (i.e. merge all the processing stages) and then proceed.

Affinity Photo image processing: processing steps

Step 1: Tone stretching

At first glance, the TIFF file may confuse you (see figure 2): the image appears almost completely dark. Actually, the signal does exist. What we can see at this point is basically the heart of the nebula and the brightest stars. To show the whole nebula, it is necessary to “stretch” the dark tone part of the histogram of the image. This step is called tone stretching.

How to better understand the role of tone stretching

The range of shades that a computer screen can display (the dynamic) is much smaller than that of the TIFF file (256 levels per color for the screen vs. 65536 levels per color for the TIFF file). This is why we only see the very bright parts of the image on our screens.
Nebulae and galaxies are much less bright than the brightest stars. In astrophotography, it is the dark part of the image that we want to highlight.
The “tone stretching” allows for emphasis the dark tones compared to light tones.

Once you have opened the image with Affinity Photo, pay attention to the panels on the right (see figure 2). Make sure the “Layers” panel is visible.

Like most image processing software, Affinity Photo is based on a system of superimposed layers to compose the final image. Some layers may contain an image, while others contain adjustment layers whose effect affects all the visible underlying layers.

To achieve the “tone stretching”, we will use adjustment layers.

  • At the bottom of the layers panel, click the “adjustments” icon (fig. 2). In the pop-up menu, choose “levels”.

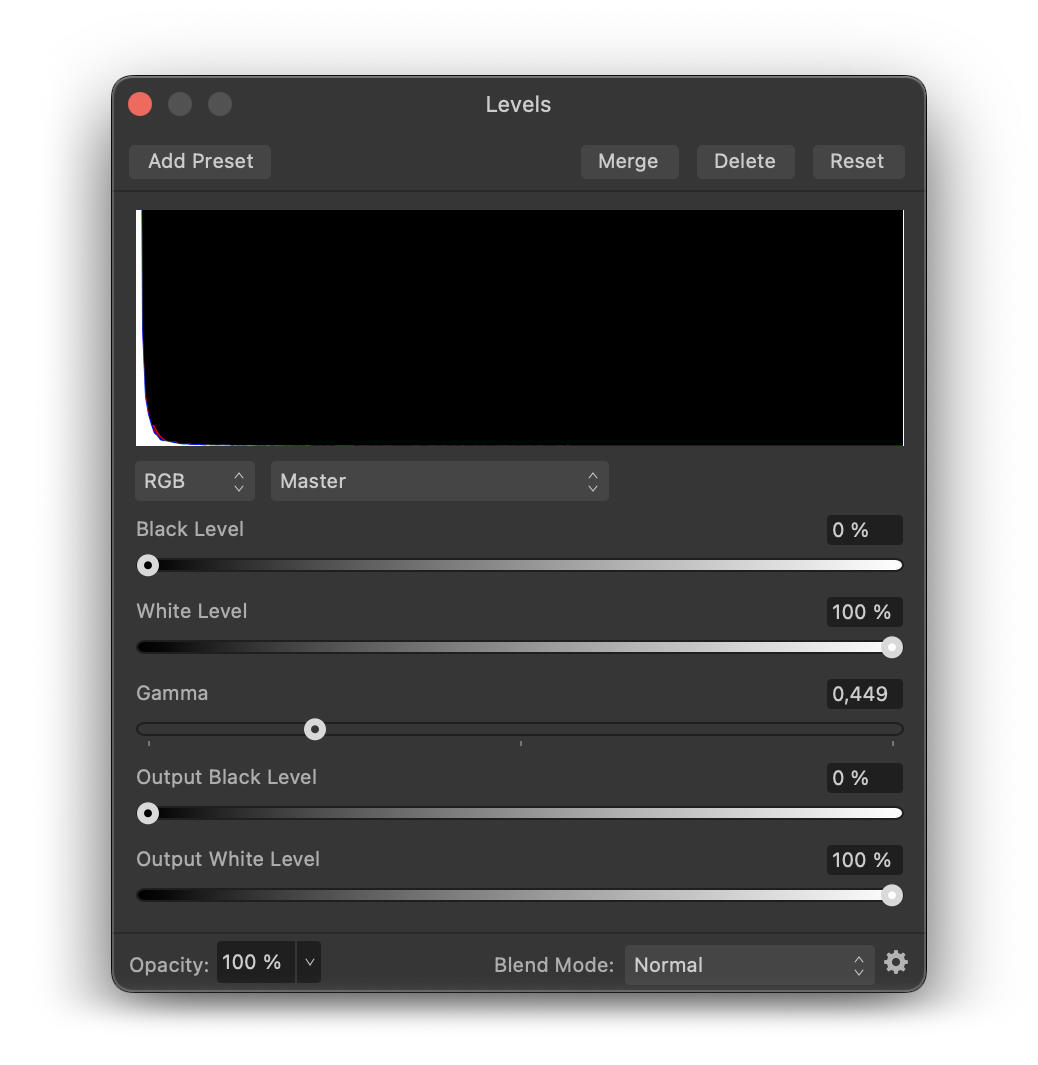
A new panel shows a histogram of the image (the signal distribution across the image) as well as the available controls. The histogram shows that the majority of the signal in the image is located in dark tones (left part of the histogram).

How to process Stellina and Vespera Raw Images with Affinity Photo

fig. 3 – gamma setting

  • Bring the “gamma” slider to the left to emphasize the darker tones until the nebula appears but without getting the sky background too bright. For this image, I recommend setting the gamma to 0.45 (if you apply this tutorial to another image, the setting will probably be different).

Let’s proceed with another tool to make the nebula pop without increasing the brightness of the sky background.

  • Make sure the Level adjustment layer is selected and click again on the “adjustments” icon at the bottom of the layers palette. Then choose “curves” from the list.

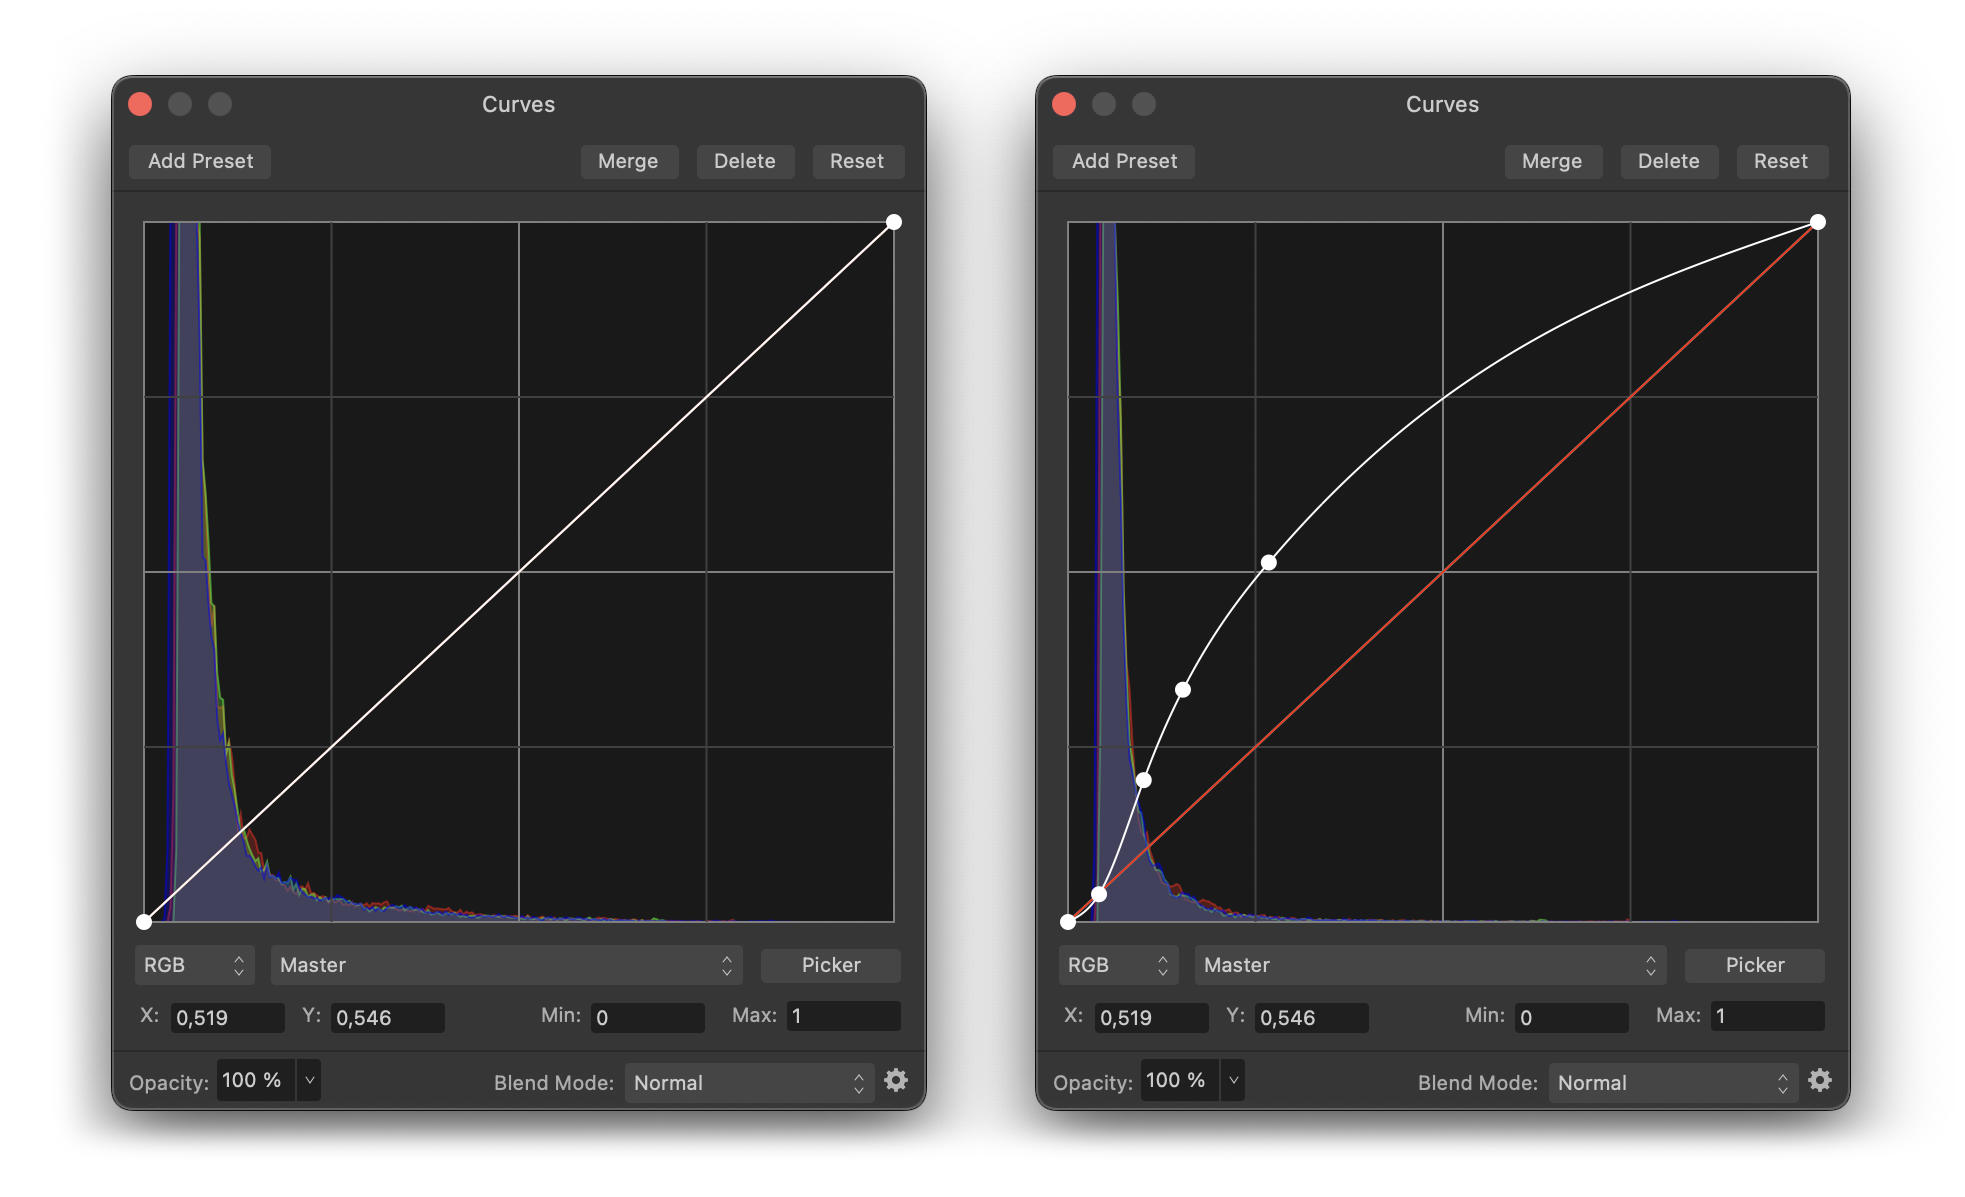
A new layer appears on top of the layer “Levels adjustment” and a new panel displays the corresponding controls (fig. 4, left part).

How to process Stellina and Vespera Raw Images with Affinity Photo

Fig. 4 – The curves adjustment tool

How to better understand tone curves

The tone curve graph allows you to selectively increase or decrease the brightness of the image areas according to the brightness they already have. For example, you can decide to increase the brightness of dark areas without changing the brightness of areas that are bright enough.

The left side of the graph (Figure 6 on the left) stands for the very dark tones, called shadows (or blacks), while the right side refers to the very light tones ( “whites”). In between are the dark mid-tones and the light mid-tones.

The vertical axis of the graph shows the brightness value for each tone: minimum (black) at the bottom, and maximum (white) at the top. At first, the curve that runs through the graph consistently indicates that the shadows (on the left) are extremely faint, and the highlights on the right are very bright.


By clicking on the curve, you can change its shape in order to increase the brightness level of certain tones without affecting others.
For our purpose, we want to increase the brightness of the nebulosities without increasing the highlights (to avoid “overexposing” them) or the black tones (so as not to make the sky background too bright).

  • Click the curve on the dark tones side to add a control point. Then move it upward to increase the brightness of that tone range.

The darker parts come out more but the very bright areas become burnt. We need to add another control point on the curve to bring the brightness of the highlights back to their original values.

  • Add the required control points to the curve so that it adopts a shape similar to Figure 4 on the right.

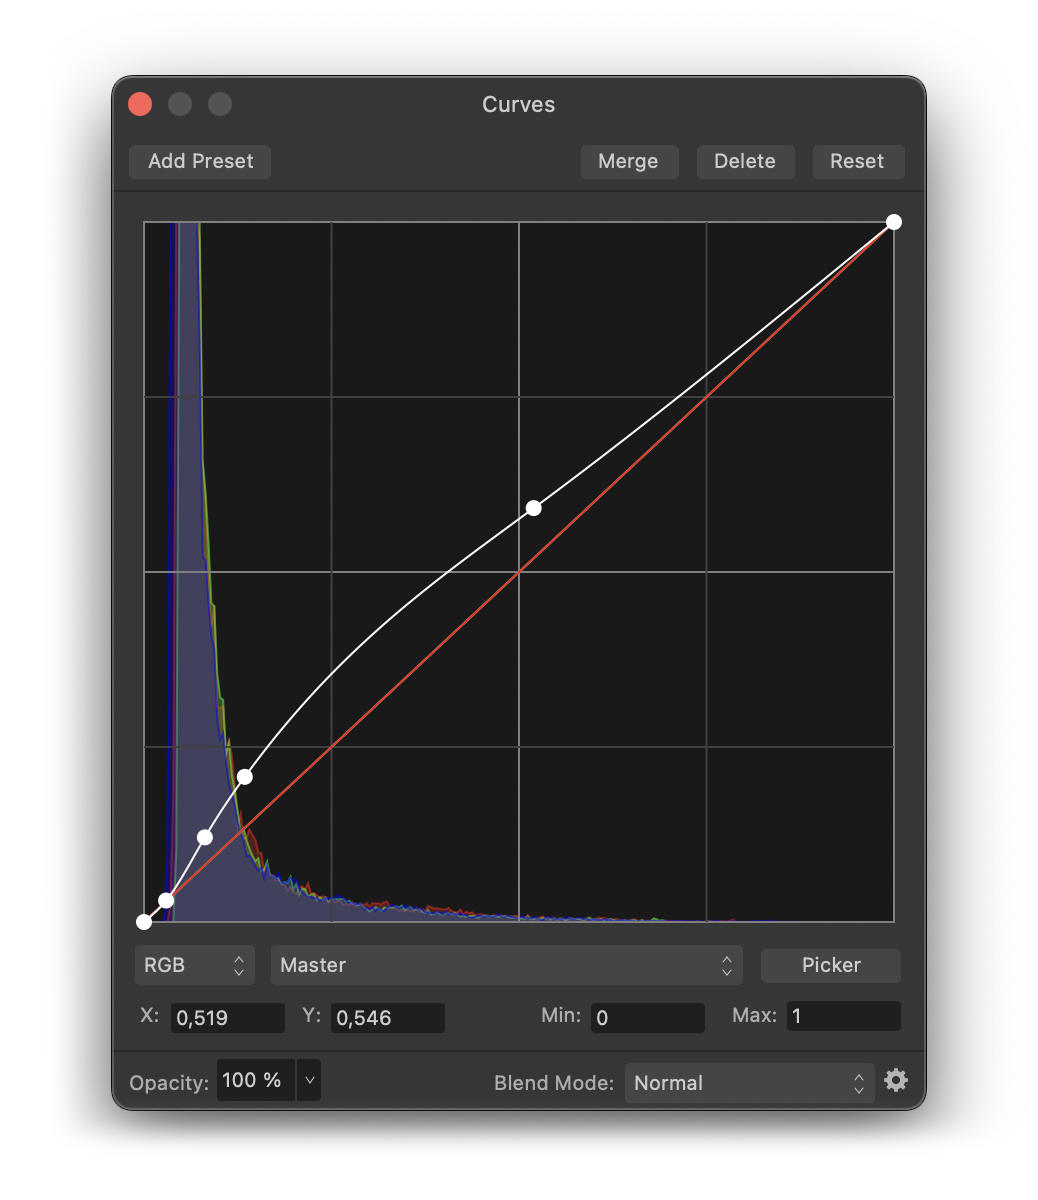
We are now tempted to make the nebulosities pop out even more. Rather than readjusting the tone curve we’ve just set, adding a second layer of “curve adjustment” may be better to proceed gradually.

  • Click on the “adjustments” icon at the bottom of the layers palette and choose “curves”.
  • Add control points on the new tone curve (fig. 5) in order to highlight the nebula while preserving the sky background and the very bright parts.

How to process Stellina and Vespera Raw Images with Affinity Photo

Fig. 5 – second setting of the tone curve.

Here is the result you should get at the end of this step, compared to the starting image.

Step 2: Noise reduction

While zooming in on the image, we observe the presence of “noise”. The noise is this kind of granulation that appears mainly in the dark areas of the image.
The noise is distributed randomly and evenly across the image. It is less noticeable in the bright areas because the weaker light intensity of the noise is overpowered by the strong “signal” of the bright areas.

How to better understand the causes of image noise

Noise is initially present on any image captured by an electronic device. It can be produced by the image sensor and circuitry of a digital camera. It’s possible to limit the noise generated by the sensor by cooling it. This is why some experienced astrophotographers and professional astronomers use cooled cameras.

When processing an image, the various manipulations performed to bring out the details also have the negative side effect of bringing out the noise.
Let’s reduce it before it becomes too damaging for the following manipulations.

  • At the bottom of the layers palette, click on the “live filters” icon and choose “denoise” from the list
  • A new layer appears in the layers panel. Make sure it is on top of the layer stack. Otherwise, drag it over the “Curve Settings” layer.

Let’s start by reducing the color noise.

If you zoom in on a part of the image where only the sky background is visible, you see that what should be a dark grey area is actually a juxtaposition of pixels of different colors (Fig. 7 left)

How to process Stellina and Vespera Raw Images with Affinity Photo

Fig. 7 – Details of the noise on the sky background before and after applying the color noise reduction.

  • Make sure the colors contribution slider is set to 100% and drag the Color slider slightly towards the right. For this image, you can use a setting of 6%.

If you look again in detail at the sky background, you can see that we now get a juxtaposition of gray pixels (fig. 7, right part)

Now, let’s tackle the luminance noise. Instead of making the adjustment in the active live filter layer, let’s create a new one (in order to apply a more specific adjustment)

  • Click again on the “live filters” icon and choose “denoise”.
  • Make sure the “Luminance Contribution” slider is set to 100%, the “Color” slider to 0%, and the “Luminance Detail” to 50%, and then drag the “Luminance” slider to the right to reduce the noise in the image.

The higher the “Luminance” value, the less noise there will be in the image. Be careful, however. Drastically reducing noise also reduces the details in the image. You need to find the right compromise.

For this example, I suggest setting the “Luminance” slider to 12%.

Noise reduction has been applied to the entire image. However, we’ve found that the noise was less noticeable in the light areas. It would be interesting to apply noise reduction only in the darker areas and thus keep all the details in the lighter areas.

We can achieve this result by controlling the blending options of the “Noise Reduction” layer. We can indeed indicate that the light areas of the “Noise Reduction” layer become “transparent” and let the underneath information pass through without modifications.

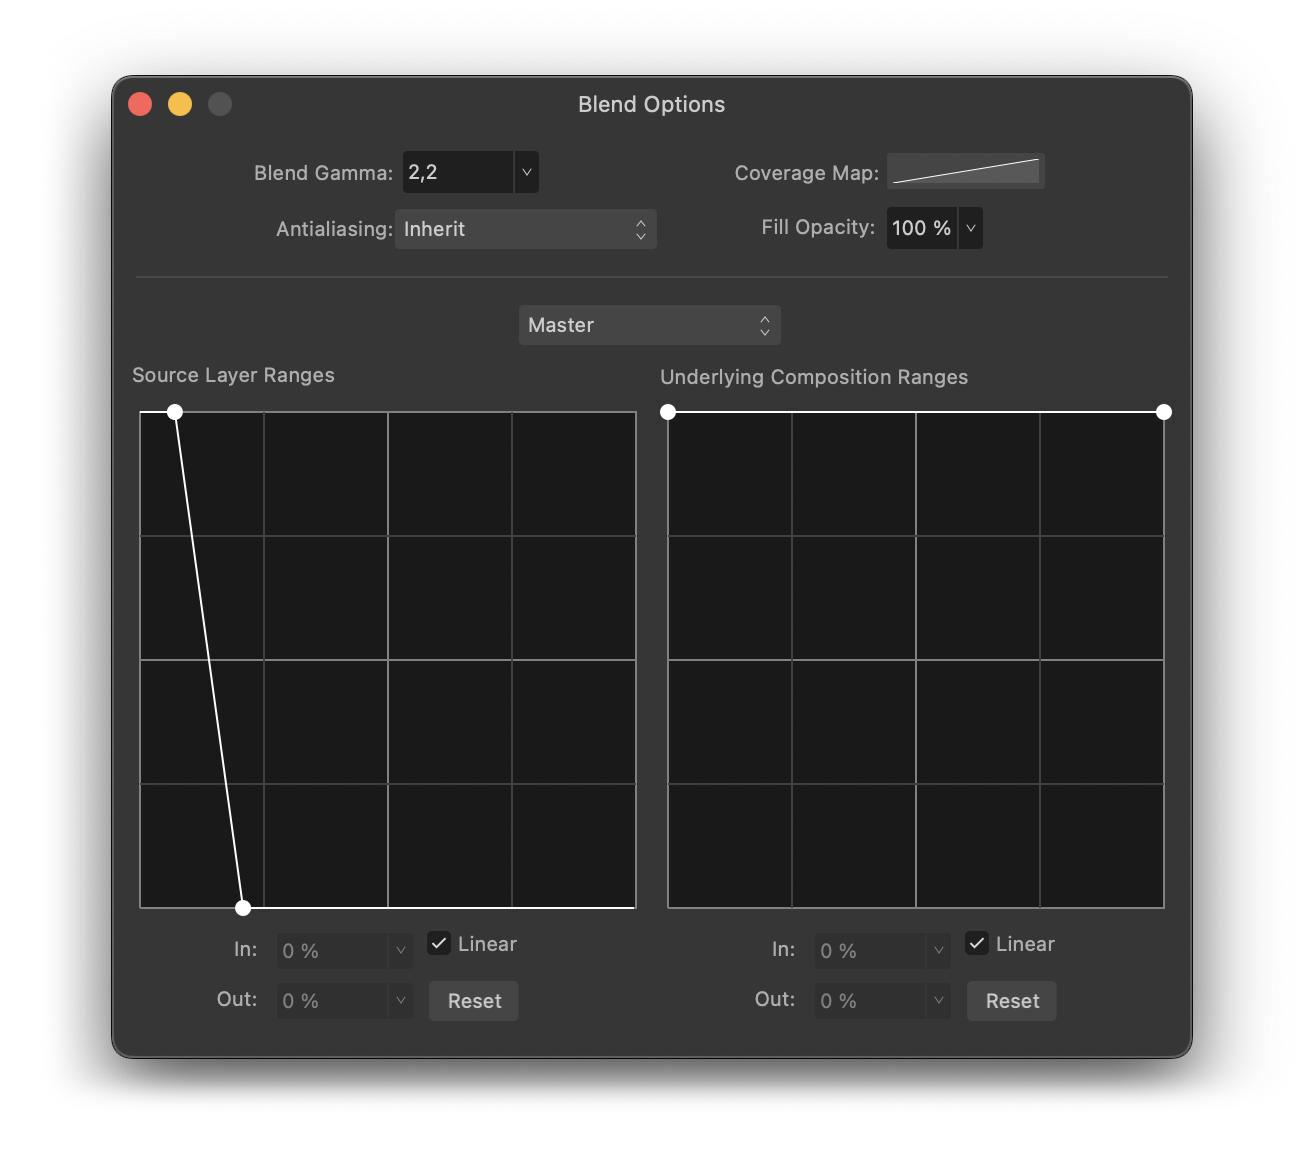
  • Make sure that the top layer “noise reduction” is selected. At the top of the layer panel, click on the “blend options” icon (see fig. 2).

The settings panel that appears shows two graphs that look like the tone curve graph we are familiar with. They work in a similar way. Let’s focus on the left-hand graph “Source layer ranges”. This allows specifying the tone ranges to which the filter will be applied (if you are working with version 2 of affinity photo, you can use the new “Luminosity range mask” instead).

affinity-photo-tutorial-tiff

Fig. 8 – Blending options for noise reduction.

  • Click on the control point at the top right of the graph (the one corresponding to the whites) and drag it down.
  • Once completely at the bottom, drag it to the left and check in the image how the noise evolves to find the right setting.

The noise reduction layer no longer affects highlights.

  • To make sure that the “noise reduction” layer affects all the very dark areas, move the control point at the top left of the curve (shadows) slightly to the right.

The graph should look similar to the illustration above (fig. 8).

Step 3: Details enhancement

Now that we have removed the noise from the image, we can bring out even more of the very faint nebulosity below the M42 nebula and around the “running man” nebula without too much altering the quality of the rendering.

  • Add a new “curves adjustment” layer. We have to operate in a subtle and localized way on the tonal zone corresponding to these weak nebulosities.
  • In the curve setting panel, click on “picker” at the bottom right.
  • In the image, click on an area with very subtle nebulosities and while holding the click, drag the mouse cursor upward very gently. This will add a control point in the “curve setting”.
  • Drag the control point upwards to highlight the relevant part of the image.
  • Add 2 more control points on either side and drag them downward, so that the rest of the curve returns to its original position as shown in figure 9 below.

How to process Stellina and Vespera Raw Images with Affinity Photo

Fig. 9 – Tone curve settings.

Now, let’s enhance the details and the sharpness of the image.

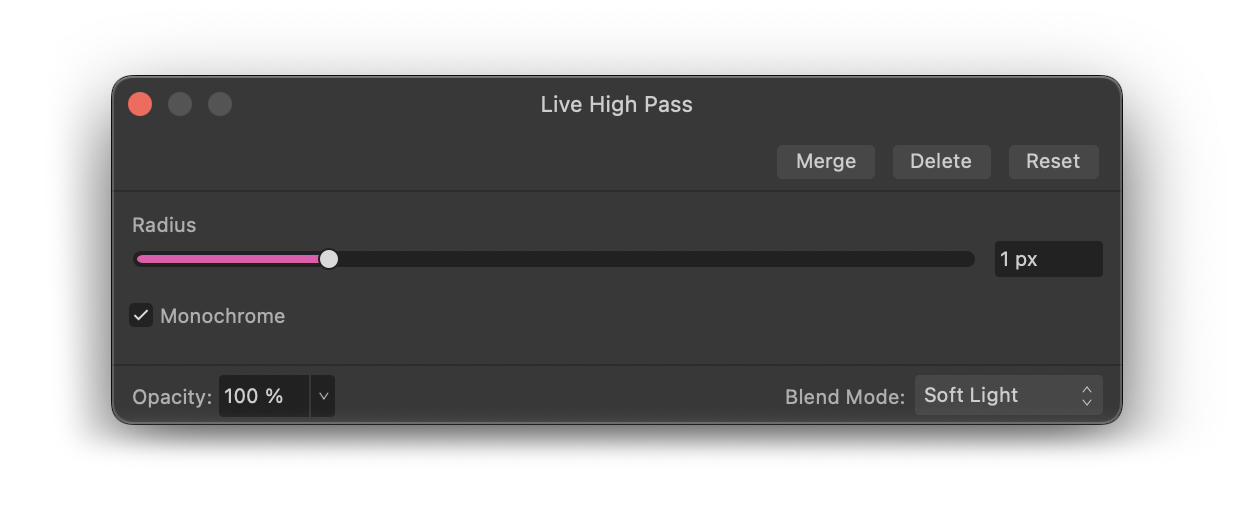
Affinity Photo has three main tools for this: the “Clarity” setting, the “Unsharp Mask” and the “High Pass” filter. We are going to use the latter as it has the fewest undesirable side effects.

  • At the bottom of the layers panel, click on “Live Filters” (fig. 2) and choose “High Pass” from the list.
  • Make sure the new layer is placed at the top of the layer stack.

The “high-pass” filter affects a certain scale of details depending on the setting we choose. In order to act on different scales of details, we are going to apply this filter several times starting with the finest details.

affinity-photo-tutorial-tiff

Fig. 10 – High pass filter

  • In the “live high-pass” filter settings panel (fig. 10), set the radius to 1 pixel and check the “monochrome” box, then set the blend mode to “soft light”.

The effect on the image is subtle yet noticeable. It is necessary to be particularly careful when sharpening details as this has the side effect of also increasing the noise in the image.

To accentuate the effect, let’s apply the filter again with the same settings:

  • Right-click on the name of the layer “high-pass” in the layer panel then choose “duplicate”.
  • Perform the same operation once again to get a third “high-pass” layer with a radius setting of 1 pixel (make sure that the new layer is placed at the top of the layer stack).

Now, let’s tackle the larger scale details.

  • Duplicate the top “high pass” layer again (make sure it is placed at the top of the layer stack) then double-click on it to open its settings panel.
  • Set the radius to 2 pixels.
  • Duplicate this layer twice to accentuate the effect.

Finally, let’s work on details at an even higher scale.

  • Once again, duplicate the “high pass” layer located at the top of the layer stack.
  • Open its settings panel and set the radius to 4 pixels.
  • Duplicate this layer one last time to increase the effect.

You should now get 8 “high pass” layers.

This step is complete. The figure below shows the evolution of the image between the beginning and the end of step 3.

Step 4: Star reduction

The detail sharpening has the side effect of highlighting the stars. This is an unwanted result as we want to highlight the nebula.

  • Click on the “live filters” icon at the bottom of the layers panel and choose “minimum blur”.
  • Set the radius to 1 pixel and check the “circular” box.

We note that the effect is too dramatic. Most of the small stars have disappeared but above all, the details in the nebula are completely distorted.

  • To fix this, set the opacity of the “minimal blur” live filter to 25%.
  • Duplicate the “minimal blur” layer twice.

This step is complete. The figure below compares the image between the beginning and the end of step 4.

Step 5 : Color grading

Here comes the most creative step that allows you to personalize your image with Affinity Photo.

For the moment, the Orion Nebula is quite pale compared to the images we are used to. Let’s bring out the colors, then adjust them to get a look that suits us.

  • Click on the “adjustments” icon at the bottom of the layers panel and choose “Vibrance”. Make sure the new layer is at the top of the layer stack.
  • In the corresponding new panel, bring “vibrance” and “saturation” sliders all the way up.

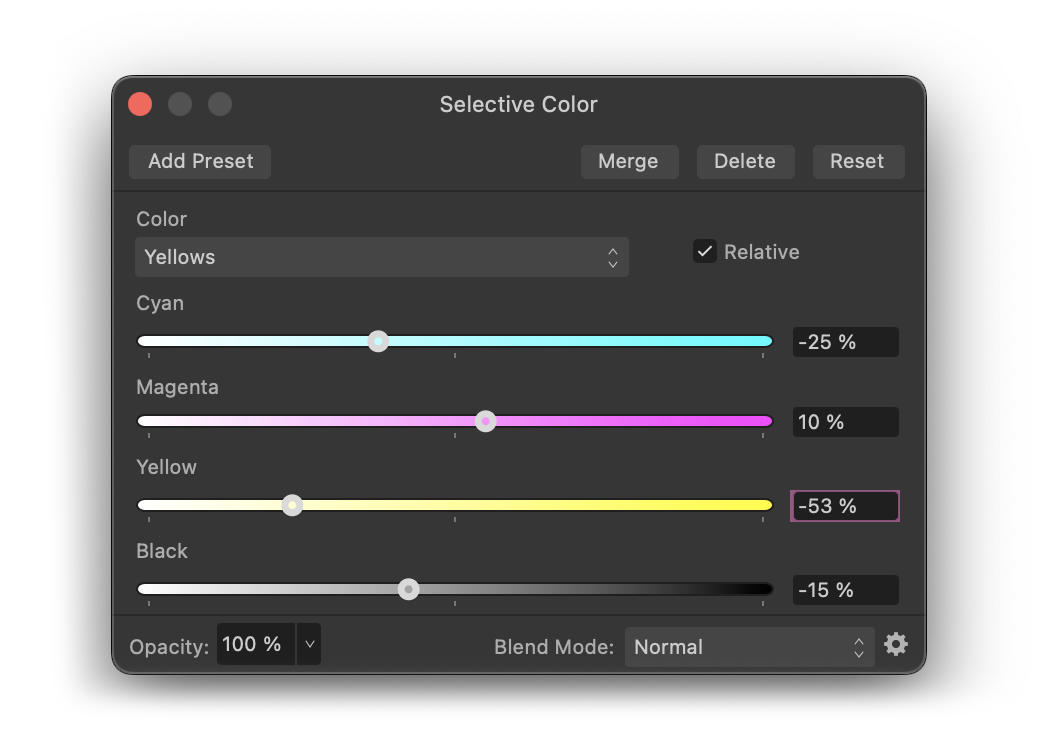
Now, let’s take advantage of the “selective color” tool to target an alter specific color. First, let’s add color contrast to the faintest nebulosities (below M42 and around “Running Man”).

  • Click on “adjustments” at the bottom of the layers panel and choose “Selective Color” (make sure the new layer is at the top of the layer stack).
  • In the color menu, select “yellow” to alter the yellow tones.
  • Bring the cyan slider to -25%, the magenta to 10%, the yellow to -55% and the black to -15% (fig. 13 below).

How to process Stellina and Vespera Raw Images with Affinity Photo

Fig. 13 Selective color correction.

We are now going to highlight the blue areas with the help of the “curves” tool that we have already used previously.

  • Click on “adjustments” at the bottom of the layers palette and choose “Curves” (make sure the new layer is placed at the top of the layer stack).
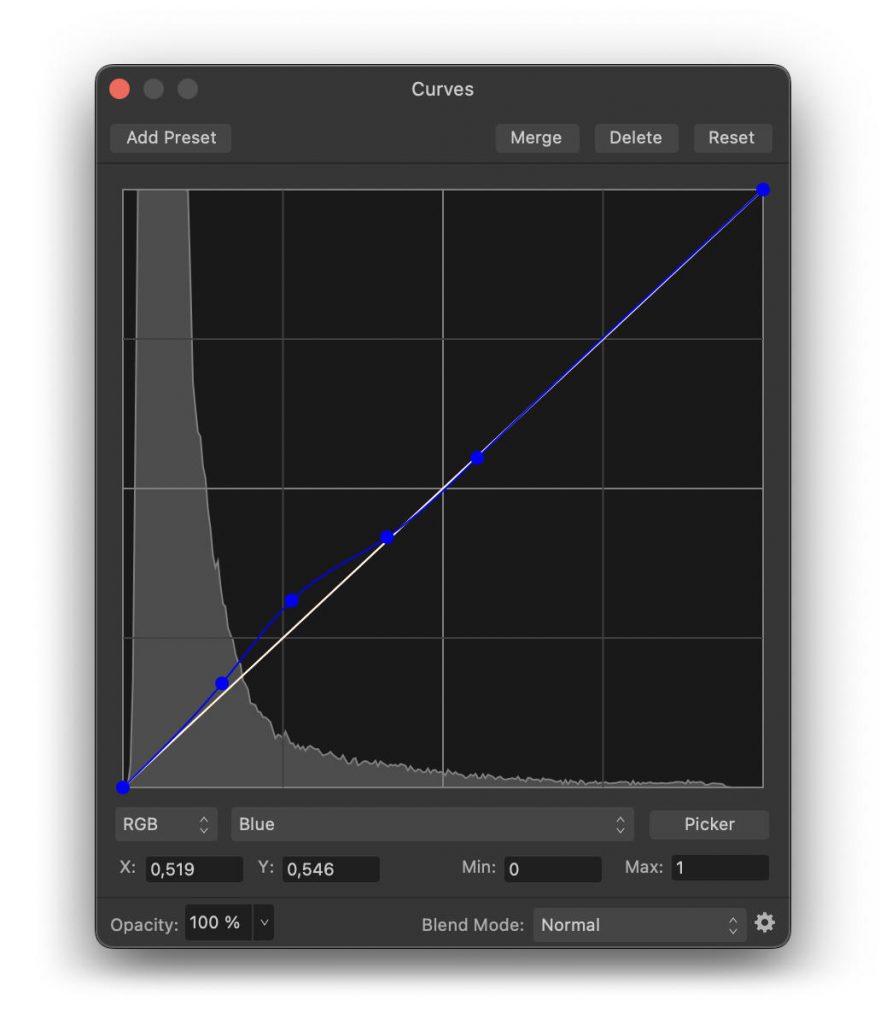
  • In the “curve” settings panel, choose the “blue” channel in the main (master) drop-down menu.
  • Add control points on the blue curve and change their positions as shown in the figure below (Fig. 14) to emphasize the blue signal on the nebulae.

Affinity Photo image processing

Fig. 14 – Adjustment of the blue tone curve.

Let’s improve the effect with a “selective color” setting.

  • Click on the “adjustments” icon and choose “selective color”.
  • Select “blue” in the “color” menu.
  • Set cyan to 100% and yellow to 25%.

Now let’s work with the red shades.

  • Add a new “selective color” adjustment layer as above.
  • Select “red” from the color menu.
  • Set the cyan to -20%, magenta to 30%, and yellow to 80%.
  • In order to accentuate the result even more, duplicate this last “selective color” adjustment layer.

The values given above for color correction are examples and it is up to you to define how you want the nebula to look.

This step is complete. The figure below compares the image between the beginning and the end of step 5.

Step 6: Final touch

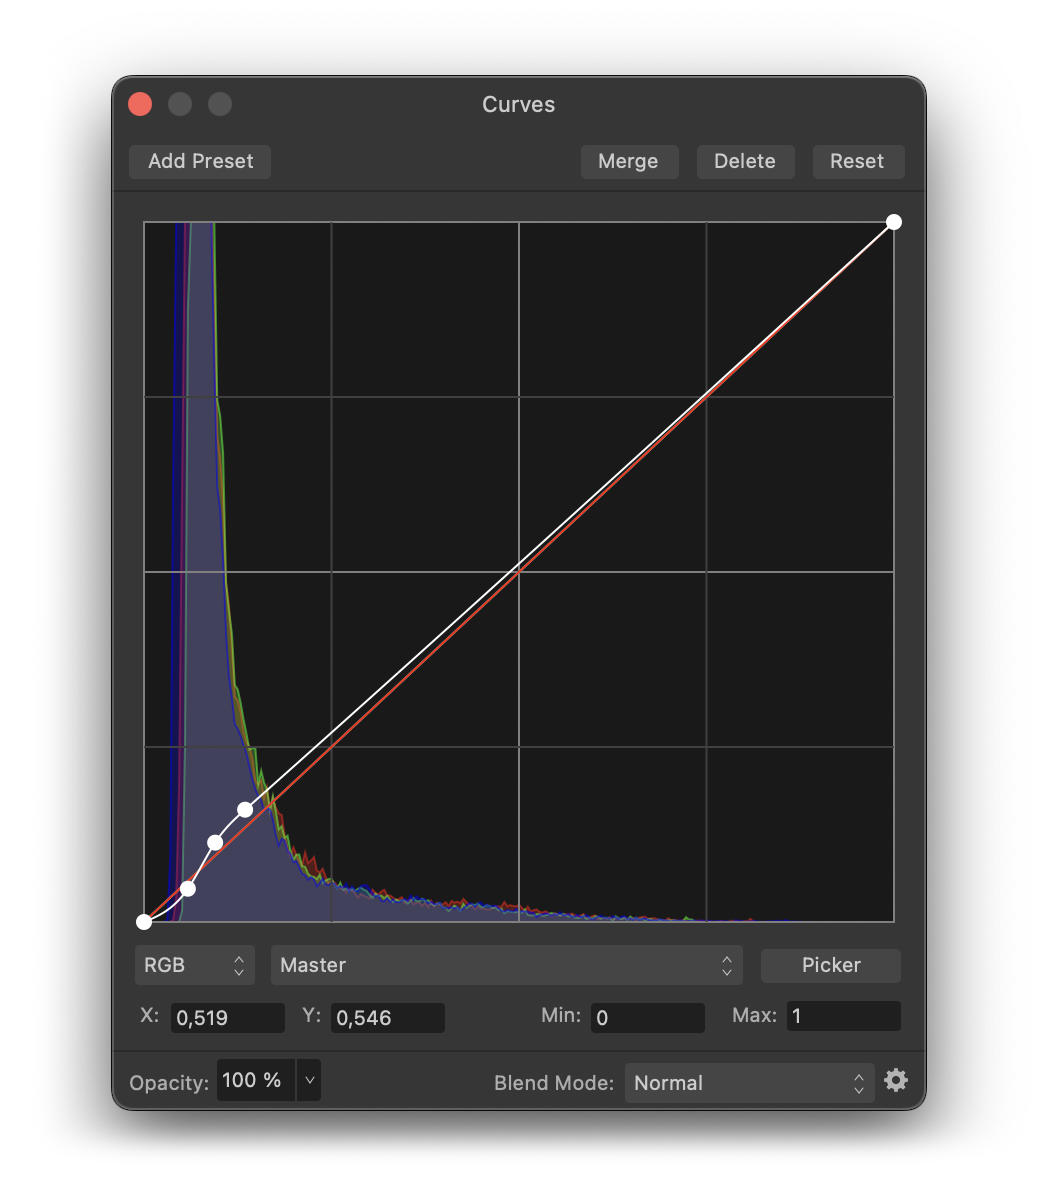
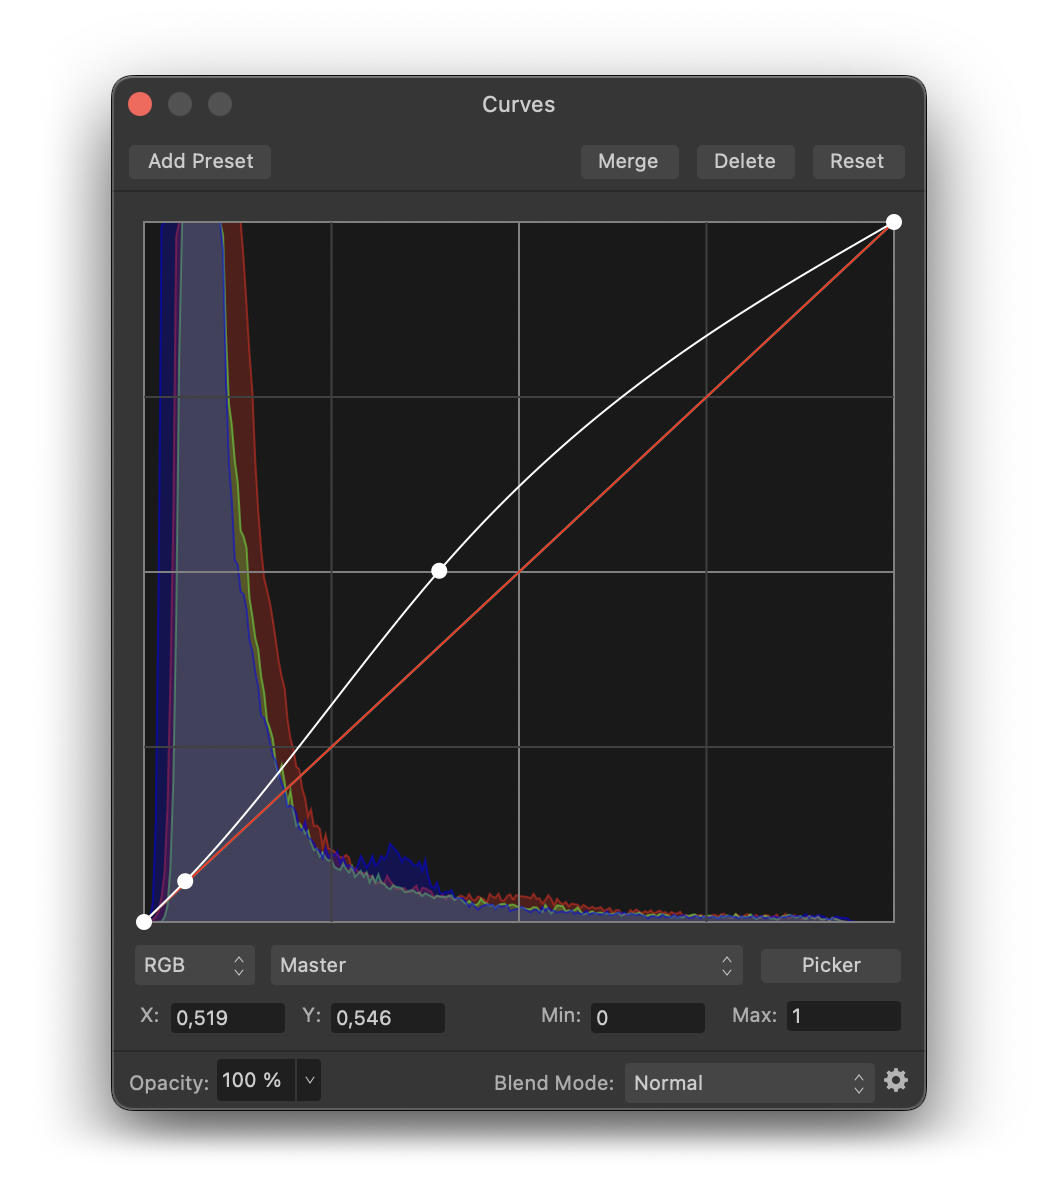
To finish the processing of this image, let’s apply a final adjustment “curves” to increase the overall brightness of the image while preserving the sky background and very bright areas.

  • Click on the “adjustments” icon and choose “curves” from the list (make sure it’s placed at the top of the layer stack).
  • Add control points to the curve to increase the brightness of the mid-tones as shown in Figure 16 below.

affinity-photo-tutorial-tiff

Fig. 16 – Final adjustment of the tone curve.

Examining the image, we can see on the left side that the sky background has a slight magenta cast. To fix this, we are going to use a specific Affinity Photo feature dedicated to astrophotography.

To use this feature, we must first generate a new layer with the result of all the adjustments we have made so far.

  • Right-click on the layer at the top of the layer stack and choose “merge visible” from the menu.
  • Make sure the newly created layer is selected.
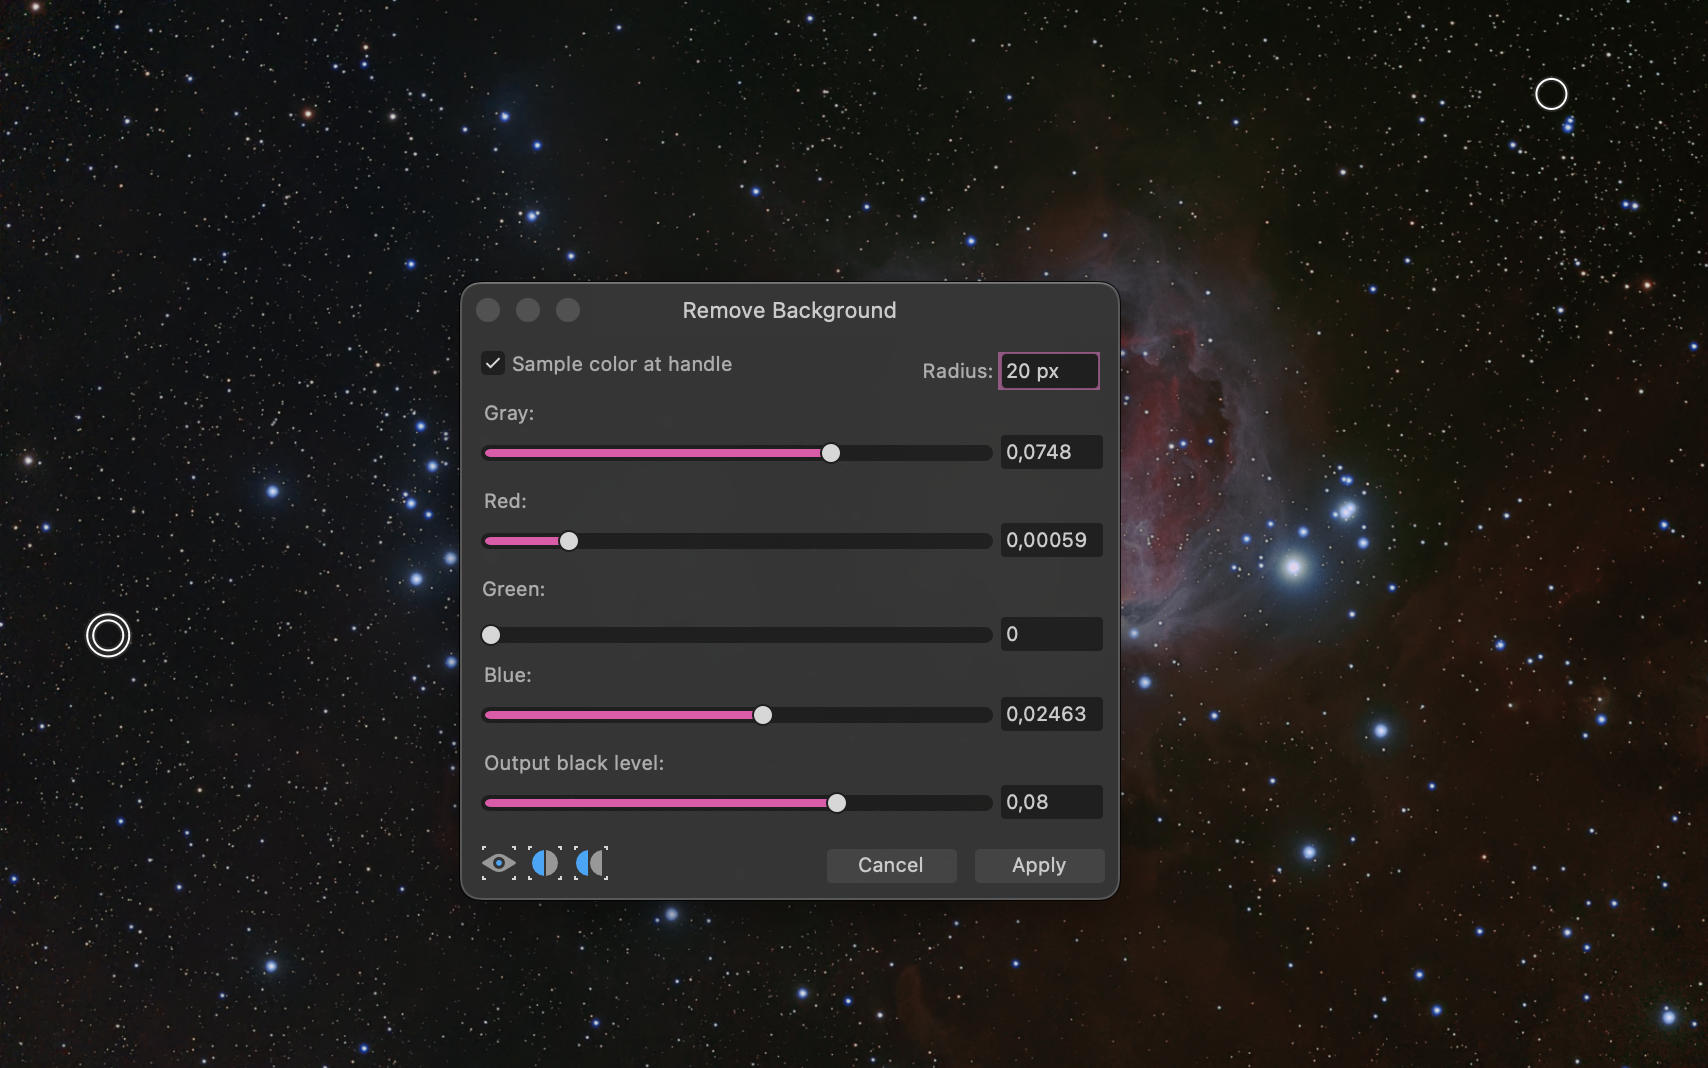
  • In the main menu “filters” of Affinity photo, choose “astrophotography”, then “remove background”.
  • In the new panel, set the “radius” to 20 px.

At the center of the image, you can see a handle in the form of two small concentric circles.

  • Move this handle to the right of the image on an area where only the sky background is present, i.e. without stars or nebulas.
  • In the “remove background” panel, check “sample color at handle”.
  • Click on the image to create a second handle this time in the upper right part of the image where only the sky background is visible.
  • In the “remove background” panel, adjust the “output black level” slider to set the intensity of the background gradient removal.
  • Click “apply”.

A value too low will make the faint nebulosities disappear. So you have to find the right compromise to soften the magenta background gradient while keeping all the details. For this example, I recommend a value of 0.08 for the “output black level”.

Affinity Photo image processing:

Fig. 17 – Removal of the sky background gradient.

This step is complete. You can see the final result in figure 1 at the beginning of this tutorial. The original file of the final result is also available in the tutorial files for download.

Affinity Photo image processing: shall we proceed further?

We can now consider the processing of the Orion Nebula image from the 16-bit TIFF export of Vespera to Affinity Photo as complete. We have managed to get a more detailed, brighter, and more colorful image.

It’s tempting to go further and accentuate the details and colors even more. The real question is: should you do it?

When it comes to image processing, there are no laws or rules. However, the processing is often considered successful when the image retains a natural appearance. By further processing, you will certainly increase the detail, but the image may look less natural. Also, keep in mind that by further processing you will also accentuate the defects in the image.

Remember that each celestial object is different and will require customized settings. You will improve your skills by practicing and also asking for advice from other astrophotographers.

Feel free to share the results of your work on social networks and in the Facebook group “My Singularity by Vaonis”.

If you have been working with a non-destructive process, it is easy to adjust the settings of the intermediate steps to try to achieve a result that suits you better.

We hope you enjoyed this tutorial on how to Affinity Photo image processing.

Singularity
Tips & News, Travel journal

Singularity, the new companion app of your observation station

One star fades. Another one ignites. With the arrival of Vespera, the application used to pilot Stellina has handed over to a new generation. This evolution brings with it new features to further improve your user experience. Singularity helps you to prepare and plan your observation evenings, stay connected to sky and space news, and discover tips and tricks to get the most out of your observation station. Advanced users will enjoy new experiences via the Expert Mode.


Installing Singularity

Singularity is not just a name change but an entirely new application. You can download it to your smartphone or tablet from the App Store or Play Store. The first time you launch Singularity you will need to create a new user account. The first time you connect to your observation station with Singularity, you will also need to update your instrument.
After this you will no longer be able to control your observation station with Stellinapp, so you can delete the old application from your devices. Browse the Singularity FAQ on our support website here.


1. The Space Center: your new gateway to the stars

The application’s home screen has been completely redesigned. There are many features in addition to the controls of your telescope.The space center

Weather conditions

Watch how the weather should evolve over the next few hours and days, directly from Singularity. You can also consult information on sunrise and sunset times and moon phases. This offers the essential elements for finding the best time for observation, all at a glance.The weather screen

Tip

Under the weather summary, tap the arrow to access more detailed information and the sunrise and sunset times.

weather details screen

Almanacs and astronomical news

To make sure you don’t miss any important astronomical events, Singularity presents a summary of upcoming phenomena to observe. You can also access a complete article on the sky for the current month. Singularity also offers articles on astronomy or space exploration news.

Tip

In the almanac section, tap “Add to Calendar” under an astronomical event you are interested in to share it on your smartphone or tablet calendar. This will allow you to set reminders.

Practical advice, guides and tutorials

From Singularity, you can access articles published on the Vaonis website which offer you tips on how to get the most out of your observation station, tutorials on image processing, and much more besides.

2. Introduction of a new concept: observatories

Stellina and Vespera are designed to accompany you on your favorite observation sites, from a weekend in the country away from light pollution to clear summer nights on vacation.

Singularity can save all your favorite observation sites for faster initialization of your observation station, showing you the prevailing conditions at each of them.
The first time you launch the application you must create at least one observatory. If you have registered several observation sites, to initialize your telescope simply choose the corresponding observatory and tap the “Initialize” button.
If you use multiple devices to connect to your observing station, your observatories will be shared among all your devices.observatories

Important

Before initializing StellinaVespera, make sure that the correct observatory is selected. If you initialize the telescope with an observatory that does not correspond to your location, it may not work properly (a notification will be sent).

When choosing your observatory, you will also be able to use the new “Plan my night” feature according to the visible stars (see below for information on this module).

Tip

Even if you have a tablet without built-in GPS, the location of your observatory is recorded in Singularity so you can still initialize without having to enter the geographic coordinates manually.

3. Control everything that happens on your observation station at a glance

What is the temperature of my instrument? How much space is left on my USB key? What files are saved on it? Who are the other users connected to my telescope? All these questions are answered in a new screen that shows the status of your observation station. You may also use this screen to put your instrument to sleep when you have finished your observations or, for experts, access commands to capture calibration images (see below for more details).status screen

Tip

To access the “Expert” features from this screen, please activate the Expert Mode: go to the “Profile” screen, tap the menu icon at the top right, choose “Settings” and then “Activate expert mode”.

4. An improved explorer to help you find your next target more easily

The explorer now offers a section to regroup your favorite stars, that you observe frequently. This enables you to have them immediately at your fingertips.favorites screen

A new section also allows you to store manual targets that you can point to by entering their coordinates.

Use this section to capture images of the stars using custom camera settings. Your settings are saved with the object. You can easily restart a capture session with the same settings (Expert Mode must be enabled, see below).

Various interface improvements have been made to facilitate exploration of the celestial object library. You can now consult at a glance the position in the sky of the objects directly from the catalog and do a search by constellation name.

Tip

To view the position information of objects, go to the “Profile” screen, tap the menu icon at the top right, choose “Settings” and then “Display objects position”.

5. Expert Mode: control camera settings and capture calibration images

Eagerly awaited by advanced users, Singularity offers the full power of the “Expert Mode”.
To activate this mode, go to the “Profile” screen, then in the menu at the top right, choose “Settings” then “Activate expert mode”.

Capture images of the stars with custom camera settings

When the Expert Mode is activated, you can capture images of the stars by adjusting the unit exposure time and the camera gain. The exposure time can vary between 5 and 20 seconds and the gain between 0 and 27dB (default values are 10 seconds and 20 dB).capture custom parameters

Keep in mind that the default exposure time and gain values were established after extensive testing to achieve optimal performance in most situations.
However, there are some cases where you might want to change the default settings: for very faint objects if you observe under a sky of particularly good quality, for stars with strong contrasts in brightness (for example the Orion nebula), for very bright objects such as star clusters…

You can experiment with the optimal settings for you!

Tip

To capture an object with custom camera settings, you must add it as a manual target.

Capture calibration images

When you activate the recording of raw images (FITS format) on the USB key in order to perform manual stacking for image processing, we recommended also capturing calibration images (“darks” and “flats”) which allow you to “subtract” any defects inherent in the sensor and optics from the image of the object.

Singularity now officially supports this feature: from the status screen of your observation station, by tapping the “Expert Mode” button you can launch image acquisition while the optical tube is obstructed. You can define the camera settings and the number of images you want to capture and then let Stellina / Vespera do the work.

calibration image capture screen

Tip

For an effective use of the darks, they must be captured with the same camera parameters (gain and exposure time) as those used to capture the images of the star on which they will be applied, and also at the same temperature.

6. Plan my Night: schedule your observation sessions and let your station take care of the rest


This feature is currently only available on iOS. It will be available by the end of the year for Android devices.

With “Plan My Night” you can take advantage of all the nights that are suitable for observation until daybreak without having to stay up behind the screen of your smartphone.
You can prepare your observations in advance if, for example, you are receiving friends or in the framework of an association’s activities. If your goal is to accumulate many captures of certain objects for image processing, you can let your observation station work while you sleep.plan my night

From a date and an observatory, create a program with a list of objects to observe. Set the dedicated observation time for each object. Activate the program on your observation station and Stellina / Vespera will start the sequence at the scheduled time following the instructions you set.

You can always follow the progress of your observation program in Singularity and interrupt it if you want to take over.

Singularity offers different filters to find the objects to include in your observation program: height on the horizon, duration of visibility, type of object…

Tip

Once you have completed your observing program, log in to your observing station to save the images you wish to keep. When a new program is started, the images from the previous program will be deleted from the internal memory. If you have plugged a USB stick into your device, the images will be saved on it according to the settings defined in the “status” screen of the telescope.

7. To discover also…

Synchronizing saved images.

Save your photos in your Singularity gallery and now find them on both your tablet and smartphone. Photo storage in the app is now synchronized across all your devices.

Random observations (only available on iOS).

If you’re stuck for inspiration on what to target, want to be guided, or perhaps discover items you didn’t know, start a random observation from the home screen.

Stargazing with Vespera Pro
Press, Travel journal

14 tips to optimize the performance of your Vaonis smart telescope.

You can now observe the sky at any time with the Stellina and Vespera smart telescopes. Their user-friendly advanced technology features enable use in big cities thanks to the light pollution filter or between two cloudy periods with very fast installation. Our users speak for themselves, commenting that they have never observed the sky as much as since they started using a Vaonis smart telescope! Here are some tips to help you improve the quality of your observations and photos and make the most of your instrument’s capabilities. 

1. Turbulence and transparency: choose the right time.

Two factors affect the quality of astronomical observations even in fair weather: sky transparency and atmospheric turbulence.

Tip 1: check for optimal sky transparency.

Even in the absence of clouds, the atmosphere can be loaded with particles (dust, sand, pollution, haze) that absorb part of the light coming from the stars. Here’s how to assess the transparency of the sky.

  • During the day, the horizon may seem hazy and long-distance visibility is limited, or you might notice a light halo around the sun. These are advance clues that sky transparency will be poor
  • When the sunset is deep red, this indicates that the atmosphere is loaded with particles.
  • This happens when a high-pressure system stays over a region for a long time, which often causes particles to stagnate in the atmosphere. Most of the time, this is associated with high pollution levels in cities.
  • After a period of rain or heavy showers, the sky is generally “washed out” and more transparent (once the cloud cover has gone of course).
  • The number of stars you can see with the naked eye from your usual observation site (after acclimatizing your eye to darkness) is also a good indicator of the sky’s transparency.

Tip 2: check for the lowest turbulence levels.

The atmosphere is comprised of air masses with different densities and temperatures that are in motion. This is atmospheric turbulence. It generates slight deviations of light rays, a kind of “shaking” of what we observe. It is responsible for the glittering of stars. Heavy turbulence alters the sharpness of the observed stars. Therefore, it is helpful to know how to evaluate the turbulence and choose the best nights of observation.

  • As a general rule, when the weather is scorching, the air masses are moving faster, and turbulence is more critical. Conversely, in freezing weather, the turbulence is often lower. When the sky is clear, observations in winter may be of better quality.
  • With the naked eye, if you notice that even the stars located very high in the sky are glittering a lot, it means that the turbulence is strong. Conversely, if the glittering of the stars is barely noticeable, then the atmospheric turbulence is low, and the conditions are right for better observations.

2. Light pollution, sun and moon: observe when the sky is dark

The darker the sky, the more contrasted and brighter your images of the stars will be.

Tip 3: keep away from artificial light sources where possible.

  • If you observe from an urban area, try to avoid streetlights or prefer dimly lit areas, such as parks.
  • For even better conditions, find a site far from urban areas and point away from the light halo created by distant towns.

Tip 4: observe after astronomical twilight.

Even after sunset, the sky is still bright because of the scattering of sunlight through the atmosphere. For perfect darkness and good visibility of the stars, the sun must go down at least 18° below the horizon. In summer in the northern hemisphere, above certain latitudes, the sun never goes low enough to obtain a sufficiently dark sky (near and beyond the Arctic Circle there is even no night). Winter is the season when you can enjoy longer dark nights.

Twilight phases

  • Civil twilight: the Sun has set below the horizon but at less than 6°. The sky is still quite bright, and only the very brightest stars are visible.
  • Nautical twilight: the Sun is between 6° and 12° below the horizon. Many stars become visible while the horizon also remains distinctly visible. This is when sailors could easily take measurements at sea with a sextant.
  • Astronomical twilight: the Sun is between 12° and 18° below the horizon. The sky becomes dark enough to make astronomical observations in good conditions.


Vespera Pro at dusk

Even when the stars become visible, the sky is not yet dark enough to observe nebulae and galaxies in good conditions. Depending on the season, you have to wait between half an hour and 2 hours after sunset to have the darkest sky possible.

Tip 5: observe when the moon is not visible or in a thin crescent.

From the first quarter, the moon’s brightness is enough to produce a glow on the whole sky, hindering observations. The period around the new moon is ideal because the moon is not visible.

Around the first quarter, the moon is visible in the evening, and one can make observations of better quality during the second part of the night once the moon has set. On the other hand, around the last quarter, the first part of the night is more interesting, until the moon rises.
Around the full moon, it is especially bright and visible all night long making it the worst time for observation.

Fish Head Nebula

The Fish Head Nebula captured close to the full moon (top) and without the moon (bottom). Credit : Enrique Gonzales


Mobile apps that can be helpful.

There are a number of applications available to find the times of sunset and sunrise, astronomical twilight, moon phases and visibility, and to determine the best potential periods for observation. These include “Sun Surveyor” and “Photopills”, or specialized astronomy apps such as “Stellarium”.

Tips on observation times

Sun Surveyor helps you determine the best time to observe.

3. Temperature: acclimatize your smart telescope.

Tip 6: take out Stellina / Vespera one hour prior to your observation.

Telescopes are high precision instruments that require extremely fine adjustments to produce good-quality images. They are sensitive to temperature variations which cause contraction or shrinkage effects of mechanical and optical parts.
The telescope may have been stored in a warm place before you take it out in the evening, when the outside temperature has dropped significantly. There will therefore be a significant difference in temperature between your instrument and the outdoors (especially in winter). We recommend taking the instrument out one hour before starting your observation for it to cool down to the ambient temperature.

4. Stability, vibrations, local turbulence: the right place to set up your telescope.

Tip 7: it is best to avoid using concrete or tarred surfaces for setting up Stellina / Vespera. Grass or dirt is more suitable.

We have seen how atmospheric turbulence can cause problems for astronomical observations. Another type of turbulence is local turbulence which results from the day’s heat being released by certain surfaces during the night.
For example, cement and tar heat up when exposed to the sun. As night falls, the temperature drops and these surfaces become warmer than the surrounding air, producing localized turbulence. Grass or dirt surfaces do not retain as much heat and create little turbulence.

Tip 8: set up Stellina / Vespera on a stable floor.

After initialization, it is essential that the tripod does not move to ensure better tracking of the stars and sharper images (avoiding oval-shaped stars). Try not to place Stellina on loose soil, sand, or gravel.

> Learn more on the initialization of observation stations:

Tips on choosing the right place for your telescooe

An ideal place to set up Stellina

Tip 9: observe when there is no wind, or shelter the telescope from the wind.

Wind above 10km/h can produce unwanted movements of the telescope, reducing the quality of the captured images or significantly increasing the capture time given that many images will be rejected.

Tip 10: avoid any vibrations near to the telescope.

Even small vibrations that you produce while walking near the telescope can be transmitted through the ground and affect image quality. This is especially the case if you observe from a terrace, a balcony, a wooden floor…

5. Observation target: choose wisely.

Tip 11: observe objects more than 20° above the horizon and less than 75°.

Near the horizon, light from the stars travels through a thicker layer of the atmosphere, causing a decrease in brightness. It is better to wait until the stars rise more than 30° over the horizon. Depending on the duration of observation required to get a good image quality, you may consider that the apparent rotation of the sky can bring your target under the limit of 20° although it was well-positioned at the beginning of observation. To avoid this, you may want to target stars rising in the east as soon as they reach 20°.

Tracking celestial objects that are more than 75 or 80° above the horizon is more critical with an altazimuth mount such as the one that equips Stellina and Vespera. A lot of frames may be rejected, particularly with Vespera Pro or when using mosaic mode.

Tip to choose a target to observe

Favor targets between 30° and 80° of height, taking into account the apparent rotation of the sky. Sometimes you won’t have a choice, some stars will never be more than 30° high. Stellarium™ sky simulation

6. Under the best skies: take Stellina and Vespera along with you.

Tip 12: go and search for better skies with your observation station.

One of the benefits of Stellina and Vespera over conventional telescopes is their ease of carrying and setting up. It is mainly the case with Vespera, which is so compact you can take it everywhere with you: while hiking in the mountains or as cabin luggage when flying. A real opportunity to conquer skies of exceptional quality and get even more out of your telescope.

So where to go?

  • A weekend in the countryside far from the light (and air) pollution of the cities. Thanks to the observation stations’ battery power, you can set up in the middle of a field. No one will come and disturb your observations.
  • A stay in the mountains at altitude: the sky is often more transparent and far from artificial light. Even with the naked eye, you will see more stars. Take Vespera in your backpack for an overnight bivouac.
  • Some countries or regions of the world have specific climatic conditions that favor exceptional sky quality. Plan your next trip with Stellina or Vespera to the most famous destinations with crystal clear skies: Arizona and Utah National Parks in the United States, the Canary Islands in the North Atlantic, Pic du Midi in France, the Atacama Desert in Chile, Namibia in Southern Africa, the Aoraki Mackenzie International Dark Sky Reserve in New Zealand, the Hawaiian archipelago…
Observation with Stellina from Namibia, one of the best skies on the planet.

Observation with Stellina from Namibia, one of the best skies on the planet.


Assessing the quality of the sky: the Bortle scale.

The Bortle scale, named after its creator, has 9 levels to assess the darkness and purity of the sky and, therefore, the quality of astronomical observations. The scale goes from 1 for an excellent sky to 9 for a very bright sky in the center of large cities (one can see very few stars with the naked eye).
Online maps are available to indicate light pollution and sky quality levels that can help you to choose your next destination. Keep in mind that temporary circumstances can change the sky quality locally… and that the weather must also be with you.
https://www.lightpollutionmap.info

7. Extend the experience: capture longer and manage the telescope power.

Tip 13: run longer captures to get images of better quality.

Stellina and Vespera show you objects of the universe vividly and colorfully thanks to their automatic image stacking process. The Singularity application recommends a minimum observation time, depending on the object, needed to collect enough images and get a good result. However, you can get even better results if you double the recommended capture time, especially on fainter nebulas and galaxies.

Tip 14: use approved batteries and carry a spare.

Longer captures require enough power supply. Stellina works with removable batteries. Vespera works with an integrated battery. Yet you still have the ability to plug an external one. You can therefore have several with you to last all night long (It won’t probably be needed with Vespera Pro since its internal battery lasts 11 hours) . Make sure your batteries meet the required specifications: 5.1 volts and 2.4 A minimum. A 10,000 mAh battery will last up to 5 hours. Yet keep in mind that if you operate in cold weather, the battery will be depleted more quickly.

Recap

Tip 1: check for optimal sky transparency.
Tip 2: check for the lowest turbulence levels.
Tip 3: keep away from artificial light sources where possible.
Tip 4: observe after astronomical twilight.
Tip 5: observe when the moon is not visible or in a thin crescent.
Tip 6: take out Stellina / Vespera one hour prior to your observation.
Tip 7: it is best to avoid using concrete or tarred surfaces for setting up Stellina / Vespera. Grass or dirt is more suitable.
Tip 8: set up Stellina / Vespera on a stable floor.
Tip 9: observe when there is no wind, or shelter the telescope from the wind.
Tip 10: avoid any vibrations near to the telescope.
Tip 11: observe objects more than 20° above the horizon and less than 75°.
Tip 12: go and search for better skies with your observation station.
Tip 13: run longer captures to get images of better quality.
Tip 14: use approved batteries and carry a spare.


Star pattern analysis Stellinapp
Tips & News

Stellina & Vespera Initialization: how it works?

You are looking at the starry sky from a planet that orbits around the sun at about 30 km per second. In addition, the Earth rotates on itself, making a complete rotation every 23 hours, 56 minutes and 4 seconds.
Therefore, depending on your location and the date and time of your observation, visible stars and constellations are not always the same. Their positions even keep changing during your observation.
In these circumstances, accurately pointing to a star (often invisible to the naked eye) with a telescope and following its movement to capture sharp images is a real technical challenge. A telescope must be set up in a rigorous and precise manner, taking into account the date and location information.

This time-lapse video shows the apparent movement of the stars caused by the Earth’s rotation. The position of the stars is permanently changing.

With a classical telescope, the setting-up procedure required to be fully operational and start capturing images of celestial objects can take between 30 minutes and 1 hour, even for an experienced amateur astronomer. With Stellina or Vespera, on the other hand, it only takes a few minutes and no particular technical skill.
Here is a detailed description of the setting-up and initialization process of the Vaonis observing stations and an explanation of why the process is easier and faster than with a conventional telescope.

1. Requirements for a successful initialization

1.1 External conditions

Apart from solar observations which require appropriate filters, initialization of the two telescopes for night observation requires a dark enough sky and visible stars. It is not necessary to wait for complete darkness. The observation stations can initialize from the nautical twilight when the sun goes down 6° below the horizon. However, the initialization duration of Stellina and Vespera can be shorter if it is a very dark night.
The sky must also be clear enough. In case of heavy cloud cover, initialization may fail. In any event, under these conditions, most observations are impossible.

Initialisation de Stellina

As soon as enough stars are visible to the naked eye, you can launch the Stellina initialization. If it fails, wait for more darkness or check that the targeted region of the sky is clear.

1.2 Leveling the tripod

A similar step in setting-up Stellina and Vespera with a classic telescope is that it is required that the tripod be set horizontally. It is done manually by adjusting the length of each leg and checking the spirit level so that the bubble is positioned precisely in the center of the black circle.

Tip: Look at the spirit level from above to be sure of the position of the bubble. If you look at it from a different angle, you may think it is well centered while it’s actually not (due to the parallax).

niveau à bulle

Stellina’s bubble level allows the telescope to be set horizontally. This adjustment is required for more efficiency in pointing and tracking.

2. What is the initialization of a telescope?

2.1 Why is initialization necessary?

The start-up of Stellina and Vespera is much quicker than that of a classical telescope: less than 5 minutes in good conditions versus more than 1 hour for classical equipment. The main reason is that they are fewer manipulations to perform. Above all, one particularly long and complex step of the process with a classical telescope that is fully automatic with Stellina and Vespera is the syncing with the celestial sphere.

As explained previously, the appearance of the sky is constantly changing. Using a telescope to capture images of the universe requires accurate synchronization with the orientation and rotation of the sky. Time and geographical location must be taken into account. The mount axis must also be aligned in a particular way. Then the telescope can calculate the stars’ position and activate its motors to point and follow the lead to observe.

Ecran d'initialisation dans Stellinapp

With Stellina and Vespera, sky syncing is achieved within 2 or 3 minutes by simply pressing a button.

2.2 Stellina / Vespera: automatic initialization with astrometric calibration

The initialization of Stellina and Vespera requires four main steps, which can be followed in the Stellinapp.

Step 1: Geolocation and time syncing

Firstly, to properly operate, the observation stations must be input with the time and the geographical position. This information is retrieved from the connected device you use to control the telescopes.
If Stellinapp indicates it can’t get the geographical coordinates of your observation place, your smartphone or tablet may not have an integrated GPS, or it could be disabled. You can input your geographical coordinates (longitude and latitude) manually if necessary.

Step 2: Astrometric calibration

Stellina and Vespera have to determine their orientation with respect to the starry sky position and the horizontal (although the horizontal alignment has been achieved manually with the spirit level, it may be necessary to improve it for further accuracy).

To achieve this, our stations use the astrometric calibration method, also known as “plate-solving” calibration. It consists of comparing the starfield captured by the telescope with an internal database to identify the targeted region of the sky:

  1. The observation station targets a random area of the sky.
  2. It captures an image of the bright stars.
  3. The onboard computer analyzes the resulting image to determine patterns formed by groups of stars.
  4. The patterns are compared with an internal database to find a match and determine the sky target region.

In case of a fail, the observing station starts over with another region of the sky. Most of the time, the second attempt is successful. Clouds or haze in the targeted region of the sky may be responsible for the failure.

Step 3: Tracking activation

To remain in sync with the sky, Stellina and Vespera must follow the apparent movement of the stars caused by the rotation of Earth. This is accomplished by continuously activating the motors on the two axes of the telescope (and a third axis on Stellina which also compensates the starfield rotation).

Step 4: Focusing

Focusing consists of adjusting the sharpness of the image generated by the telescope. It is achieved by adjusting the distance between the lens and the camera in order to view the stars as sharply as possible.
Successful focus allows one to get the maximum amount of detail on the images of galaxies and nebulae.

Stellina and Vespera have an integrated automatic focuser. To this day, it is the only astronomy consumer telescope in the world equipped with such a feature.
With conventional telescopes, focusing is done manually using various methods, such as using Bathinov or Hartman masks or checking star diffraction spikes, possibly with specific astronomy software. The observer is the final judge of the sharpness of the images (focus).

2.3 Classical telescope: polar alignment

Classical telescopes are often equipped with an equatorial mount (while Stellina and Vespera have an azimuthal mount). It facilitates star tracking, yet above all, it is required to capture images of the universe. When properly installed, the equatorial mount allows one to follow the apparent rotation of the sky by performing a slow and steady course on one of its axes. It is also required to keep the object’s orientation in the field of view (essential for astrophotography). Stellina and Vespera have a mechanism to compensate for the field rotation (optical for Stellina and software-based for Vespera) to get the same result as an equatorial mount.

To achieve the polar alignment, the observer must sequentially point to different stars. Depending on the accuracy of the result, he must manually apply corrections to the orientation of the polar mount axis.
Some mounts are equipped with a viewfinder built into the polar axis, allowing for a first approximate orientation by targeting the North Star.
On conventional telescopes, astrometric calibration does not apply as they do not have an integrated camera and an onboard computer system to operate.

3. Six tips to reduce initialization time or limit failure?

  1. Regularly check to ensure that your Singularity mobile application and the internal program of the telescope are up to date. Visit the App Store or Google Play Store to check if new versions are available. You can subscribe to the Vaonis newsletter to be notified of updates and new features.
  2. Set up the telescope’s tripod on a flat, stable, and non-slippery surface (avoid loose soil or sand). If the mount moves during your observation, the calibration will lose its effectiveness.
  3. Shelter the telescope from the wind.
  4. Level the tripod as carefully as possible with the spirit level.
  5. Wait for sufficient darkness before starting the initialization.
  6. Before starting the initialization of Stellina or Vespera, rotate the telescope’s body on its tripod (taking care not to move the tripod) towards a region of the sky free of obstructions, clouds, and stray light sources such as street lamps. The stars should be clearly visible in the chosen area.

During the observation, if you find that your telescope struggles to point to a new object accurately or that stars are oval-shaped rather than circular, you can solve the issue by restarting the initialization.

Tip: Switch from the smartphone for initialization to the tablet for observation.

Stellina and Vespera need to retrieve the date, time, and geographical location from your mobile device to proceed with the initialization. A tablet with a larger screen may be better suited to observe the images captured by the telescopes. However, while all smartphones have a built-in GPS, most tablets do not. It is then impossible to use them for initialization unless you manually input your geographical coordinates in Stellinapp.
You can launch the initialization from your smartphone, switch instantly to your tablet by taking control of your instrument with it (first tab of Stellinapp), then enjoy the rest of your observation session with more ease.

Tips & News

How to get the best of your images captured with STELLINA – Affinity Photo tutorial

Image processing tutorial with Affinity Photo – Intermediate level

Did you know? You can now export the images of your observations in a 16-bit TIFF format. This raw file allows you to apply your own image processing settings and edit the images at your convenience. Doing so, you will get better image quality and personalize the results without the hassle from stacking files yourself on astrophotography software. This tutorial describes a method to process the images obtained from TIFF export using the Affinity Photo software. It explains basic concepts of image processing tools which can be applied using any other graphic design software.

For a more thorough understanding, please read:
Save, share and use STELLINA’s images

CONTENTS

  1. Introduction
    1. Requirements
    2. About the technique used in this tutorial
    3. Tips for capturing better images with STELLINA
  2. Processing steps
    1. Reveal the image
    2. Enhance the details
    3. Reduce the noise
    4. Adjust the colors
    5. Put the finishing touches
  3. Can we proceed further?


Fig 1: The Orion Nebula. Left side: as shown on your screen when observing with STELLINA. Right side: after processing the image via the TIFF export.

Introduction

Requirements

Affinity Photo software

Affinity Photo is a raster graphics editor similar to Photoshop. It is able to export and read Photoshop files (.psd) but it is more accessible than Photoshop because of its price, and its interface is more user-friendly. It is available for Windows and macOS systems. A version for the iPad is also available.

Information and download: www.affinity.serif.com

Rate: about 50€/$50 (one-time purchase)

If you already own image processing software, it probably shares many features with Affinity Photo. So you should be able to draw inspiration from it.

The example file

This tutorial is based on an image of the famous Orion Nebula (M42).You can download the original TIFF file (as you would retrieve it during your observation) by clicking here..

The Orion Nebula is an interesting case study. It has a very bright center – its heart is lit by 4 stars forming a trapeze – with faint extensions. The challenge for any astrophotographer is to enhance the extensions without “burning” the heart.

About the technique used in this tutorial

There is no unique way to process an astronomical image. The vast array of software available on the market and their various functionalities offer many ways to achieve a result. There is also a multitude of possible results. If you process the same image several times with the same tools, you probably won’t get an identical end result. 

The method described here is one among many. For this tutorial, we’ve decided to use Affinity Photo, a versatile graphic design software accessible to all, rather than a dedicated astrophotography software.

Be aware that the settings required to process a particular celestial object may significantly differ depending on whether they are nebulae, galaxies or star clusters. Celestial objects can show very different characteristics, even within their category. The advantage of manual processing over STELLINA’s automatic processing is precisely to allow for the treatment of objects differently depending on their features. It is important to understand that this article is not about strictly following the step-by-step tutorial, but rather understanding the notions related to image processing and being able to apply the concepts to other cases.

This tutorial is organized into 5 main steps:

  1. Revealing the image
  2. Enhancing the details
  3. Reducing noise
  4. Adjusting colors
  5. Adding the finishing touch

Tips for capturing your images with STELLINA

To obtain the best possible end image quality, you must begin with having all the right parameters in place when capturing photos with STELLINA. Here are a few tips that will positively impact your image’s final quality regardless of the processing technique you use.

  • Set up your STELLINA outside about 1 hour before starting your observation. This will allow time for the optical and mechanical components to adapt to the ambient temperature, ensuring a more precise focus (sharp stars, less rejected images…). Stellinapp displays the temperature of the instrument. If you notice a significant drop in temperature, it’s likely your final image will show some defects.
  • Target objects that are high in the sky, preferably above 30°. Close to the horizon line, the atmosphere absorbs more light. Furthermore, the more turbulence there is, the more the image quality will degrade. Keep in mind that during your observation, the apparent rotation of the sky will cause the celestial sphere to move. Use a star chart software such as Stellarium to control the height above the horizon of the object you plan to capture and check how it changes overnight.
  • The longer, the better: plan for longer exposures.  Stellinapp provides minimum observation time recommendations for each target in order to get an image with decent quality. However, by prolonging the capture beyond the recommended time, you can achieve a higher quality result. We recommend that you to double the total exposure time (2 hours if we recommend 1 hour).
  • The darker, the better: whenever possible, choose an observation site away from any artificial lights and use STELLINA when the moon is not too visible (new moon, waxing crescent phase…)
  • Avoid setting up STELLINA on or near tarred, concrete or rocky surfaces. Those materials release heat at night, which increases the turbulence. Prefer grassy or earthy grounds.

Step 1: Reveal the image

At first glance, when opening it, the TIFF file may confuse you (see figure 2): the image appears almost completely dark. Actually, the signal does exist. What we can see at this point is basically the heart of the nebula with the 4 stars of the trapeze. This image refers to a 30 minutes capture. As mentioned in the tips above, we could have obtained an even sharper result with a 1 hour exposure.

The goal of this step is to expose the extensions of the nebula without burning its heart. While adjusting the settings, you will need to keep checking that the stars of the trapeze and the heart’s details remain distinctly visible.
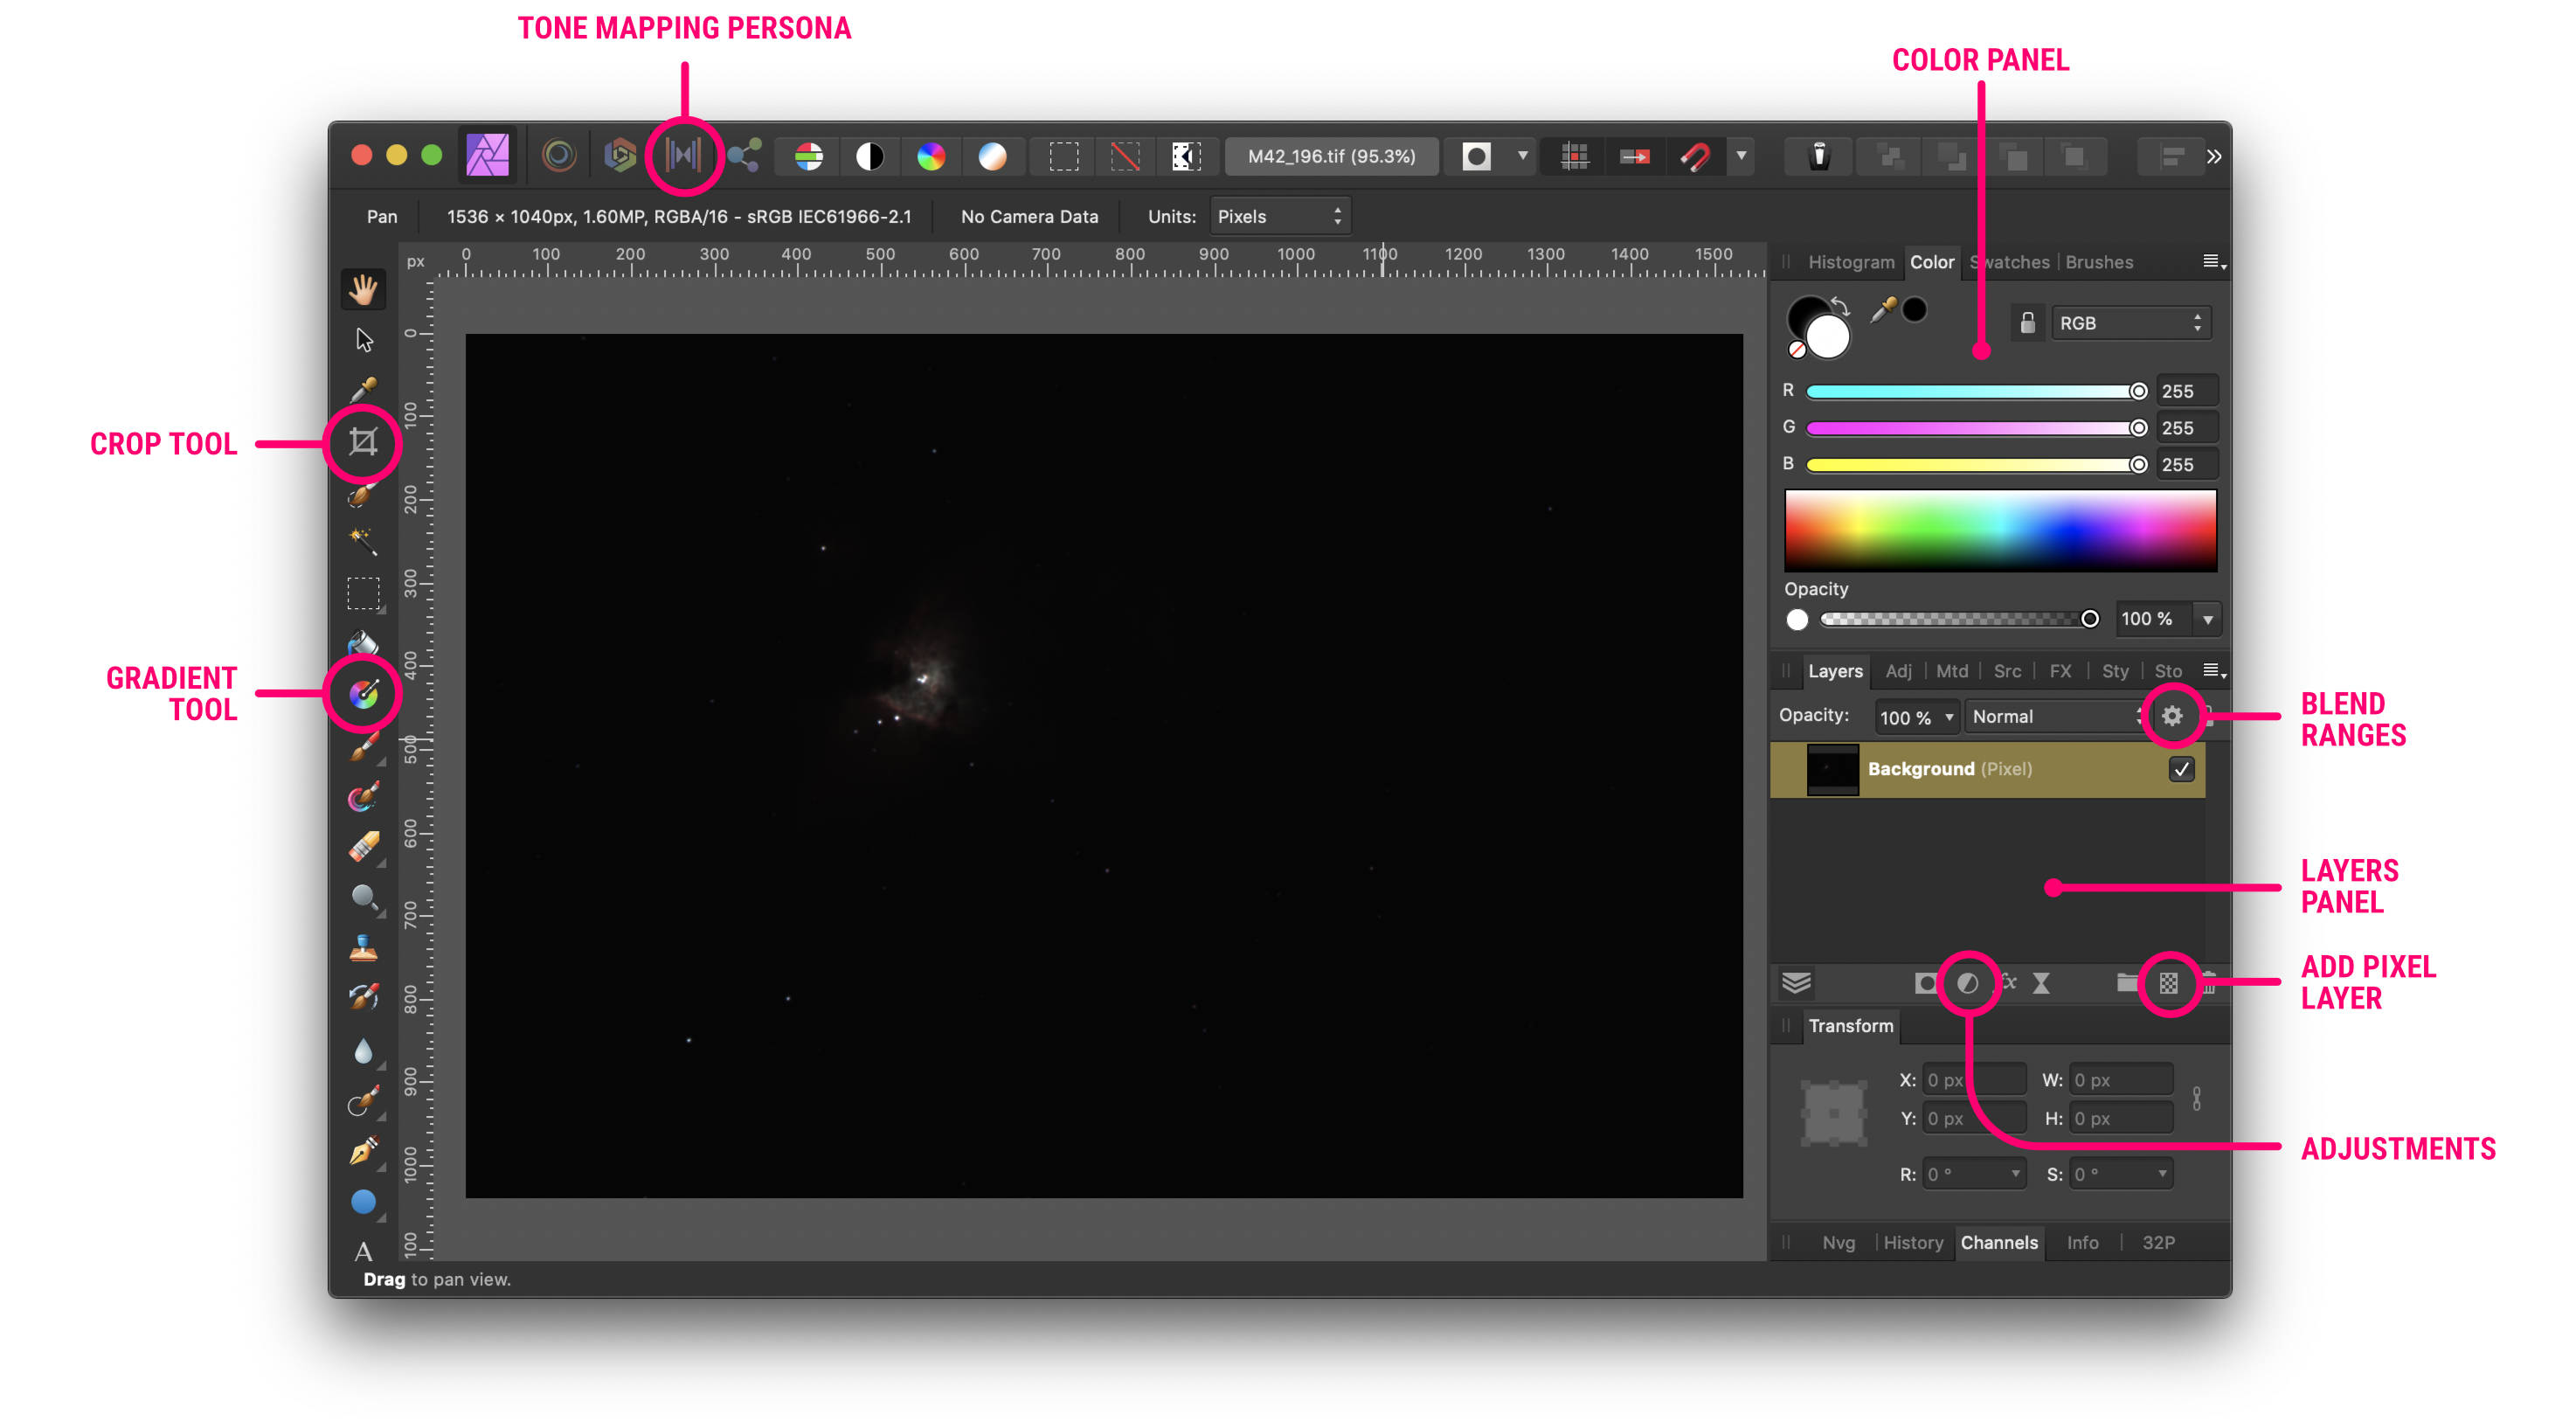
 

fig. 2: the image as it appears in Affinity Photo while opening it, with the main interface’s elements.

Once you’ve opened the image with Affinity Photo, take a look at the panels on the right (figure 2). Make sure the” Layer Panel” is visible.

Like most graphics software, Affinity Photo uses a combination of layers that blend together to compose the final image. You can think of layers as being like sheets of paper that are stacked one on top of the other. Transparent areas of a layer reveal the layer below, while opaque parts of a layer obscure the layers below. Some layers may contain an image, while others are adjustment layers that affect all the visible layers below them. All layer management is carried out from the Layers Panel.

So far, we only have one layer with our image on it. To keep this source safe in case we need to start over, we will work on a copy of this layer.

  • Click on the layer to select it, and in the “Layer” menu, choose “Duplicate“.
  • The new layer appears in the panel. For better organization, let’s rename it “Tone Mapping” (you’ll soon understand why).

Activate the tone mapping mode: “Tone mapping persona” (see figure 2). Tone mapping is the equivalent of the HDR filter feature you can find in other photo editing software. This tool is particularly useful for images with a high dynamic range, which is the case with a 16-bit TIFF file.

For a better understanding of: The role of tone mapping.

The range of shades that a computer screen can display (the dynamic) is much smaller than that of the TIFF file (256 levels per color for the screen vs. 65536 levels per color for the TIFF file). This is why we only see the very bright parts of the image on our screens.

Tone Mapping is the process of taking a range of tones and remapping them to a smaller range that most devices can accurately reproduce. Proceeding this way will reveal the fainter areas and locally increase the contrast in the picture without impacting the overall contrast (which would result in dimming the dark areas – low light – and would highlight the brighter ones, the opposite of what we are trying to achieve).


Use the controls available on the right-side panel to apply the relevant settings (Figure 3).

  • To adjust the overall brightness of the image, move the “Tone Compression” slider to low values, about 10%.
  • To bring out the less bright parts of the nebula, increase the value of the “Local Contrast,” for example, to 30%.
  • Slightly increase the “Blackpoint” value to darken the sky. During this step, don’t try to get an entirely dark sky background. You may lose details in the low lights. For example, set the slider to 3%.
  • To protect the brightest areas from being burnt, activate the “Shadows and highlight” panel, and reduce the highlights to minus 100%.

You can try different settings to find a result that suits you best. Take care not to burn the heart of the nebula. If the stars of the trapeze are slightly burnt, we will be able to rectify this in the next steps.

These are the only settings to be made in the “Tone mapping persona“. Click on “Apply” (top left) to return to the standard mode.

fig 3: the interface of the “Tone mapping persona” with the settings to be made.

We now have an image that looks more like the Orion Nebula as we know it. By zooming in on the stars of the trapeze, we may notice that they are slightly burnt. In our primary image (which is still on the layer underneath), they were perfect. For this area only, we will try to let the underlying layer appear.

To achieve this, we will use the blend options (the goal of this feature is explained more in-depth in part 3).

  • Make sure the “Tone Mapping” layer is selected.
  • At the top of the Layer Panel, locate the gear icon “Blend Ranges” (see figure 2) and click on it to display the layer blending options.
  • A new panel opens with two diagrams. Adjust the curve in the right-hand chart ((Underlying Composition Range))so that it looks like Figure 4. 
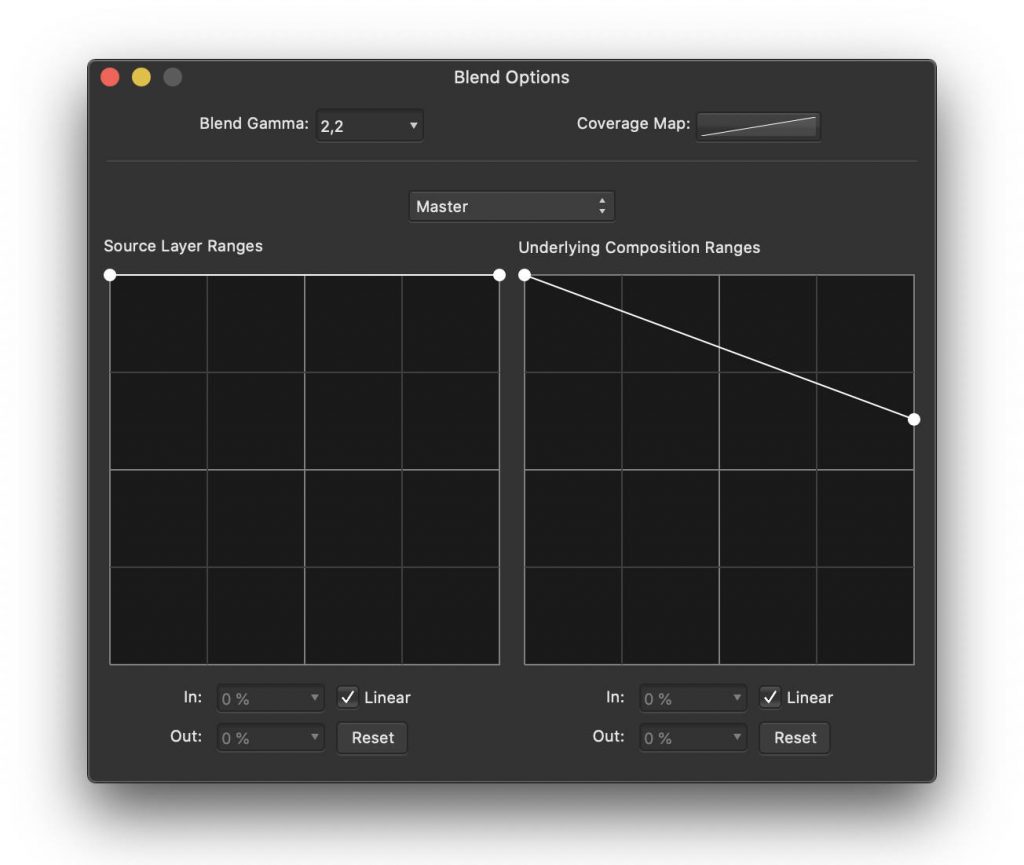
fig 4: setting the blending options for the “Tone Mapping” layer.

At this stage, the trapeze stars should no longer be burnt. We’ve revealed the underlying layer only for the very bright areas (where the stars in the trapeze are perfect).

This step is complete. The figure below compares the image at its opening in Affinity Photo with the result you should have at the end of step 1.

fig. 5: comparison before/after step 1

Step 2: Enhance the details

Now that we can clearly visualize the nebula, let’s try to enhance more details.

To achieve this, we are going to use a tool that looks intimidating at first glance, but is quite powerful: Tone Curves..  This adjustment is available as an adjustment layer.

  • At the bottom of the Layer Panel, click on the “Adjustment” icon (see figure 2) then choose “Curves” in the drop-down menu.

A new layer is created, and the proper setting panel opens (figure 6 on the left).
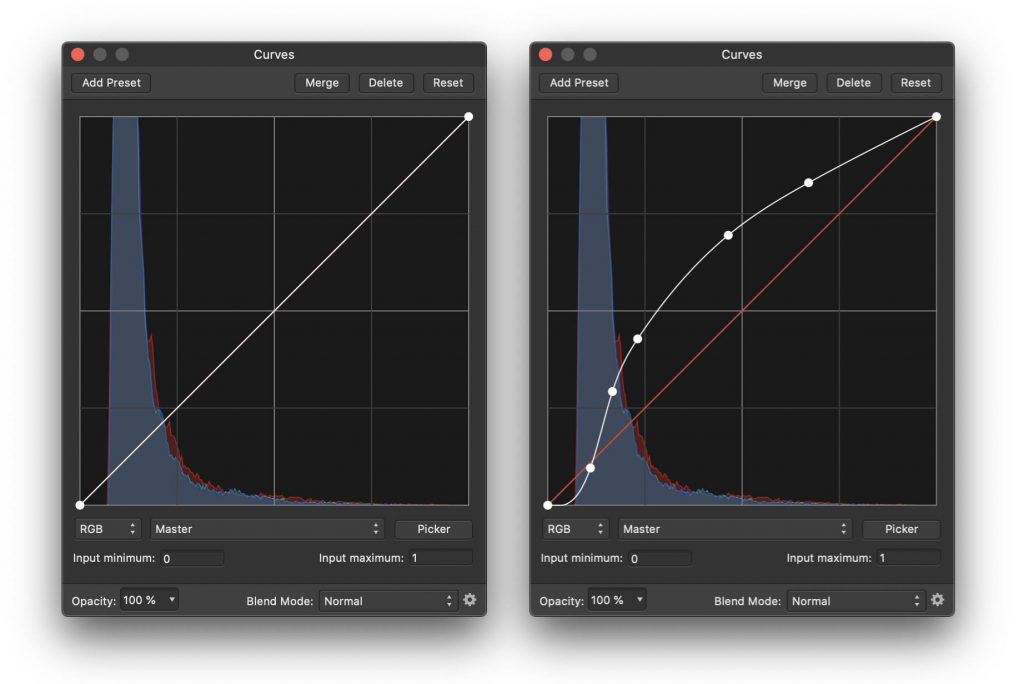
fig 6: the tone curve, prior and post adjustments.


For a better understanding of: Tone curves

The tone curve graph allows you to selectively increase or decrease the brightness of the image’s areas according to the brightness they already have. For example, you can decide to increase the brightness of dark areas without changing the brightness of areas that are bright enough.

The left side of the graph (Figure 6 on the left) stands for the very dark tones, called shadows (or blacks), while the right side refers to the very light tones ( “whites”). In between are the dark mid-tones and the light mid-tones.

The vertical axis of the graph shows the brightness value for each tone: minimum (black) at the bottom, and maximum (white) at the top. At first, the curve that runs through the graph consistently indicates that the shadows (on the left) are extremely faint, and the highlights on the right are very bright.


By clicking on the curve, you can change its shape in order to increase the brightness level of a particular tone range without impacting the other tone ranges too much.

In our case, we would like to increase the brightness of the dark tones without increasing the highlights in order to avoid burning the nebula’s heart.

  • Click on the curve on the dark tone side to add a control point and then move it upwards to increase the brightness of this tone range.

As a result, we enhance the darker areas, but burn the very light ones. We therefore need to add another control point on the curve to retract the brightness of the highlights to their initial values.

  • Add the required control points to the curve to get a shape similar to the one shown in Figure 5 on the right.
  • Check that the details of the heart and the stars of the trapeze remain distinctly visible.

To complete this step, we are going to apply a detail enhancement filter.. Before proceeding, let’s flatten, i.e., merge, the layer containing our original image (called “Background” if you have not modified it) with the “Tone Mapping” layer.

  • Uncheck the box next to the layer named “Curves setting” to temporarily disable the effect of this layer.
  • Right-click on one of the other layers to bring up the layer contextual menu.
  • In the contextual menu, choose “Merge visible“.

A new layer has been created. The initial layers are still available in case we need to go back to the previous steps.

  • Ensure that the new layer is between the “Tone Mapping“layer and the “Curves Adjustment” layer.
  • Activate the layer named “Curves adjustment” again by checking the relevant box.
  • Rename the newly created layer “Clarity“.
  • Make sure that the “Clarity” layer is selected, then in the menu “Filter / Sharpen…” choose the option “Clarity…
  • Adjust the intensity of the filter to increase the level of sharpness according to your preferences. Preserve the heart and stars of the trapeze. For example, you can set it to 40%.
  • Click “Apply“.
  • You can still adjust the tone curve settings if needed. This is the advantage of the adjustment layers: they produce non-destructive modifications and can be changed later.

This step is complete. The figure below compares the image between the beginning and the end of Step 2.

fig. 7: comparison before/after step 2

Step 3: Reduce the noise

When we zoom in on the image, we notice the presence of “noise.” Noise is the kind of granulation that appears, particularly in the darker areas of the picture.

The noise is distributed randomly and evenly throughout the image. It is less noticeable in bright areas as the brightness of the noise is low and therefore disappears in the strong “signal” of the bright areas.

For a better understanding of: what causes image noise?

Noise is initially present on any image captured by an electronic device. It can be produced by the image sensor and circuitry of a digital camera. It’s possible to limit the noise generated by the sensor by cooling it. This is why some experienced astrophotographers and professional astronomers use cooled cameras.


When processing an image, the various adjustments performed to enhance the details may increase the image noise. Let’s see how to limit that noise, in order to preserve the image quality.

Please keep in mind that by reducing the noise too much, we could loose some of the smallest details. Therefore, it’s important to keep a balance and accept that a certain amount of noise will always be present.

  • Duplicate the “Clarity“, layer to keep a back-up copy in case you want to revisit ((Layer menu / Duplicate)).
  • Rename this new layer “Noise Reduction“.
  • Make sure that the new layer is selected, then in the “Filters / Noise” menu, choose “denoise“.
  • Zoom in on a faint area of the nebula that has details and where noise is more noticeable. Use the “Luminance” setting to find a suitable compromise between noise reduction and loss of details. For example, you can set the luminance slider to 20%.
  • Click “Apply“.

Noise reduction has been applied to the whole image. We’ve seen that the noise was less noticeable in the bright areas. It would be interesting to apply the noise reduction only in the darker areas and then keep all the details in the bright areas.

You can achieve this by setting the blending options of the “Noise Reduction“layer. Indeed, we can indicate that the bright areas of the layer “Noise Reduction” become transparent. By doing so, the underlying layer “Clarity” which retains all the finest details, remains visible for that part of the image.

  • Select the “Noise Reduction” layer.
  • At the top of the Layer Panel, click on the gear icon “Blend Ranges“.

The Affinity Photo setting panel that opens shows two graphs that look like the tone curves we are now familiar with. They work similarly. Let’s pay attention to the diagram on the right “Underlying Composition Range“. It allows you to specify which tone ranges (black, dark, light, white) should become transparent (more or less) to show the underlying layers.

Like the tone curve graph, the left part of the diagram refers to dark tones and the right side to light tones. Our goal is to make the lighter parts transparent. Then the “Clarity” layer appears through only for the brighter areas, and the “Noise Reduction” layer remains visible on the darker areas where it is most useful.

  • Click on the control point at the top right of the graph (the one that affects the white areas) and drag it downwards.
  • Once at the bottom, slide it to the left as well. Watch the image to control how the noise varies to find the right setting.

The noise reduction layer no longer affects the highlights.

  • To ensure the “Noise Reduction” layer affects all the darker areas, slightly move the control point at the top left of the curve (shadows) to the right.

The graph should look similar to the illustration below.
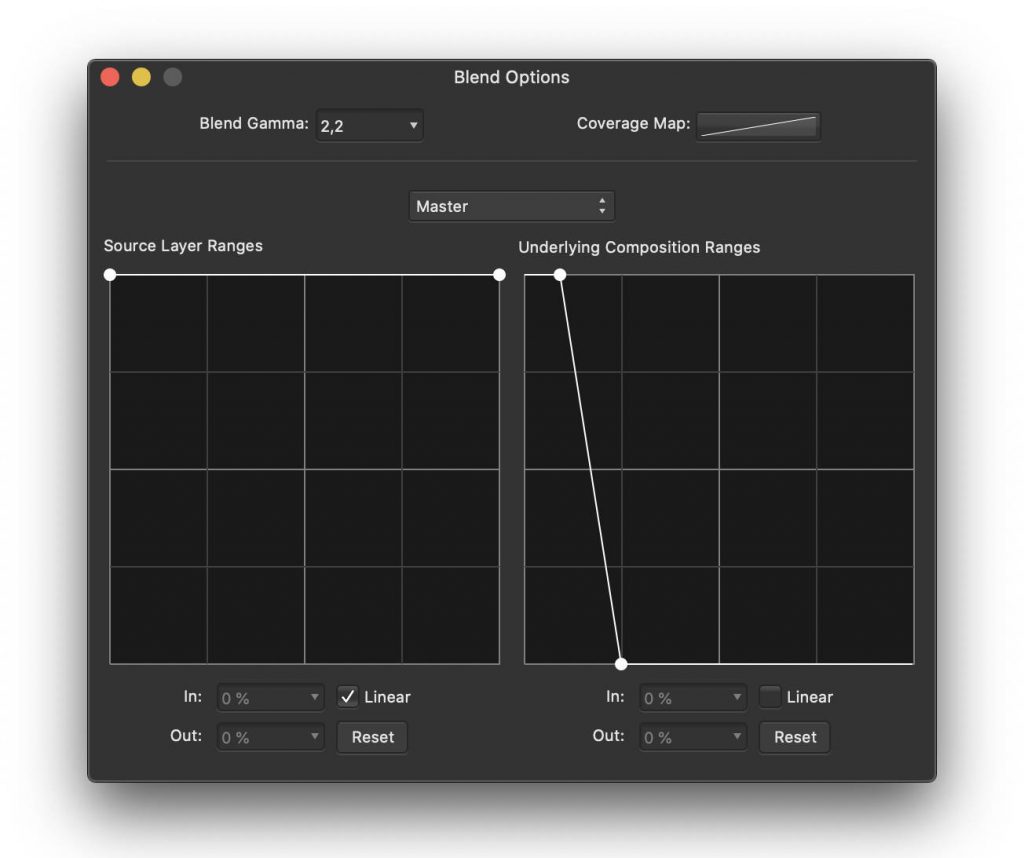
Fig 8. Blending options to be applied to the "Noise Reduction" layer.

Fig 8. Blending options to be applied to the “Noise Reduction” layer.

This step is complete. The figure below compares the image between the beginning and end of Step 3.

Fig. 9 comparison before/after step 3.

Step 4: Adjust the colors

We have now reached the most creative step that will allow you to personalize your image with Affinity Photo.

So far, our Orion Nebula is quite pale compared to the images we are used to. Let’s enhance the colors and adjust them to get a look that suits us.

  • Select the upper layer “Curves Adjustment“.
  • Click the “Adjustments” icon at the bottom of the Layers panel and choose “Vibrance” from the drop-down menu to add a “Vibrance” adjustment layer.
  • Move the “Vibrance” and “Saturation” sliders to their maximum values.
  • Click on the “Adjustments” icon at the bottom of the Layers panel and choose “Selective Color” from the drop-down menu to add a “Selective Color“adjustment layer..

The “Selective Color” adjustment layer allows you to apply color changes to a specific hue. Since the Orion Nebula is mostly red, we will work mainly on this hue.

  • In the Selective color setting panel, select “Red” from the top color drop-down menu.
  • Set the “Cyan” slider to -100% (to remove cyan in red tones), the “Magenta” slider to +50%, and the “Yellow” slider to +100% to add each of these tones in proportion to the red tones.
  • In the color menu, choose “Magenta” then set the sliders to “Magenta” and “Yellow” to + 100%.
  • Eventually, in the Colors menu, choose black and place the “Black” slider at +5% to slightly darken the sky background and to add more contrast to the image.

At this point, the nebula appears quite pink, and we would like it to be more reddish. We can add a second “Selective Color” adjustment layer whose effects will cumulate with the first one.

  • Click on the “Settings” icon at the bottom of the Layers palette and choose “Selective Color” from the drop-down menu to add a “Selective Color” adjustment layer.
  • Select the color red from the menu and set the Cyan slider to -15%, Magenta to +35%, and Yellow to +100%.

The values given above for color correction are an example, and it is up to you to define how you want the nebula to look.

This step is complete. The figure below compares the image from the beginning and the end of step 4.

Fig. 10 comparison before/after step 4

Step 5: Put the finishing touches

Our nebula now looks very different from what it was on the smartphone or tablet display while we were observing with STELLINA: it is more detailed.

There are still some defects that we can try to eliminate or mitigate.

To begin with, the edges of the image show defects related to the capture. Let’s crop the image to remove the altered areas.

  • Select the “Crop” tool from the left side toolbar (Figure 2), then adjust the frame and click on Apply.

he lower right corner of the image still shows a kind of unsightly halo. Let’s dim it by applying a dark gradient over it.

  • Make sure that the top layer “Selective Color Adjustment,” is selected. At the bottom of the Layers panel, click on the “Add Pixel Layer” icon (see figure 2).

A new empty layer is added to the stack. Rename it “Gradient”.

  • Select the “Gradient” layer.
  • On the left toolbar, select the “gradient” tool (see figure 2).
  • On the image, draw a short gradient from the lower right corner to the upper left corner at about 1/6th of the diagonal.

A control point is available at each extremity of the gradient to choose the color.

  • Select the control handle on the bottom right corner of the image.
  • Activate the “Color” panel in the right-hand setting panels and select the black color for this control point.
  • Select the second control handle. Select the black color and a 0% opacity.
  • Adjust the position of the second control point so that the gradient covers only the concerned area, without masking the wisps of the nebula.
  • Now reduce the opacity of the “Gradient” layer to about 40%.

This step is complete. The figure below compares the image from the beginning and end of step 5

Fig. 11 comparison before/after step 5

Should we go further?

We can now consider that the processing of the Orion Nebula image from STELLINA’s 16-bit TIFF export on Affinity Photo is complete. We have managed to get a more detailed image, with colors that are quite natural. We have also preserved the heart of the nebula, which highlights many details.

When it comes to image processing, the users can be tempted to go further to see more colors, more details, accentuate further details and colors. How do you know when you should stop?

There are no laws or rules regarding image processing. However, a good indicator that the image processing is sufficient is that the image looks natural. Further processing will result in the details being more detailed. Yet, the result may not look natural even to the untrained eye. Furthermore, too much image processing may accentuate the defects in the image.
Experimenting and comparing your results with others is the key to learn how far you can go.

To end this tutorial, here is a way to improve the image a bit more while keeping the ability to balance this improvement in case you have regrets (and without having to start the processing over again).

  • Temporarily disable the “Gradient” layer.
  • Right-click on one of the layers to select the contextual menu and choose “Merge visible“.
  • Place the newly created layer between the “Gradient” layer and the “Selective Color adjustment” layer.
  • Select the new layer and rename it “Extra peps“.

We are going to use the tone mapping persona again to enhance the details on this layer.

  • In the top toolbar, click on “Tone mapping persona“.
  • Set the tone compression to 0% and the local contrast to about 20%.
  • Click “Apply“.
  • Activate the “Gradient” layer again..

By doing so, we have just created a layer of the image with enhanced sharpness. But we have also accentuated the defects.

To balance the effect, we can adjust the opacity of this layer to more or less blend with the underlying layers.

We can also set the blending options for this layer to affect only the highlights of the image where the details actually are and preserve the dark areas where defects are more easily visible. Proceed in the same way as you did with the “Noise Reduction” layer by adjusting the blend ranges.

Here is what the curve might look like:
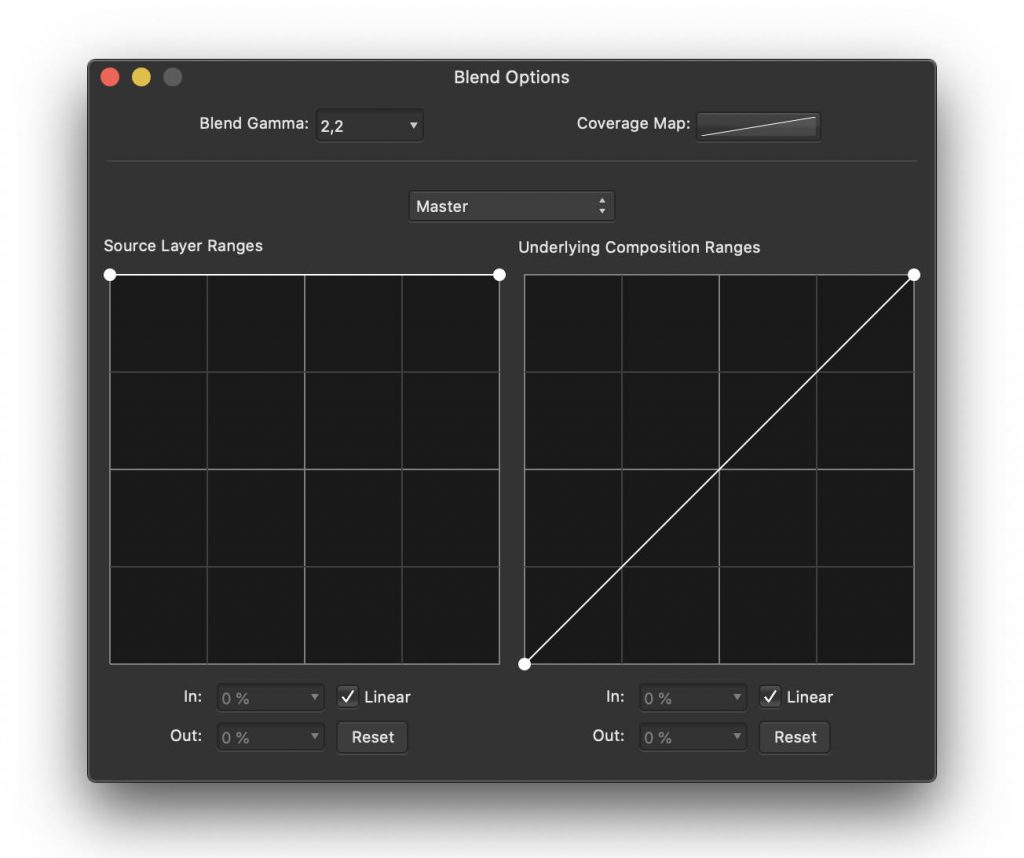
fig.12: blending option settings for the "Extra peps" layer

fig.12: blending option settings for the “Extra peps” layer


Congratulations, you’ve reached the end of this tutorial! Don’t forget that each celestial object is different and will require custom settings. The more time you spend on Affinity Photo, the more experienced you will become and you will see progress. Ask for feedback from fellow amateur astrophotographers.  

Please share the results of your work on social networks and in the #myStellina Facebook group.

  • To save your Affinity Photo working file, choose “Save As” from the file menu.
  • To export your image for sharing, select “Export” from the file menu.

You can download the Affinity Photo file (NB: the photo is in low resolution) used in this tutorial by clicking here..
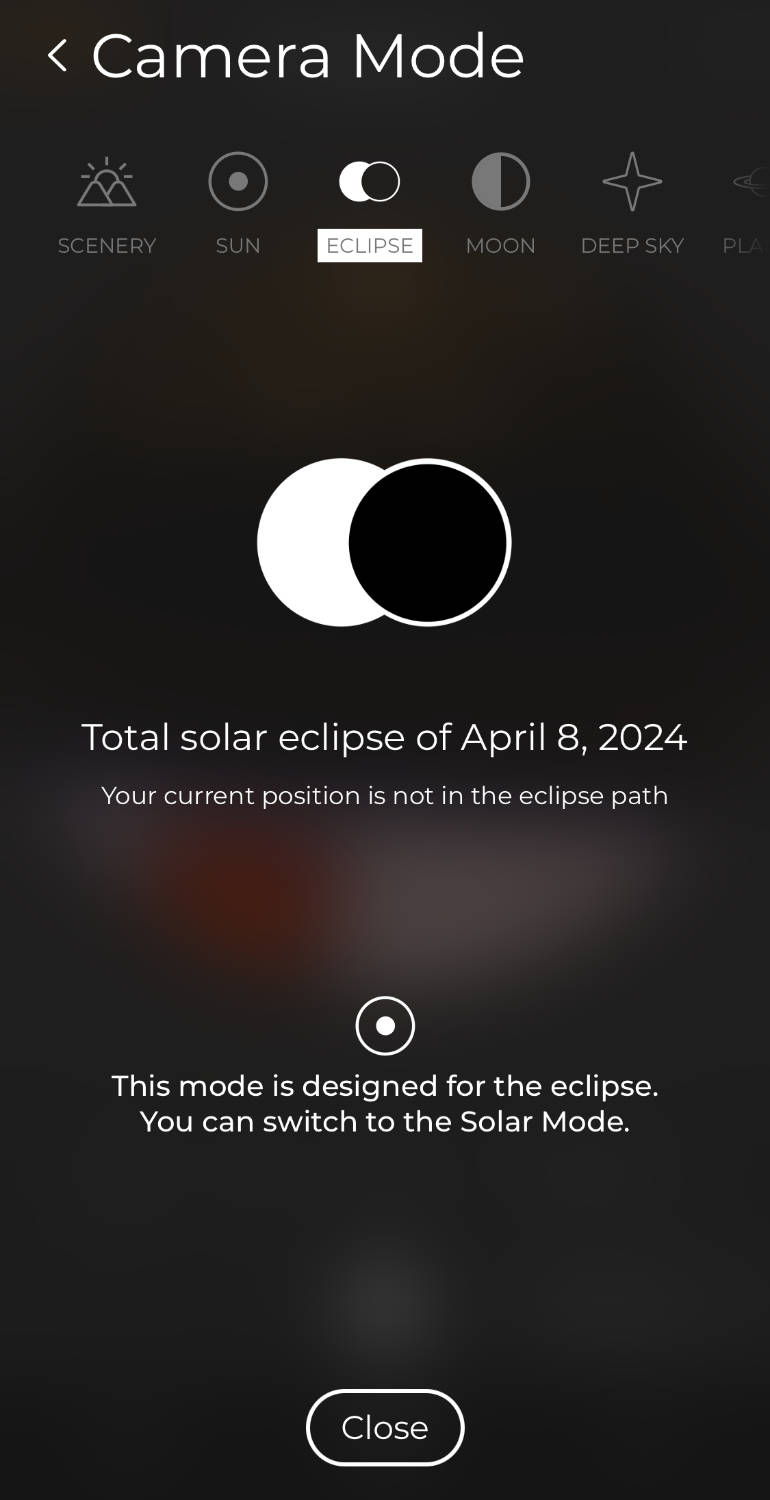
Tips & News

Saving, sharing and editing Vaonis smart telescope images

Whether you are a beginner excited to share your exploration of the universe or a more experienced and demanding amateur astronomer, Stellina and Vespera got you covered and can satisfy everyone’s expectations.
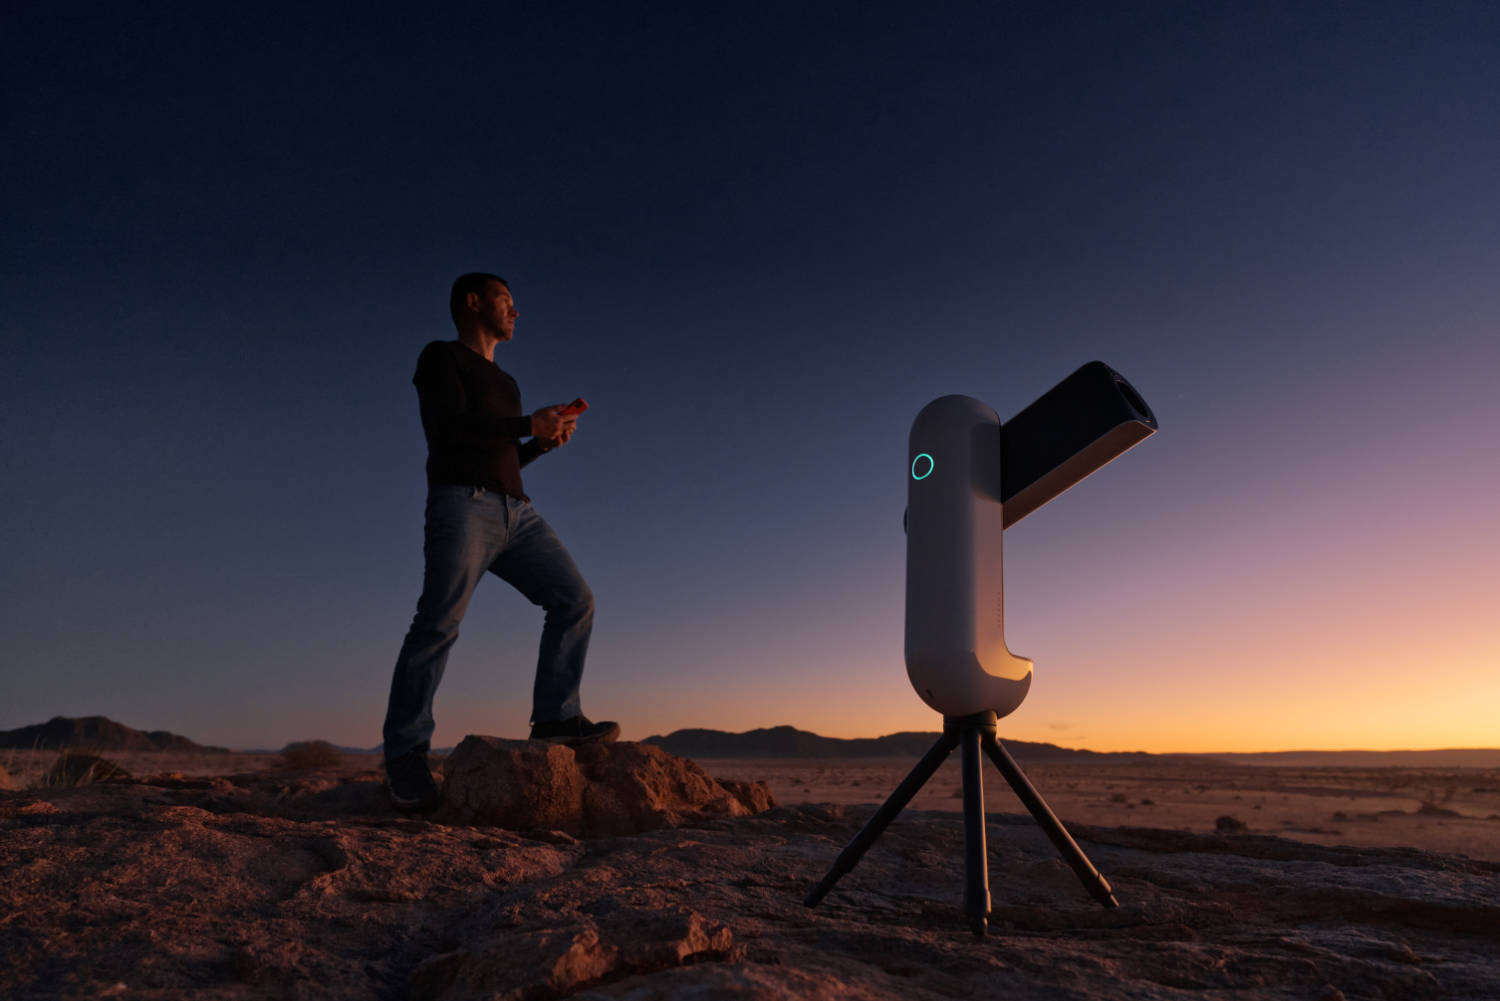
Three methods are available to save, share, and edit the results of your observations.

ABSTRACT
1. JPEG for instant results: save or share what you see on your screen
2. TIFF for manual image processing: raw images that you can edit by yourself
3. FITS for astrophotography experts: stack and process raw images yourself


Horsehead Nebula

The HorseHead Nebula captured with Vespera. Image processed from the exported file in 16-bit TIFF. Image credit: Sébastien Aubry

For a better understanding

STELLINA and VESPERA run a real-time image stacking process. While you are observing a celestial body, the smart telescope keeps capturing new images and adds them to a “stack” to build up the final image you are visualizing. This is a commonly used process in astrophotography. Its goal is to improve the quality of the final rendering by reducing noise (a spurious signal generated by the electronics of any sensor that is randomly distributed over the image) and by highlighting the faint areas. For this reason, the longer you observe, the more the image quality improves, as shown in the video below.


fig.1: As your observation keeps progressing, STELLINA improves the image quality in real-time.

In this article, we will call each individual image that is captured and stacked together a “frame”.

Other than the very first image displayed when the observation station starts capturing, you can’t see the unstacked single frames, but only the image built up from all the pictures that have been added to the previous stack. However, it is possible to retrieve all the single frames for a specific use, as you will see later.

Each single frame refers to an exposure of ten seconds (unless you specify another setting). When the Singularity App recommends an observation time of 30 minutes (1800 seconds), this means you will have to collect 180 ten-seconds exposures (1800 divided by 10).

Note: The Moon, the planets, and the stars available via the Stellinapp object index are displayed live. There is no stacking done on these objects.

1. JPEG for instant results: save or share what you see on your screen

Overview

The image displayed on your smartphone or tablet is the result of the stacking process carried out by the smart telescope software in real-time. Our image processing algorithms automatically improves image quality and help enhance the details.

How to save the file?

Click on the “Image” icon on the top right corner of the Capture tab. You will get several options (figure 2).

fig. 2: The Image menu and its export options

fig. 2: The Image menu and its export options

You can:

  • Share Vespera and Stellina images currently displayed right on social networks,
  • Save the image in Singularity,
  • Save the image into your mobile device’s photo album.

If you plan to edit or share the image later, we recommend that you save your photo in your device.

You can save your smart telescope images at any time during your observation. You can also automatically save all generated images by plugging a USB memory stick into the battery compartment (for Stellina)  or into the telescope internal memory ( Vespera).

How to use the file?

After your observation, you may be tempted to edit your image to improve the colors or try to bring out more details.

In case you want to edit the image in a graphics software, please note that the actions you can perform are limited and may degrade the image quality. There are several reasons for this:

  • Jpeg images have already been processed.
  • Images are saved in JPEG format: in order to reduce the weight of this well-known format, a digital digital compression is applied. This compression leads to barely perceptible changes to the pixels of the image. Running a deep processing on a JPEG image will bring out those imperfections (sometimes called “compression artifacts”) and eventually degrade the image quality (Figure 4).

In order to get a better image than what you see on the screen, Singularity offers a second format you can use to pursue manual image processing: TIFF files.

Artifacts caused by JPEG compression

Fig. 4: Zooming in on the detail of an image. On the left: raw image – On the right: JPEG compression where artifacts appear (for example, around the stars).

2. TIFF for manual image processing: raw images you can edit by yourself

Overview

While you are observing, STELLINA automatically processes the captured images to provide you with bright, high-contrast, and detailed rendering.
However, the celestial objects you can observe, whether they are star clusters, galaxies or nebulae, have different features: they are more or less bright, more or less contrasted, with variable colors and show fields more or less dense with stars.

As Vespera and Stellina applies automatic processing on the images, it is not possible to handle each object’s specific feature. However, it is often possible to get better quality images by running out the image processing by yourself. This requires some learning and time, but the experience is fun, and the results can be very satisfying.

Figure 5 – Comparison between the image displayed on the screen and the result of TIF export processing.

As stated above, the images saved with the previous method can only be slightly improved. Stellinapp offers you an alternative option: the ability to export the image of your observation in a format suitable for advanced image processing: the 16-bit TIFF.

Note: This format is not available for the Moon, planets and stars available via the Stellinapp object’s index.

How to save the file?

To activate this option, you must first enable it in the app. Go to Profile > Gear icon > Settings > Enable TIFF export (figure 6).

You’ll now see the TIFF export option when clicking on the Image icon in your Capture tab during an observation.

The TIFF files will be saved on the internal memory or USB stick each time you click on “TIFF export” during the observation. Alternatively, you can save it in the photo album or a folder of your mobile device, transfer it directly to your computer or send it via email if you have an Internet connection. When you stop your observation, the smart telescope save a TIFF file as well.

fig. 6 : TIFF export options in STELLINA settings.

fig. 6 : TIFF export options in STELLINA settings.

How to use the file?

The TIFF export allows you to retrieve an image which is the equivalent of a RAW file for a DSLR camera. The telescope will automatically stack the single frames, but its image processing algorithm won’t apply and the image will remain untouched. It is raw data. The image is not compressed; therefore, the file size is more significant. It also has a higher dynamic range (number of different shades that can be rendered): 16 bits versus 8 bits for a JPEG file.

The TIFF file can be edited with any graphic design softwares such as Photoshop, Gimp, Affinity Photo, Luminar. You can also use this type of file with astrophotography dedicated software such as PixInsight.

3. FITS for astrophotography experts: stack and process raw images yourself

Overview

The images retrieved with the previous methods are a result from the automatic stacking process performed by the smart telescope in real-time during an observation.

It is possible to automatically save each single frame that builds up the stack. The purpose of this method is to manually stack the unit images by yourself to have better control over the process. This action can be performed with software dedicated to astronomical image processing such as Deep Sky Stacker.

The automatic stacking is elaborated. For example, it rejects single frames which do not comply with the required quality (tracking issues, wind, vibrations…). When it comes to saving the FITS files, the rejected frames will also be saved, allowing the users the option of using them or not.

Yet, processing the FITS files manually requires much experience and good knowledge of astrophotography. If the manual stacking is not correctly done, the final image may have a lower quality than the TIFF export made by STELLINA. Besides, it takes several hours to process.

How to save the file?

The FITS files are saved on a USB drive (Stellina) or in the internal memory  (Vespera). Go to the instrument widget and choose “file format”. Then select “RAW images ( FITS)”.

The automatic saving of FITS unit images can generate a huge amount of data. If you plan to capture several celestial objects in one night or to make very long exposures, we recommend you purchase a USB drive with at least 32 GB.

Note: This format is not available for the Moon, planets and stars available via the Stellinapp object’s index.

How to use the file?

The FITS format is widely used in amateur astronomy, as well as in the scientific field in general. Its distinctive feature is to be able to store “visual” as well as other information. However, this type of file is not usually supported by standard graphic design software and can only be opened with specific astrophotography software.

About “dark files”

During the manual stacking process, astrophotographers commonly generate images called “darks” in addition to images of the star itself. Darks are pictures taken while the telescope aperture is obstructed so that no light can reach the sensor. One would expect to get a completely black image (hence the name “dark”). Actually, this type of image contains a weak signal generated by defects of the sensor. For example, it can be hot pixels. The signal of the “darks” is subtracted from the images of the celestial body. Proceeding this way removes the glitches generated by the sensor on the final image.

Does Vaonis smart telescope take darks?
During your observation, Vespera and Stellina does not generate darks by default. When the telescope automatically applies its algorithms, it uses a predefined dark pattern that characterizes the sensor’s spurious signals and does other corrections through various processes.
If you wish to use “dark” images in your manual stacking process, you will have to capture them by yourself by activating the “expert mode”.

In a nutshell:

JPEG TIFF FITS
Audience All Intermediate Expert
Processing Automatic Manual, to be done Manual, to be done
Stacking Automatic Automatic by STELLINA Manual, to be done
Compression Yes (destructive) No No
File size About 1 Mb from 20 Mb to 150 Mo (CovalENS) from 13 to 24 Mo
Backup Smartphone, tablet, internal memory, USB stick Smartphone, tablet, computer, internal memory, USB stick internal memory, USB drive
Softwares Any photo editing software Photoshop, Affinity Photo, Luminar … DeepSkyStacker, Registax, PixInsight, SIRIL, IRIS …
Our online buy steroids store specializes in delivering steroids across the US.