Our online buy steroids store specializes in delivering steroids across the US.
Travel journal Archives - Page 2 of 8 - Vaonis
Our online buy steroids store specializes in delivering steroids across the US.

Travel journal

Observations, Tips & News, Travel journal

Save The Date: let’s head to the Virgo Cluster on May 12th

The results are in!

Vaonis is excited to share the first ever collaborative image captured by the Vaonis community during the recent Virgo Cluster Challenge.

Despite the inclement weather, our team received over 100 entries over the weekend.

Thanks to your participation, we were able to push the limits of Vespera’s and Stellina’s capabilities, especially in detecting the faintest celestial bodies, also known as the limiting magnitude, that our instruments can perceive.

On behalf of the entire Vaonis team, we would like to thank ALL of you, challenge participants and the entire Vaonis community, for participating in this unique challenge!

Here are the results obtained by Vespera and Stellina users.

Vespera

Stellina

DOWNLOAD STELLINA FINAL TIFF VERSION

DOWNLOAD VESPERA FINAL TIFF VERSION

Save The Date: let’s head to the Virgo Cluster on May 12th! With modern technology, capturing stunning photographs of the universe has become more accessible than ever before. Today, Vaonis is inviting you to create a new world record with the longest cumulative exposure time image in 24 hours ever taken by Vaonis fast-growing community.

On May 12th, Vespera owners will point their instruments at NGC 4438 (part of the Markarian’s Chain), while Stellina owners are invited to point theirs at M60, both part of the Virgo cluster, and work together to create the longest exposure photograph ever captured with the same gear. This is a fantastic opportunity to join a pioneering community of individuals with a shared passion for astrophotography.

Join Vaonis on that special day as we set our sights on the beautiful Virgo Cluster on May 12th! In this blog post, we’ll discuss the Virgo Cluster and how you can participate in Vaonis’ exciting new challenge.


What is the Virgo Cluster?

The Virgo Cluster is a stunning and awe-inspiring phenomenon in the cosmos. Located within the constellation Virgo, this cluster is a massive collection of galaxies that contains thousands of individual members. From massive elliptical galaxies to smaller, irregular ones, the Virgo Cluster is a testament to the sheer scale and complexity of the universe. At its core lies the M87 galaxy, a behemoth that weighs in at trillions of times the mass of our Sun. The Virgo Cluster has captivated astronomers and stargazers alike with its intricate structure and breathtaking beauty. Whether you’re a seasoned astrophotographer or simply an admirer of the cosmos, the Virgo Cluster is a must-see spectacle that is sure to leave you in wonderment.

Save The Date: let’s head to the Virgo Cluster on May 12th

Vaonis’ new challenge is designed to bring together amateur astronomers from all over the world to capture a new world record with the longest cumulative exposure time image in 24 hours ever taken by Vaonis fast-growing community.

On May 12th, Vespera owners will point their instruments at NGC 4438 (part of the Markarian’s Chain), while Stellina owners are invited to point theirs at M60, both part of the Virgo Cluster, and work together to create the longest exposure photograph ever captured with the same gear.

How to Participate

Participating in Vaonis’ challenge is easy and straightforward. All you need to do is follow these simple steps:

  1. Own a Vespera or a Stellina
  2. Save the date in your calendar and set an alarm for May 12th
  3. Check if the Virgo Cluster is visible from your location using tools such as Stellarium : if you live between Olso and Cape Horn, you should be able to observe it
  4. Ensure your observation station and app are up-to-date by checking the latest releases
  5. Enable TIFF export in your Singularity app settings by following the tutorial provided by Vaonis


Stellina owners Vespera owners
  • Select Messier 60 galaxy
  • Let the observation run for at least 1 hour (stacking time)
  • Do not use the CovalENS or Reframe features
  • Find more help here
  • Select NGC 4438 (the target will be added in the next app release of May 9th)
  • If you want to have a try and observe the object before May 9th, enter the following coordinates in the manual mode:

ra: 12h27min47s dec:13°0′

  • CovalENS mode REQUIRED: change the size of the mosaic then center the square of the mosaic on NGC 4438 by keeping the field 2.8° x 2.0°, without changing the default position, nor rotate

Once you have captured your image, save it in TIFF format and send the file to photo@vaonis.com before May 14th, along with your full name, email address, and location. 

Join the Community

Join the dedicated event on the mySingularity Facebook group to meet other participants and get advice. You can also browse the FAQ for Vespera and Stellina section to get answers to any questions you may have. Joining the community can be a great way to learn more about astrophotography and connect with other astronomy enthusiasts.

Vaonis’ new challenge promises to be a unique and exciting experience for amateur astronomers all over the world. By participating in the challenge, you’ll have the opportunity to capture a stunning photograph of the Virgo Cluster and potentially be a part of a new world record. With simple instructions and plenty of resources provided by Vaonis, this is a great opportunity for amateur astronomers of all levels to come together and capture the beauty of the universe. 

Don’t miss out on this exciting opportunity and join the challenge today!


Observations, Tips & News, Travel journal

Complete guide to observing eclipses

Passionate about astronomy and in particular our star and satellite, we are delighted to present a comprehensive guide to eclipse viewing, highlighting each of our previous blog posts, and share with you our expertise on eclipse viewing through a series of six detailed articles.

What is an eclipse?

In our first article “What is an eclipse?” we explained in detail the different kinds of eclipses and their mechanism, covering the different types of solar and lunar eclipses.

CLICK HERE TO READ OUR ARTICLE

Guide complet sur l’observation des éclipses


The best places to observe the total solar eclipse of 2024

Our second article, “The best places to observe the total solar eclipse of 2024”, provided you with valuable information on the most recommended places to observe this exceptional event. We discussed the criteria to consider when choosing your viewing location, the most suitable areas and the precautions to take for a successful viewing.

CLICK HERE TO READ OUR ARTICLE

Watching the sun with Vespera and Stellina

If you are looking to use our observing stations to observe an eclipse, our third article “Observing the sun with Vespera and Stellina” gave you detailed information about our products and their use for solar observation, especially solar eclipses. We presented the advantages of our telescopes, Vespera and Stellina, as well as their respective solar filters, and how to use them to obtain exceptional quality images.

CLICK HERE TO READ OUR ARTICLE

Duration and frequency of solar eclipses

In our fourth article “Duration and frequency of solar eclipses”, we have deepened the concepts of periodicity and frequency of solar eclipses. We also explained which factors influence the occurrence of eclipses.

CLICK HERE TO READ OUR ARTICLE

Guide complet sur l’observation des éclipses

Stellina and its solar filter

Tips for viewing a solar eclipse

Our fifth article “Tips for Viewing a Solar Eclipse” provided you with important tips for safely viewing and enjoying the solar eclipse. We covered eye health aspects, precautions to take to avoid accidents, as well as proper Vespera and Stellina equipment to use for a successful viewing.

CLICK HERE TO READ OUR ARTICLE


Between penumbra and totality band, where to observe a solar eclipse

Finally, our sixth article “Path Of Totality, Umbra And Penumbra” introduced you to the different zones to observe during a solar eclipse and how to choose the best place for the observation. We also explained the difference between the totality band and the penumbra zone, and how they affect the observation of the solar eclipse.

CLICK HERE TO READ OUR ARTICLE

We hope these articles help you better understand eclipses and how to observe them successfully. Feel free to explore our website to discover our observing stations and their accessories and the latest news in astronomical observation by subscribing to our newsletter.

Observations, Tips & News, Travel journal

What can we observe in the sky in April 2023?

What can we observe in the sky in April 2023?

April 2023 is an exciting time for stargazers as there are several celestial objects to observe in the night sky. From galaxies to star clusters, nebulas and eclipses, the Universe offers an abundance of beautiful and mesmerizing astronomical wonders to explore.

In this blog post, we’ll take a closer look at five of the most interesting objects to observe in the sky during April 2023.

The Andromeda Galaxy

The Andromeda Galaxy, also known as M31, is a spiral galaxy located approximately 2.5 million light-years away from Earth. It is the closest galaxy to our Milky Way and can be seen with the naked eye on a clear night away from light pollution. It appears as a faint fuzzy patch in the constellation Andromeda. With a telescope, you can see its spiral arms and its bright core. The Andromeda Galaxy is a beautiful sight and is worth observing in April.

Taken with Vespera by Sébastien Aubry using our CovalENS technology

The Beehive Cluster

The Beehive Cluster, also known as M44, is an open cluster located in the constellation Cancer. It is visible to the naked eye as a small fuzzy patch. With a telescope, you can see its many stars that sparkle like diamonds. The Beehive Cluster is one of the nearest and brightest open clusters to Earth. It is a beautiful sight and worth observing in April.

Taken with Vespera by Ray B.

The Pleiades

The Pleiades, also known as the Seven Sisters, is an open star cluster located in the constellation Taurus. It is visible to the naked eye as a small cluster of stars. With a telescope, you can see its many stars, gas, and dust clouds. The Pleiades is one of the most famous and easily recognized open clusters in the night sky. It is an excellent target for beginners and experienced stargazers alike.

Taken with Vespera using our CovalENS technology

The Rosette Nebula

The Rosette Nebula, also known as NGC 2237, is a beautiful emission nebula located in the constellation Monoceros. This large, circular nebula appears as a faint, reddish-pink cloud and is visible with a telescope. It gets its name from its rose-like shape and intricate details, which make it a popular target for astrophotographers. The Rosette Nebula is an awe-inspiring object to observe and is definitely worth checking out in April 2023.

Taken with Vespera using our CovalENS technology

Eclipse in the Southern Hemisphere: Hybrid Solar Eclipse

On April 20, a total solar eclipse sweeps over the North West Cape, a remote peninsula of Western Australia. It’s also visible from parts of East Timor and the Indonesian province of West Papua. 

What is a hybrid solar eclipse? A hybrid solar eclipse, also known as an annular-total eclipse, is a rare type of solar eclipse that occurs when the Moon’s shadow passes over the Earth, but the apparent size of the Moon is not large enough to completely cover the Sun.

Make sure to order your Vespera solar filter and read this article about solar osbervations before you observe from your corner of the world!

Conclusion

April 2023 is an excellent time for stargazers to explore the southern hemisphere and observe some of the most beautiful and fascinating objects in the night sky and witness the eclipse!

If you’re interested in exploring the night sky, why not try stargazing this April? All you need is a clear night and Vespera.

For more tips and advice on stargazing, visit our website.

Happy stargazing!

Observations, Tips & News, Travel journal

Best places to watch the 2024 total Solar Eclipse

Want to know about the best places to watch the 2024 total Solar Eclipse?

The 2024 total solar eclipse is shaping up to be one of the most exciting astronomical events of the decade, and millions of people around the world are eagerly planning their trips to witness this once-in-a-lifetime spectacle. If you’re looking for the best places to watch the 2024 total solar eclipse, you’ve come to the right place. In this article, we’ll explore some of the top destinations for eclipse viewing and provide tips on how to make the most of your experience.

Best places to watch the 2024 total Solar Eclipse

Sources : The SkyLive

Mexico

For those looking to venture outside of the United States, Mexico is actually the best option. The eclipse will pass over several cities in the country, including Mazatlan, Los Pozos, and Torreon. These locations offer a unique opportunity to combine eclipse viewing with a vacation in a beautiful and vibrant country.

Texas

If you’re looking for a prime viewing spot for the 2024 total solar eclipse, Texas is an excellent choice. The eclipse will pass over the northern part of the state, offering spectacular views for those in the path of totality. Some of the best locations to watch the eclipse in Texas include Eagle Pass, Uvalde, and Lampasas. Just be sure to book your accommodations well in advance, as these cities are likely to be popular destinations for eclipse chasers.

Indiana

If you’re looking for a destination in the Midwest, Indiana is a great choice. The path of totality will cross the state from the southwest corner to the northeast corner, with several cities offering excellent viewing opportunities. Indianapolis, the state capital, is a particularly good option, as it is located near the center of the path of totality.

Ohio

Ohio is another great option for eclipse viewing, as the state will experience totality for several minutes. The eclipse will pass over the northwest to northeast corner of the state, with the town of Lima being one of the best places to watch. 

Canada

Finally, if you’re looking for a destination in Canada, the eastern provinces will be in the path of totality for the 2024 eclipse. St. John’s, the capital of Newfoundland and Labrador, is a particularly good choice, as it will experience totality for nearly three minutes.

Solar eclipse observation with Vespera

Some recommendations for your Eclipse observations

Here are a few recommendations we have before you get ready to pack for this once-in-a-lifetime tripe.

  1. Whether you own a Vespera or a Stellina, don’t forget to order your Vespera Solar Filter or Stellina Solar Filter to ensure an optimum observation.
  2.  Read our article about “Observing the Sun with Vespera and Stellina” on our blog so that you know exactly how your instrument works with its associated filter
  3. Read our article “Tips To View A Solar Eclipse” to get our best tips for eclipse observations


Affinity Photo image processing
Observations, Tips & News, Travel journal

Affinity Photo image processing tutorial

New 2023 version

How to process Stellina and Vespera Raw Images with Affinity Photo

Did you know that you can now export the images of your observations in a 16-bit TIFF format? This raw file allows you to apply your own image processing settings and edit the images at your convenience. By doing so, you will get better image quality and personalize the results without the hassle of stacking files yourself on astrophotography software. This tutorial explains how to process raw images with Affinity Photo, being suitable for beginners who wish to learn astronomical image processing techniques.


CONTENTS

  1. Introduction
    1. Requirements.
    2. About the technique used in this tutorial
  2. Processing steps
    1. Tone stretching.
    2. Noise reduction.
    3. Details enhancement.
    4. Star reduction
    5. Color grading
    6. Final touch
  3. Can we proceed further?

Affinity Photo image processing: how to process Stellina and Vespera raw images | introduction

Requirements: Affinity Photo software

Affinity Photo image processing: here’s a tutorial on how to process Stellina and Vespera raw images with Affinity Photo to optimize your astrophotography skills.

Affinity Photo is a raster graphics editor similar to Photoshop. It can export and read Photoshop files (.psd) but is more accessible than Photoshop because of its price, and its interface is more user-friendly. It’s available for Windows and macOS systems. An iPad version is also available.

Affinity photo is packed with features dedicated to astronomical photos, such as native support for FITS images and stacking with the use of calibration images.

The price is about 50€/$50 for a one-time purchase.

While this tutorial is made with Affinity Photo version 2, all the actions presented can also be performed with version 1. The screenshots differ mainly in the new design of the icons. For those of you using Photoshop, most of the features are similar to what you’ll see below.

The screenshot below (fig. 2) shows the main elements of the Affinity Photo interface that we will use.

How to process Stellina and Vespera Raw Images with Affinity Photo

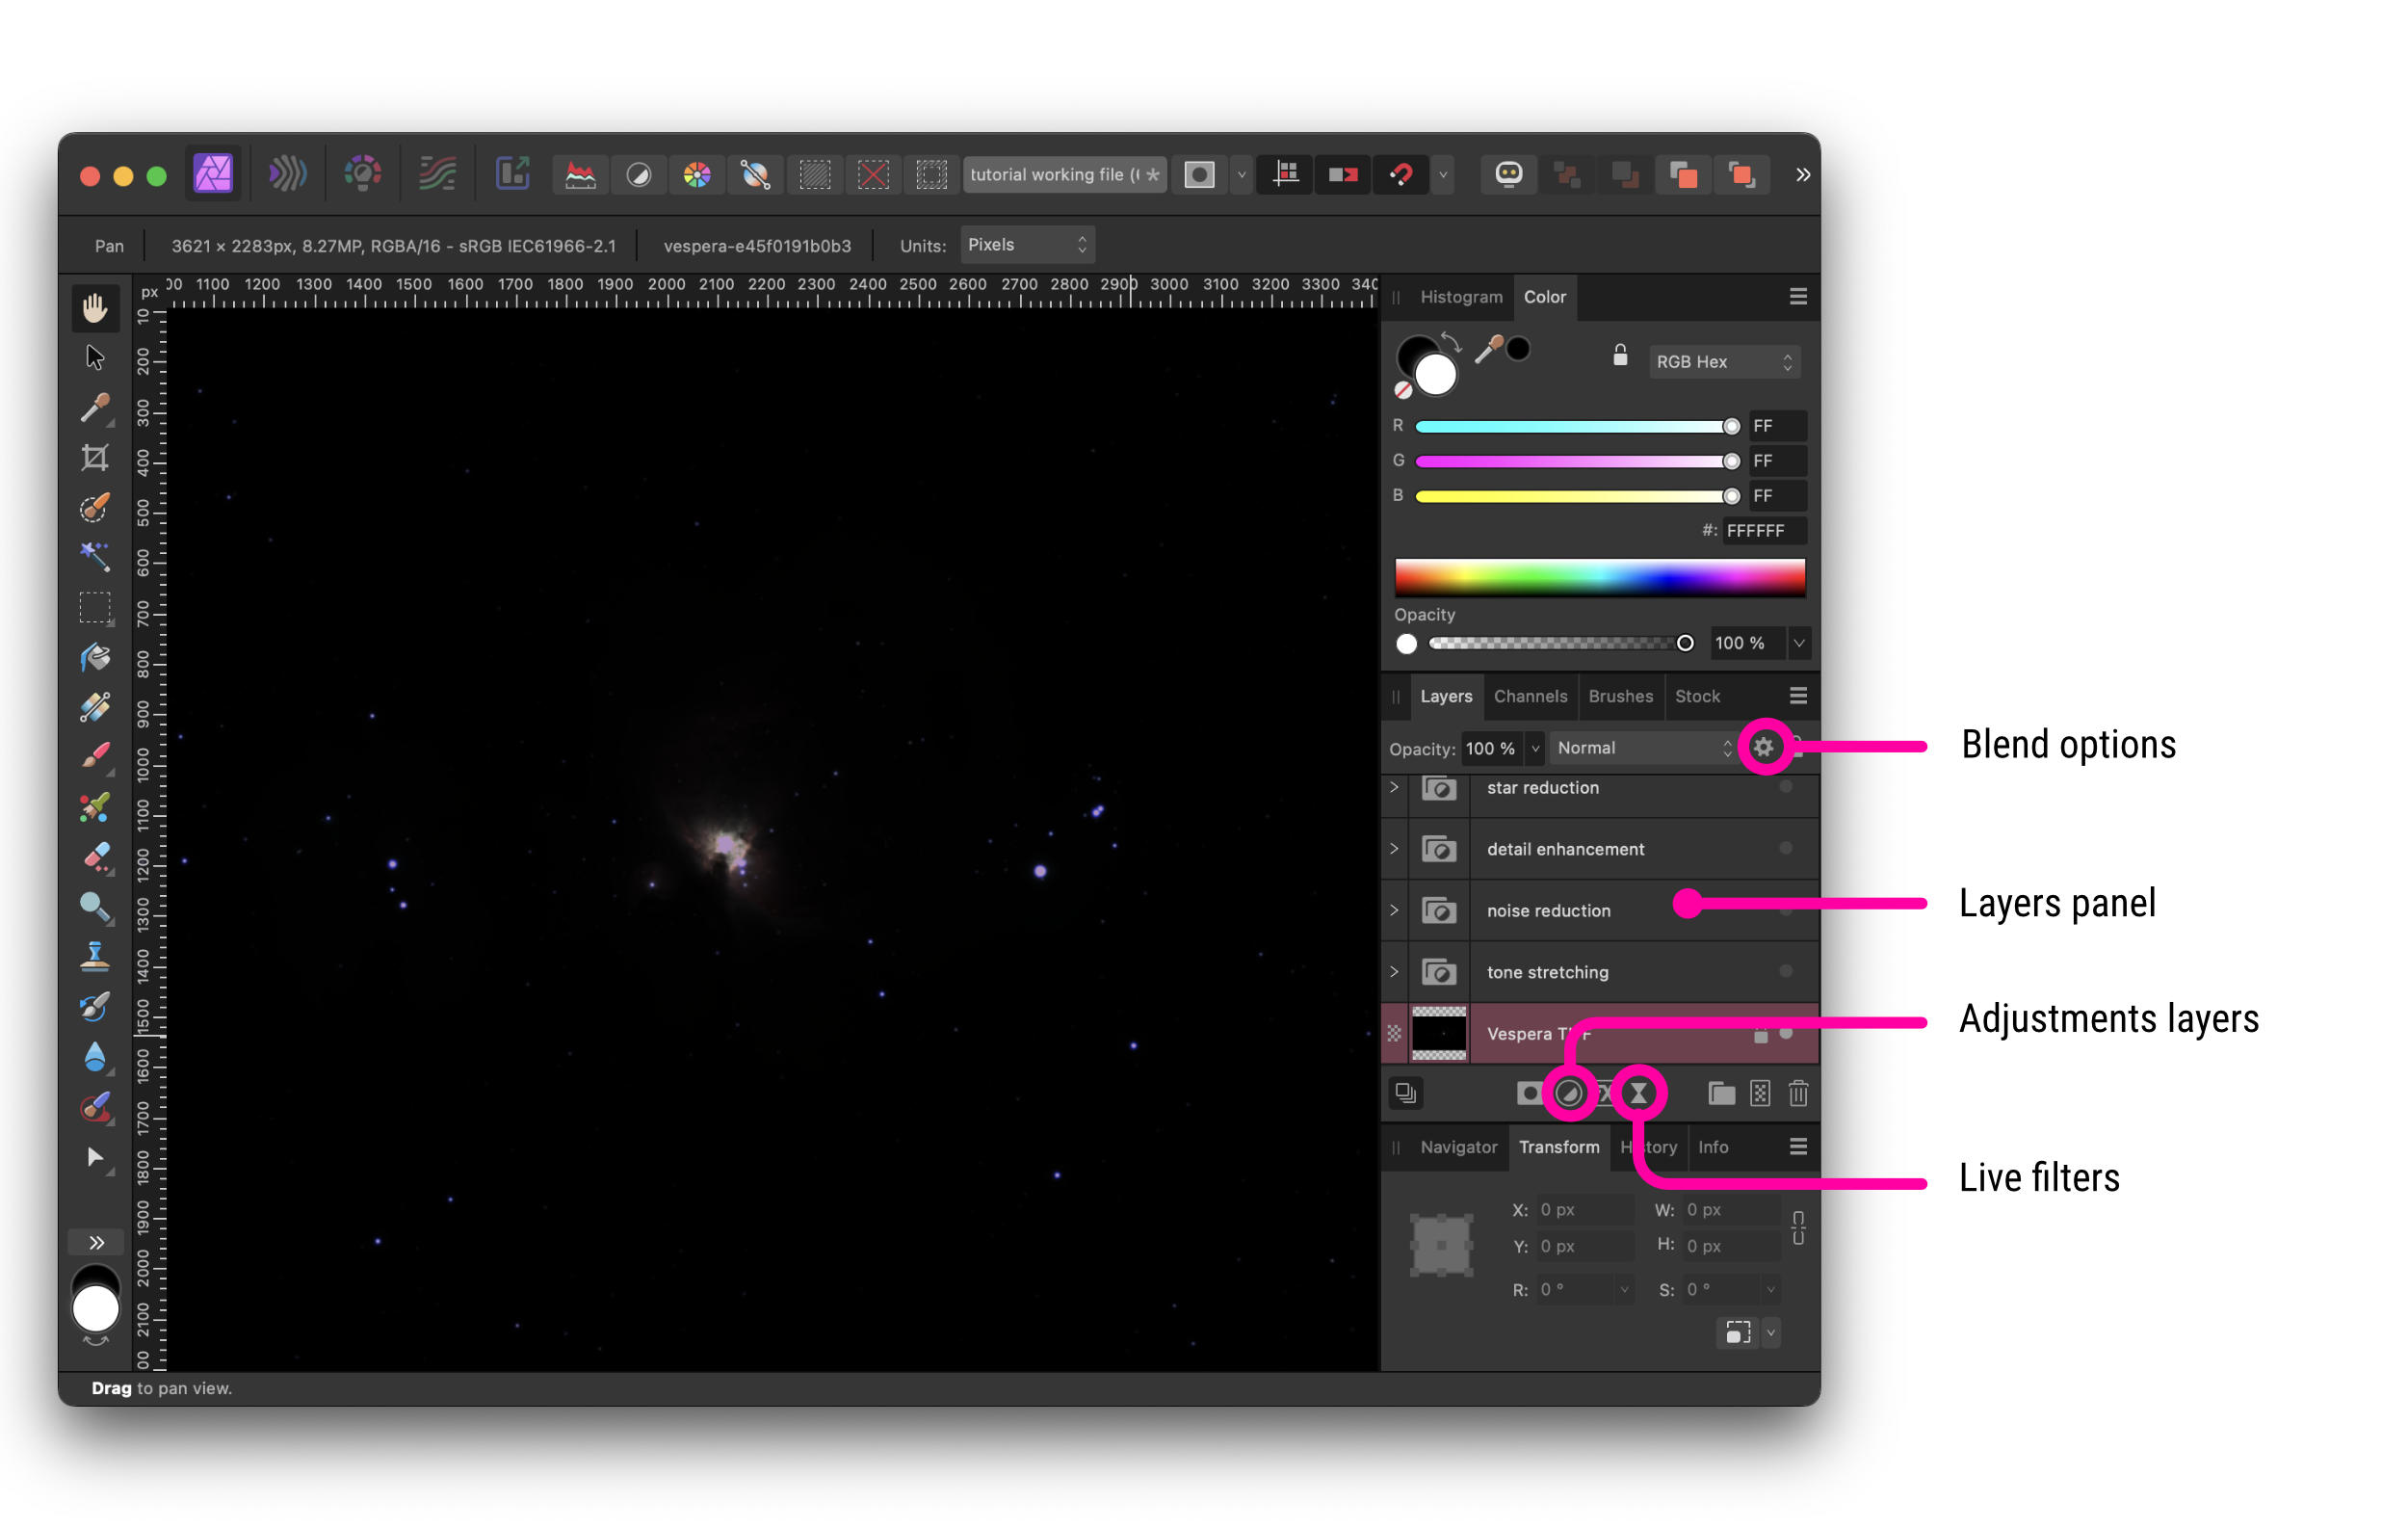
Fig. 2 – Affinity photo interface.

Affinity Photo image processing: how to process Stellina and Vespera raw images with Affinity Photo | the example file

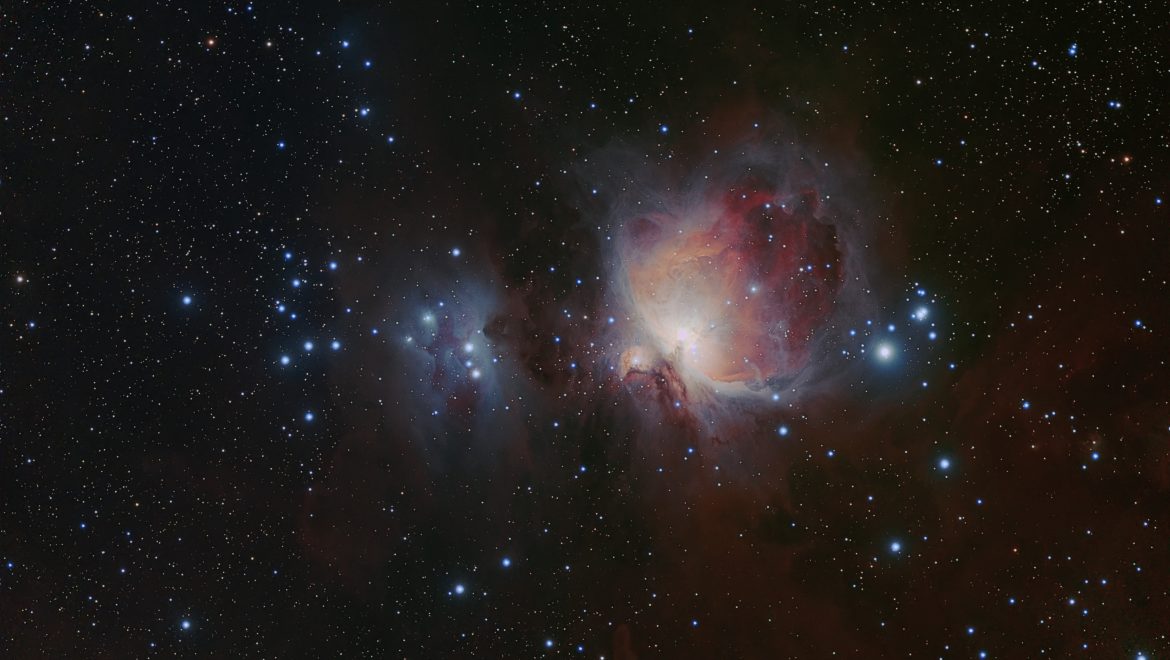
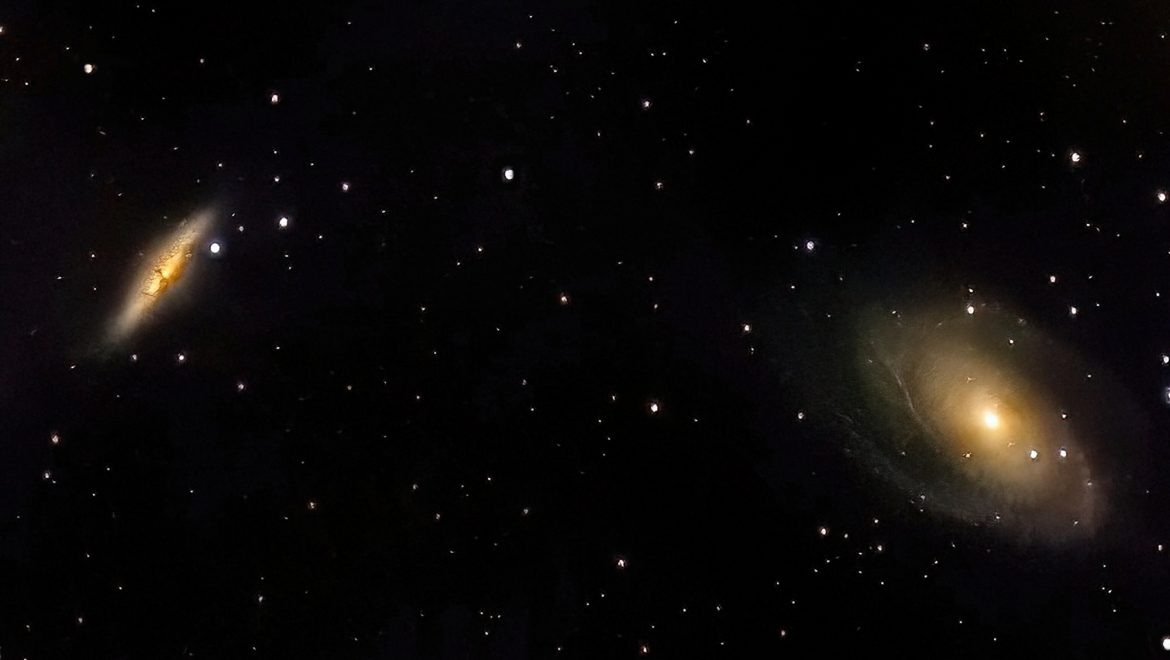
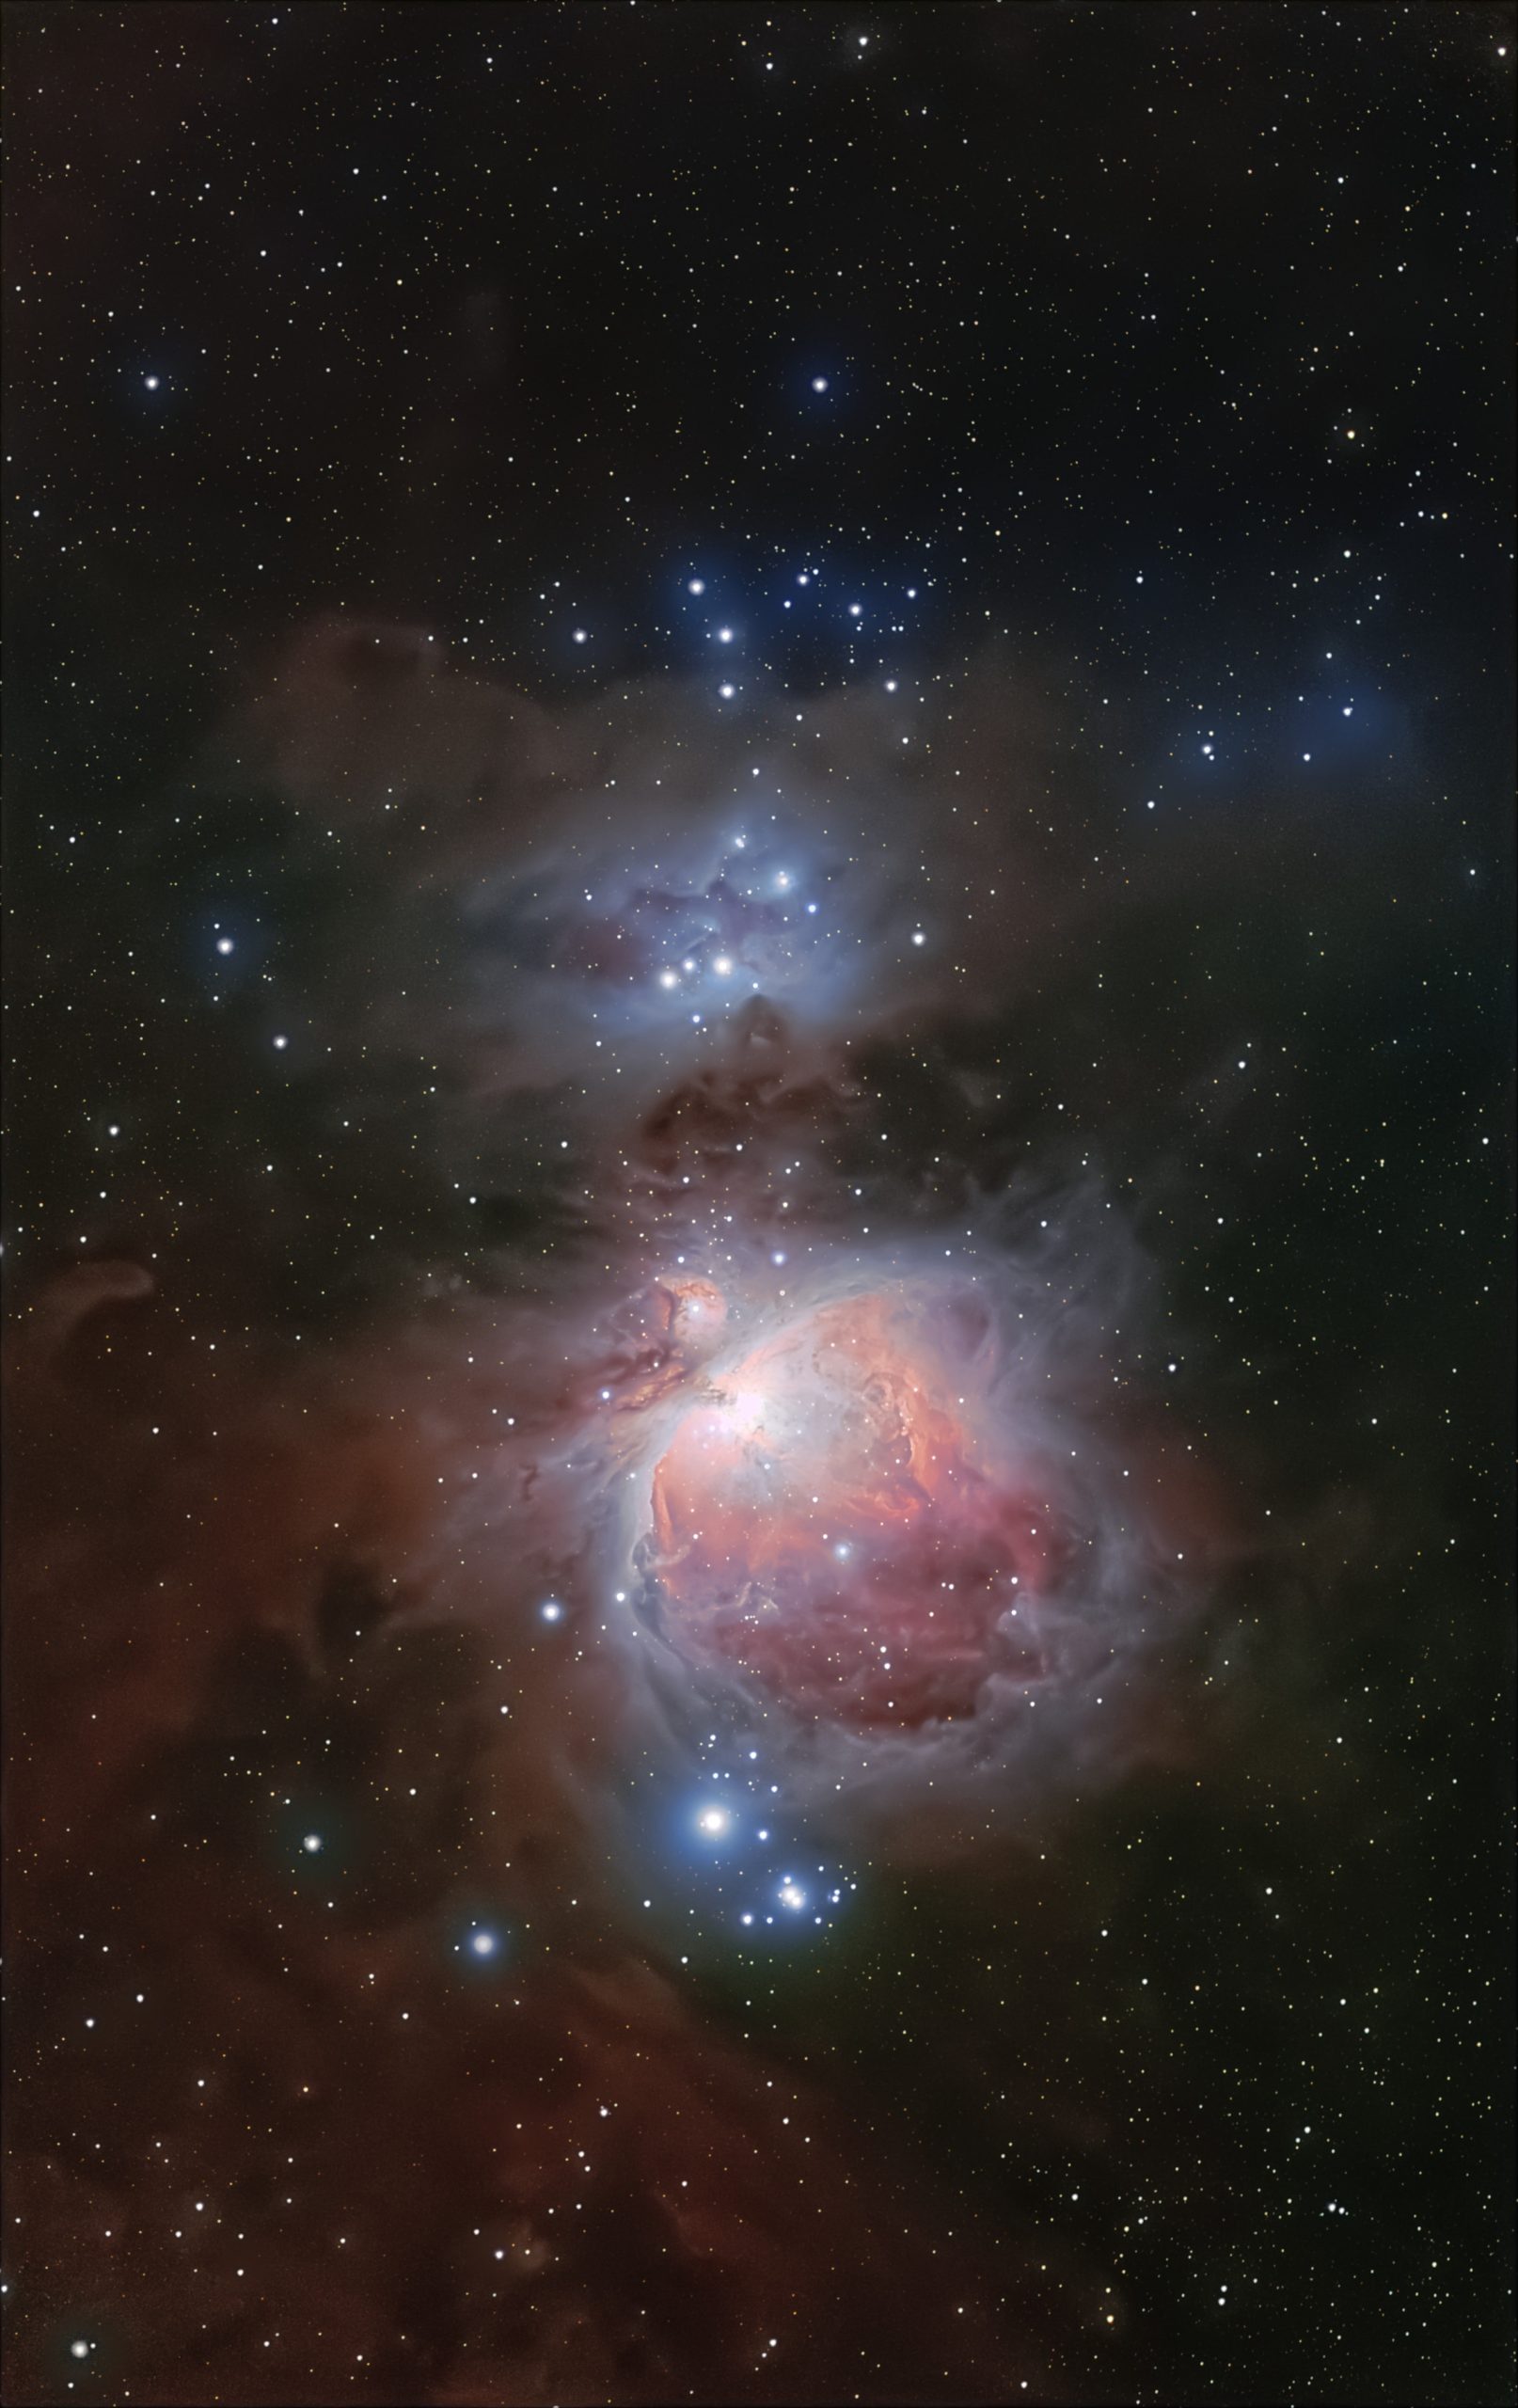
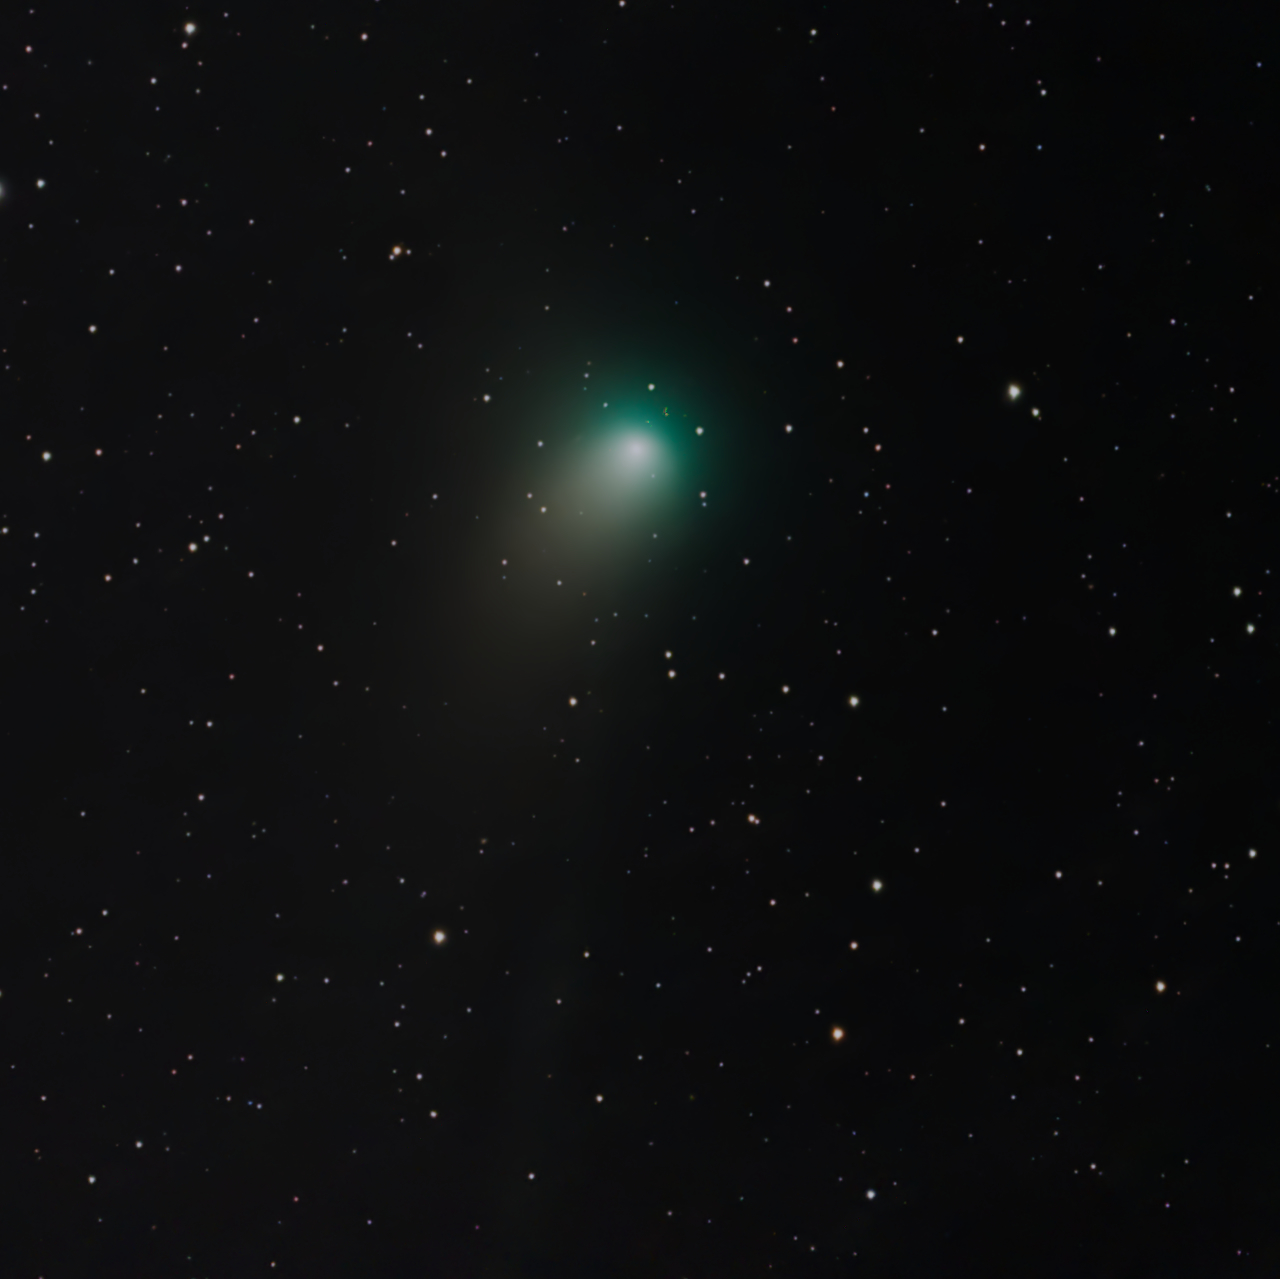
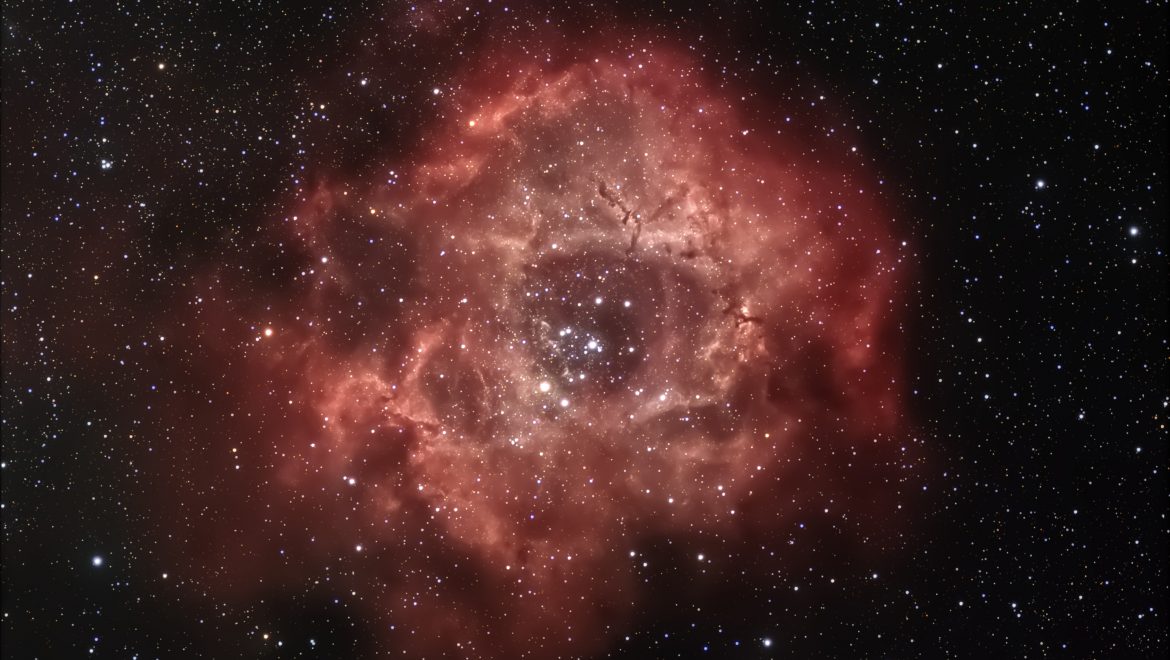
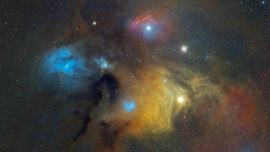
This tutorial is based on an image of the famous Orion Nebula (M42). You can download the original TIFF file (as you would retrieve it during your observation) by clicking here.
This image was captured with Vespera using our CovalENS mosaic mode, with the integration of 900 exposures of 10s (2h30 in total).

You can of course apply this tutorial to your own images. To do so, you need to make a TIFF export of the images you capture (read this article to learn more).

The better the image captured, the better the final result of the process. You may want to read the 14 tips for optimizing the performance of your observation station.

About the technique used in this tutorial

There is no unique way to process an astronomical image. The vast array of software available on the market and their various functionalities offer many ways to achieve a result.

Note that the settings required to process a particular celestial object may significantly differ depending on whether they are nebulae, galaxies, or star clusters. Celestial objects can show very different characteristics, even within their category. The advantage of manual processing over Stellina’s or Vespera’s automatic processing is precisely to allow for the treatment of objects differently depending on their features. It is important to understand that this article is not about strictly following the step-by-step tutorial, but rather understanding the notions related to image processing and being able to apply the concepts to other cases.

Affinity Photo image processing tutorial: Non-destructive processing

Most of the actions described in this tutorial are non-destructive. At any point in the process, it is possible to easily go back to previous settings, adjust them and get the result in real-time while preserving the rest of your work. The original image remains available without being directly altered.
This method offers more flexibility but also requires a more powerful computer configuration.
If at any stage of processing, your computer becomes too slow, you can “flatten” the result (i.e. merge all the processing stages) and then proceed.

Affinity Photo image processing: processing steps

Step 1: Tone stretching

At first glance, the TIFF file may confuse you (see figure 2): the image appears almost completely dark. Actually, the signal does exist. What we can see at this point is basically the heart of the nebula and the brightest stars. To show the whole nebula, it is necessary to “stretch” the dark tone part of the histogram of the image. This step is called tone stretching.

How to better understand the role of tone stretching

The range of shades that a computer screen can display (the dynamic) is much smaller than that of the TIFF file (256 levels per color for the screen vs. 65536 levels per color for the TIFF file). This is why we only see the very bright parts of the image on our screens.
Nebulae and galaxies are much less bright than the brightest stars. In astrophotography, it is the dark part of the image that we want to highlight.
The “tone stretching” allows for emphasis the dark tones compared to light tones.

Once you have opened the image with Affinity Photo, pay attention to the panels on the right (see figure 2). Make sure the “Layers” panel is visible.

Like most image processing software, Affinity Photo is based on a system of superimposed layers to compose the final image. Some layers may contain an image, while others contain adjustment layers whose effect affects all the visible underlying layers.

To achieve the “tone stretching”, we will use adjustment layers.

  • At the bottom of the layers panel, click the “adjustments” icon (fig. 2). In the pop-up menu, choose “levels”.

A new panel shows a histogram of the image (the signal distribution across the image) as well as the available controls. The histogram shows that the majority of the signal in the image is located in dark tones (left part of the histogram).

How to process Stellina and Vespera Raw Images with Affinity Photo

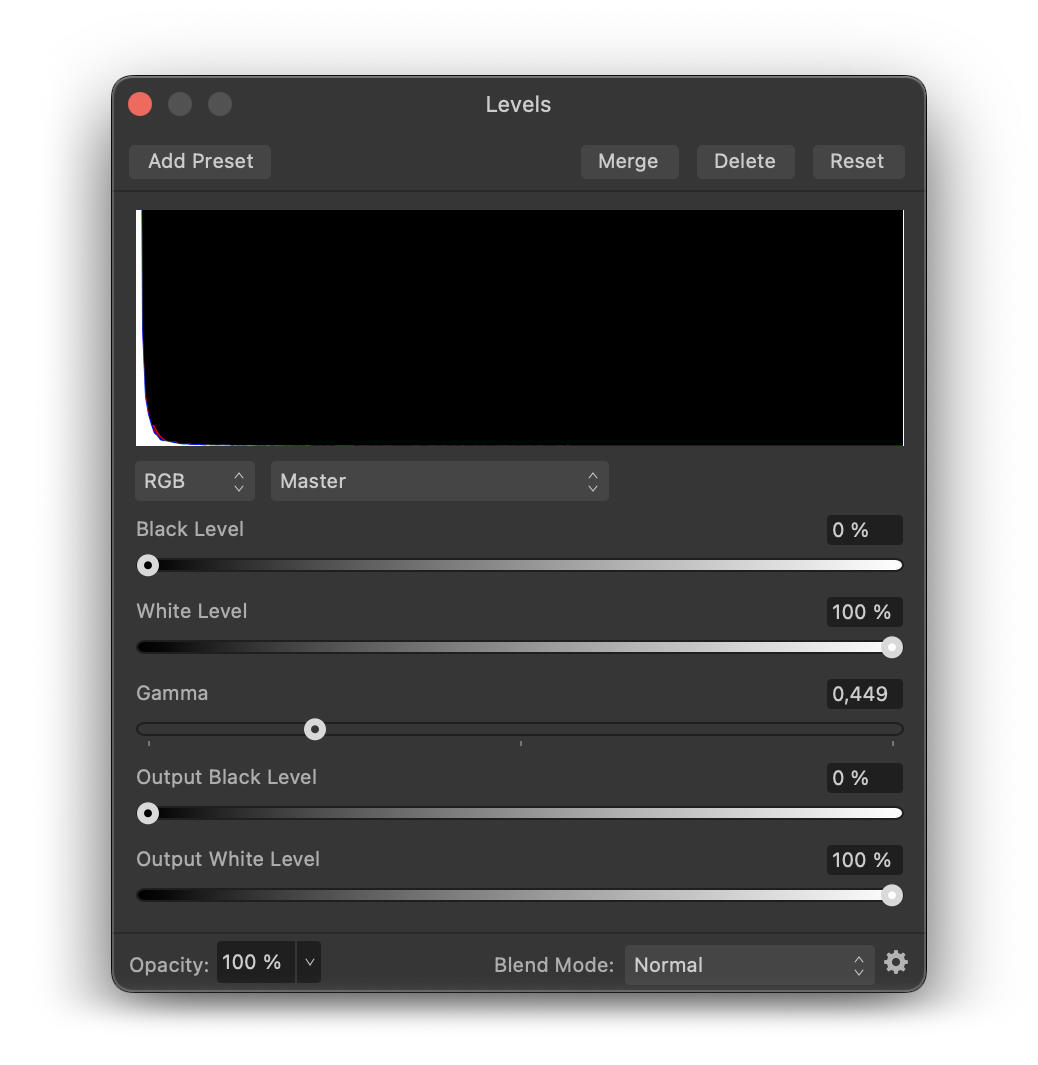
fig. 3 – gamma setting

  • Bring the “gamma” slider to the left to emphasize the darker tones until the nebula appears but without getting the sky background too bright. For this image, I recommend setting the gamma to 0.45 (if you apply this tutorial to another image, the setting will probably be different).

Let’s proceed with another tool to make the nebula pop without increasing the brightness of the sky background.

  • Make sure the Level adjustment layer is selected and click again on the “adjustments” icon at the bottom of the layers palette. Then choose “curves” from the list.

A new layer appears on top of the layer “Levels adjustment” and a new panel displays the corresponding controls (fig. 4, left part).

How to process Stellina and Vespera Raw Images with Affinity Photo

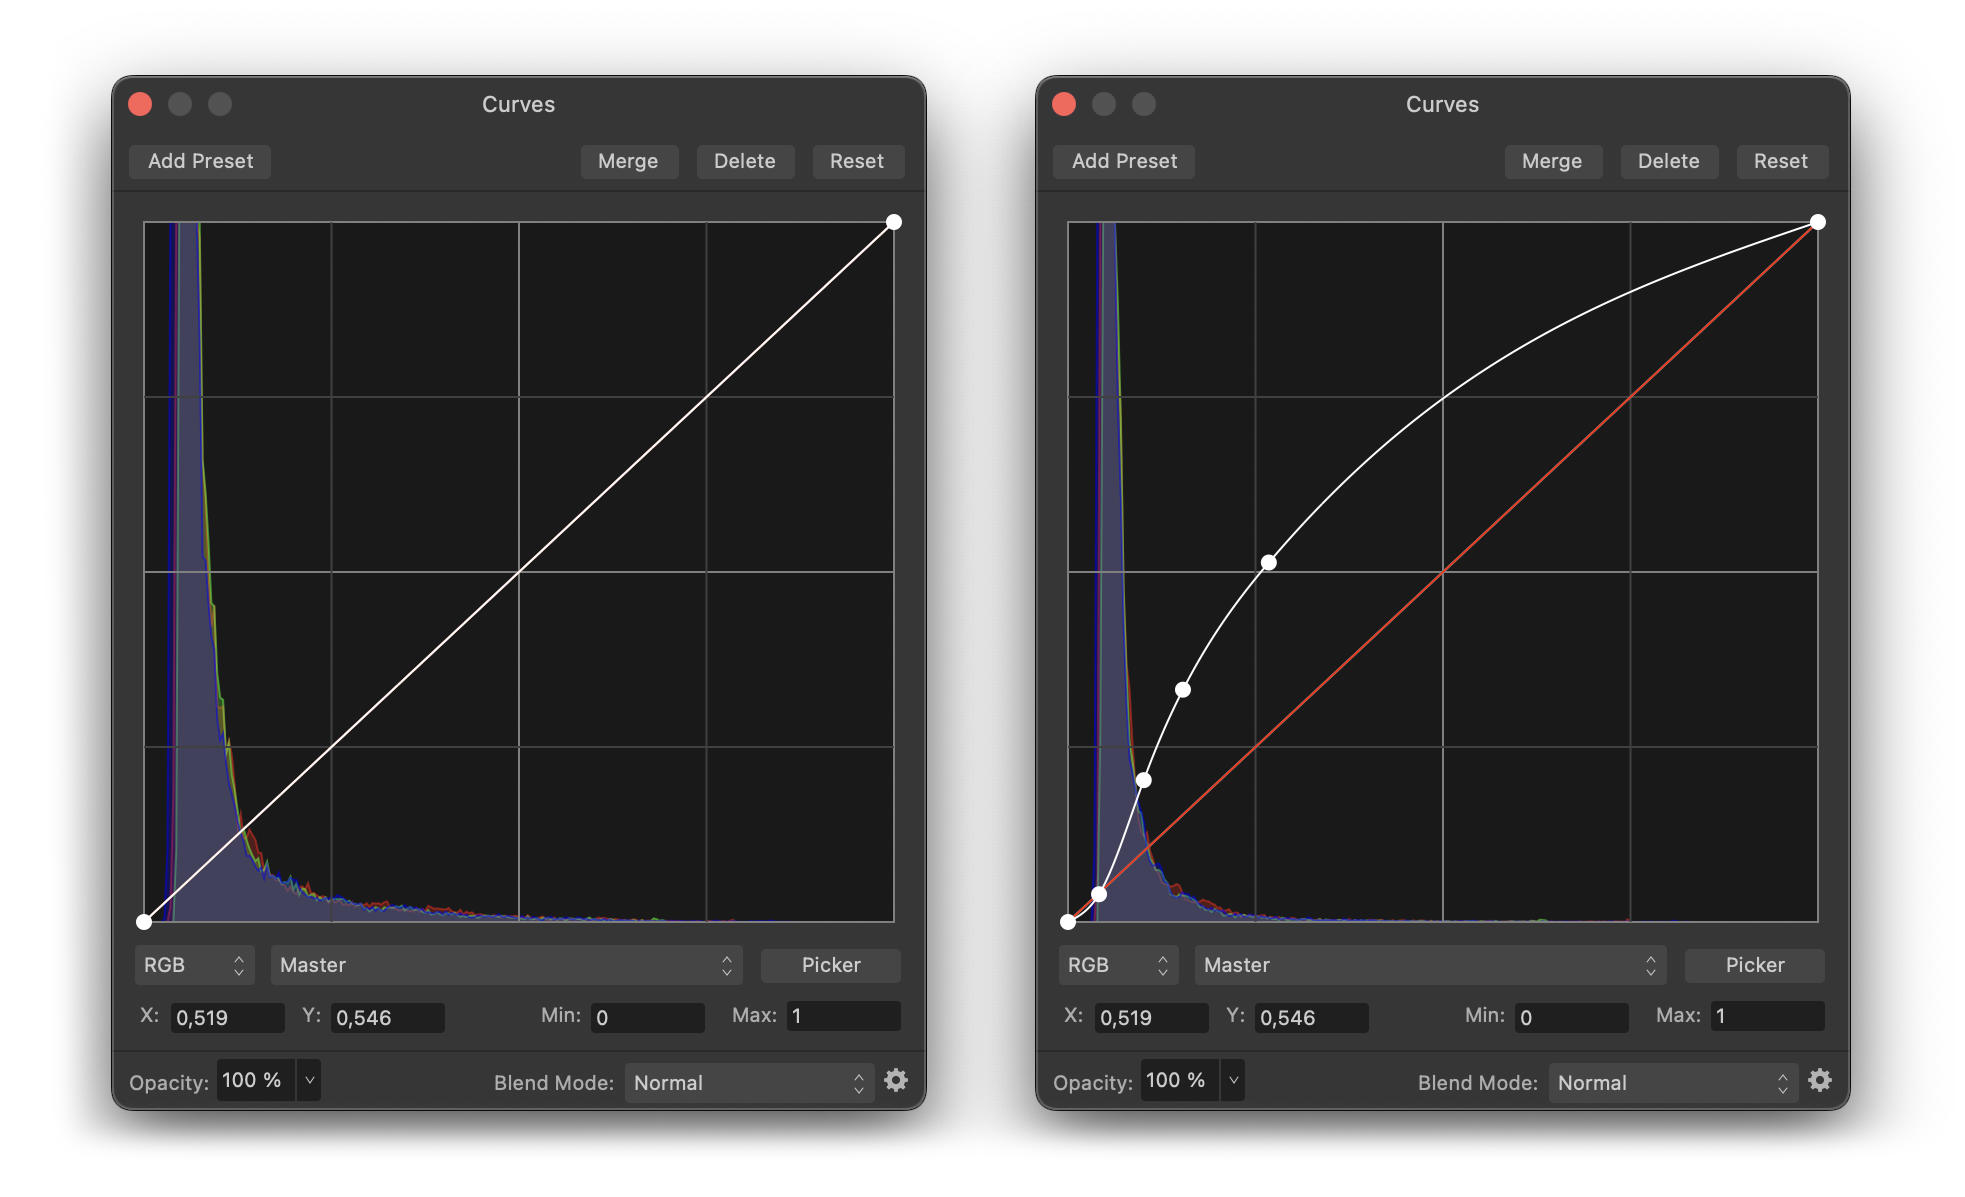
Fig. 4 – The curves adjustment tool

How to better understand tone curves

The tone curve graph allows you to selectively increase or decrease the brightness of the image areas according to the brightness they already have. For example, you can decide to increase the brightness of dark areas without changing the brightness of areas that are bright enough.

The left side of the graph (Figure 6 on the left) stands for the very dark tones, called shadows (or blacks), while the right side refers to the very light tones ( “whites”). In between are the dark mid-tones and the light mid-tones.

The vertical axis of the graph shows the brightness value for each tone: minimum (black) at the bottom, and maximum (white) at the top. At first, the curve that runs through the graph consistently indicates that the shadows (on the left) are extremely faint, and the highlights on the right are very bright.


By clicking on the curve, you can change its shape in order to increase the brightness level of certain tones without affecting others.
For our purpose, we want to increase the brightness of the nebulosities without increasing the highlights (to avoid “overexposing” them) or the black tones (so as not to make the sky background too bright).

  • Click the curve on the dark tones side to add a control point. Then move it upward to increase the brightness of that tone range.

The darker parts come out more but the very bright areas become burnt. We need to add another control point on the curve to bring the brightness of the highlights back to their original values.

  • Add the required control points to the curve so that it adopts a shape similar to Figure 4 on the right.

We are now tempted to make the nebulosities pop out even more. Rather than readjusting the tone curve we’ve just set, adding a second layer of “curve adjustment” may be better to proceed gradually.

  • Click on the “adjustments” icon at the bottom of the layers palette and choose “curves”.
  • Add control points on the new tone curve (fig. 5) in order to highlight the nebula while preserving the sky background and the very bright parts.

How to process Stellina and Vespera Raw Images with Affinity Photo

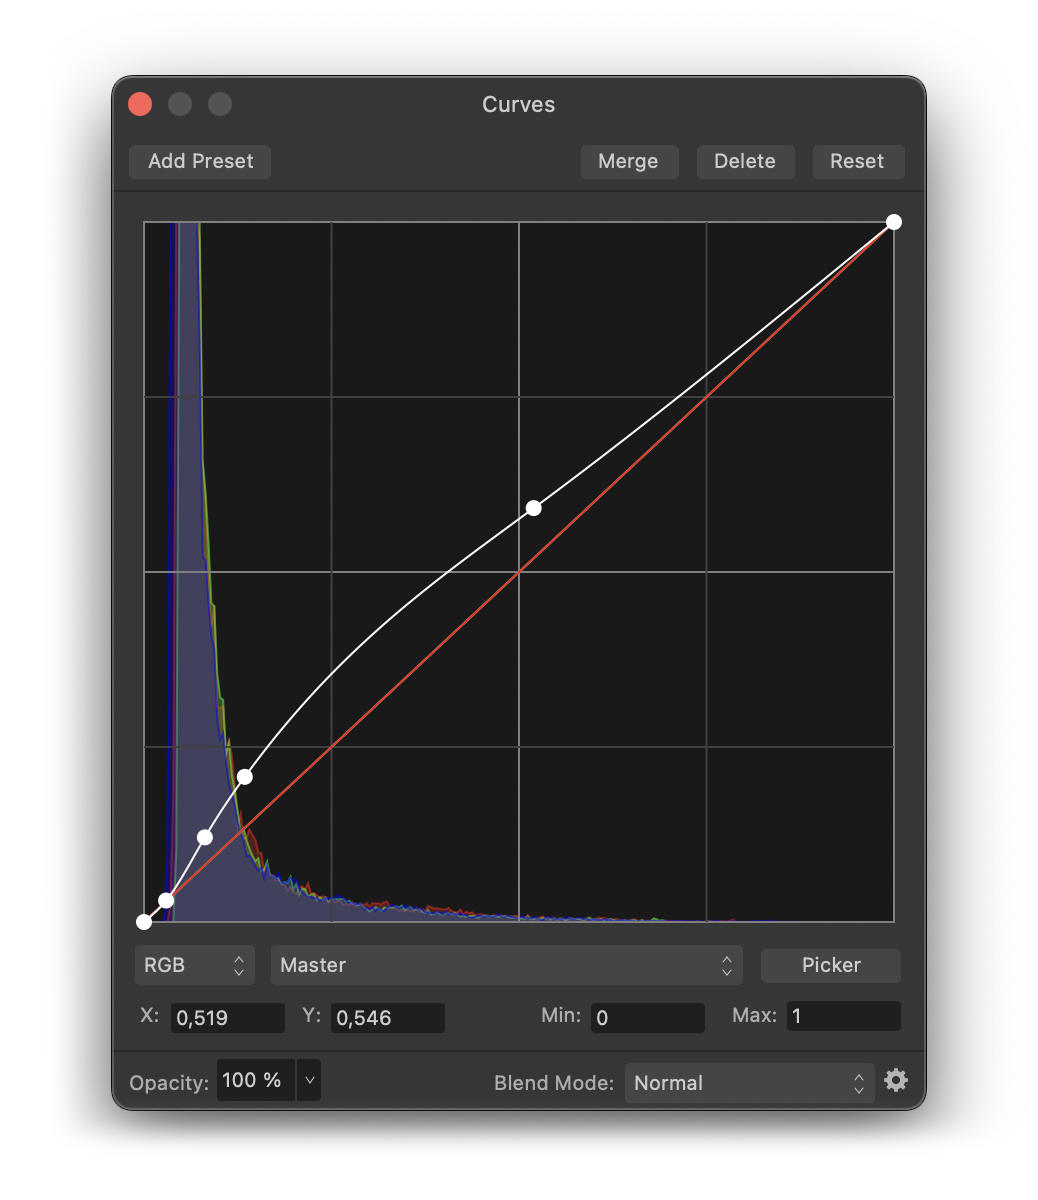
Fig. 5 – second setting of the tone curve.

Here is the result you should get at the end of this step, compared to the starting image.

Step 2: Noise reduction

While zooming in on the image, we observe the presence of “noise”. The noise is this kind of granulation that appears mainly in the dark areas of the image.
The noise is distributed randomly and evenly across the image. It is less noticeable in the bright areas because the weaker light intensity of the noise is overpowered by the strong “signal” of the bright areas.

How to better understand the causes of image noise

Noise is initially present on any image captured by an electronic device. It can be produced by the image sensor and circuitry of a digital camera. It’s possible to limit the noise generated by the sensor by cooling it. This is why some experienced astrophotographers and professional astronomers use cooled cameras.

When processing an image, the various manipulations performed to bring out the details also have the negative side effect of bringing out the noise.
Let’s reduce it before it becomes too damaging for the following manipulations.

  • At the bottom of the layers palette, click on the “live filters” icon and choose “denoise” from the list
  • A new layer appears in the layers panel. Make sure it is on top of the layer stack. Otherwise, drag it over the “Curve Settings” layer.

Let’s start by reducing the color noise.

If you zoom in on a part of the image where only the sky background is visible, you see that what should be a dark grey area is actually a juxtaposition of pixels of different colors (Fig. 7 left)

How to process Stellina and Vespera Raw Images with Affinity Photo

Fig. 7 – Details of the noise on the sky background before and after applying the color noise reduction.

  • Make sure the colors contribution slider is set to 100% and drag the Color slider slightly towards the right. For this image, you can use a setting of 6%.

If you look again in detail at the sky background, you can see that we now get a juxtaposition of gray pixels (fig. 7, right part)

Now, let’s tackle the luminance noise. Instead of making the adjustment in the active live filter layer, let’s create a new one (in order to apply a more specific adjustment)

  • Click again on the “live filters” icon and choose “denoise”.
  • Make sure the “Luminance Contribution” slider is set to 100%, the “Color” slider to 0%, and the “Luminance Detail” to 50%, and then drag the “Luminance” slider to the right to reduce the noise in the image.

The higher the “Luminance” value, the less noise there will be in the image. Be careful, however. Drastically reducing noise also reduces the details in the image. You need to find the right compromise.

For this example, I suggest setting the “Luminance” slider to 12%.

Noise reduction has been applied to the entire image. However, we’ve found that the noise was less noticeable in the light areas. It would be interesting to apply noise reduction only in the darker areas and thus keep all the details in the lighter areas.

We can achieve this result by controlling the blending options of the “Noise Reduction” layer. We can indeed indicate that the light areas of the “Noise Reduction” layer become “transparent” and let the underneath information pass through without modifications.

  • Make sure that the top layer “noise reduction” is selected. At the top of the layer panel, click on the “blend options” icon (see fig. 2).

The settings panel that appears shows two graphs that look like the tone curve graph we are familiar with. They work in a similar way. Let’s focus on the left-hand graph “Source layer ranges”. This allows specifying the tone ranges to which the filter will be applied (if you are working with version 2 of affinity photo, you can use the new “Luminosity range mask” instead).

affinity-photo-tutorial-tiff

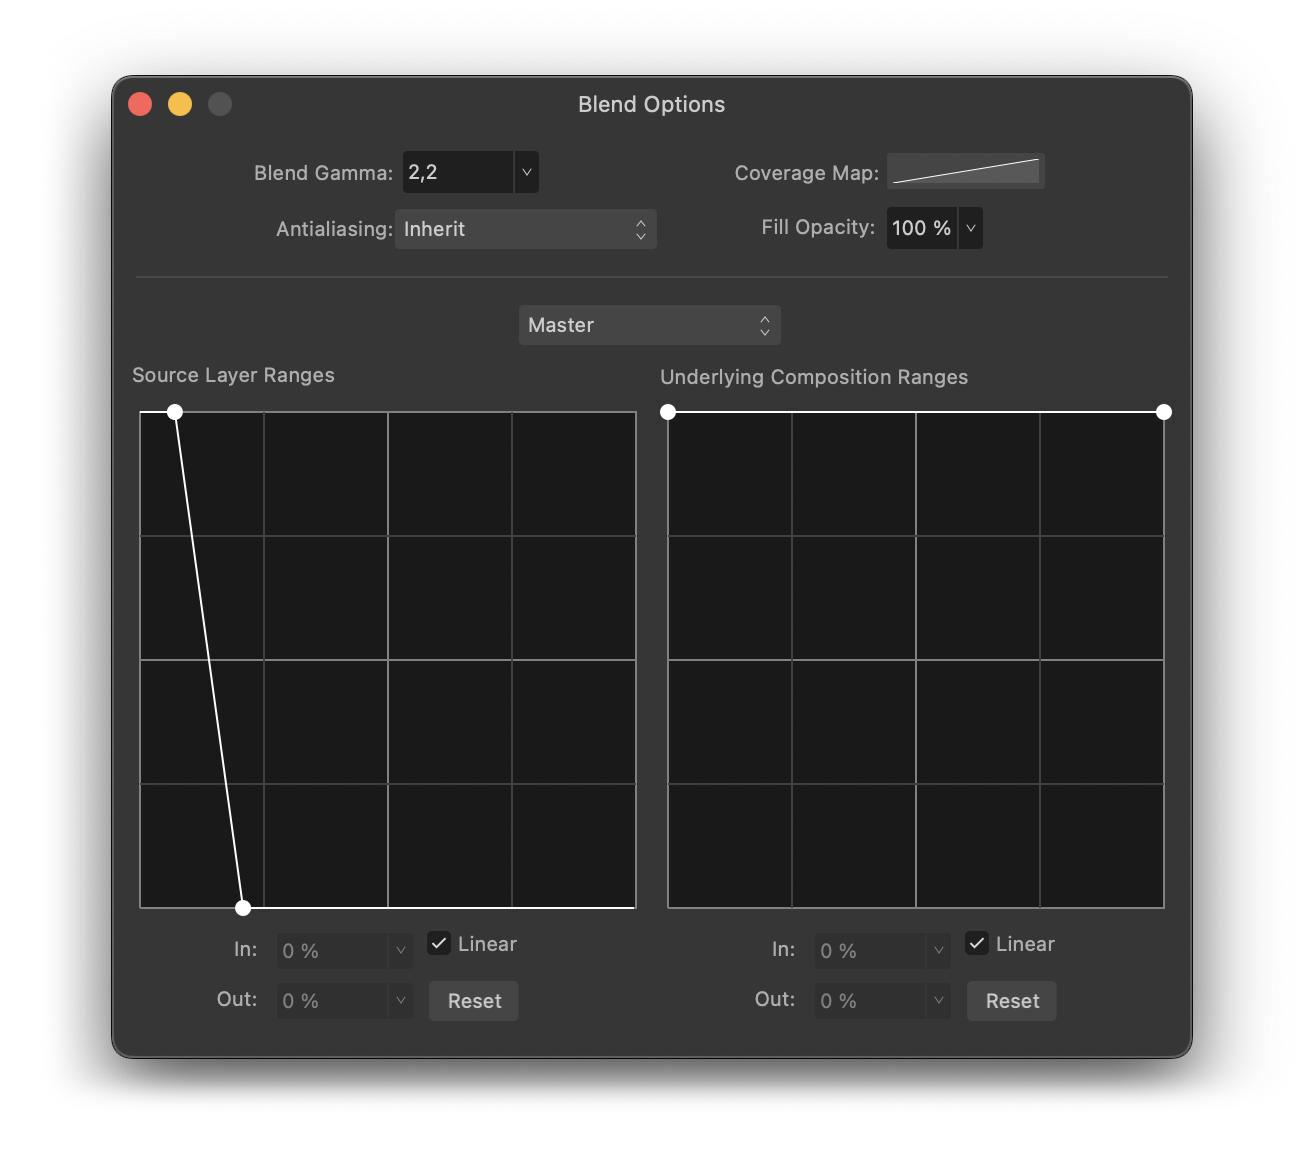
Fig. 8 – Blending options for noise reduction.

  • Click on the control point at the top right of the graph (the one corresponding to the whites) and drag it down.
  • Once completely at the bottom, drag it to the left and check in the image how the noise evolves to find the right setting.

The noise reduction layer no longer affects highlights.

  • To make sure that the “noise reduction” layer affects all the very dark areas, move the control point at the top left of the curve (shadows) slightly to the right.

The graph should look similar to the illustration above (fig. 8).

Step 3: Details enhancement

Now that we have removed the noise from the image, we can bring out even more of the very faint nebulosity below the M42 nebula and around the “running man” nebula without too much altering the quality of the rendering.

  • Add a new “curves adjustment” layer. We have to operate in a subtle and localized way on the tonal zone corresponding to these weak nebulosities.
  • In the curve setting panel, click on “picker” at the bottom right.
  • In the image, click on an area with very subtle nebulosities and while holding the click, drag the mouse cursor upward very gently. This will add a control point in the “curve setting”.
  • Drag the control point upwards to highlight the relevant part of the image.
  • Add 2 more control points on either side and drag them downward, so that the rest of the curve returns to its original position as shown in figure 9 below.

How to process Stellina and Vespera Raw Images with Affinity Photo

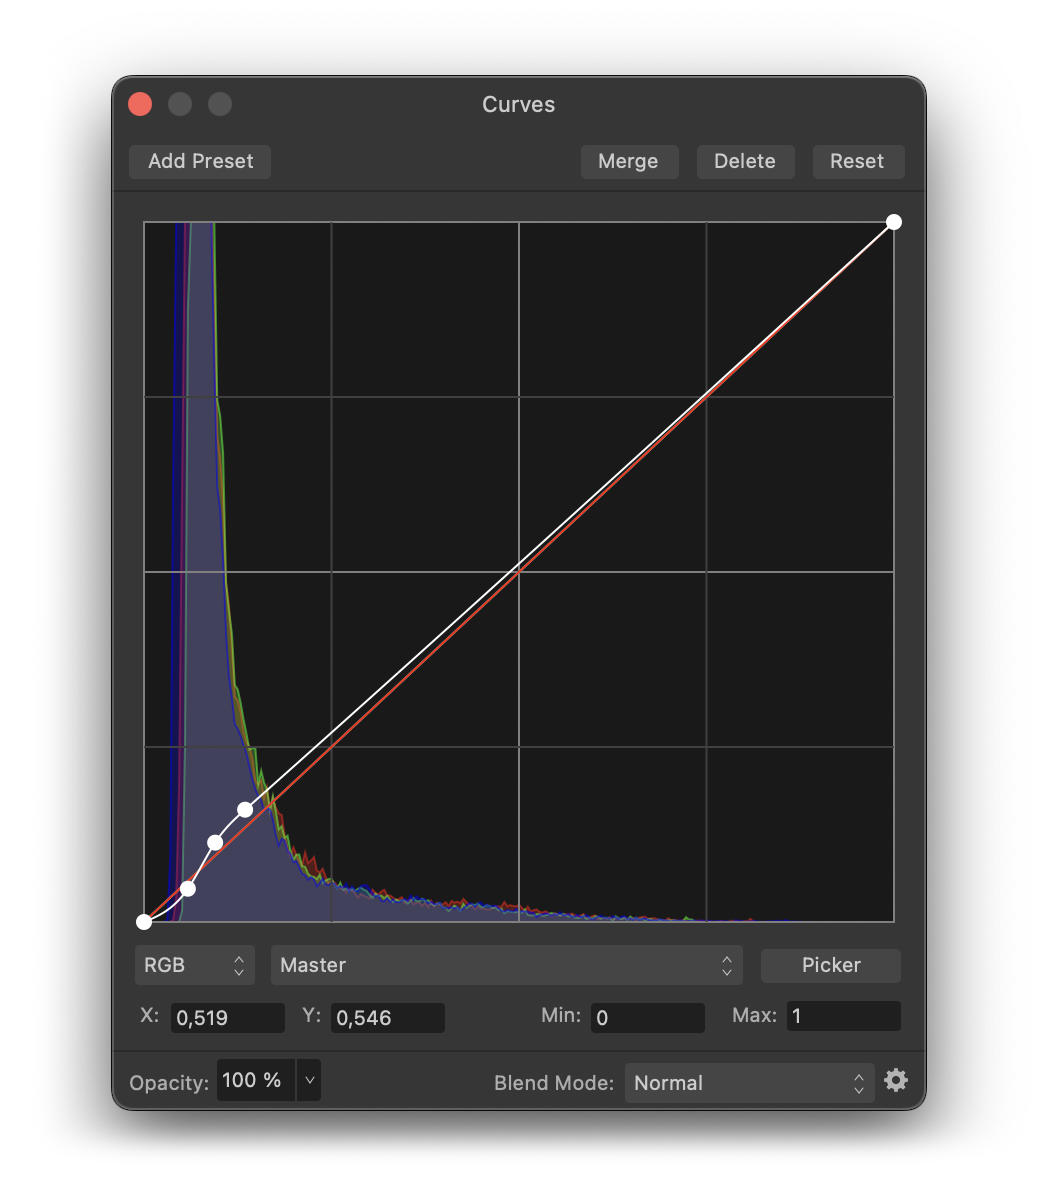
Fig. 9 – Tone curve settings.

Now, let’s enhance the details and the sharpness of the image.

Affinity Photo has three main tools for this: the “Clarity” setting, the “Unsharp Mask” and the “High Pass” filter. We are going to use the latter as it has the fewest undesirable side effects.

  • At the bottom of the layers panel, click on “Live Filters” (fig. 2) and choose “High Pass” from the list.
  • Make sure the new layer is placed at the top of the layer stack.

The “high-pass” filter affects a certain scale of details depending on the setting we choose. In order to act on different scales of details, we are going to apply this filter several times starting with the finest details.

affinity-photo-tutorial-tiff

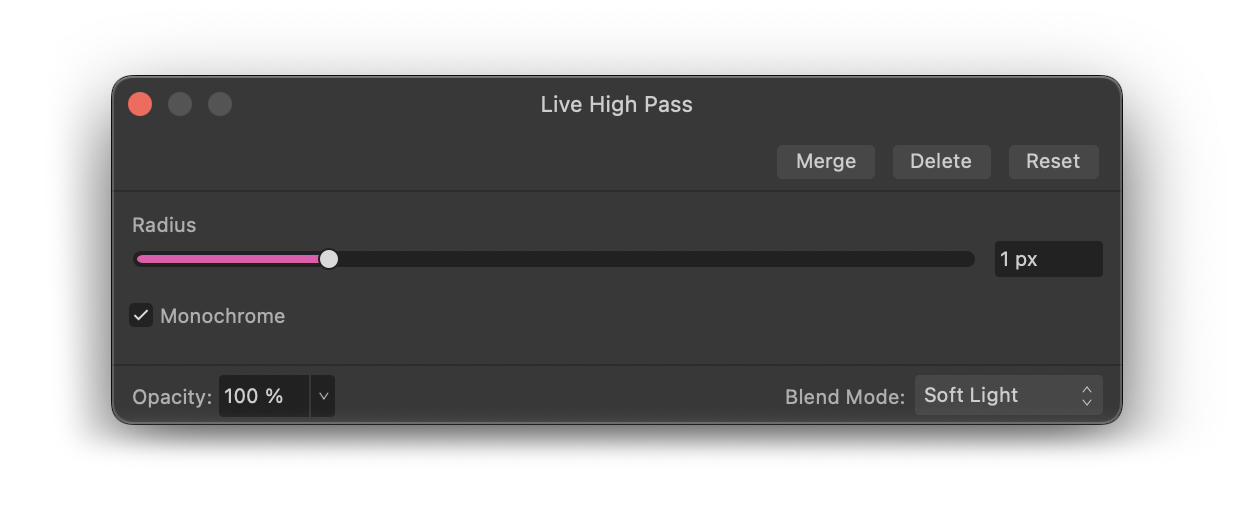
Fig. 10 – High pass filter

  • In the “live high-pass” filter settings panel (fig. 10), set the radius to 1 pixel and check the “monochrome” box, then set the blend mode to “soft light”.

The effect on the image is subtle yet noticeable. It is necessary to be particularly careful when sharpening details as this has the side effect of also increasing the noise in the image.

To accentuate the effect, let’s apply the filter again with the same settings:

  • Right-click on the name of the layer “high-pass” in the layer panel then choose “duplicate”.
  • Perform the same operation once again to get a third “high-pass” layer with a radius setting of 1 pixel (make sure that the new layer is placed at the top of the layer stack).

Now, let’s tackle the larger scale details.

  • Duplicate the top “high pass” layer again (make sure it is placed at the top of the layer stack) then double-click on it to open its settings panel.
  • Set the radius to 2 pixels.
  • Duplicate this layer twice to accentuate the effect.

Finally, let’s work on details at an even higher scale.

  • Once again, duplicate the “high pass” layer located at the top of the layer stack.
  • Open its settings panel and set the radius to 4 pixels.
  • Duplicate this layer one last time to increase the effect.

You should now get 8 “high pass” layers.

This step is complete. The figure below shows the evolution of the image between the beginning and the end of step 3.

Step 4: Star reduction

The detail sharpening has the side effect of highlighting the stars. This is an unwanted result as we want to highlight the nebula.

  • Click on the “live filters” icon at the bottom of the layers panel and choose “minimum blur”.
  • Set the radius to 1 pixel and check the “circular” box.

We note that the effect is too dramatic. Most of the small stars have disappeared but above all, the details in the nebula are completely distorted.

  • To fix this, set the opacity of the “minimal blur” live filter to 25%.
  • Duplicate the “minimal blur” layer twice.

This step is complete. The figure below compares the image between the beginning and the end of step 4.

Step 5 : Color grading

Here comes the most creative step that allows you to personalize your image with Affinity Photo.

For the moment, the Orion Nebula is quite pale compared to the images we are used to. Let’s bring out the colors, then adjust them to get a look that suits us.

  • Click on the “adjustments” icon at the bottom of the layers panel and choose “Vibrance”. Make sure the new layer is at the top of the layer stack.
  • In the corresponding new panel, bring “vibrance” and “saturation” sliders all the way up.

Now, let’s take advantage of the “selective color” tool to target an alter specific color. First, let’s add color contrast to the faintest nebulosities (below M42 and around “Running Man”).

  • Click on “adjustments” at the bottom of the layers panel and choose “Selective Color” (make sure the new layer is at the top of the layer stack).
  • In the color menu, select “yellow” to alter the yellow tones.
  • Bring the cyan slider to -25%, the magenta to 10%, the yellow to -55% and the black to -15% (fig. 13 below).

How to process Stellina and Vespera Raw Images with Affinity Photo

Fig. 13 Selective color correction.

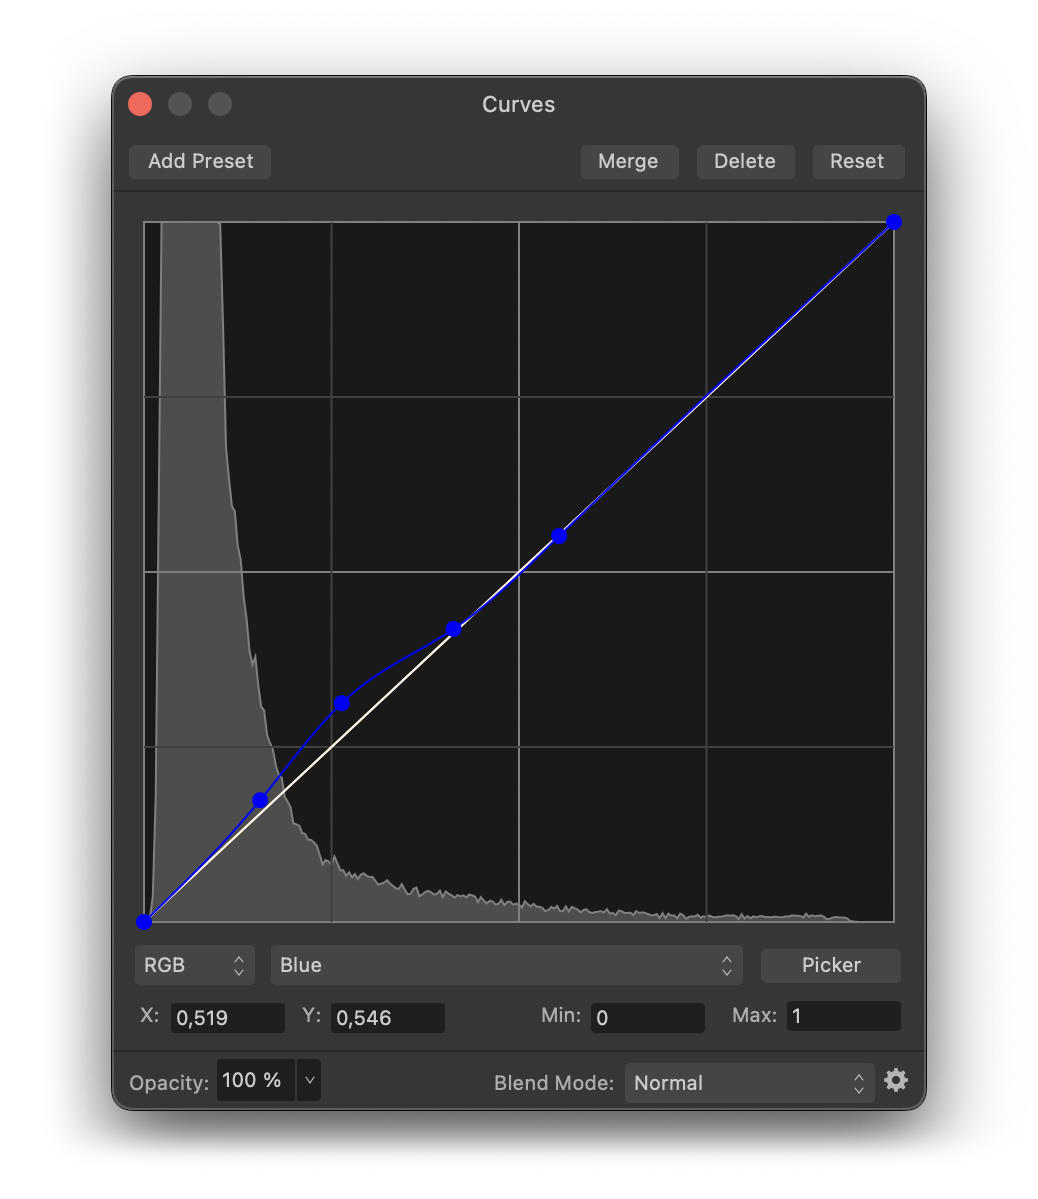
We are now going to highlight the blue areas with the help of the “curves” tool that we have already used previously.

  • Click on “adjustments” at the bottom of the layers palette and choose “Curves” (make sure the new layer is placed at the top of the layer stack).
  • In the “curve” settings panel, choose the “blue” channel in the main (master) drop-down menu.
  • Add control points on the blue curve and change their positions as shown in the figure below (Fig. 14) to emphasize the blue signal on the nebulae.

Affinity Photo image processing

Fig. 14 – Adjustment of the blue tone curve.

Let’s improve the effect with a “selective color” setting.

  • Click on the “adjustments” icon and choose “selective color”.
  • Select “blue” in the “color” menu.
  • Set cyan to 100% and yellow to 25%.

Now let’s work with the red shades.

  • Add a new “selective color” adjustment layer as above.
  • Select “red” from the color menu.
  • Set the cyan to -20%, magenta to 30%, and yellow to 80%.
  • In order to accentuate the result even more, duplicate this last “selective color” adjustment layer.

The values given above for color correction are examples and it is up to you to define how you want the nebula to look.

This step is complete. The figure below compares the image between the beginning and the end of step 5.

Step 6: Final touch

To finish the processing of this image, let’s apply a final adjustment “curves” to increase the overall brightness of the image while preserving the sky background and very bright areas.

  • Click on the “adjustments” icon and choose “curves” from the list (make sure it’s placed at the top of the layer stack).
  • Add control points to the curve to increase the brightness of the mid-tones as shown in Figure 16 below.

affinity-photo-tutorial-tiff

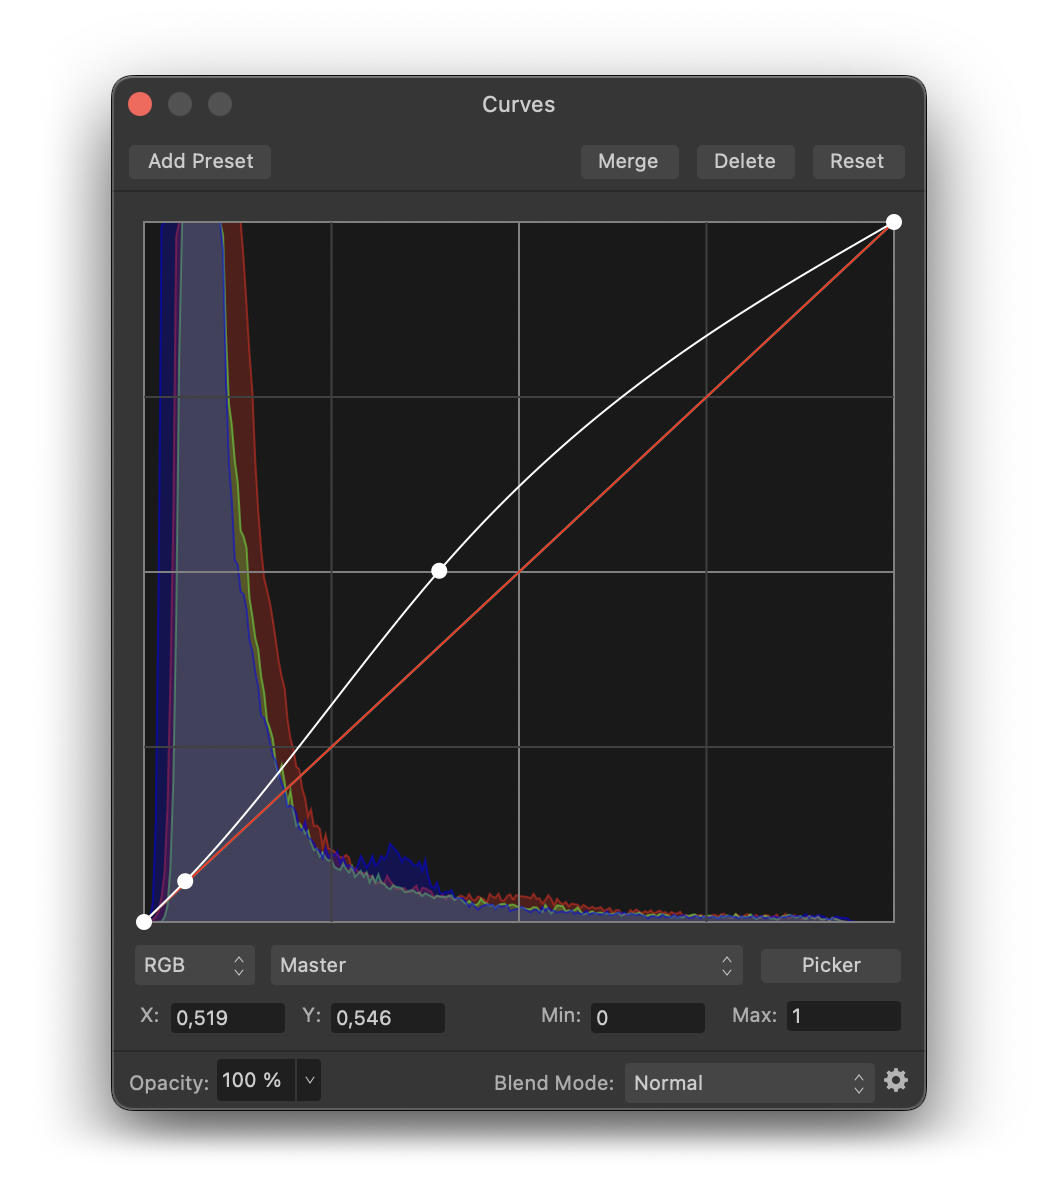
Fig. 16 – Final adjustment of the tone curve.

Examining the image, we can see on the left side that the sky background has a slight magenta cast. To fix this, we are going to use a specific Affinity Photo feature dedicated to astrophotography.

To use this feature, we must first generate a new layer with the result of all the adjustments we have made so far.

  • Right-click on the layer at the top of the layer stack and choose “merge visible” from the menu.
  • Make sure the newly created layer is selected.
  • In the main menu “filters” of Affinity photo, choose “astrophotography”, then “remove background”.
  • In the new panel, set the “radius” to 20 px.

At the center of the image, you can see a handle in the form of two small concentric circles.

  • Move this handle to the right of the image on an area where only the sky background is present, i.e. without stars or nebulas.
  • In the “remove background” panel, check “sample color at handle”.
  • Click on the image to create a second handle this time in the upper right part of the image where only the sky background is visible.
  • In the “remove background” panel, adjust the “output black level” slider to set the intensity of the background gradient removal.
  • Click “apply”.

A value too low will make the faint nebulosities disappear. So you have to find the right compromise to soften the magenta background gradient while keeping all the details. For this example, I recommend a value of 0.08 for the “output black level”.

Affinity Photo image processing:

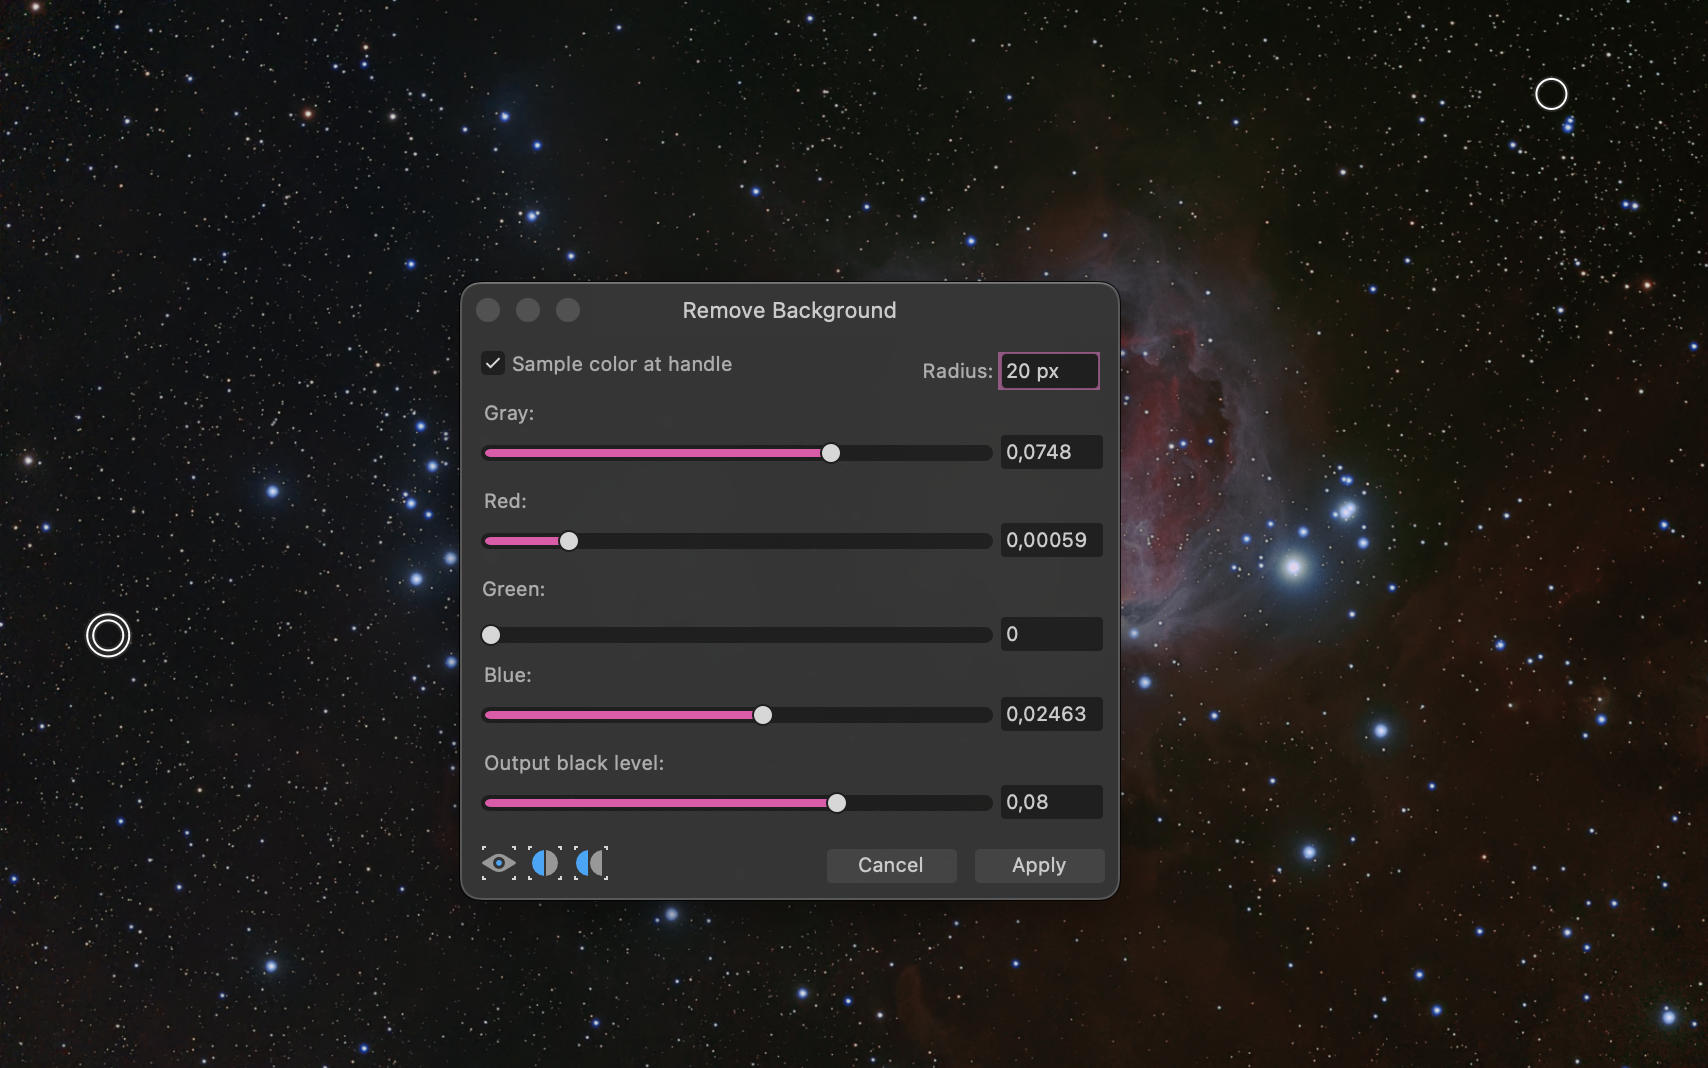
Fig. 17 – Removal of the sky background gradient.

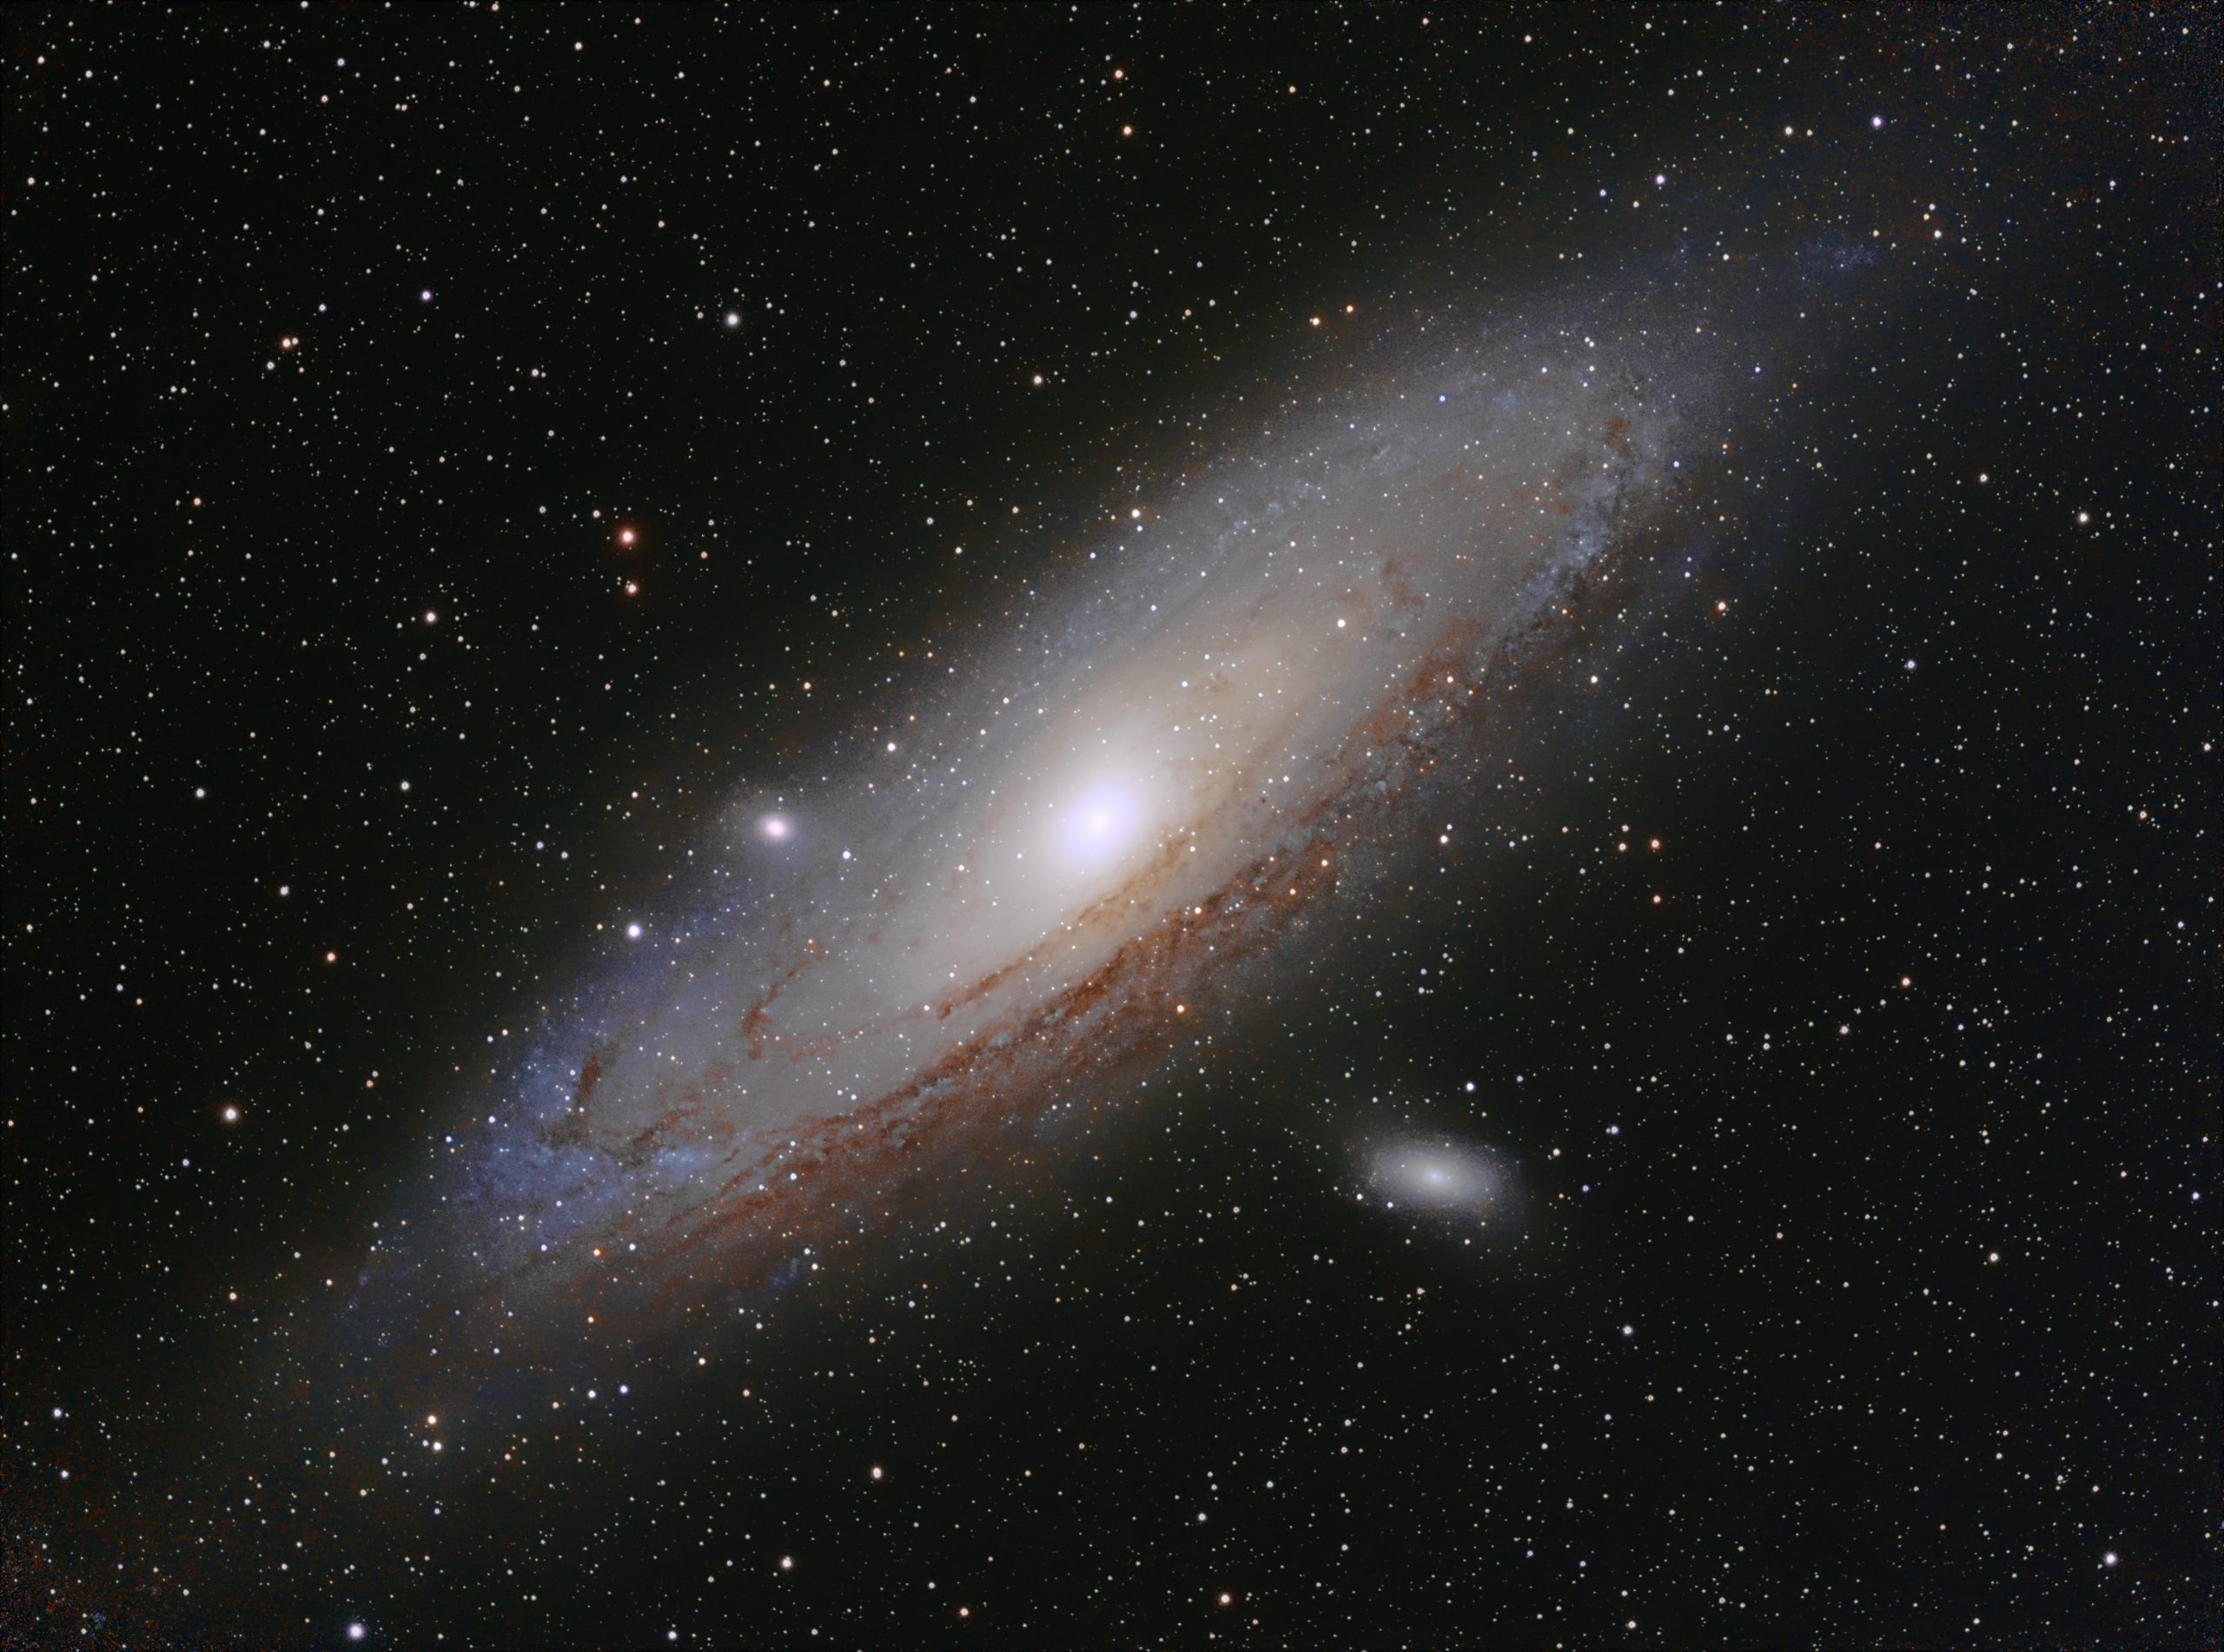
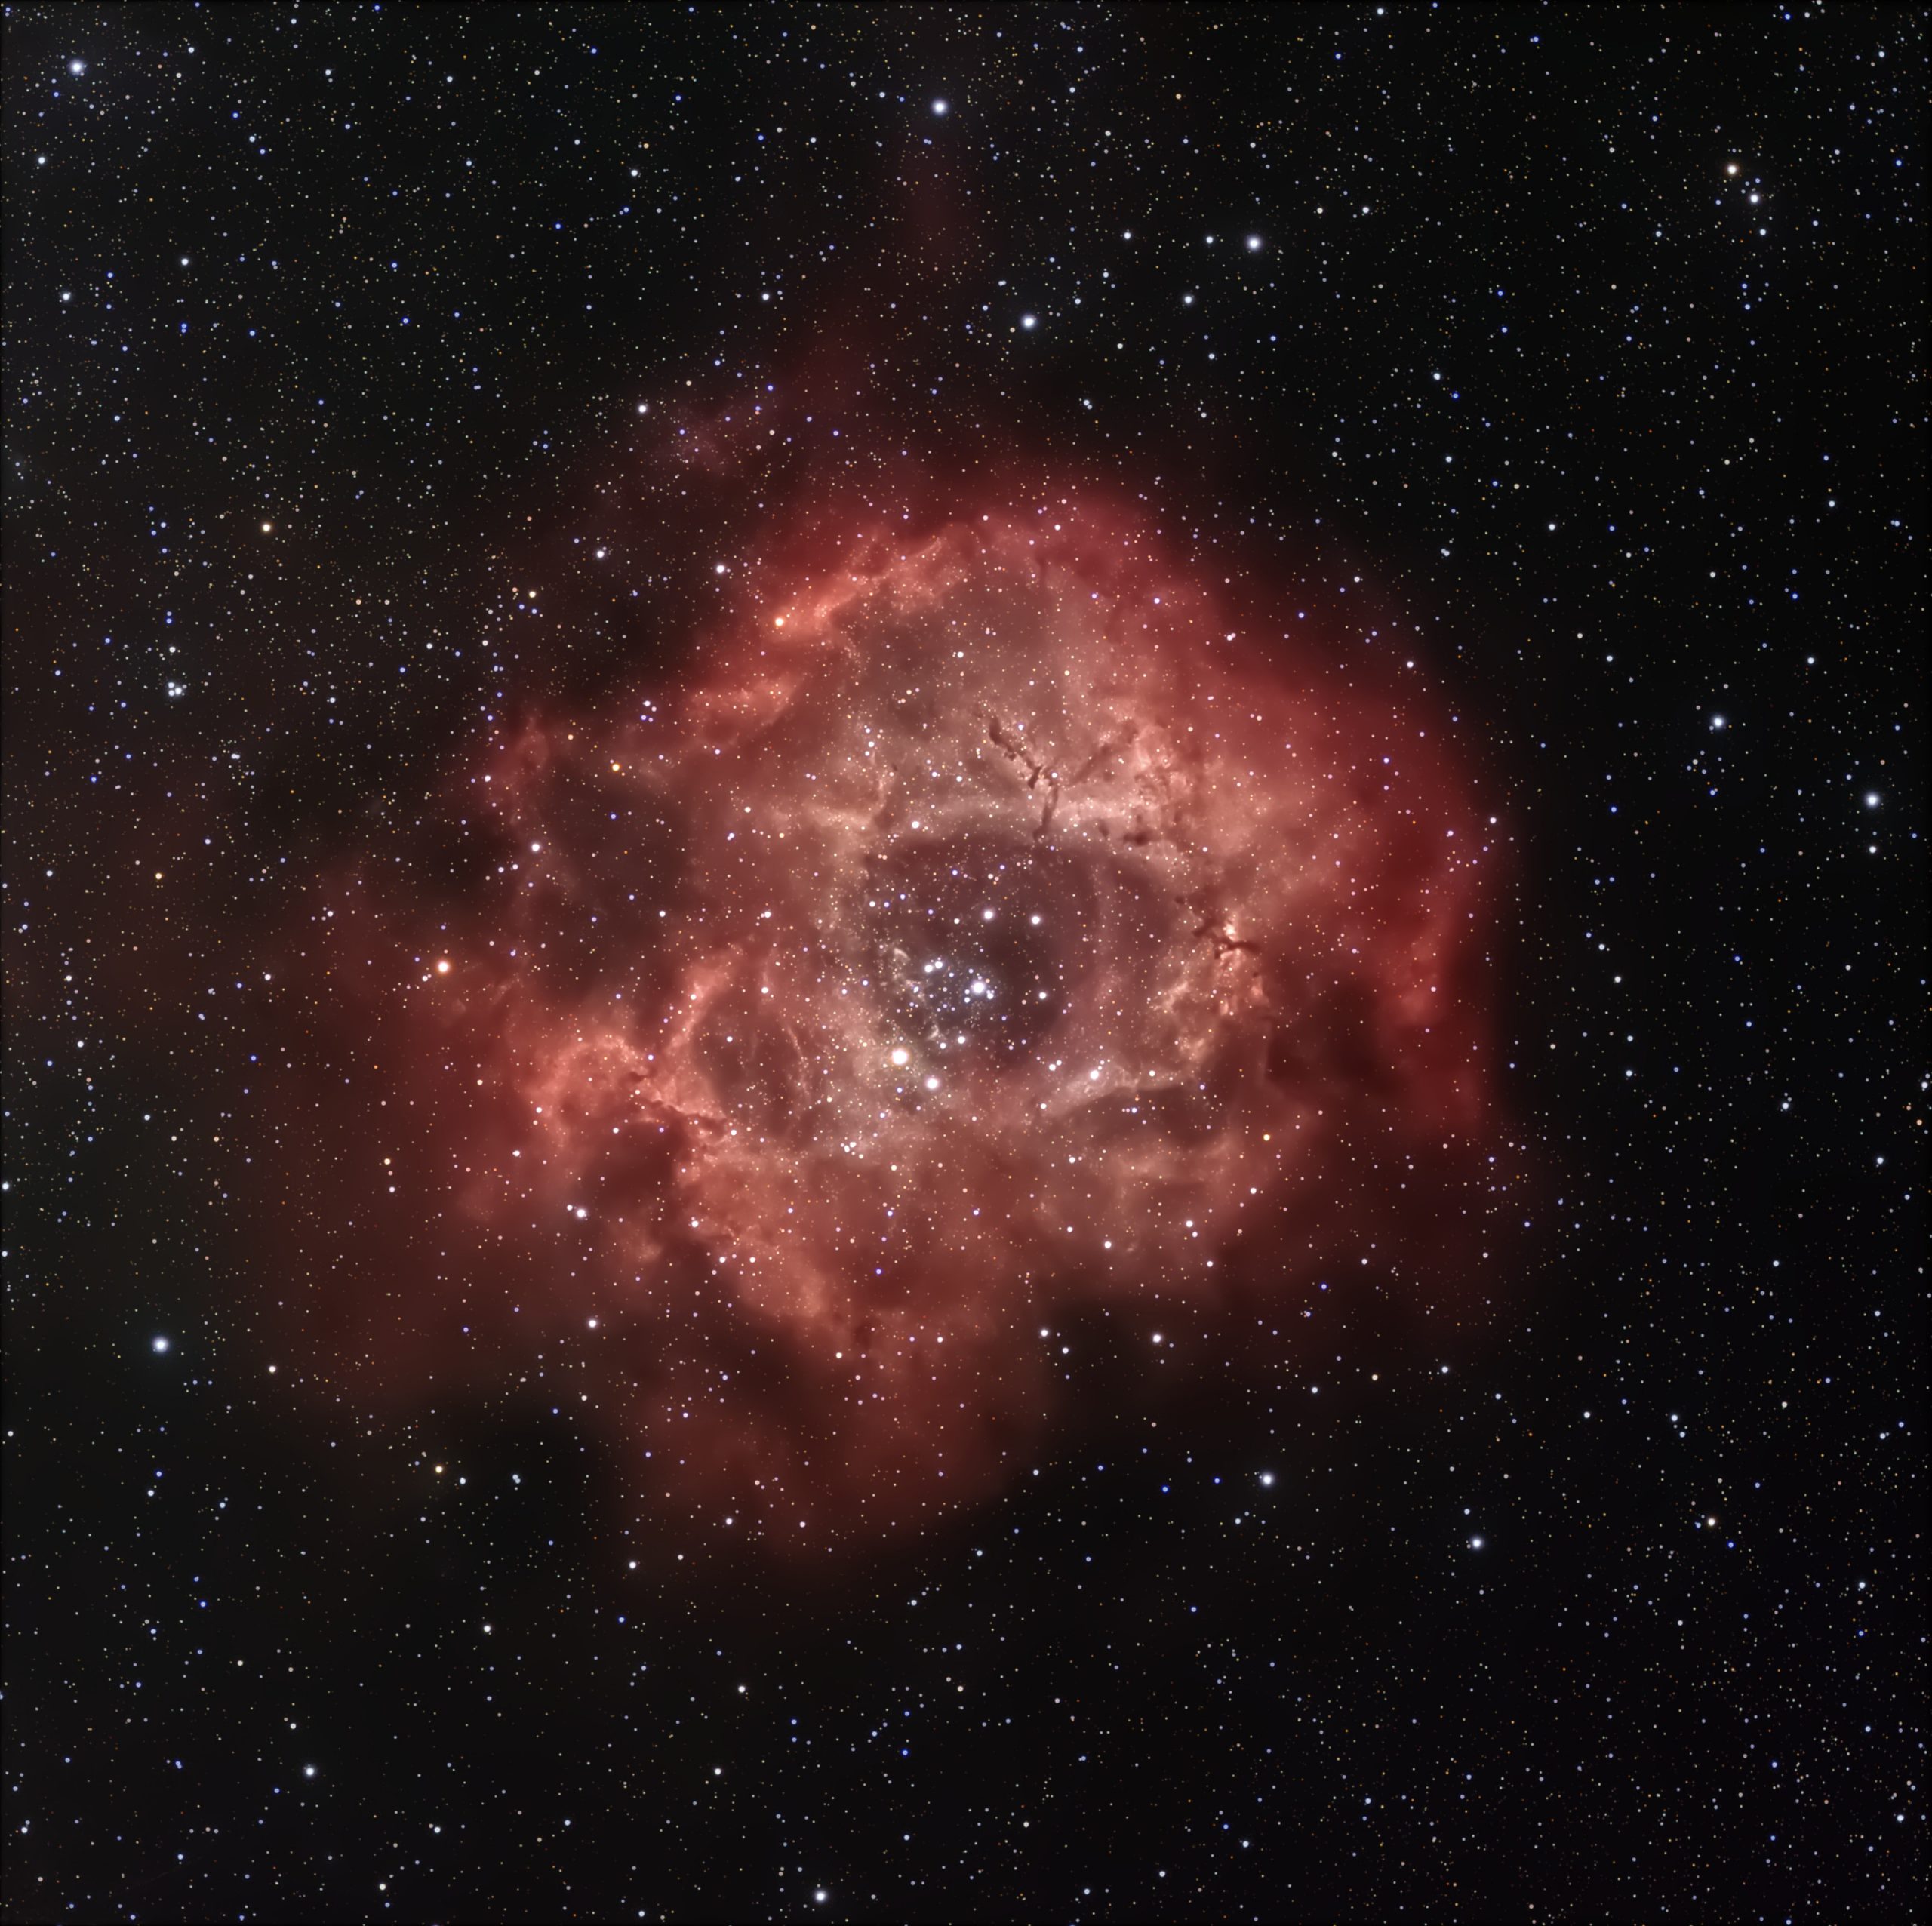
This step is complete. You can see the final result in figure 1 at the beginning of this tutorial. The original file of the final result is also available in the tutorial files for download.

Affinity Photo image processing: shall we proceed further?

We can now consider the processing of the Orion Nebula image from the 16-bit TIFF export of Vespera to Affinity Photo as complete. We have managed to get a more detailed, brighter, and more colorful image.

It’s tempting to go further and accentuate the details and colors even more. The real question is: should you do it?

When it comes to image processing, there are no laws or rules. However, the processing is often considered successful when the image retains a natural appearance. By further processing, you will certainly increase the detail, but the image may look less natural. Also, keep in mind that by further processing you will also accentuate the defects in the image.

Remember that each celestial object is different and will require customized settings. You will improve your skills by practicing and also asking for advice from other astrophotographers.

Feel free to share the results of your work on social networks and in the Facebook group “My Singularity by Vaonis”.

If you have been working with a non-destructive process, it is easy to adjust the settings of the intermediate steps to try to achieve a result that suits you better.

We hope you enjoyed this tutorial on how to Affinity Photo image processing.

Observations, Tips & News, Travel journal

Unlock the Secrets of the Universe with Vespera: a Review by Nebula Photos

Unlock the Secrets of the Universe with Vespera: A Review by Nebula Photos

We were thrilled to discover that Nebula Photos, a popular YouTube channel dedicated to outdoor photography and gear reviews, recently did a review video about Vespera. In this blog post, we’ll be highlighting three key points from his video that showcase Vespera‘s impressive capabilities, how to unlock the secrets of the Universe with it and why it’s a great investment for any astronomy enthusiast.

In this YouTube video titled “Can I beat a ROBOT at Astrophotography?”, astrophotographer Nico compares the Vaonis Vespera observation station to his own astrophotography kit made from spare parts.

Unlock the Secrets of the Universe with Vespera | 3 points from his review

Vespera Review | Automation and easy to use

One of the standout features of Vespera‘s telescope, according to Nebula Photos, is its capacity of automation. Additionally, the telescope is designed to be easy to set up and use, making it a great option for beginners or anyone looking for a hassle-free stargazing experience.


Vespera Review | Impressive image quality

Nebula Photos was particularly impressed by the image quality produced by Vespera‘s telescope. He notes that the telescope’s large aperture allows for clear and detailed views of celestial objects, even in low light conditions. He also highlights the telescope’s high-quality optics, which he says contribute to the overall sharpness and clarity of the images.

Unlock the Secrets of the Universe with Vespera: Review by Nebula Photos

Vespera Review | Versatile and customizable

Finally, Nebula Photos highlights the telescope’s versatility and customizable features. He notes that the telescope comes with a variety of filters that allow users to customize their viewing experience based on their specific needs and interests. 

Unlock the Secrets of the Universe with Vespera: Review by Nebula Photos

Conclusion

Nico discusses the pros and cons of both systems, including weight, packability, upgradeability, cost, flexibility, and results. He also compares the walking noise between the two setups, noting that adding a cheap guide scope and autoguiding camera can minimize or eliminate it. 

Overall, Nebula Photos‘ review of Vespera is overwhelmingly positive. He notes that the telescope is a great option for both beginners and experienced stargazers alike, and praises its portability, image quality, and versatility. If you’re in the market for a new telescope, be sure to check out Nebula Photos‘ review of Vespera‘s offering for a more in-depth analysis.

M81 M82 by Vespera
Observations, Tips & News, Travel journal

What can we observe in the sky in March 2023?

What can we observe in the sky in March 2023?

March 2023 may be a particularly interesting time for astronomers. This month, an array of phenomena can be observed and studied in the night sky. From historically significant astronomical events to constellations and objects visible with the naked eye, the skies of March will provide astronomers plenty of opportunities to explore and understand the universe and its many mysteries. In this blog post, we will discuss the many wonders that await astronomers in March 2023.

Galaxy: Messier 82

Located in the constellation Ursa Major, Messier 82 (M82) is a starburst galaxy that is approximately 12 million light-years away from Earth. This galaxy is notable for its bright, elongated shape, due to the presence of large amounts of gas and dust being pushed out of the galaxy by intense bursts of star formation.

M81 M82 by Vespera

M81 & M82 by Harry Laytos using Vespera

Nebula: The Orion Nebula

One of the most famous and beautiful nebulae in the night sky, the Orion Nebula (also known as Messier 42) is a vast cloud of gas and dust that is located in the constellation Orion. This nebula is one of the closest regions of active star formation to Earth, and it is home to many young, hot stars.

Enhance your experience of M42 using our CovalENS technology, which enables you to change the composition of your photos with bigger frames, as seen on this amazing image shot by Sébastien Aubry.

M42 (951 exp) with Vespera

Star Cluster: M11

M11, also known as the Wild Duck Cluster, is a stunning star cluster located in the constellation Scutum. It’s best observed during the months of summer, but it can be seen in March 2023 as it rises higher in the sky throughout the night. Using Vespera or Stellina, you’ll be able to see dozens of bright stars arranged in a loose, open cluster. The cluster is estimated to be around 220 million years old and located approximately 6,000 light-years away from Earth. It’s a popular target for amateur astronomers and is definitely worth checking out if you have a telescope and clear skies. 


Object visible from the Southern Hemisphere: The Carina Nebula

Located in the constellation Carina, the Carina Nebula is a massive cloud of gas and dust that is home to many young, hot stars. This nebula is one of the brightest and most active regions of star formation in the Milky Way, and it is a favorite target for astronomers and astrophotographers alike.


Comet C/2022 E3

Discovered on March 1st, 2022, by Richard Grauer, comet C/2022 E3 is a long-period comet that is currently making its way through the inner solar system. In March 2023, the comet will be visible in the constellation Auriga, and it is expected to reach peak brightness around the middle of the month.

To observe comet C/2022 E3 with your Vaonis instrument, make sure to check out our article to set your observation station on manual mode here.

E3 Comet by Phillip McGee

E3 Comet by Phillip McGee

Curious for more?

In addition to these specific objects, one of the most significant astronomical events of March 2023 will be the conjunction of Jupiter and Saturn. This rare event, often referred to as the “Great Conjunction”, occurs when the two largest planets in the solar system align in the night sky. Although conjunctions between Jupiter and Saturn happen approximately every 20 years, this particular event will be unique because it will be the closest alignment of the two planets since the Middle Ages. This rare alignment will be visible to the naked eye and will provide astronomers with an opportunity to study the solar system’s largest planets in a way that hasn’t been possible in centuries.

In conclusion, March 2023 offers plenty of exciting objects and events to observe in the night sky. From galaxies to nebulae, star clusters to comets, there is something for everyone to enjoy. With the right equipment and a little bit of patience, you can witness some of the most awe-inspiring sights the universe has to offer.

Observations, Tips & News, Travel journal

How to catch a comet with the Vaonis’ observation stations?

In the past two years, comets like Neowise, Atlas or the current C/2022 E3 ZTF have caught the attention of amateur astronomers. The Stellina and Vespera smart telescopes work well for imaging these objects, but it needs some preparation in the planning and some effort in processing the images to get the best result.

We have broken down this How to article in three steps to cover the basics of how to image a comet or an asteroid and create a good and correct image of it.

1. How to find the comet
2. How to set up the Manual Mode in Singularity App
3. How to process the images

1. How to find the comet

The first step is to know where in the sky the comet is located at the moment. Comets and asteroids are objects that change their position in the sky as they roam through our solar system. Stellar objects such as nebulae or galaxies are always at the same place on the star map, even if they are not always at the same place from our observing position on earth.

In order to enter the right spot to launch an observation into the Singularity App, we need the so-called J2000 coordinates of an object. An easy way to find them is to use online tools such as The Sky Live. The website provides an overview of comets (along with other objects) that are currently observable. Click on a comet to get details.

For us, the information of “Right Ascension” and “Declination” is important:
Right Ascension: 14h 45m 22.4s
Declination: 67° 25′ 05.9″ (J2000)

You will see that the values change slowly over time as the comet moves through the sky. So it is important to check the coordinates when you start your imaging session.

A second way to plan your nights is to use the free software Stellarium.


It is available as Desktop App for Windows, MacOS, and Linux as well as a mobile version for Android and iOS. The benefit for this app is
that you can set the focal length of your telescope (Vespera 200mm, Stellina: 400mm) and the sensor data to get a preview of the field of view of your telescope.

You then need to add the data of the comet to Stellarium as shown in the image. Once this is done you can search for the comet’s name to get it shown on the star map. On the left side of the screen, you will see a lot of information about the object, including the J2000 coordinates that we need.

2. How to set up the Manual Mode in Singularity App

The next step is to actually take images of the comet. As comets are not yet part of Singularity’s database, we need to use the manual mode.

Go to the Catalog tab at the bottom of the app and select Manual.

Enter the name of the object (e.g.: C/2022 E3).

As comets are quite bright compared to nebulae or galaxies, choose Cluster as the object type. Don’t select “Star” as this will use the live tracking mode like with sun observations and you don’t get a stacked image and also only JPEG exposures saved instead of the FITS files that we need later.

You can leave the default exposure time at 10 seconds or change it up to 15 seconds. Leave the Gain setting untouched (20 dB) and the Pointing Type as well (Auto).

Enter the coordinates found on Stellarium or The Sky Live website as shown in the picture and hit the Save button at the end. You can prepare this already before you connect to your Stellina and Vespera.

Before you start, you should also check that FIT files are enabled in the settings of Singularity’s app.

To start your session, initialize your telescope as usual and select the manual mode for the objects after the telescope is initialized. You can directly start the observation or choose the mosaic mode for a wider field of view. Especially if the comet has a bright and long tail, it might be worth taking the extra time for a mosaic, but it will create some additional effort in the processing steps.

Once the session is running you should see the comet appear right away in your images.

If you take only a few minutes of imaging you can use the exported TIFF file from the observation and tweak it a little with any photo editing software. If you let the session run for longer you will see that the comet gets more and more elongated and stretched in the picture. That happens because the Vespera or Stelina are tracking the sky in a way to keep the stars fixed in your image. But the comet moves slowly insight the image causing the elongation in the stacked image.

3. How to process the images

There are various ways of processing the image.

The most simple approach is to take only short observation times like 5 to 10 minutes. In this short time, the comet should not move too much so you can just keep your stacked TIFF file from the telescope and edit the image in any photo editing software like Photoshop, Affinity Photo, or GIMP.

A more advanced option for processing is to use a free tool like Deep Sky Stacker or Siril to create an additional stacked image of the single exposures of the imaging session. This is the reason why we need to enable the saving of FIT files for the telescope. Deep Sky Stacker is only available for Windows, but Siril works on Mac, Windows and Linux.

Both free tools have a comet registration mode, that helps to get a clear and correct image of the comet.

Deep Sky Stacker

Deep Sky Stacker

Deep Sky Stacker

Deep Sky Stacker

Deep Sky Stacker

Read tutorials on Siril and Deep Sky Stacker.

Once we have a stacked image of the comet, we can open both images as layers in a photo editing software.

The image with the stars should be the bottom layer and the image with the comet the top layer. Both images are edited (stretched, color adjusted, de-noised etc.) separately and then with a mask we can blend in the image of the comet over the image.

If you have access to professional tools like AstroPixelProcessor or PixInsight you can create better-stacked images with more options for tweaking details.

With the help of starnet++, a tool that is able to split an astro image into an image with only the stars and a second image with only the rest, we can create an image with the stars only and the comet only.

These images can then be combined using a PixelMath function that blends both images together.

The final result can also be edited in a photo editing software for final touches as shown above. The data for the final image was only 15 minutes of observation time in mosaic mode.

Comet final result. Author: Mario K.

Comet final result. Author: Mario K.

This how to is based on an article about the comet C/2022 E3 published in German for golem.de.


Observations, Tips & News, Travel journal

What can we observe in the sky in January 2023?

What can we observe in the sky in January 2023? In our solar system, several events will take place at the beginning of this new year.

First, on January 4, the Earth will pass at perihelion. In its elliptical trajectory around the Sun, this day will mark the minimum distance between our planet and its star.

The distance will be 147 098 925 km, which is about 5 million kilometers closer than the maximum distance between the two objects.

Que peut-on observer dans le ciel en Janvier 2023?


Also on January 4, the Quadrantid shower will reach its peak of activity : between 60 and 200 meteors per hour are expected to light up the night sky.

The radiant point, the place where the shooting stars seem to come from, is located in the constellation of the Cattleman in the direction of the Big Dipper. Its name comes from an ancient constellation, the Quadrans Muralis created in 1795 by the astronomer Jérôme Lalande. The name referred to a tool used by astronomers. The constellation was deleted in 1922 when the International Astronomer Union (IAU) formalized the names of the 88 constellations in our sky.

Discovered in spring 2022, the comet C/2022 E3 (ZTF) will animate this beginning of year. On January 12, it will pass at perihelion at about 1.1 times the distance from Earth to the Sun.

The name of the comet follows the official nomenclature for naming these objects. The “C” indicates that the comet is not periodic or that it takes more than 200 years to complete its orbit. “2022 E3” indicates that it is a comet discovered in 2022 in early March. “(ZTF)” is the reference to the research team that made the discovery, namely the Zwicky Transient Facility located at Mount Palomar in California.

After this date, the comet will be on its way to Earth: it should pass close to us on February 1st at only 0,28 astronomical unit, or about 100 times the distance to the Earth’s moon.

In the best case, the comet should be visible to the naked eye. Estimates of brightness should improve after its closest passage to the Sun.

Que peut-on observer dans le ciel en Janvier 2023?

Source

In the deep sky, several objects depending on your position can be observed in ideal conditions during this month of January.

There is for example M47, an open cluster in the constellation of the Puppis, which will pass at most in the sky on January 15. You will be able to use the mosaic mode to capture on the same image M47 as well as M46 another open cluster and the planetary nebula NGC 2438.

Also at its highest point in the sky on January 15, the spiral galaxy NGC 2403 in the constellation Giraffe will also be in ideal conditions to be photographed with your instrument.

the rosette nebula
Observations, Travel journal

What can we observe in the sky in December?

What can we observe in the sky in December? For this last month of the year, Mars will be in the sky several times, accompanied by beautiful showers of shooting stars!

The planet Mars will offer us several events in December

On December 1st, as it does every 780 days, the Red Planet will pass close to Earth. During this visit, Mars will be at 81 million kilometers from us this time around. As the trajectory of the planet is eccentric, it does not describe a circle but an ellipse, consequently the minimum distance between the two planets varies between 55 million and 120 million km.

The configuration of 2022 is therefore not the most optimal. It will be necessary to wait for the next transits in 2035 and 2050 for the planet to be as close as possible.

To witness the next record of proximity between the two planets, we will have to wait until August 28th, 2287. The distance will be only 55.758 million km, that is to say 70,000 km less than the previous record of 2003.

Credit : Yohann Gominet, Paris observatory – PSL / IMCCE

A few days later, on December 8th, the planet will be in opposition: the Sun-Earth-Mars system will be aligned.

On the same day, in some parts of the world, Mars will be playing hide-and-seek with the Full Moon. In Western Europe, Canada and a large part of the United States, the Red Planet will pass behind the last Full Moon of the year. During about 1 hour, between 2H17 UTC and 6H10 UTC, depending on your position, the planet will disappear behind our natural satellite.

occultation de la lune par mars

Finally, Mars will be visible simultaneously with the other planets of the solar system at the end of the twilight.

For Uranus and Neptune, you will need an instrument to observe them.

The others will be visible with the naked eye.

Solstice December 21 21h48 UTC

December 21st, at 21:48 UTC, will mark the December solstice.

For the Northern Hemisphere, it will be the longest night of the year and the beginning of winter for temperate regions. For the Southern Hemisphere, it will be the shortest night of the year and the beginning of summer in temperate areas.

Showers of shooting stars

Geminid meteor shower

Between December 4 and 17, the Earth will pass through the dust and small rocky particles left by the asteroid Phaeton. These fragments will burn up in the atmosphere and offer a shower of shooting stars. The peak of activity is expected on December 14 with rates up to 120 shooting stars per hour depending on your location.

Ursids meteor Shower

After the Geminid shower, the Ursids will take over between December 17 and 26. The Earth will then pass through the dust deposited by the comet Tuttle. The maximum activity is expected on December 22. The number of shooting stars will be a few dozen per hour.

Deep sky

December 13

For those in the Southern Hemisphere, the Large Magellanic Cloud will be high in the sky and in good observing conditions. The new Mosaic mode will allow you to observe different regions of this galaxy, such as the Tarantula Nebula and the open clusters surrounding it. You can also explore another part of the LMC by observing the open cluster NGC 1761 and its environment also rich in clusters and nebulosities.

December 30: The Rosette Nebula

For those in the Northern Hemisphere, the Rosette Nebula will be in good observing conditions in December. It will reach its peak on December 30. Take advantage of the Mosaic mode to get an observation of the whole area.

Our online buy steroids store specializes in delivering steroids across the US.